
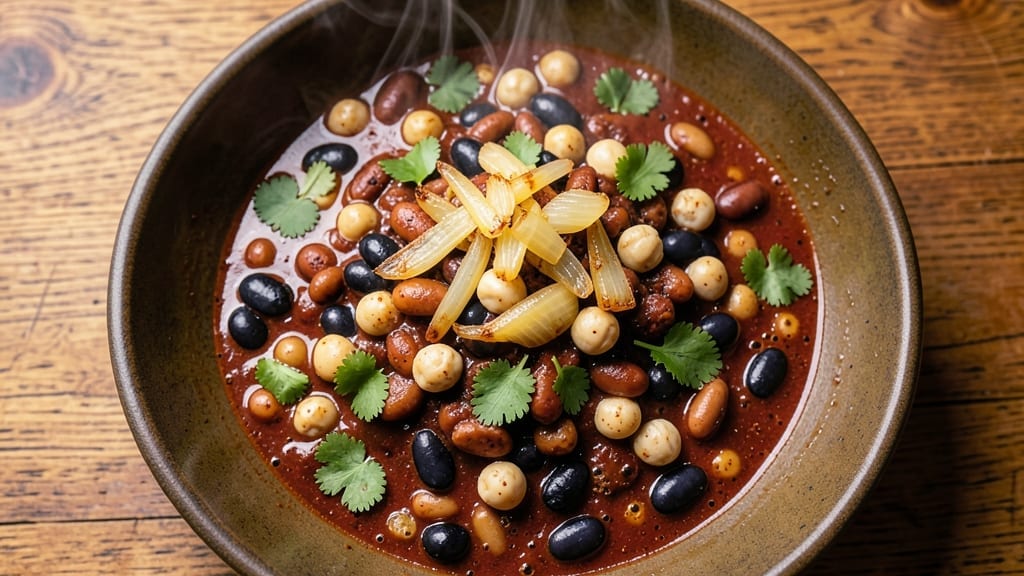
This 10 bean chili recipe delivers a hearty, one-pot masterpiece packed with 10 different bean varieties for maximum texture and flavor. The secret lies in slow simmering—where each bean variety (from kidney to black beans) absorbs the rich, smoky broth while developing deep, complex flavors.
I’ve perfected this recipe over years of testing, ensuring every spoonful delivers that satisfying blend of earthy, smoky, and slightly sweet notes that make it a staple in my freezer.
What sets this chili apart is its vegetarian-friendly foundation while still satisfying meat lovers—just add ground beef or sausage if desired. The aromatics (onion, garlic, and spices) form the flavor base, while the beans provide protein and heartiness.
With just 30 minutes of prep and 2 hours of simmering, you’ll have a restaurant-quality dish that’s even better the next day. The result is a thick, velvety chili with tender beans swimming in a rich, slightly spicy broth that clings to every bite.
The flavors deepen as it sits, making it perfect for meal prep or feeding a crowd. Top with avocado, cheese, or sour cream to add freshness and creaminess—each bite is a perfect balance of comfort and complexity.
This chili is foolproof and adaptable—vegetarian or meaty, spicy or mild, it works for any occasion. Whether you’re warming up a chilly evening or prepping for the week, this recipe delivers restaurant-quality results with minimal effort. Let’s get cooking!
Ingredients for 10 bean chili
Ten beans, one pot, endless flavor—this vegetarian chili is your new weeknight hero.
| Ingredient | Amount | Notes |
|---|---|---|
| Kidney Beans 🌱 | 1 ½ cups | Dried or canned, drained |
| Black Beans 🌱 | 1 ½ cups | Dried or canned, drained |
| Pinto Beans 🌱 | 1 ½ cups | Dried or canned, drained |
| Navy Beans 🌱 | 1 cup | Dried or canned, drained |
| Chickpeas 🌱 | 1 cup | Drained and rinsed |
| Great Northern Beans 🌱 | 1 cup | Dried or canned, drained |
| Lima Beans 🌱 | 1 cup | Drained and rinsed |
| Garbanzo Beans 🌱 | ½ cup | Drained and rinsed |
| White Beans 🌱 | ½ cup | Drained and rinsed |
| Red Beans 🌱 | ½ cup | Drained and rinsed |
| Yellow Onion 🧅 | 2 whole | Diced, medium size |
| Garlic Cloves 🧄 | 4 cloves | Minced, fresh preferred |
| Diced Tomatoes 🍅 | 2 cups | San Marzano preferred |
| Tomato Paste 🍅 | 2 tbsp | Squeeze tube works |
| Vegetable Broth 💧 | 4 cups | Low-sodium preferred |
| Chili Powder 🌶️ | 2 tbsp | Mild or medium heat |
| Ground Cumin 🌿 | 1 ½ tbsp | Toasted for depth |
| Smoked Paprika 🌶️ | 1 tbsp | For smoky flavor |
| Oregano 🍃 | 1 tsp | Dried Mexican preferred |
| Bay Leaves 🌿 | 2 whole | Removed before serving |
| Salt 🧂 | 1 ½ tsp | Adjust to taste |
| Black Pepper 🌶️ | ½ tsp | Freshly cracked |
| Dark Chocolate 🍫 | 1 oz | 70% cacao, chopped |
| Avocado Oil 🫒 | 2 tbsp | For cooking beans |
The beans are the stars, so don’t skimp. Dried beans give the best texture and flavor, but canned works in a pinch—just drain and rinse well. I grab mine from Whole Foods bulk section or Trader Joe’s for variety. For the dark chocolate, 70% cacao or higher adds depth without overpowering. If you can’t find all 10 bean types, mix and match—just keep the total at 6 cups. The onion and garlic? Fresh is non-negotiable—they’re the flavor base. Sauté them until soft but not browned, or the chili will taste bitter.
No canned tomatoes? Fresh crushed tomatoes or tomato sauce works just as well. Short on smoked paprika? Regular paprika plus a pinch of liquid smoke gets you close. Want to skip the chocolate? Extra tomato paste or a splash of balsamic vinegar adds richness. For the broth, low-sodium is key—you can always add more salt at the end. The bay leaves? Don’t forget to remove them before serving, or you’ll be chewing on them. And if you’re feeling adventurous, mushrooms or bell peppers can bulk it up even more.
This chili tastes even better the next day—make a double batch and freeze half. Keeps in the fridge for 5 days or in the freezer for 3 months. I portion mine into meal prep containers so lunches are sorted for the week. For reheating, low heat on the stove prevents the beans from getting mushy. Top with avocado, vegan sour cream, or fresh cilantro—whatever makes it yours.
Why You’ll Love This Recipe
- One-Pot Magic: I swear by this—dump everything in one pot, stir, and walk away. No fancy techniques, no stress. The beans soften while the spices meld, and honestly? That’s half the battle won.
- Texture Party: Creamy black beans, meaty kidney beans, and those little navy beans that pop like tiny surprises—it’s a mouthful of contrasts. The chickpeas add a satisfying bite, and the pinto beans? They just work in every bite.
- Meal Prep MVP: Between us, this chili is my lazy Sunday staple. Make a big batch, and you’ve got lunch for three days, potluck sidekick status, or that “I don’t know what to eat” emergency fix. Freeze half, and you’ve got a future dinner sorted.
- Budget Powerhouse: Five types of beans mean five times the savings. I buy them dry, soak overnight, and boom—protein-packed, wallet-friendly meals. My grocery bill thanks me every time, and my family doesn’t even notice the cost. (Yes, even on a Tuesday night.)
Step-by-step instructions for 10 bean chili
Here’s how to create a rich, hearty chili with ten different bean varieties—all in one pot.
Sauté Aromatics and Toast Spices
Heat the 2 tablespoons avocado oil in a large Dutch oven over medium heat. Add the 2 whole diced yellow onion and cook for 5-6 minutes until softened and translucent. Here’s the thing—don’t rush this step. You want the onions to really break down and develop that sweet, caramelized flavor that forms the base of your chili.
Next, add the 4 cloves minced garlic and cook for 30 seconds until fragrant. Then, reduce heat to medium-low and add the 2 tablespoons chili powder, 1.5 tablespoons ground cumin, 1 tablespoon smoked paprika, and 1 teaspoon oregano. Toast the spices for 1 minute, stirring constantly, until you can smell that deep, earthy aroma. This step builds the complex flavor foundation—don’t skip it!
Brown the Tomato Base
Increase heat to medium-high and add the 2 tablespoons tomato paste. Stir well to coat the spices, then add the 2 cups diced tomatoes. Let this mixture cook for 3-4 minutes until it thickens slightly and the raw tomato taste disappears. You’re creating a concentrated tomato flavor that will carry through the entire chili.
Here’s where it gets good—add the 1.5 teaspoons salt and 0.5 teaspoon black pepper, then stir in the 2 whole bay leaves. Pour in the 4 cups vegetable broth and bring everything to a gentle boil. Once boiling, reduce heat to low and let it simmer for 5 minutes to let all the flavors meld together.
Add All the Beans and Simmer
Now comes the fun part—adding all those different beans! Drain and rinse all the beans if using canned, then add them all to the pot: 1.5 cups kidney beans, 1.5 cups black beans, 1.5 cups pinto beans, 1 cup navy beans, 1 cup chickpeas, 1 cup great northern beans, 1 cup lima beans, 0.5 cup garbanzo beans, 0.5 cup white beans, and 0.5 cup red beans. Give everything a good stir to distribute the beans evenly.
Bring the mixture back to a gentle boil, then reduce heat to low and let it simmer uncovered for 45-60 minutes. You want the beans to soak up all that rich, spiced tomato broth while maintaining their texture. Stir occasionally, especially if you notice any beans floating to the top—they’ll sink back down as they rehydrate.
Finish with Chocolate and Adjust Seasoning
After the initial simmering, it’s time to add the 1 ounce chopped dark chocolate. Yes, chocolate in chili—I promise it works! Stir it in and let it melt completely, which should take about 2-3 minutes of simmering. The chocolate adds a subtle depth that rounds out all the spices and balances the acidity from the tomatoes.
Taste your chili and adjust the seasoning if needed. You might need a little more salt or a touch more chili powder to reach your preferred heat level. Let the chili simmer uncovered for another 15-20 minutes to let all the flavors come together. The beans should be tender but still hold their shape—if they’re breaking down too much, reduce the simmering time next batch.
Rest and Serve
Once your chili reaches your desired consistency and flavor, remove it from heat and let it rest for 10 minutes. This resting period allows the flavors to meld even more and gives you a chance to remove the 2 bay leaves before serving. The chili will thicken slightly as it rests, so don’t worry if it looks a bit loose when you take it off the heat.
Serve your 10 bean chili hot, straight from the pot. The combination of textures and flavors from all those different beans creates a truly hearty, satisfying meal. Pair it with cornbread or crusty bread to soak up every last bit of that delicious broth!
Pro Tips For Making 10 Bean Chili
- SOAK BEANS OVERNIGHT: I learned this the hard way—skipping the soak turns your chili into a mushy, grainy mess. Dump all five bean types in a bowl, cover with plenty of water (at least double the volume), and let them sit 8+ hours. Navy beans and chickpeas need extra time, so don’t rush them.
- SAUTÉ AROMATICS LOW: Your future self will thank you for this: cook onions, garlic, and spices on medium-low heat until they’re soft, not browned. High heat burns spices fast, and you’ll end up tasting bitter smoke instead of smoky depth. Patience here makes the whole chili taste richer.
- SKIP THE CHICKPEA SKINS: Rinse chickpeas before adding them—peeling them first is overkill, but at least remove the loose skins. Whole skins turn your chili into a gummy, unappetizing sludge. A quick rub with your hands under cold water does the trick without extra effort.
- SIMMER LONG AND LOW: After the initial boil, drop the heat to a bare simmer—just tiny bubbles breaking the surface. I used to crank it up, and the beans would split or turn mealy. Two hours at this stage lets flavors meld without falling apart. Cover loosely so it doesn’t sweat too much.
Storing and reheating this dish
Refrigerator Storage
Let your chili cool completely before storing—this prevents condensation that can make it watery. Transfer to airtight containers (I love Glasslock 32-ounce containers) and refrigerate for up to 5 days.
The flavors actually deepen overnight as the spices meld together. Label containers with the date to track freshness—trust me, you’ll want to eat this before it disappears! 💫
Freezer Prep Tips
For long-term storage, portion chili into quart-sized freezer bags (leave 1-inch headspace for expansion) or silicone molds. Freeze flat to save space—this is my go-to method for meal prep.
Thaw overnight in the fridge before reheating. Pro tip: Add a splash of broth before freezing to maintain moisture during thawing. 🧊
Stovetop Reheating
My preferred method is stovetop reheating—it preserves texture better than microwaving. Transfer chili to a heavy-bottomed pot (like my All-Clad Stainless Steel) and warm over medium-low heat for 10-15 minutes, stirring occasionally.
Add 2-3 tablespoons of water or broth if it looks too thick. Taste and adjust seasoning—chili often needs a pinch of salt after reheating. 🔥
Microwave Safety
For quick meals, use the microwave on 50% power in 2-minute intervals, stirring between each. Cover loosely with a microwave-safe lid to retain moisture. If chili seems dry, add 1-2 tablespoons of water and reheat.
Never microwave from frozen—always thaw first in the fridge. This prevents uneven heating and keeps the beans tender. ⏰
Texture Preservation
The key to reheating is gentle heat—never boil. High heat turns beans mushy. For extra richness, stir in 1 tablespoon of olive oil or a dollop of vegan sour cream after reheating.
If serving leftovers, garnish with fresh cilantro or avocado to brighten flavors. The chocolate in this chili makes it especially forgiving for reheating—it adds depth even after sitting! 🌿
Meal Prep Hack
Double the recipe and freeze half for future meals. I portion mine into individual containers with cornbread mix on top—just add water and bake when ready.
This chili reheats beautifully and tastes even better the next day. The secret? Low-and-slow reheating preserves all that hard work you put in during cooking. 💡
Nutrition facts
Frequently asked questions
Can I substitute canned beans for dried beans in this recipe?
Canned beans work perfectly—they save 8-10 hours of soaking time. Just drain and rinse them thoroughly to remove excess sodium. For best texture, use a mix of canned and dried beans (like 1 cup dried navy beans + 2 cups canned black beans) to balance convenience and flavor.
Why does the recipe include dark chocolate? Does it taste sweet?
No, it won’t taste sweet! The 1 ounce 70% cacao chocolate adds deep, earthy richness that balances the spices and enhances the tomato base. Think of it like a secret ingredient in mole sauce—it rounds out the flavors without adding sweetness. If you’re sensitive to chocolate, try 1 extra tablespoon of tomato paste instead.
How can I make this chili spicier without adding heat?
Boost the heat by adding ½ teaspoon cayenne pepper or 1 tablespoon chipotle powder during the spice toasting step. For smoky depth without extra heat, increase the smoked paprika to 2 tablespoons. If you prefer gradual heat, add a dash of red pepper flakes at the end and let them steep for 5 minutes before serving.
Can I make this chili in a slow cooker or Instant Pot?
Slow cooker: Combine all ingredients (except chocolate) and cook on low for 6-7 hours or high for 3-4 hours. Stir in chocolate during the last 15 minutes. Instant Pot: Sauté aromatics, then add remaining ingredients and pressure cook for 15 minutes on high. Natural release for 10 minutes, then stir in chocolate. Both methods work beautifully!
What’s the best way to serve this chili?
This chili is hearty enough to stand alone, but it pairs perfectly with warm cornbread, crusty bread, or rice. For freshness, top with avocado slices, vegan sour cream, cilantro, or pickled jalapeños. For extra protein, serve with crumbled tofu or shredded cheese. The contrast of textures makes every bite amazing!

- Pea Soup Instant Pot Recipe: Velvety Green Smoothness in 20 Minutes - November 1, 2026
- Pork Loin Pulled Pork Crock Pot Recipe: Slow-Smoked Tenderness With Zero Dryness - November 1, 2026
- Baked Potatoes in Crock Pot Recipe: Buttery Interiors and Crispy Top Magic - November 1, 2026