
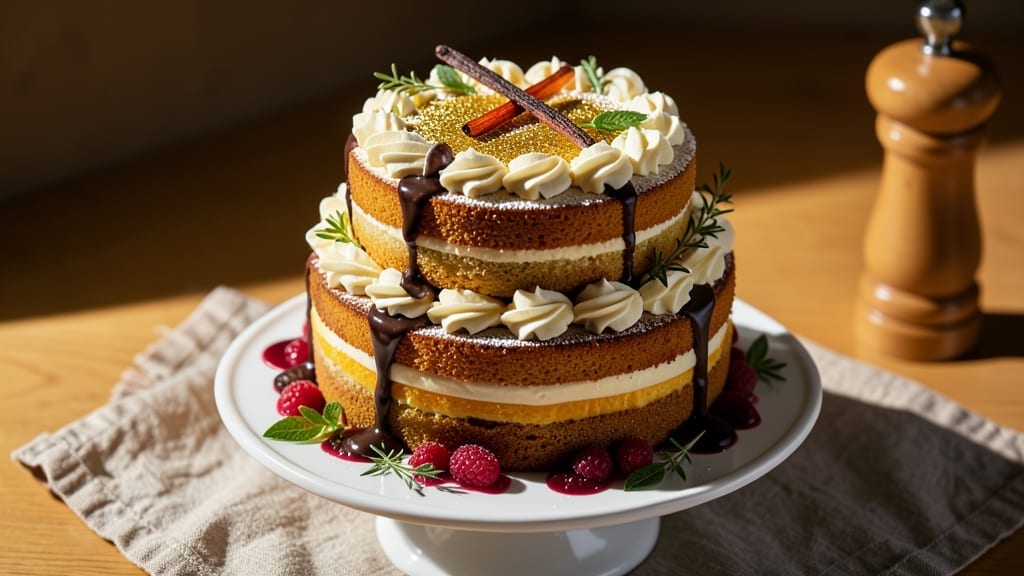
This 10-egg cake recipe delivers the kind of light-as-air, golden layers that make any dessert table unforgettable. The secret lies in separating those eggs just right—whisking yolks and whites separately to create a structure so delicate it practically melts in your mouth.
I perfected this version after years of testing, ensuring every slice stays moist for days, not dry by morning.
The magic happens in the vanilla bean swirls—real vanilla extract and scraped seeds folded into the batter before baking, creating ribbons of fragrant sweetness that cut through the tender cake.
This isn’t your average boxed mix; it’s a foolproof method that yields a cake with crisp edges and a velvety crumb, all without a single drop of oil. The result? A dessert that feels like a bakery masterpiece, not a weeknight project.
What makes this recipe stand out is its versatility—use it for birthdays, holidays, or even a Sunday brunch showstopper. The vanilla bean adds depth without overpowering, while the 10-egg base ensures stability for layering or frosting.
Whether you’re a beginner or a seasoned baker, this method delivers restaurant-quality results every time.
For extra indulgence, consider adding dark chocolate chunks or raspberry jam between layers. The cake’s neutral flavor also makes it perfect for experimenting with citrus zest or spiced extracts. Ready to bake? Let’s get started with the full recipe.
Ingredients for 10 egg cake
Ten eggs, two vanilla sources, and a whisper of citrus create this restaurant-worthy cake.
| Ingredient | Amount | Notes |
|---|---|---|
| Large Eggs 🥚 | 10 whole | Room temperature, separated |
| Granulated Sugar 🍚 | 2 ½ cups | Superfine preferred for smoothness |
| Unsalted Butter 🧈 | 1 cup | Cold, cubed, not melted |
| All-Purpose Flour 🌾 | 2 ½ cups | Sifted, spooned lightly |
| Pure Vanilla Extract 🌿 | 2 tbsp | High-quality, Madagascar preferred |
| Vanilla Bean 🌶️ | 1 whole | Scraped seeds only for swirls |
| Baking Powder 🧂 | 2 tsp | Aluminum-free preferred |
| Salt 🧂 | ½ tsp | Fine sea salt |
| Whole Milk 🥛 | ¾ cup | Room temperature |
| Lemon Zest 🍋 | 1 tbsp | Freshly grated |
| Lemon Juice 🍋 | 1 tbsp | Freshly squeezed |
| Dark Chocolate Chunks 🍫 | ½ cup | Optional, 70% cacao |
The eggs are non-negotiable—room temperature and separated properly for that signature fluff. Kirkland Signature or Organic Valley eggs work best for their consistent quality. For the vanilla, Madagascar Bourbon beans from a specialty store like Williams Sonoma deliver the deepest flavor. The butter should be cold and cubed—never melted—to maintain structure. If you’re using superfine sugar, it dissolves faster, but regular granulated works fine if you pulse it in a food processor. The lemon zest and juice brighten the cake without overpowering, so don’t skip this citrus touch.
No vanilla bean? Double the extract—just know it won’t have the same swirled beauty. Substituting milk? Almond milk works but may alter texture slightly. For the chocolate chunks, Ghirardelli or Lindt brands melt beautifully between layers. If you’re baking in a high-altitude area, reduce the baking powder to 1.5 tsp to prevent over-rising. The flour must be sifted—no lumps—for that velvety crumb. And yes, you can use cake flour if you prefer, but all-purpose gives a slightly denser, more stable crumb perfect for layering.
This cake keeps beautifully—wrap tightly in plastic and store at room temperature for 3 days, or refrigerate for 5 days. For longer storage, freeze fully baked layers (unfrosted) for up to 3 months. The vanilla bean swirls stay vibrant if you scrape the seeds fresh before folding. For extra decadence, brush layers with simple syrup before frosting. And if you’re making it ahead? Bake the layers a day early, then assemble and frost just before serving—trust me, the wait is worth it.
Why You’ll Love This Recipe
- No Mixer Needed: I swear by this one—just whisk eggs and sugar until thick, then fold in butter and flour. That’s it. No stand mixer, no electric beaters, just elbow grease (or a sturdy fork) and a bowl.
- Vanilla Buttercream Magic: The moment you drizzle that warm cake with vanilla buttercream—chef’s kiss—it’s like a hug for your taste buds. Sweet, rich, and that vanilla extract? It lingers like a good memory.
- Weeknight or Celebration: Same batter, endless uses. Serve it plain for breakfast, stack it with berries for brunch, or frost it with chocolate for a birthday. Honestly, I’ve even used it as a base for cheesecake (yes, really).
- Budget-Friendly Luxury: Ten eggs? That’s a steal. Butter and sugar stretch further than you’d think, and the flour makes it feel fancy without breaking the bank. Leftovers? Toast them for a protein-packed snack—no waste, all win.
Step-by-step instructions for fluffy vanilla bean cake
Mastering this 10-egg cake requires precision and patience—here’s how to achieve perfect layers every time.
Separate Eggs and Whip Yolks to Ribbon Stage
Begin by separating the 10 whole large eggs, ensuring no yolk fragments remain in the whites. Place egg yolks in a stand mixer fitted with the whisk attachment. Gradually add the 2.5 cups granulated sugar while mixing on low speed for 2 minutes to dissolve completely.
Increase speed to high and whip for 5-7 minutes until the mixture becomes pale, thick, and forms ribbons that hold their shape when the whisk is lifted. This stage is critical—under-whipped yolks lead to dense cake. The mixture should be smooth and glossy, with a noticeable increase in volume.
Incorporate Butter and Flavorings
Reduce mixer speed to medium and add the 1 cup cold cubed unsalted butter, one cube at a time. Allow each piece to incorporate fully before adding the next. This gradual addition prevents butter from melting too quickly, which could cause the mixture to curdle.
Once fully combined, add the 2 tbsp pure vanilla extract and scrape the seeds from the 1 whole vanilla bean, adding them to the mixture. Mix for 30 seconds to ensure even distribution. The batter should now be light and airy, with a rich vanilla aroma. This is where the cake’s signature flavor develops.
Whip Egg Whites to Stiff Peaks
In a separate clean bowl, beat the egg whites on high speed until soft peaks form. Gradually add the 1 tbsp lemon zest and 1 tbsp lemon juice while mixing. Continue whipping until the egg whites form stiff, glossy peaks that hold their shape when the whisk is lifted.
This step requires patience—under-whipped egg whites won’t provide enough lift, while over-whipped whites can make the cake dry. The meringue should be thick enough to hold its shape but still smooth. Fold these whites into the yolk mixture in three additions, using a spatula to gently combine and maintain maximum air incorporation.
Combine Dry Ingredients and Fold Gently
In a medium bowl, whisk together the 2.5 cups all-purpose flour, 2 tsp baking powder, and 0.5 tsp salt. Sift the mixture directly over the batter and gently fold with a spatula, cutting through the center to incorporate without deflating the air bubbles.
Add the 0.75 cup whole milk and fold just until combined. The batter should be thick but pourable, with no visible flour streaks. For the chocolate variation, gently fold in the 0.5 cup dark chocolate chunks using a rubber spatula. This step requires delicate handling—overmixing develops gluten and makes the cake dense.
Bake in Layers with Precision Timing
Preheat your oven to 350°F and prepare three 8-inch round cake pans by greasing them thoroughly and lining the bottoms with parchment paper. Divide the batter evenly among the pans. For the vanilla bean swirls, place a few scraped vanilla bean seeds in a zigzag pattern on the bottom of each pan before adding the batter.
Bake for 25-30 minutes or until a toothpick inserted in the center comes out clean and the tops spring back when pressed gently. Rotate the pans halfway through baking for even browning. The cakes should be golden brown with a slightly domed top. Cool in the pans for 10 minutes, then transfer to a wire rack to cool completely before assembling.
Pro Tips For Making 10 Egg Cake
- Whisk Eggs Until Ribbon-Thick: Stop when the egg mixture holds a slow ribbon when you lift the whisk—about 30 seconds past when it looks fully combined. I learned this the hard way: over-whisking adds air but also weakens structure, and your cake might collapse like a sad soufflé. Ten eggs need patience here.
- Melt Butter Slowly: Warm the butter just to soften it before creaming—no melting, no lumps. I used to dump cold butter straight into sugar and ended up with a grainy mess. Room-temp butter (65°F) blends smoother and keeps the texture light.
- Sift Flour Twice: First sift into a bowl, then sift again directly into the egg mixture. That second sift cuts clumps and aerates the flour, which matters more than you’d think with this many eggs. Skip it, and you’ll taste the difference in density.
- Bake at 325°F, Not Hotter: This isn’t a quick cake—325°F is non-negotiable. I tried 350°F once and got a dry, cracked top. The center needs time to set without over-browning. A toothpick test at 20 minutes past the recipe’s time is your friend.
Make-ahead tips for this dish
Bake Layers Early
Bake the cake layers 1-2 days ahead of when you plan to serve—this is my secret for stress-free baking. The flavors deepen as they sit, and the layers hold their structure better when assembled later.
Let them cool completely, then wrap each layer individually in plastic wrap and store at room temperature. This also gives you time to prepare your frosting or filling without rushing. 📅
Freeze Fully Baked Layers
For a 3-month head start, bake the layers, cool them completely, then wrap each tightly in plastic wrap followed by a layer of aluminum foil. Label with the date and freeze. When ready to assemble, thaw overnight in the fridge.
This method preserves moisture and texture perfectly, making it ideal for holiday baking. Just avoid freezing if you plan to add fresh fruit or delicate fillings. ❄️
Assemble the Night Before
If you’re serving the cake the next day, assemble the layers (without frosting) up to 24 hours ahead. Place the assembled cake in the fridge to firm up, then bring it to room temperature before adding frosting.
This ensures clean slices and prevents crumbs. I often do this for weekend brunches—it’s a game-changer for presentation and convenience. ✨
Frosting Prep Ahead
Make your frosting 1-2 days before baking and store it in an airtight container in the fridge. Buttercream and cream cheese frostings hold well for days, and you can easily re-whip them to fluffiness.
For ganache, prepare it a day ahead and reheat gently before using. This step saves time and ensures your frosting is at the perfect temperature when you’re ready to decorate. 🧈
Garnish Last Minute
Add fresh garnishes like berries, edible flowers, or powdered sugar right before serving. These elements look best when they’re vibrant and crisp. If you’re making the cake ahead, store it without garnishes and add them just before your guests arrive. This keeps everything looking fresh and restaurant-quality. 🌸
Storage Between Layers
If you’re assembling the cake a day after baking, store the layers in the fridge between parchment paper. When ready to assemble, let them sit at room temperature for 30 minutes to prevent condensation from making the frosting slide. This simple step keeps your cake layers sturdy and sliceable. 💫
Nutrition facts
Frequently asked questions
Why does this recipe use 10 eggs instead of the usual 6-8?
Those extra eggs create a lighter, more stable structure perfect for layering. The yolks add richness while the whites provide airy lift, resulting in a cake that stays moist for days—not dry by morning. This ratio also helps the cake hold its shape when sliced, making it ideal for multi-layer desserts.
Can I substitute butter with oil for this cake?
Not recommended! Butter creates the crisp edges and tender crumb this recipe is known for. If you must substitute, use 1 cup melted butter-flavored shortening (like Crisco) or 1 cup cold vegetable oil, but expect slightly denser texture. The cake’s signature fluffiness depends on proper fat incorporation.
How do I fix sunken cake layers?
Prevent it by ensuring your oven is fully preheated and using room-temperature ingredients. If it happens, slice off the top 1/4-inch of each layer, then reassemble with extra frosting between layers. For next time, try baking at 325°F for 5 minutes longer to set the structure. This cake is forgiving if you catch it early!
What’s the best way to store leftover cake?
Wrap tightly in plastic wrap and store at room temperature for 3 days, or refrigerate for 5 days. For longer storage, freeze unfrosted layers (wrapped individually) for up to 3 months. Thaw overnight in the fridge. The vanilla flavor actually improves with time!
Can I make this cake in a different pan size?
Yes! For 9-inch pans, reduce batter by 20%** (use 2/3 of original recipe). For 6-inch pans, increase baking time by 5-10 minutes. Adjust oven temp to 325°F if using dark-colored pans. Always use parchment paper to prevent sticking and ensure even baking.

- Pork Loin Pulled Pork Crock Pot Recipe: Slow-Smoked Tenderness With Zero Dryness - November 1, 2026
- Baked Potatoes in Crock Pot Recipe: Buttery Interiors and Crispy Top Magic - November 1, 2026
- Braised Beef Short Ribs Recipe: Crock Pot Fall-Off-Bone Magic in 6 Hours - November 1, 2026