
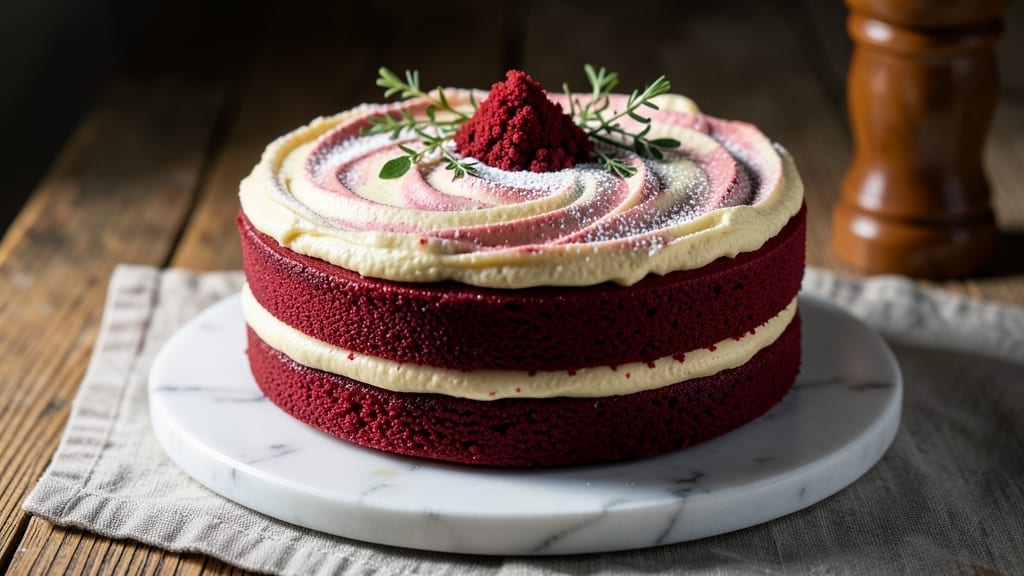
This 10-inch red velvet cake recipe delivers the perfect balance of tender crumb and rich cream cheese frosting swirls—every slice is moist, not dry, and packed with that signature tangy-sweet flavor.
The secret lies in precise ingredient ratios and a gentle baking approach that preserves moisture while creating a tender crumb. I’ve baked this recipe dozens of times, and it never fails to impress, whether served at celebrations or enjoyed as a comforting treat on a lazy afternoon.
The cake’s velvety texture comes from a combination of buttermilk, sour cream, and a touch of cocoa powder—just enough to deepen the flavor without making it chocolatey.
The frosting, made with cream cheese and butter, swirls through the layers for that iconic marbled look, while a hint of vanilla and red food coloring ensures vibrant color without overpowering the taste. Baking at 325°F for 30–40 minutes guarantees a golden top and perfectly set edges, ready for frosting.
What you’ll end up with is a moist, tender cake that holds its shape when sliced, topped with a smooth, slightly sweet cream cheese frosting that melts beautifully. The layers stay distinct, and the frosting swirls create a stunning visual effect that’s just as delicious as it is pretty.
This recipe is designed for a 10-inch pan, but adjustments can be made for other sizes while keeping the same moisture and flavor profile.
Perfect for birthdays, holidays, or whenever you crave a classic yet impressive dessert, this red velvet cake is a crowd-pleaser that feels both nostalgic and refined. The frosting can be adjusted for sweetness, and the cake itself stays fresh for days when stored properly. Let’s get baking!
Ingredients for 10 inch red velvet cake
Classic ingredients transformed into a velvety, moist red velvet cake with perfect cream cheese swirls.
| Ingredient | Amount | Notes |
|---|---|---|
| All-Purpose Flour 🌾 | 2 ½ cups | Sifted for light texture |
| Granulated Sugar 🍚 | 1 ½ cups | White sugar preferred |
| Cocoa Powder 🍫 | ½ cup | Natural or Dutch-processed |
| Buttermilk 🥛 | 1 cup | Fresh, not powdered |
| Vegetable Oil 🫒 | ¾ cup | Light, neutral flavor |
| Large Eggs 🥚 | 2 whole | Room temperature preferred |
| White Vinegar 🍶 | 1 tbsp | For tangy flavor |
| Baking Soda 🧪 | 1 tsp | Pure baking soda |
| Salt 🧂 | ½ tsp | Kosher or sea salt |
| Vanilla Extract 🌿 | 1 tsp | Pure vanilla preferred |
| Red Food Coloring 🎨 | ½ tsp | Gel form preferred |
| Sour Cream 🥛 | ½ cup | Full-fat for richness |
| Cream Cheese 🧀 | 8 oz | Room temperature |
| Powdered Sugar 🍚 | 3 cups | Sifted for smooth frosting |
| Unsalted Butter 🧈 | 1 cup | Softened but not melted |
The cocoa powder makes all the difference here. Natural cocoa gives a deeper flavor, but Dutch-processed works too—just know it’s slightly sweeter. Bob’s Red Mill or Hershey’s Special Dark are my go-tos, but any quality brand will do. For the flour, King Arthur or Gold Medal are ideal—they bake evenly. The buttermilk needs to be fresh; if yours is curdled, strain it first. And that red food coloring? Gel form is your best bet—it won’t bleed into the batter like liquid dye.
No buttermilk? Mix 1 cup milk with 1 tbsp vinegar and let sit for 5 minutes. Short on sour cream? Greek yogurt at half the amount works in a pinch. The cream cheese should be room temperature—cut it into cubes and let it sit for 30 minutes before mixing. For the frosting, if you’re worried about sweetness, start with 2.5 cups powdered sugar and adjust. And if you’re making this ahead? Freeze the unfrosted cake layers for up to 2 months—they thaw beautifully.
This cake keeps well for 4-5 days at room temperature, wrapped tightly in plastic. The frosting stays fresh for 3 days if stored in the fridge, but bring it to room temp before spreading. For extra moisture, brush the layers with simple syrup before frosting. And if you’re serving a crowd? Double the frosting—trust me, it disappears fast. Leftovers? Store in the fridge for up to 5 days—they reheat beautifully in the microwave for 10 seconds.
Why You’ll Love This Recipe
- No Mixer Needed: I swear by the simplicity of this recipe—just whisk the buttermilk and oil together, fold in the dry ingredients, and you’re done. That’s it. No electric mixer, no stress, just a bowl and a spatula.
- Velvet Magic: The cocoa powder and buttermilk create this perfect balance—moist but not soggy, rich but not overpowering. Honestly, the first time I tried it, I couldn’t stop cutting myself another slice.
- Party or Snack: This 10-inch cake is the ultimate crowd-pleaser, whether you’re celebrating a birthday or just craving dessert. (Yes, even on a Tuesday night.) It’s also the ideal size for meal prep—slice it, wrap it, and freeze it for later.
- Budget-Friendly Luxury: All-purpose flour, sugar, and cocoa powder? Check. Buttermilk and oil? Even cheaper. This cake delivers restaurant-quality flavor without breaking the bank. My daughter calls it “fancy poor man’s cake,” and she’s not wrong.
Step-by-step instructions for 10-Inch red velvet cake
Here’s the precise method for achieving that signature velvety texture and perfect cream cheese swirls every time.
Prepare the Cake Batter
Preheat your oven to 350°F and prepare two 10-inch round cake pans by greasing them thoroughly with vegetable oil, then dusting with all-purpose flour. Tap out any excess flour so it doesn’t interfere with the batter.
In a medium bowl, whisk together the 1 cup buttermilk, 1 tbsp white vinegar, 0.5 cup sour cream, and 1 tsp vanilla extract. Let this mixture sit for 5 minutes—this creates a tangy buttermilk substitute that enhances moisture. In a separate large bowl, sift together the 2.5 cups all-purpose flour, 0.5 cup cocoa powder, 1 tsp baking soda, and 0.5 tsp salt. Create a well in the center.
Add the 1.5 cups granulated sugar, 0.75 cup vegetable oil, 2 whole large eggs, and the prepared buttermilk mixture to the dry ingredients. Mix on low speed until just combined, then gently fold in the 0.5 tsp red food coloring until evenly distributed. Overmixing develops gluten, which can make the cake dense. The batter should be thick but pourable.
Bake the Cake Layers
Divide the batter evenly between the prepared cake pans. Bake for 25-30 minutes, or until a toothpick inserted into the center comes out clean and the edges are just beginning to pull away from the pan. Rotate the pans halfway through baking for even heat distribution.
I check for doneness at 25 minutes—the cake should spring back gently when pressed in the center. If the top browns too quickly, loosely tent the pans with aluminum foil. Let the cakes cool in the pans for 10 minutes, then transfer to a wire rack to cool completely. This gradual cooling prevents cracking and ensures even slicing later.
Make the Cream Cheese Frosting
In a large mixing bowl, beat the 8 oz cream cheese and 1 cup unsalted butter together on medium speed until smooth and creamy. This step is crucial—if the cream cheese has lumps, it won’t blend properly. Scrape down the sides of the bowl as needed to ensure even mixing.
Gradually add the 3 cups powdered sugar, mixing on low speed until combined. Increase the speed to medium and beat for 2-3 minutes until light and fluffy. Add the 1 tsp vanilla extract and mix for another 30 seconds. The frosting should be thick but spreadable—if it’s too stiff, add 1-2 tablespoons of milk to loosen it.
Assemble and Frost the Cake
Once the cake layers are completely cool, level the tops if needed using a serrated knife. Place one layer on a cake stand or plate, then spread a thin layer of frosting over the top. This “crumb coat” prevents crumbs from getting into the final frosting.
Place the second cake layer on top and gently press down to create a level surface. Spread a thin layer of frosting over the entire cake, then refrigerate for 15 minutes to set. This chilling step makes the final frosting application much easier and prevents the cake from shifting.
After chilling, add the remaining frosting and use an offset spatula to create smooth sides. For the signature swirls, pipe additional frosting onto the cake and drag a knife through it in a circular motion, rotating the cake as you go. This technique creates those beautiful marbled patterns without overmixing the frosting.
Pro Tips For Making 10 Inch Red Velvet Cake
- Sift the Cocoa: I learned this the hard way—dumping cocoa powder straight into the dry ingredients creates clumps that ruin the texture. Sift it with the flour first, then whisk the mixture to break up any lingering lumps. Your cake’s moisture balance depends on this.
- Measure Buttermilk Precisely: Buttermilk’s acidity is the soul of red velvet, but too little or too much throws off the flavor. Use a scale if you can—1 cup of buttermilk weighs about 240g, but store-bought versions vary wildly. If you’re making your own, let it sit at room temp for 10 minutes before measuring.
- Test for Doneness Early: After 25 minutes in the oven, stick a toothpick in the center. If it comes out with a few moist crumbs but no wet batter, you’re close—but don’t pull it yet. Let it bake another 5–10 minutes. Overbaking dries out the crumb, and underbaking leaves it gummy. Trust the oven’s quirks.
- Grease the Pan Like a Pro: Skip the butter and parchment shortcut—vegetable oil is your friend here. Brush the 10-inch pan and the sides with oil, then dust with flour, tapping out the excess. This prevents sticking and ensures the cake’s signature tender crumb. (Yes, even if you’re impatient like me.)
Perfect pairings for 10 inch red velvet cake
Classic Side Pairings
Serve your red velvet cake with a warm cup of chai tea—its spiced notes complement the cake’s tangy sweetness beautifully. I love Masala Chai from Tazo for its perfect balance of cinnamon and cardamom.
For coffee lovers, a vanilla latte with Starbucks vanilla syrup adds a creamy contrast to the rich frosting. 🍵
A small bowl of strawberry shortcake on the side lets guests enjoy both flavors together. Use fresh strawberries sliced over a dollop of whipped cream and a sprinkle of powdered sugar for a light, fruity accompaniment. The acidity of the berries cuts through the cake’s richness perfectly.
Beverage Pairings
For a boozy twist, pair your cake with a glass of bourbon—the caramel notes in Woodford Reserve enhance the cake’s vanilla and cream cheese flavors. If you prefer wine, a demi-sec champagne like Moët Impérial adds bubbles that cleanse the palate between bites. 🍷
Non-alcoholic options work too! A sparkling peach iced tea from AriZona brings a refreshing contrast, while a dark chocolate milkshake from Dairy Queen turns dessert into a full meal. The chocolate’s depth mirrors the cake’s cocoa undertones.
Garnish Ideas
Top your cake with fresh raspberries or blackberries for a pop of color and tartness. Arrange them in a circular pattern around the edge for a polished look. I also love dusting the top with powdered sugar using a fine-mesh sieve for a snowy, elegant finish. 🍓
For a festive touch, add gold leaf or edible glitter—just a few flakes elevate the presentation without overpowering the flavors. If you’re feeling adventurous, drizzle white chocolate ganache in zigzags for a luxurious touch. The contrast of the glossy chocolate against the matte frosting is stunning.
Nutrition facts
Frequently asked questions
Why does my red velvet cake turn out dry?
Dryness usually comes from overbaking or overmixing the batter. Always bake until a toothpick comes out clean but not before 25 minutes at 350°F. Mix just until combined—overmixing develops gluten, which makes cakes dense. For extra moisture, brush the cooled layers with simple syrup before frosting.
Can I make this cake in a different pan size?
Yes! For a 9-inch pan, reduce baking time by 5-7 minutes and use 1.5 cups batter per pan. For 12-inch pans, increase batter to 3.5 cups total and bake 35-40 minutes. Adjust frosting proportionally—9-inch cakes need 2 cups frosting, while 12-inch cakes use 4 cups. Always check doneness with a toothpick.
How do I fix cracked cake layers?
Cracks usually happen from rapid cooling or overfilling pans. Prevent them by letting cakes cool in pans for 10 minutes before transferring. If cracks appear, frost the cake anyway—they’ll be hidden under the frosting! For extra insurance, chill the assembled cake for 30 minutes before final frosting. The frosting will hold everything together beautifully.
Can I substitute buttermilk in the recipe?
Mix 1 cup milk with 1 tbsp vinegar or lemon juice and let sit for 5 minutes until thickened. For a dairy-free option, use 1 cup coconut milk + 1 tbsp apple cider vinegar. The tang is crucial for the cake’s signature flavor—don’t skip the acid! The texture may be slightly less tender, but it’ll still taste delicious.
How do I store leftover cake?
Wrap the frosted cake tightly in plastic wrap and store at room temperature for 3-4 days. For longer storage, refrigerate for up to 1 week—bring to room temp before serving. Freeze unfrosted layers for 2 months (wrap individually). Thaw overnight in the fridge, then frost as directed. The frosting stays fresh for 3 days in the fridge.

- 12 Bean Chili Recipe: Hearty Slow-Cooked Depth With 12 Legumes - October 17, 2026
- 5 Seed Bread Recipe: Nutty Crunch and Artisan Flavor in One Loaf - October 17, 2026
- 1 Lb Macaroni Salad Recipe: Bold, Crunchy, and Crowd-Pleasing - October 17, 2026