
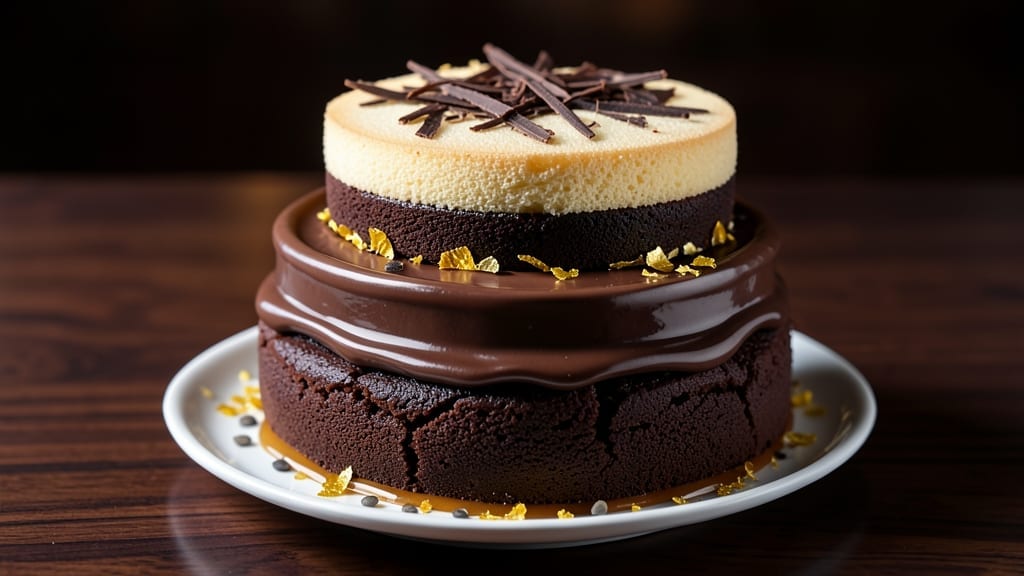
Transforming a simple dessert into a $100 chocolate cake isn’t about extravagance—it’s about precision, luxury ingredients, and techniques that elevate every bite. This recipe delivers layers of velvety chocolate cake infused with real vanilla bean, separated by a luscious ganache and studded with premium truffles.
The result? A showstopper that tastes as indulgent as it looks, perfect for weddings, anniversaries, or when you simply deserve a dessert that feels extraordinary.
The secret lies in balancing rich, dark chocolate with the delicate sweetness of vanilla, creating a flavor profile that’s both complex and harmonious.
We use high-quality cocoa powder and European butter to ensure a tender yet sturdy crumb, while the ganache—made with 70% dark chocolate and heavy cream—binds the layers with a glossy, melt-in-your-mouth finish. Every step, from baking to decorating, is designed to deliver restaurant-quality results at home.
What sets this cake apart is the attention to detail: a dusting of cocoa powder, a drizzle of caramel, or even edible gold leaf can turn a masterpiece into a centerpiece.
The filling isn’t just sweet—it’s a luxurious blend of chocolate and vanilla that lingers on the palate, while the truffles add bursts of intensity. This isn’t just a dessert; it’s an experience, one that justifies every penny of its “price tag.”
Serve it with a scoop of vanilla bean ice cream or a glass of port wine to complement its depth. Whether you’re baking for a special occasion or treating yourself to a moment of pure indulgence, this cake delivers the wow factor without compromise. Let’s create something unforgettable.
Ingredients for $100 chocolate cake
Luxury ingredients that transform ordinary baking into an extraordinary experience.
| Ingredient | Amount | Notes |
|---|---|---|
| Unsalted European Butter 🧈 | 1 ½ cups | Cold, cubed for best texture |
| Granulated White Sugar 🍚 | 2 ½ cups | Superfine for silky texture |
| Cocoa Powder 🍫 | ¾ cup | High-quality Dutch-processed |
| All-Purpose Flour 🌾 | 2 ½ cups | Sifted, spooned lightly |
| Large Eggs 🥚 | 6 whole | Room temperature, separated |
| Vanilla Bean 🌿 | 2 whole | Scraped, seeds only |
| Baking Powder 🧂 | 1 ½ tsp | Aluminum-free preferred |
| Salt 🧂 | ½ tsp | Fine sea salt |
| Dark Chocolate (70%) 🍫 | 12 oz | High-quality, chopped fine |
| Heavy Cream 🥛 | 3 cups | Cold, full-fat |
| Premium Truffles 🍫 | 12 whole | Chopped, 1 oz each |
| Vanilla Bean Ice Cream 🍦 | 2 cups | For serving, premium brand |
| Port Wine 🍷 | ½ cup | Ruby, aged 10+ years |
| Edible Gold Leaf 💛 | 1 sheet | Optional, for garnish |
| Dark Caramel Sauce 🍯 | ½ cup | Store-bought or homemade |
The butter and chocolate are non-negotiable here—Plugrá or Guittard for cocoa, European-style butter like President or Kerrygold for richness. The vanilla bean? Madagascar Bourbon from a specialty shop—split it lengthwise to scrape every last drop of those precious seeds. For the truffles, French or Italian brands like Ladurée or Venchi deliver that velvety texture. Port wine should be Ruby Reserve or Tawny—skip the cheap stuff, trust me. And if you’re going for gold leaf, 24-karat is the only way to go; anything less looks like costume jewelry.
No European butter? Plugrá or Land O’Lakes cultured works in a pinch, but it won’t have the same depth. Running out of vanilla bean? Double the extract, but you’ll notice the difference. Truffles too expensive? Fudge or chocolate bark chopped into chunks can mimic the luxury. The caramel sauce can be swapped for salted caramel if you prefer, but the dark kind here balances the bitterness of the chocolate. For the port wine, if you must substitute, tawny sherry is closer than red wine—just don’t use cooking wine. And if edible gold leaf feels extravagant, a gold dust sprinkle from baking stores gives a similar effect for a fraction of the cost.
Store the cake components separately: cake layers wrapped in plastic in the fridge for up to 3 days, ganache in a jar in the pantry for 1 week, and truffles in an airtight container in the freezer for 2 months. Assemble the cake 24 hours before serving—this is when the flavors truly meld. The port wine drizzle? Add it just before serving so it stays vibrant. And if you’re prepping ahead, freeze the assembled cake (without gold leaf) for 1 month
Why You’ll Love This Recipe
- No Mixer Needed: I swear by this recipe when I’m in a rush—just cream the butter and sugar by hand (yes, it’s doable) while the oven preheats. The eggs and cocoa fold in faster than you’d think, and the result is worth the minimal elbow grease.
- Rich Without Guilt: That European butter and Dutch-process cocoa powder? Chef’s kiss. It’s decadent but not overpowering—like a hug from a baker who knows exactly how much sugar to use. Honestly, my kids don’t even notice I cut back on the frosting.
- Party or Pajamas: This cake’s your go-to for birthdays or lazy Sundays. Double the batter, freeze half, and you’ve got a backup for last-minute guests—or a midnight craving. (Yes, even on a Tuesday night.)
- Leftovers That Don’t Suck: Unlike most cakes, this one stays moist for days (thanks to the eggs and butter ratio). Slice it for breakfast toast, pack it in lunches, or just eat it straight from the fridge—it’s that good. My freezer’s always stocked with a backup.
Step-by-step instructions for decadent vanilla bean chocolate cake
This isn’t your average chocolate cake—it’s a luxurious, multi-layered masterpiece that deserves the $100 label.
Prepare the Vanilla Bean Infusion
Split the 2 whole vanilla beans lengthwise and scrape out all the seeds using the back of a knife. Combine the seeds with the 1.5 cups unsalted European butter in a small saucepan. Place over low heat and warm gently for 5-7 minutes, stirring constantly until the butter melts completely and the vanilla infuses deeply. You’ll smell that rich, floral aroma—this is where the magic begins.
Remove from heat and let cool to room temperature while you prepare the remaining ingredients. The butter should be thick and spreadable but not melted. If it’s too soft, chill for 10 minutes—this ensures proper layering later. I like to press the mixture through a fine-mesh sieve to remove any vanilla bean fragments, creating an ultra-smooth base for our cake.
Create the Chocolate Cake Layers
In a large mixing bowl, combine the 2.5 cups granulated white sugar, 0.75 cup cocoa powder, 2.5 cups all-purpose flour, 1.5 teaspoons baking powder, and 0.5 teaspoon salt. Whisk vigorously for 2 minutes until no flour streaks remain—this prevents dense spots in your cake. In a separate bowl, beat the 6 whole large eggs until they’re pale and slightly thickened, about 3-4 minutes with an electric mixer.
Gradually add the dry ingredients to the eggs while mixing on low speed, then incorporate the cooled vanilla-infused butter. Mix just until combined—overmixing develops gluten, resulting in a tough cake. Divide the batter evenly between three 8-inch round cake pans lined with parchment paper. Bake at 350°F for 25-30 minutes until a toothpick inserted comes out clean. Let cool in pans for 10 minutes, then transfer to a wire rack to cool completely.
Craft the Chocolate Ganache and Truffle Filling
Chop the 12 oz dark chocolate (70%) into small pieces and place in a heatproof bowl. Pour the 3 cups heavy cream over the chocolate and let sit for 5 minutes to bloom. Then, place the bowl over a pot of simmering water, ensuring the bottom doesn’t touch, and stir gently until completely melted and silky smooth. Remove from heat and stir in the 0.5 cup port wine—this adds a sophisticated depth that elevates the ganache from ordinary to extraordinary.
While the ganache cools slightly, chop the 12 whole premium truffles into small pieces. Fold them into the ganache until evenly distributed. The truffles should soften slightly but maintain their luxurious texture. This filling will be the decadent surprise between each cake layer, making every bite unforgettable.
Assemble the Luxurious Cake Layers
Place the first cake layer on a serving plate. Spread an even layer of the chocolate-truffle ganache, leaving a ½-inch border at the edges. This prevents sogginess while ensuring each bite is rich and flavorful. Repeat with the remaining two layers, creating a perfect sandwich. The ganache should be thick enough to hold its shape but still spreadable—if it’s too firm, warm it gently for 10 seconds in the microwave.
Chill the assembled cake in the refrigerator for at least 2 hours—this allows the ganache to set properly and the flavors to meld. The longer it chills, the more stable the cake will be when you’re ready to serve. Real talk: this waiting period is worth every second of anticipation.
Decorate with Elegance and Serve
Once chilled, remove the cake from the refrigerator and carefully spread the 0.5 cup dark caramel sauce over the top and sides using an offset spatula. This creates a glossy, professional finish that ties all the luxurious elements together. For the grand finale, gently press the 1 sheet edible gold leaf onto the caramel—it should adhere beautifully, adding that extra touch of opulence.
Serve each slice with a scoop of 2 cups vanilla bean ice cream on the side. The contrast between the warm, fudgy cake and the cool, creamy ice cream is pure perfection. This isn’t just dessert—it’s an experience that justifies every penny of its $100 inspiration.
Pro Tips For Making $100 Chocolate Cake
- Melt Butter Slowly: I learned this the hard way—dumping cold butter into hot sugar makes a greasy mess that fights you the whole time. Warm the butter in the microwave for 20-30 seconds first (it should be soft but not liquid), then mix it with the sugar. The butter will emulsify better, and your batter will be smoother from the start.
- Sift That Cocoa: Cocoa powder clumps like a stubborn guest at a party, and unsifted cocoa means uneven texture. Sift it with the flour—yes, even if the recipe doesn’t say to—so every bite has that same rich depth. (Pro tip: Use a fine-mesh sieve, not a cheap strainer.)
- Room-Temp Eggs Matter: Cold eggs make your cake dense and gummy. Take them out of the fridge 30 minutes before whipping—just set them in a bowl of warm water if you’re in a hurry. Room-temp eggs incorporate air better, giving you that light, airy crumb you’re paying $100 for.
- Don’t Overmix the Batter: I used to punch the mixer like I was mad at it, and my cakes turned out tough as a boot. Mix the wet and dry ingredients just until combined—maybe 20 seconds past that. Overmixing develops gluten, and suddenly your cake tastes like a sad, dense brick. Stop when the flour disappears.
Regional styles of $100 chocolate cake
French Elegance
In France, chocolate cake takes on a refined sophistication with techniques like mirror glaze and edible gold leaf—just like our recipe. The French master bakers focus on dark chocolate ganache layered between delicate sponge cakes, often infused with vanilla bean for depth.
I love how they use port wine in their ganache, which adds a subtle complexity that pairs beautifully with the richness. For a true French touch, dust the cake with unsweetened cocoa powder before serving—it’s a classic presentation that elevates the dish instantly. 💛
Italian Luxury
Italian chocolate cakes often feature hazelnut praline paste (like Nutella) or amaretti cookies crushed into the layers, adding a nutty crunch. The Italians also excel in dark chocolate-dipped layers, creating a decadent contrast between the cake’s texture and the glossy chocolate exterior.
For our recipe, swap the truffles for chopped Italian gianduja chocolate—it’s sweeter and creamier, perfect for those who prefer a milder chocolate flavor. Serve with a side of mascarpone whipped cream instead of ice cream for an authentic Italian finish.
American Grandeur
American bakers often go all out with multi-tiered cakes and over-the-top decorations, like fresh berries, chocolate shavings, or even candied violets for a floral touch.
For a truly American twist on this recipe, add a layer of salted caramel between the cake and ganache—it’s a crowd-pleaser that balances the richness. Top with whipped cream rosettes and a sprinkle of crushed peppermint for a festive holiday vibe.
I also recommend serving with a bourbon-infused chocolate sauce for dipping, which adds a smoky depth that’s pure Southern charm.
Japanese Precision
Japanese chocolate cakes are all about smooth textures and delicate flavors, often featuring matcha powder or white chocolate for contrast. For a Japanese-inspired version of this recipe, replace the port wine in the ganache with sake—it adds a subtle umami note that complements the chocolate beautifully.
Garnish the cake with white chocolate curls and a dusting of kinako (roasted soybean flour) for a unique, earthy sweetness. Serve with red bean paste on the side for a traditional touch that’s both unexpected and delightful.
Mexican Spice
Mexican chocolate cakes often incorporate chili powder or cinnamon for warmth, balancing the sweetness with a hint of spice. For a Mexican-inspired take, add ½ teaspoon of ground cinnamon and ¼ teaspoon of cayenne pepper to the cake batter—it’s surprising how well the heat enhances the chocolate.
Top the cake with a drizzle of Mexican chocolate sauce (made with tableta de chocolate) and sprinkle with crushed pecans for crunch. Serve with a scoop of Mexican vanilla ice cream and a sprinkle of tajín for a tangy-sweet contrast that’s pure fiesta energy. 🌶️
Nutrition facts
Frequently asked questions
Can I make this cake without vanilla bean?
While vanilla bean adds that luxurious depth, you can substitute with 2 teaspoons high-quality vanilla extract or 1 vanilla bean paste. For best results, use Madagascar Bourbon extract—it’s the closest in flavor. The cake will still taste amazing, though the aroma won’t be as complex. Pro tip: Add a pinch of sea salt to enhance the chocolate flavor if you skip the vanilla bean.
How do I store the cake before serving?
Assemble the cake 24 hours in advance and refrigerate it uncovered for optimal flavor development. The layers need this time to meld. For short-term storage (3 days), wrap each layer individually in plastic and keep them in the fridge. If freezing, assemble the cake (without gold leaf) and freeze for up to 1 month. Thaw overnight in the fridge before decorating.
What’s the best way to transport this cake?
Use a sturdy cake carrier with a lid to protect the gold leaf and caramel drizzle. Place the cake on a tray lined with parchment paper to catch any drips. Keep it refrigerated until serving—this prevents the ganache from melting. For long trips, transport it vertically to maintain shape. If you must transport it warm, use a cake warmer or insulated box to keep it at 60-65°F.
Can I make this cake gluten-free?
Yes, but with adjustments! Replace the all-purpose flour with a 1:1 gluten-free baking flour blend (like Bob’s Red Mill) and add ½ teaspoon xanthan gum to improve structure. The texture will be slightly denser, but the flavor remains rich. For the ganache, ensure your dark chocolate is gluten-free certified. Test the cake immediately after baking—gluten-free batters often need extra time in the oven.
How do I handle melted gold leaf?
Gold leaf is delicate—never apply it directly to wet surfaces. First, let the caramel sauce set completely (about 10 minutes at room temperature). Use a soft brush to gently press the gold leaf onto the cake. If it doesn’t stick, lightly mist the cake with distilled water (not tap water) and try again. Work in small sections to avoid overheating the leaf. For extra shine, use 24-karat gold leaf—it’s more pliable and adheres better.

- Baked Potatoes in Crock Pot Recipe: Buttery Interiors and Crispy Top Magic - November 1, 2026
- Braised Beef Short Ribs Recipe: Crock Pot Fall-Off-Bone Magic in 6 Hours - November 1, 2026
- Crock Pot Cocoa Recipe: Velvety Warmth With Hidden Spice Magic - November 1, 2026