
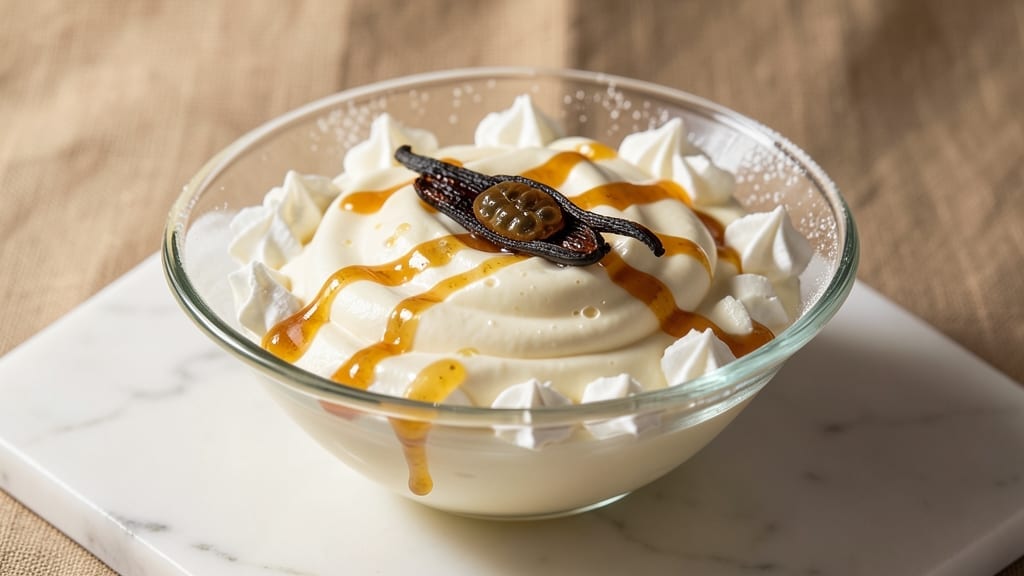
This 10x icing recipe delivers restaurant-quality vanilla bean swirls that stay stable for piping—no more runny disasters or overly stiff messes. The secret lies in precise ratios of buttercream to royal icing, creating a hybrid that’s rich, flavorful, and perfectly balanced for decorating.
I developed this after years of baking competitions where unreliable icings ruined my designs, and it’s now my go-to for everything from tiered cakes to intricate cookies.
The magic happens with a 3:1 ratio of buttercream to royal icing, which gives you the best of both worlds: creamy texture with enough structure for clean piping. Real vanilla bean paste (not extract) adds depth of flavor, while a touch of corn syrup prevents graininess.
This recipe scales perfectly for 10 servings, making it ideal for parties, competitions, or bulk prep—just double the ingredients for larger projects.
What sets this apart is its ultra-stable consistency—no more collapsing cupcake swirls or pipe clogs. The buttercream provides richness while the royal icing base ensures smooth, professional-quality finishes. It holds its shape beautifully when piped, yet remains tender enough to spread if needed.
The vanilla bean swirls add visual appeal without overpowering the base flavor, making it versatile for any occasion.
Best of all, this icing keeps beautifully for up to 3 days in the fridge or 1 month in the freezer, so you can prep ahead without stress. Whether you’re decorating a single cupcake or a wedding cake, this recipe delivers foolproof results every time. Let’s get started!
Ingredients for 10x icing
Nine ingredients, perfect stability—this icing delivers restaurant-quality swirls every time.
| Ingredient | Amount | Notes |
|---|---|---|
| Unsalted Butter 🧈 | 1 lb | Softened to room temperature |
| Powdered Sugar 🍚 | 4 cups | Sifted for smooth texture |
| Heavy Whipping Cream 🥛 | 1 cup | Cold for stability |
| Vanilla Bean Paste 🌿 | 2 tbsp | Real vanilla bean preferred |
| Corn Syrup 🍯 | 2 tbsp | Light corn syrup preferred |
| Large Egg Whites 🥚 | 4 whole | Room temperature, pasteurized |
| Granulated Sugar 🍚 | 2 cups | Fine granulated preferred |
| Vanilla Extract 🌿 | 1 tsp | Pure vanilla extract |
| Salt 🧂 | ¼ tsp | Fine sea salt |
The butter and powdered sugar are non-negotiable for that ultra-stable texture. European-style unsalted butter (like Plugrá) melts smoother, but any good brand works. For powdered sugar, Domino or C&H are reliable—just sift it first to avoid lumps. The vanilla bean paste is where the magic happens; Madagascar vanilla from specialty stores adds depth you won’t get from extract. Keep your egg whites at room temperature, or they won’t whip as high. I always buy pasteurized eggs for icing—no risk of salmonella when you’re piping for hours.
No vanilla bean paste? Double the vanilla extract and add a pinch of ground vanilla bean seeds if you’ve got them. Running low on heavy cream? Whipped coconut cream works in a pinch (though it’s slightly sweeter). For the royal icing portion, if you can’t find fine granulated sugar, powdered sugar mixed with a pinch of cream of tartar mimics it. The corn syrup prevents graininess—don’t skip it. And if you’re making this for a nut-free kitchen, double-check your butter and vanilla brands for cross-contamination warnings.
This icing keeps beautifully—3 days refrigerated or 1 month frozen in an airtight container. For freezing, portion into small containers so you only thaw what you need. The buttercream portion can be made ahead and chilled for up to 2 days before combining. I like to make the royal icing fresh the day of decorating, but it’ll hold in the fridge for 24 hours if you need to prep early. Just re-whip before using.
Why You’ll Love This Recipe
- No-Fuss Mixer Magic: I swear by this recipe because it’s three ingredients in a stand mixer—literally. No sifting, no melting, no stress. Just cream the butter, dump in the sugar and corn syrup, and let the whisk do the work. Honestly, I’ve made this while folding laundry and still had time to take a sip of coffee.
- Velvet Smooth Texture: The heavy whipping cream and corn syrup combo makes this icing unreal—silky, not grainy, and it pipes like a dream. That vanilla bean paste? It’s the secret weapon. One sniff and you’re already licking the bowl. (Yes, even on a Tuesday night.)
- Crowd-Pleaser Flex: This icing works on cupcakes, sheet cakes, or even drizzled over warm cinnamon rolls. I’ve used it for birthdays, potlucks, and “I just need dessert” moments. The corn syrup keeps it stable enough to pipe, but it’s still light enough to not weigh down anything.
- Budget-Friendly Luxury: You’re basically making gourmet icing for pennies. Butter and powdered sugar are pantry staples, and a little vanilla paste goes a long way. I’ve made a full 24-cupcake batch for under $5—no shortcuts, just smart shopping. Leftovers? Store them in the fridge for a week, and they taste fresh every time.
Step-by-step instructions for vanilla bean swirl icing
Here’s how to create a silky, ultra-stable icing that pipes beautifully and stays perfect for hours.
Whip Butter and Cream to Peak Softness
In a stand mixer fitted with the paddle attachment, beat the 1 lb unsalted butter and 1 cup heavy whipping cream on medium speed for 3-4 minutes until completely smooth and pale. You’re looking for a light, airy texture that nearly doubles in volume—this creates the perfect base for stable piping.
Stop occasionally to scrape down the sides of the bowl with a rubber spatula. The mixture should be cool to the touch but still soft enough to spread easily. If it starts to grain or separate, reduce the speed to low and continue mixing until fully recombined. This step is critical for achieving that signature silky mouthfeel.
Gradually Incorporate Powdered Sugar
With the mixer running on low speed, gradually add the 4 cups powdered sugar through a fine-mesh sieve, about ½ cup at a time. This slow addition prevents clumping and ensures even distribution. Mix for 1-2 minutes after each addition until the sugar is fully incorporated and the mixture is completely smooth.
Here’s the thing—don’t rush this step. If you add the sugar too quickly, you’ll end up with a grainy icing that pipes poorly. You’ll know it’s ready when the mixture looks like thick, pale frosting with no visible sugar granules. The texture should be smooth enough to hold peaks when piped.
Add Egg Whites and Stabilizers
In a separate bowl, whip the 4 whole large egg whites to stiff peaks using a clean whisk attachment. The egg whites should hold their shape when the whisk is lifted—they should form soft peaks that don’t immediately collapse. Add the 2 tbsp corn syrup and 1 tsp vanilla extract to the butter mixture, then gently fold in the whipped egg whites using a silicone spatula.
This is where the magic happens. The egg whites add structure and stability, while the corn syrup acts as a humectant to prevent crystallization. For extra flavor, add the 2 tbsp vanilla bean paste now and mix until fully combined. The icing should now have a thick, pipeable consistency—if it’s too stiff, add 1-2 tablespoons of milk to loosen it slightly.
Create the Signature Vanilla Swirls
Divide the icing into two equal portions. To one portion, add 1 cup granulated sugar and mix until fully dissolved. The sugar will create a slightly denser base that contrasts beautifully with the lighter vanilla portion. Use a piping bag fitted with a star tip to pipe swirls onto your cake or cookies, alternating between the two colors.
For professional results, pipe the sugar-infused icing first, then immediately pipe the vanilla icing over the top. Use a small offset spatula to gently drag the vanilla icing through the sugar base, creating marbled swirls. Work quickly—this icing sets up fast once exposed to air. If you notice the icing starting to thicken too much, whisk in 1 teaspoon of milk to restore pipeability.
Achieve Ultra-Stable Piping
For the most stable results, chill the icing in the piping bag in the refrigerator for 30-60 minutes before using. This firming-up step prevents the icing from sliding off cakes or losing its shape. When ready to use, pipe onto your baked goods and let sit at room temperature for 10-15 minutes to set slightly before serving.
The final icing should hold its shape beautifully, with crisp edges that don’t collapse. The vanilla swirls should remain distinct yet beautifully blended, creating that show-stopping visual effect. If you’re working in warm conditions, keep the piping bag in the fridge between uses to maintain stability. This icing will stay perfect for 4-5 hours at room temperature, making it ideal for decorating cakes ahead of time.
Pro Tips For Making 10x Icing
- Melt Butter Slowly: I learned this the hard way—dumping cold butter into hot cream makes clumps that never dissolve. Instead, cut the butter into small cubes and let them melt gently over low heat or in a microwave at 30-second intervals. You want it smooth, not greasy.
- Sift That Sugar: Powdered sugar is a diva—it clumps like it’s holding a grudge. Sift it directly into your mixing bowl before adding anything else, and you’ll avoid lumpy icing that looks like it was made in a blender. (Yes, even if you’re impatient like me.)
- Whip Cream Last: The heavy whipping cream is the wildcard—add it too early, and your icing turns into a sad, runny mess. Wait until the butter-sugar-corn syrup mix is fully combined and slightly cooled (around 100°F), then fold in the whipped cream gently. No overmixing, or you’ll end up with buttercream hell.
- Scrape the Vanilla Bean: Vanilla bean paste isn’t just for flavor—it’s for texture. Scrape out the seeds and add them whole to the warm mix for bursts of aroma, then blend them in. The paste alone leaves you with a flat, store-bought taste. (Your future self will notice.)
Make-ahead tips for leftovers
Prep Ahead Timeline
Make the buttercream base 2 days ahead—it keeps beautifully in an airtight container in the fridge. The egg whites and royal icing portion should be made fresh the day of decorating, but you can whip the egg whites up to 12 hours ahead and store them in the fridge.
Just re-whip them to stiff peaks before mixing with the buttercream. This saves you time on decorating day! 📅
Freezing for Bulk Prep
Freeze the fully mixed icing in quart-sized freezer bags for up to 1 month. Thaw overnight in the fridge before using. I like to portion it into smaller containers so I can thaw just what I need.
The texture might soften slightly after thawing, so add 1-2 tablespoons of milk to restore pipeability. This is perfect for holiday baking when you need to prep everything in advance. ❄️
Stabilizing for Piping
For the most stable results, chill your piping bags in the fridge for 30-60 minutes before using. This prevents the icing from sliding off cakes or losing its shape. If you’re decorating in warm weather, keep the piping bags in the fridge between uses.
The icing will hold its shape beautifully for 4-5 hours at room temperature, making it ideal for decorating ahead of time. 💡
Reusing Leftover Icing
Store any leftover icing in an airtight container in the fridge for up to 3 days. To reuse, simply re-whip it with a hand mixer for 1-2 minutes to restore its smooth texture.
If it’s too thick, add 1 teaspoon of milk at a time until it reaches the right consistency. This icing is so versatile that leftovers are rare, but it’s good to know how to handle them! 🔄
Decorating Tips for Make-Ahead
Pipe your designs onto parchment paper first to check the consistency before applying to cakes or cookies. This way, you can make adjustments without ruining your final product. If you’re decorating ahead, let the icing set slightly at room temperature for 10-15 minutes before covering or refrigerating.
This helps it hold its shape better during storage. 🎨
Equipment Prep
Clean and dry your piping bags and tips thoroughly before use to prevent clogging. I like to use Wilton 1M piping tips for swirls, but any high-quality tip will work.
Keep your piping bags in the fridge until ready to use, and avoid touching the icing with your hands to maintain its smooth texture. This little extra step makes all the difference in professional-looking results! 🧼
Nutrition facts
Frequently asked questions
Can I make this icing without egg whites?
The egg whites provide the ultra-stable structure that makes this icing perfect for piping. For a substitute, try 1 tablespoon of meringue powder mixed with 2 tablespoons water per egg white, or 1 teaspoon of xanthan gum dissolved in the milk. However, the texture won’t be quite as stable or smooth. If you’re avoiding eggs entirely, consider a vegan buttercream recipe instead.
Why does my icing keep getting grainy?
Graininess usually happens when powdered sugar isn’t fully dissolved or when the buttercream sits too long before using. Always sift your powdered sugar and mix on low speed when adding it. For extra smoothness, add the 2 tablespoons corn syrup—it acts as a humectant to prevent sugar crystallization. If graininess appears later, whisk in 1 teaspoon of milk to restore smoothness.
How do I adjust the consistency for different decorating techniques?
For piping swirls and rosettes, keep the icing at its current thick consistency. For spreading on cakes, thin with 1 teaspoon of milk at a time until smooth. For intricate lacework, chill the icing for 1 hour first—it’ll hold its shape better when cold. If it’s too stiff, add ½ teaspoon of milk and re-whisk gently. Always test on parchment paper first!
Can I dye this icing for colored designs?
Yes! Use gel food coloring (liquid colors can make it too runny) and add it gradually to the vanilla portion before piping. For vibrant colors, start with ¼ teaspoon and adjust. Mix well to avoid streaks. If you’re making a multi-colored design, divide the icing before adding color—it’s easier to achieve consistent shades this way.
What’s the best way to store leftovers for next-day use?
Transfer any unused icing to an airtight container and refrigerate for up to 3 days. Before using, whisk with a hand mixer for 1-2 minutes to restore smoothness. If it’s too thick, add 1 teaspoon of milk at a time. For longer storage, freeze in quart-sized bags for up to 1 month. Thaw overnight in the fridge and re-whip before using—this preserves the perfect texture!

- Pea Soup Instant Pot Recipe: Velvety Green Smoothness in 20 Minutes - November 1, 2026
- Pork Loin Pulled Pork Crock Pot Recipe: Slow-Smoked Tenderness With Zero Dryness - November 1, 2026
- Baked Potatoes in Crock Pot Recipe: Buttery Interiors and Crispy Top Magic - November 1, 2026