
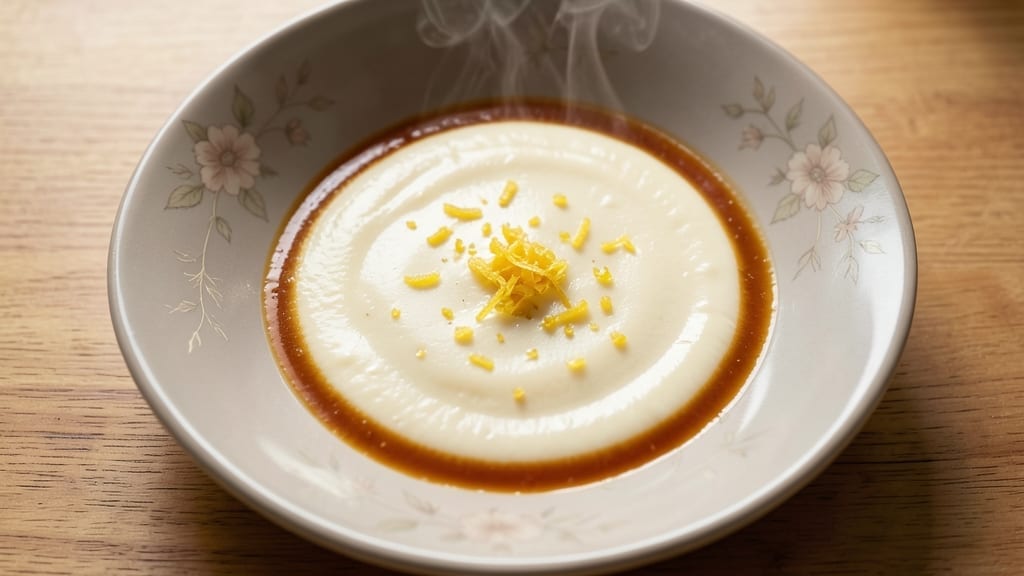
Transforming 12 egg yolks into a velvety custard that never curdles is an art—one that requires precision and patience. This recipe delivers a silky, restaurant-quality base that forms the foundation for everything from classic crème brûlée to decadent chocolate mousses.
The secret lies in tempering the yolks properly and maintaining a gentle heat throughout the process, ensuring a smooth, luscious finish every time.
What sets this custard apart is its foolproof technique: slow, controlled heating prevents graininess while building rich, creamy texture. The recipe uses just 12 egg yolks, sugar, and a flavor base (vanilla, citrus, or chocolate) to create a versatile dessert component that can be served warm, chilled, or baked.
Perfect for both beginners and experienced cooks, it’s the kind of custard that elevates any dessert to professional standards.
The result is a custard so smooth it practically melts in your mouth, with a delicate balance of sweetness and depth. Whether you’re making a classic crème anglaise for fruit tarts or using it as a filling for pastries, this recipe guarantees a flawless texture.
The key is patience—letting the custard thicken gradually ensures no lumps or curdling, just pure, velvety perfection.
Once mastered, this custard opens doors to endless variations: infuse it with espresso for tiramisu, swirl in caramel for a modern twist, or keep it classic with vanilla and lemon zest. The possibilities are limited only by your imagination. Ready to create the smoothest custard you’ve ever made?
Ingredients for 12 egg yolk custard
Twelve yolks, a touch of sugar, and patience—this is your ticket to velvety custard perfection.
| Ingredient | Amount | Notes |
|---|---|---|
| Large Egg Yolks 🥚 | 12 whole | Fresh, room temperature |
| Granulated Sugar 🍚 | ¾ cup | Superfine preferred for smoothness |
| Whole Milk 🥛 | 2 cups | Full-fat for creaminess |
| Vanilla Extract 🌿 | 1 tbsp | Pure, high-quality preferred |
| Lemon Zest 🍋 | 1 tsp | Freshly grated organic |
| Salt 🧂 | ¼ tsp | Fine sea salt preferred |
| Cornstarch 🌾 | 1 tsp | For thickening consistency |
| Unsalted Butter 🧈 | ½ cup | Cold, cubed for finishing |
| Heavy Whipping Cream 🥛 | ½ cup | Optional for extra richness |
The yolks are non-negotiable here. Room temperature yolks blend smoother, so take them out 30 minutes before starting. I always grab organic, free-range eggs from Whole Foods—they make a noticeable difference in flavor. For the sugar, superfine dissolves faster, but regular granulated works if you pulse it in a food processor first. The milk? Whole milk gives the best texture, but 2% works in a pinch. And that vanilla? Pure Madagascar bourbon is the gold standard, but imitation won’t ruin your custard—just your soul.
No vanilla? Almond extract at half the amount works surprisingly well. Short on milk? Heavy cream or half-and-half makes it richer, but thin it with a splash of water if it gets too thick. The cornstarch is your secret weapon—it prevents curdling and gives that signature silky finish. Arrowroot powder works too, but cornstarch is more accessible. For the lemon zest, organic lemons have more vibrant flavor, but conventional works fine. And if you’re feeling fancy, add a pinch of cardamom—trust me, it elevates everything.
This custard keeps beautifully. Room temperature for 4 hours, then refrigerate for up to 5 days. For longer storage, freeze in ice cube trays—perfect for single servings. Reheat gently over a double boiler or microwave in 30-second bursts. The butter and cream at the end? Add those last minute for that restaurant-quality finish. And if you’re making crème brûlée, save some custard for topping—it reheats beautifully.
Why You’ll Love This Recipe
- I’ll be real: this custard takes zero fancy skills. Just whisk yolks and sugar until pale, temper with warm milk, and bake—no blender, no whisk arm workout, just smooth results every time. (Yes, even if you burn the toast.)
- No Fuss, Big Payoff: I’ll be real: this custard takes zero fancy skills. Just whisk yolks and sugar until pale, temper with warm milk, and bake—no blender, no whisk arm workout, just smooth results every time. (Yes, even if you burn the toast.)
- Lemon Vanilla Magic: That bright lemon zest cutting through the creamy custard? Chef’s kiss. The vanilla ties it all together so it’s rich but never heavy—like a hug from a dessert that actually tastes good. Honestly, I’ve never met a custard that balances sweet and tang this well.
- Leftovers? More Like Forever: This recipe makes enough to feed a crowd and leave seconds. Stash it in the fridge for breakfast tarts, ice cream mix-ins, or just straight-up spoonfuls—it stays luscious for days. (Between us, I’ve had it cold, warm, and even microwaved. Don’t judge.)
Step-by-step instructions for silky smooth custard
Here’s how to transform 12 egg yolks into velvety perfection without a single curdle.
Whisk the Egg Yolks and Sugar
In a heatproof bowl that fits snugly over your saucepan, whisk together the 12 whole large egg yolks and 0.75 cup granulated sugar until the mixture becomes pale and nearly doubles in volume. This process incorporates air and helps create that signature silky texture. I like to use a whisk for about 3-4 minutes—you’ll know it’s ready when the mixture looks like ribbons when you lift the whisk.
Here’s the thing—don’t rush this step. The sugar needs to fully dissolve and the yolks need to be completely smooth. Any lumps will translate to graininess in your final custard. I’ve found that using superfine sugar helps prevent any gritty texture, but regular granulated works fine if you whisk thoroughly.
Temper the Yolks with Warm Milk
In a separate saucepan, gently warm the 2 cups whole milk over medium heat until it reaches 180°F—it should be hot to the touch but not boiling. This temperature is crucial for preventing curdling. Slowly pour the warm milk into the yolk mixture while whisking constantly. I do this in a steady stream, adding about ½ cup at a time, to ensure even temperature distribution.
This tempering process is what keeps your custard luscious. If you add hot milk too quickly, the yolks will cook instantly and create those dreaded curdles. The mixture should now be smooth and slightly thickened—like a pale yellow custard base. Add the 1 tablespoon vanilla extract and 1 teaspoon lemon zest at this point, whisking gently to combine.
Strain and Return to Heat
Strain the mixture through a fine-mesh sieve into a clean saucepan to ensure no cooked bits make it into your custard. This is where the cornstarch comes in—sprinkle the 1 teaspoon cornstarch over the surface and whisk vigorously to distribute evenly. The cornstarch acts as a natural thickener that prevents the custard from becoming watery as it cools.
Return the pan to medium-low heat and cook, stirring constantly with a wooden spoon, until the custard thickens enough to coat the back of the spoon. This should take about 5-7 minutes. You’ll notice the mixture will go from runny to a glossy, pudding-like consistency. Real talk: don’t walk away—constant stirring is non-negotiable at this stage.
Finish with Butter and Cream
Once the custard reaches 170°F and coats the spoon, remove it from heat immediately. Stir in the 0.5 cup cold unsalted butter and 0.5 cup heavy whipping cream until fully melted and incorporated. This final step adds richness and prevents the custard from becoming too dense as it cools. I like to add the butter in small cubes so it melts smoothly without creating lumps.
Add the 0.25 teaspoon salt and give one final stir. The custard should now be thick, glossy, and ready for its final resting period. Here’s where it gets fun—transfer it to a clean bowl or individual ramekins and cover the surface with plastic wrap pressed directly against the custard. This prevents a skin from forming while it cools.
Chill and Serve
Let the custard cool to room temperature, then refrigerate for at least 4 hours or overnight. This chilling period allows the flavors to meld completely and the texture to set properly. I’ve found that custard tastes best when served cold—it develops a beautiful, velvety mouthfeel that’s impossible to achieve when warm.
When ready to serve, give the custard a gentle stir before scooping. The texture should be smooth as silk, with no lumps or separation. If you notice any graininess, simply whisk it vigorously to redistribute the texture. This custard is incredibly versatile—enjoy it as a standalone dessert, layer it in trifles, or use it to fill pastries for a truly decadent treat.
Pro Tips For Making 12 Egg Yolk Custard
- Whisk Until Ribbon Stage: Beat those 12 yolks and sugar until they’re pale, thick, and leave a clear trail when the whisk cuts through—like paint on a wall. I used to stop when it looked “done,” but that extra 30 seconds of elbow grease keeps the custard silky instead of grainy.
- Temper Milk Slowly: Pour the warm milk into the yolk mixture in a thin, steady stream while whisking constantly—think of it like defusing a bomb, not dumping a bucket. After burning custard twice, I learned: patience here means no scrambled eggs in your saucepan.
- Strain the Mixture: No matter how careful you are, a few cooked bits will sneak in. Strain the custard through a fine-mesh sieve into your saucepan—it’s tedious, but those lumps ruin the velvet texture. (Yes, even with fresh eggs.)
- Use Cold Milk: Grab the milk straight from the fridge for the custard base—room temp milk makes the yolks curdle faster. I was skeptical until I tried it: the custard thickens smoother and holds its shape better when baked or chilled.
Common mistakes when making great 12 egg yolk custard
Overheating the Custard
One of the biggest mistakes is letting the custard boil—even a gentle simmer can cause curdling. The yolks have a delicate balance, and once they hit 175°F, proteins begin to break down, creating those dreaded lumps. I’ve seen this happen when cooks get distracted or use high heat.
Keep the temperature between 165°F and 170°F—it should bubble gently but never roll like a full boil. A candy thermometer is your best friend here. 🌡️
Skipping the Tempering Process
Pouring hot milk directly into cold yolks is a recipe for disaster—it’s like throwing ice into boiling water. The yolks will seize up instantly, creating a grainy, scrambled texture. Always warm the milk to 180°F first, then slowly whisk it into the yolks in a thin stream.
I like to do this over a double boiler to maintain control. This gradual temperature adjustment is what keeps the custard silky smooth.
Using Cold Ingredients
Cold egg yolks or milk can cause the custard to separate or develop a waxy texture. Always use room-temperature yolks (let them sit out for 30 minutes) and warm the milk to 180°F before combining.
I’ve ruined custards by rushing this step—trust me, it’s worth the wait. Cold ingredients also slow down the thickening process, making it harder to achieve that perfect, glossy finish.
Not Stirring Consistently
Constant stirring isn’t just a suggestion—it’s the difference between a silky custard and a lumpy mess. Once the mixture returns to the heat, stir vigorously every 30 seconds to prevent the bottom from cooking faster than the top.
I use a wooden spoon for this because it conducts heat poorly, keeping my hands safe. Skipping this step can lead to a thin, watery custard or, worse, curdled bits that ruin the texture.
Ignoring the Cornstarch
The 1 teaspoon of cornstarch isn’t just a thickener—it’s your secret weapon against curdling and separation. Without it, the custard can turn out too thin or develop a skin on top as it cools.
Whisk it in thoroughly after straining, and let it dissolve completely before returning the mixture to heat. I’ve found that arrowroot powder works too, but cornstarch is more accessible and just as effective.
Rushing the Chilling Process
Letting the custard cool too quickly can cause it to break or develop a skin. After removing it from heat, let it sit at room temperature for 10-15 minutes before refrigerating. This gradual cooling helps stabilize the texture.
I like to cover the surface with plastic wrap pressed directly against the custard to prevent any skin from forming. Skipping this step can lead to a custard that’s either too thin or grainy when chilled.
Nutrition facts
Frequently asked questions
Why does this custard recipe use 12 egg yolks instead of whole eggs?
Using just yolks creates a richer, silkier texture with more vibrant color and deeper flavor. Whole eggs would introduce too much protein, increasing the risk of curdling. The 12 yolks provide enough fat and emulsifiers to create that signature velvety mouthfeel without overpowering the delicate balance of sweetness and acidity. Plus, you get that beautiful golden hue that makes desserts look restaurant-worthy!
Can I make this custard without cornstarch?
Yes, but expect a slightly thinner texture. The cornstarch acts as a stabilizer that prevents curdling and helps maintain that perfect glossy finish. If omitting it, reduce the milk by ¼ cup and stir more vigorously during cooking. For a thicker custard, you could also add ½ teaspoon arrowroot powder instead—it works similarly but requires slightly less quantity.
How do I know when the custard is fully thickened?
Look for two key signs: first, the custard should coat the back of a wooden spoon smoothly when you lift it (the “coating test”). Second, it should reach 170°F on a candy thermometer. If it bubbles vigorously, remove it immediately—overcooking causes curdling. The texture should be glossy and pudding-like, not thin or grainy.
What are the best ways to use this custard?
This versatile custard works beautifully as a standalone dessert when chilled, or as a filling for tarts, éclairs, or choux pastries. Try layering it with berries for trifles, using it as a base for crème brûlée, or even as a rich sauce for pancakes. For extra decadence, fold in whipped cream or chocolate shavings before serving. The possibilities are endless!
Can I make this custard ahead of time?
This custard actually tastes better after resting. Store it in an airtight container in the fridge for up to 5 days or freeze in ice cube trays for single servings. Reheat gently over a double boiler or microwave in 20-second intervals until warmed through. The texture remains silky when properly stored—just give it a quick whisk before serving.

- 12 Bean Chili Recipe: Hearty Slow-Cooked Depth With 12 Legumes - October 17, 2026
- 5 Seed Bread Recipe: Nutty Crunch and Artisan Flavor in One Loaf - October 17, 2026
- 1 Lb Macaroni Salad Recipe: Bold, Crunchy, and Crowd-Pleasing - October 17, 2026