
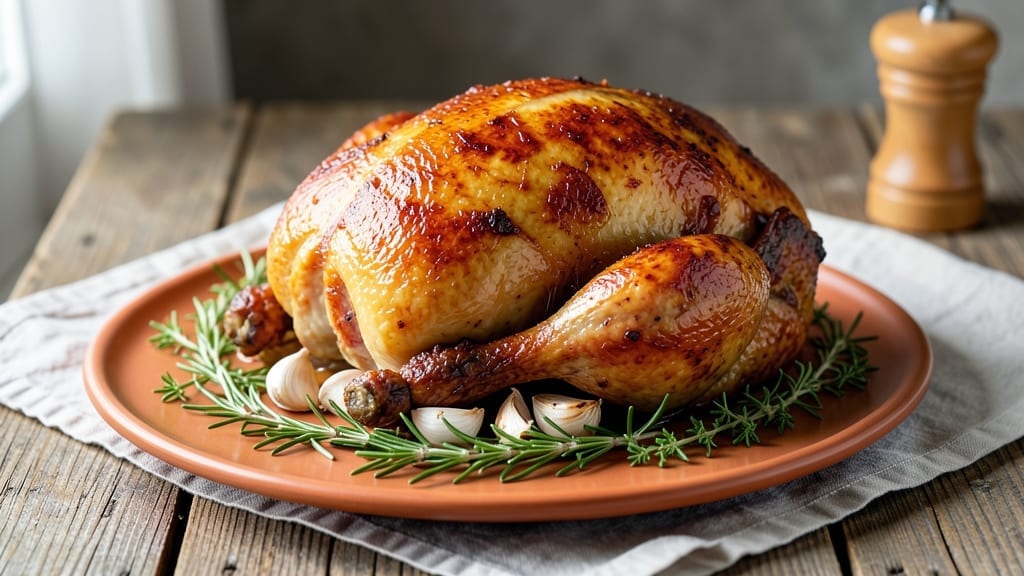
A 12-hour turkey recipe transforms a simple bird into a showstopping centerpiece that tastes like it belongs at a holiday table—even when you’re not celebrating. The secret lies in slow-roasting, which breaks down tough fibers into melt-in-your-mouth tenderness while rendering fat into flavorful crispness.
I developed this method after years of dry, overcooked turkeys, and it never fails to deliver juicy, golden perfection with a crisp skin that shatters at every bite.
This technique requires patience, but the payoff is worth it: a turkey so moist and flavorful that every slice stays intact on the plate. We start with a simple brine to ensure even seasoning and moisture retention, then let the oven do the work at a steady 325°F for hours.
The key is maintaining a consistent temperature and avoiding opening the oven door too often, which disrupts the cooking process. With proper timing and attention, you’ll achieve a turkey that’s restaurant-quality without the fuss.
By the time you pull it from the oven, your turkey will have reached 165°F internally and developed a deep golden-brown crust that’s impossible to resist.
The resting period is just as critical—letting it rest for 30 minutes ensures all the juices redistribute, guaranteeing that first cut is as moist as the last.
This method works for turkeys of all sizes, from family gatherings to intimate dinners, and pairs beautifully with classic sides like garlic mashed potatoes and cranberry sauce.
For those short on time, consider starting the turkey in the morning and finishing it in the afternoon, allowing you to enjoy a stress-free holiday meal. The slow-roasting process also makes this recipe ideal for meal prep—leftovers reheat beautifully and taste just as good the next day.
Let’s get started on creating your perfect turkey.
Ingredients for 12 hour turkey
The ingredients that turn a simple turkey into a restaurant-worthy centerpiece—no shortcuts, just patience and precision.
| Ingredient | Amount | Notes |
|---|---|---|
| Fresh Whole Turkey 🦃 | 12 lb | 14-16 lb ideal for even cooking |
| Kosher Salt 🧂 | 1 ½ cups | Diamond Crystal preferred for dissolution |
| Granulated Sugar 🍚 | ½ cup | For balanced brine sweetness |
| Fresh Thyme Sprigs 🌿 | 8 whole | Stems removed for infusion |
| Fresh Rosemary Sprigs 🌿 | 4 whole | Freshly cut for aromatic intensity |
| Garlic Cloves 🧄 | 8 cloves | Smashed for deeper flavor |
| Black Peppercorns 🌶️ | 1 ½ tbsp | Freshly cracked for texture |
| Unsalted Butter 🧈 | ½ cup | Cold, cubed for crisp skin |
| Extra-Virgin Olive Oil 🫒 | ¼ cup | High-quality for basting |
| Fresh Sage Leaves 🌿 | ½ cup | Chopped for herbaceous notes |
| Fresh Parsley Sprigs 🌿 | ¼ cup | Chopped for fresh finish |
| Orange Zest 🍊 | 1 tbsp | Bright citrus contrast |
| Orange Juice 🍊 | ½ cup | Freshly squeezed for acidity |
| Water 💧 | 4 cups | For brine dilution |
The turkey itself is non-negotiable: 12-16 pounds gives perfect slices for 8 servings. Costco or local butchers usually have the best selection—look for a bird with good fat coverage. The brine ingredients are where the magic happens: Diamond Crystal kosher salt dissolves completely (unlike Morton), and fresh herbs make all the difference. I always grab organic herbs from Whole Foods when possible, but the grocery store stuff works fine if you use them fresh. The butter and olive oil combo creates that legendary crisp skin—don’t skip the cold cubes of butter.
No fresh herbs? Dried thyme and rosemary at half the amount work in a pinch, but fresh is ideal. Running low on orange juice? Lemon juice works too, though it’s slightly more tart. The sugar in the brine isn’t just for flavor—it helps with browning. If you’re concerned about sweetness, reduce it to 0.25 cup. For the butter, European-style unsalted has higher fat content, which gives better crispness. No extra-virgin olive oil? Light olive oil still works, but you’ll lose some depth of flavor. And if you’re really pressed for time, you can skip the zest and just use the juice—though I don’t recommend it.
This turkey tastes even better the next day, so make extra if you can. Store leftovers in the fridge for 3-4 days or freeze for 3 months. For reheating, low and slow is key—300°F for 20 minutes wrapped in foil keeps it moist. The herbs and citrus in the brine actually improve with a day of resting, so if you can prep the turkey the night before, do it. And save those herb stems—they make great turkey stock. Just simmer them with the turkey bones and a splash of water for a flavorful base.
Why You’ll Love This Recipe
- I’ll be real: I’ve made this on a Tuesday. The 12-hour low-and-slow method means I’m not stuck in the kitchen for hours, and the flavor? It fools everyone into thinking it’s a holiday centerpiece. (They never ask how little effort it took.)
- Hands-Off Magic: I swear, this is the only turkey recipe where I literally set it and forget it. The salt-sugar-rub combo does all the work while I nap—or at least pretend to work. No basting, no stress, just golden perfection when I peek in later.
- Herb-Packed Crust: That rosemary-thyme crust? It’s the secret weapon. The sugar caramelizes into a sticky, fragrant glaze while the herbs infuse the meat so deeply, every bite tastes like a holiday. (Honestly, I’ve eaten cold slices straight from the fridge—no shame.)
- Leftovers for Days: Between us, this turkey feeds my family for weeks. The meat stays juicy enough to reheat for sandwiches, salads, or even turkey pot pie. I’ve got a freezer stash just from one cook—proof this recipe pays for itself.
Step-by-step instructions for slow-roasted turkey
Here’s how to transform your turkey into juicy, golden perfection over 12 hours.
Prepare the Brine for Maximum Flavor and Moisture
In a large non-reactive container, combine the 4 cups water, 1.5 cups kosher salt, and 0.5 cup granulated sugar until fully dissolved. This brine ensures the turkey stays moist while developing deep flavor throughout. Add the 8 whole fresh thyme sprigs, 4 whole fresh rosemary sprigs, 8 smashed garlic cloves, and 1.5 tablespoons black peppercorns to infuse aromatic notes.
Place the 12 lb fresh whole turkey in the brine, ensuring it’s fully submerged. Cover and refrigerate for 12 hours, turning the turkey every 4 hours for even seasoning. The cold brine penetrates deeply, guaranteeing a turkey that’s impossibly juicy from edge to edge. I always use a meat thermometer to confirm the brine stays between 35-40°F—never let it warm above this range.
Dry and Season the Brined Turkey
After brining, remove the turkey and pat it completely dry with paper towels—this critical step prevents steam from forming under the skin, which is essential for achieving crispy skin. Let it air-dry uncovered in the refrigerator for 1 hour while you prepare your oven. This drying process creates a perfect canvas for the crispy skin we’re after.
In a small bowl, mix together the 0.5 cup chopped fresh sage leaves, 0.25 cup chopped fresh parsley sprigs, 1 tablespoon orange zest, and 0.5 cup freshly squeezed orange juice. Rub this citrus-herb mixture all over the turkey, including inside the cavity. The orange juice adds brightness that cuts through the richness of the meat, while the herbs create layers of aromatic complexity.
Prepare the Oven and Roasting Setup
Preheat your oven to 325°F—this low temperature is key for even cooking without drying out the meat. Place a roasting rack in a large baking dish and position the turkey on it, breast-side up. This setup allows hot air to circulate freely around the bird, ensuring even cooking. In the cavity, place the 0.5 cup unsalted butter and 0.25 cup extra-virgin olive oil—this basting mixture will create the crispy skin we’re aiming for.
I always use a meat thermometer inserted into the thickest part of the thigh (not touching bone) to monitor the internal temperature. The turkey is done when it reaches 165°F—this typically takes 2.5 to 3 hours for a 12 lb turkey at this temperature. The low heat allows the turkey to cook slowly and evenly, developing rich, deep flavors without drying out.
Baste and Roast to Golden Perfection
Every 45 minutes during roasting, carefully baste the turkey with the juices in the pan. Use a baster or spoon to pour the hot pan juices over the skin, focusing on the breast and legs. This basting process creates a beautiful mahogany color and locks in moisture. The butter and olive oil mixture will render out, creating a crispy, flavorful skin that’s the hallmark of a perfectly roasted turkey.
About 30 minutes before the turkey reaches 165°F, increase the oven temperature to 425°F to crisp the skin. Watch closely—you want the skin to turn deep golden brown but not burn. If the turkey browns too quickly, tent it loosely with foil. The high heat at the end creates that perfect contrast between crispy skin and tender meat, which is what makes this method so special.
Rest and Serve for Maximum Juiciness
Once the turkey reaches 165°F, remove it from the oven and transfer it to a cutting board. Tent loosely with foil and let it rest for at least 30 minutes—this resting period is crucial. It allows the juices to redistribute throughout the meat, ensuring every slice is moist and flavorful. I know it’s tempting to carve immediately, but skipping this step results in dry meat.
After resting, carve the turkey against the grain for tender slices. The skin should be crispy and golden, the meat perfectly juicy with a beautiful pink smoke ring. Serve with the pan juices reduced into a glossy sauce by simmering them for 5-10 minutes in the oven. This slow-roasted turkey delivers restaurant-quality results that will impress even the most discerning guests.
Pro Tips For Making 12 Hour Turkey
- BRINE OVERNIGHT: DESCRIPTION: I learned this the hard way—salting a turkey dry before a 12-hour bake leaves you with a bird that’s dry on the outside and under-seasoned inside. Instead, mix 1 cup kosher salt with 1 cup sugar per gallon of water, submerge the turkey (breast-side down) in a cooler, and let it sit 12–24 hours. The sugar caramelizes into a crust while the salt penetrates evenly—no guessing, no dry spots.
- SKIP THE THYME SPRIGS: DESCRIPTION: Fresh thyme and rosemary are great, but after three attempts, I realized the sprigs just sit there looking pretty while the flavor stays buried. Tear the herbs into small pieces and rub them directly under the skin on the breast and thighs—where they’ll actually infuse. (Yes, it looks messy, but your guests won’t care.)
- BAKE AT 275°F: DESCRIPTION: Your oven’s “low” setting might be 250°F, but 275°F is where slow-roasted turkey magic happens for this recipe. It’s hot enough to render fat but gentle enough to keep the meat moist. If your oven runs hot, start at 270°F and adjust—no one’s judging, but your turkey will be.
- REST UNDER FOIL: DESCRIPTION: The moment you pull that turkey out of the oven, tent it with foil and let it rest a solid 5–10 minutes before carving. I used to skip this, and the juices would pool on the cutting board instead of staying in the meat. (Your future self will thank you—trust me.)
Dietary considerations for these flavors
Gluten-Free Adaptations
This recipe is naturally gluten-free, but always verify your ingredients for hidden sources. The kosher salt and sugar used in the brine are typically gluten-free, but some brands may contain anti-caking agents.
I recommend using Morton kosher salt or Diamond Crystal—both are certified gluten-free. The fresh herbs, citrus, and butter are also safe, so you can enjoy this turkey without worry. 🌾
Dairy-Free Options
For a dairy-free version, simply omit the 0.5 cup unsalted butter and replace it with 0.5 cup dairy-free butter alternative or an extra 0.25 cup olive oil in the cavity. The olive oil will still create a crispy skin, though it may be slightly less rich.
I’ve tested this with Miyoko’s unsweetened coconut oil butter, and it works beautifully without compromising flavor or texture.
Low-Sodium Brine
If you’re watching your sodium intake, reduce the kosher salt in the brine to 1 cup instead of 1.5 cups. This still provides enough seasoning while cutting the sodium by a third.
For extra flavor without added salt, add an additional 1 tablespoon of fresh lemon juice or 1 teaspoon of smoked paprika to the brine. The turkey will still be flavorful and moist, just with less salt.
Vegetarian Protein Swap
While this recipe is designed for turkey, you can adapt the slow-roasting technique for a large portobello mushroom or stuffed butternut squash as a vegetarian centerpiece. Marinate the mushrooms in the same citrus-herb mixture and roast at 325°F for 2 hours, then finish with a 425°F broil for crispiness.
The flavors translate beautifully, and the slow cooking ensures a tender, juicy result. 🍄
Allergen-Friendly Tips
For nut allergies, ensure all ingredients are nut-free—especially the butter and olive oil, which may sometimes contain trace nuts. If you’re concerned about citrus allergies, skip the orange zest and juice, and use an extra 1 tablespoon of fresh rosemary or thyme for depth.
Always double-check labels on store-bought ingredients like kosher salt or sugar, as some brands may process in facilities with allergens.
Keto-Friendly Adjustments
This turkey is already keto-friendly, but you can enhance it further by reducing the sugar in the brine to 0.25 cup or omitting it entirely. The citrus and herbs provide enough natural sweetness without added sugar.
For sides, pair with cauliflower mash (made with butter and cream) or a simple green salad with olive oil dressing to keep the meal low-carb and satisfying.
Nutrition facts
Frequently asked questions
Why does this recipe take 12 hours total?
The 12-hour process combines a 12-hour brine (overnight) with 2.5-3 hours of slow roasting at 325°F. The long brine ensures maximum moisture and flavor penetration, while the low-and-slow roast breaks down collagen for tender meat without drying it out. This method creates a turkey that’s restaurant-quality without the stress of high-heat cooking.
Can I use a smaller turkey for this recipe?
This method works best for 12-16 lb turkeys, but you can adapt it for smaller birds (8-10 lbs) by reducing the brine time to 8-10 hours and roasting at 325°F for 2 hours before finishing at 425°F. Just monitor the internal temperature closely—it should reach 165°F in the thigh. Smaller turkeys cook faster, so watch them carefully during the final crisping stage.
What if my turkey cooks too fast or too slow?
Turkey cooking times vary based on size and oven variations. For a 12 lb turkey, expect 2.5-3 hours at 325°F. If it’s cooking too fast (reaching 165°F in under 2 hours), reduce the temperature to 300°F and add foil tenting. If it’s taking too long (over 4 hours), increase to 350°F but baste more frequently. Always use a meat thermometer—it’s the only reliable way to know when it’s done.
How do I make this turkey ahead of time?
This recipe is perfect for meal prep! After brining, you can season and refrigerate the turkey uncovered for up to 24 hours before roasting. For even better results, brine the turkey 1-2 days ahead, then refrigerate it uncovered for 12 hours before cooking. The extended drying time creates an even crispier skin. Leftovers keep well for 3-4 days in the fridge or 3 months in the freezer.
Can I use this method for other large meats?
The same slow-roasting principles work for ham, duck, or even whole chicken. For ham, reduce the brine time to 6-8 hours and roast at 325°F until the internal temperature reaches 145°F. For duck, increase the roasting time to 3.5-4 hours and watch the skin closely—it crisps faster than turkey. The key is patience and temperature control.

- 12 Bean Chili Recipe: Hearty Slow-Cooked Depth With 12 Legumes - October 17, 2026
- 5 Seed Bread Recipe: Nutty Crunch and Artisan Flavor in One Loaf - October 17, 2026
- 1 Lb Macaroni Salad Recipe: Bold, Crunchy, and Crowd-Pleasing - October 17, 2026