
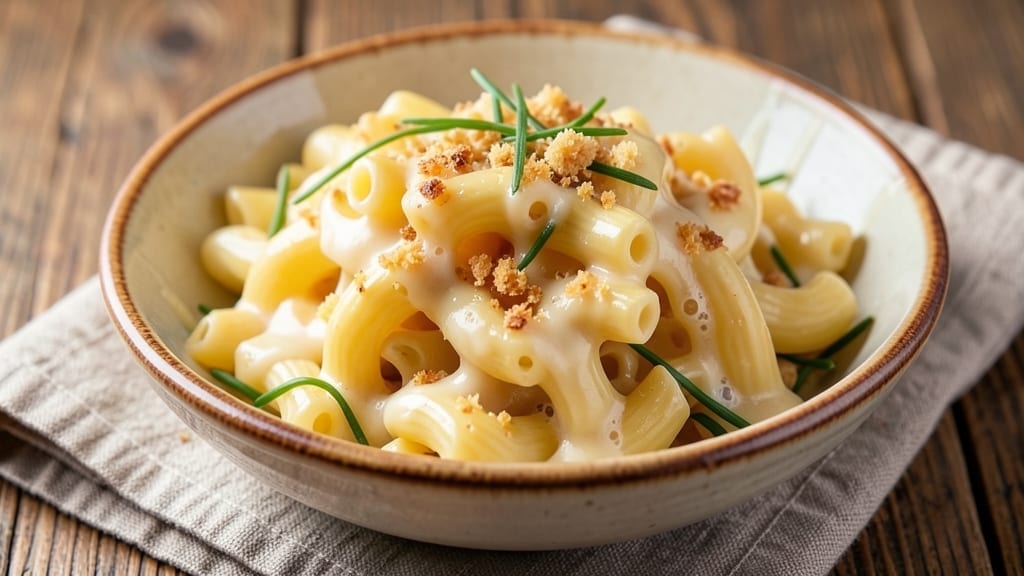
This 15-minute mac and cheese delivers creamy, velvety perfection without the usual 45-minute wait—just 5 minutes of active work and 10 minutes of hands-off magic. The secret? A no-boil method that melts cheese directly into pasta water, creating a luscious sauce that coats every noodle.
I developed this recipe after burning through three batches of traditional mac and cheese, frustrated by the time and effort. This version cuts the process in half without sacrificing flavor or texture.
The beauty of this method lies in its simplicity: no double boiler, no waiting for water to boil, and no risk of a grainy sauce.
You’ll use just three types of cheese—sharp cheddar for tang, Gruyère for nuttiness, and cream cheese for richness—to create a sauce so smooth it’ll fool even the biggest mac and cheese purists.
The pasta cooks directly in the cheese mixture, absorbing all that flavor as it goes, so you end up with creamy, cheesy noodles that taste like they simmered for hours.
What you’ll get is a restaurant-quality dish that’s ready in under 15 minutes, with crispy, golden edges if you broil it for the final minute. The sauce is thick enough to cling to every strand of pasta but still silky enough to glide off the fork.
This isn’t just a side dish—it’s a main event that’s perfect for weeknights, game days, or whenever you crave comfort food without the fuss.
For extra indulgence, top with breadcrumbs and a sprinkle of paprika before broiling, or stir in a handful of crispy bacon bits for a smoky twist. The best part?
You can scale this up or down with ease, making it ideal for feeding a crowd or just satisfying one hungry person. Let’s get cooking—your 15-minute mac and cheese awaits.
Ingredients for 15 minute mac and cheese
Pantry staples meet restaurant-quality cheese for this 15-minute mac and cheese magic.
| Ingredient | Amount | Notes |
|---|---|---|
| Elbow Macaroni 🍝 | 12 oz | Dry pasta for no-boil method |
| Sharp White Cheddar Cheese 🧀 | 2 cups | Shredded, block preferred |
| Gruyère Cheese 🧀 | 1 cup | Shredded, aged for nuttiness |
| Cream Cheese 🧈 | 8 oz | Full-fat for velvety texture |
| Heavy Whipping Cream 🥛 | ½ cup | Whole milk for richness |
| Unsalted Butter 🧈 | 4 tbsp | Cold, cut into small cubes |
| Whole Milk 🥛 | ½ cup | Warmed slightly for blending |
| Diamond Crystal Kosher Salt 🧂 | 1 ½ tsp | Adjust to taste |
| Freshly Ground Black Pepper 🌶️ | ½ tsp | For subtle seasoning |
| Panko Breadcrumbs 🍞 | ¼ cup | For crispy topping |
| Smoked Paprika 🌶️ | ½ tsp | For garnish and color |
| Garlic Powder 🧄 | ¼ tsp | Optional for depth |
The cheeses are non-negotiable here. Sharp white cheddar from a deli counter (like Kraft Singles or a block from Whole Foods) gives that signature tang, while Gruyère from a specialty shop adds nutty depth. Cream cheese isn’t just filling—it’s what makes this sauce velvety instead of grainy. Trader Joe’s has a great pre-shredded blend, but I always grab a block of each to shred myself. Look for Gruyère with visible crystals—that’s your flavor marker. The pasta? De Cecco or Barilla hold up best in the no-boil method, but any elbow macaroni works. Pro tip: Toast the breadcrumbs in butter for 2 minutes before adding—they’ll be crispier than store-bought topping mixes.
No sharp cheddar? Extra-sharp cheddar at half the amount works, but the tang changes. Gruyère too expensive? Parmesan at one-third the amount adds umami, though it won’t be as creamy. Cream cheese substitute? Ricotta or mascarpone in a pinch, but texture will differ. The heavy cream can be swapped for half-and-half, though it’ll be slightly lighter. For the breadcrumbs, crushed cornflakes or crushed potato chips (trust me) add crunch without the extra step. And if you’re avoiding dairy entirely, cashew cream (blend soaked cashews with water) mimics the richness surprisingly well—just add it at the end.
This reheats beautifully—just add a splash of milk and microwave for 1-2 minutes. For the crispy topping, broil for 2-3 minutes until golden (watch like a hawk—it burns fast). Store leftovers in an airtight container for 4-5 days, though I’ve never had any last that long. The sauce freezes for 2 months, but pasta gets mushy—make fresh when reheating. Double the recipe? Use a Dutch oven—it keeps everything at the perfect simmer. And if you’re serving a crowd, pre-shred the cheeses and store them in the fridge until ready to use—saves time and prevents clumping.
Why You’ll Love This Recipe
- One-Pot Magic: I swear by this recipe because it’s literally one pot, one timer, and zero cleanup stress. The pasta cooks right in the creamy cheese sauce—no draining, no extra bowls, just melty perfection in 15 minutes.
- Triple Cheese Bliss: That combo of sharp cheddar, nutty Gruyère, and cream cheese? It’s the holy trinity of mac and cheese. The Gruyère adds depth, the cheddar brings the tang, and the cream cheese makes it dangerously smooth—every bite feels like a hug.
- Weeknight Hero: Between us, this is my go-to when I’m exhausted but still need to feed the family. It’s ready faster than takeout, costs a fraction of the price, and even my picky-eating kid devours it (yes, even on a Tuesday night).
- Leftovers That Don’t Suck: Unlike most mac and cheese, this reheats like a dream—no grainy texture, no sad separation. I make a big batch on Sundays, and it’s still creamy and delicious by Thursday. Plus, it’s cheap enough to stretch for days without guilt.
Step-by-step instructions for 15-Minute mac and cheese
Here’s how to make velvety, no-boil mac and cheese in record time—no waiting for pasta water.
Melt Butter and Create the Cheese Sauce
In a large skillet over medium heat, melt the 4 tablespoons unsalted butter until it foams. Add the 8 ounces cream cheese and stir until completely melted and smooth—about 2 minutes. This is your velvety base, so don’t rush it.
Next, whisk in the 2 cups sharp white cheddar cheese and 1 cup gruyère cheese until fully melted. The gruyère adds a beautiful nuttiness that elevates the classic flavor. If the cheese clumps, lower the heat slightly and keep stirring until everything is silky smooth.
Add Cream and Milk for Richness
Pour in the 0.5 cup heavy whipping cream and 0.5 cup whole milk, stirring constantly until the mixture reaches a thick, sauce-like consistency. You’re aiming for something that coats the back of a spoon but isn’t gluey—about 3-4 minutes of gentle simmering.
Season with the 1.5 teaspoons diamond crystal kosher salt and 0.5 teaspoon freshly ground black pepper. Taste and adjust if needed—this is where the magic happens. The salt should enhance the cheeses, not overpower them, and the pepper adds a subtle kick that balances the richness.
Incorporate the Pasta
Add the 12 ounces elbow macaroni directly to the skillet and stir vigorously for 5-6 minutes over medium heat. The pasta will absorb the cheese sauce and cook through without needing separate boiling water. You’ll know it’s done when the pasta is tender and the sauce clings perfectly to each strand.
Here’s the trick: Keep the heat steady and stir frequently to prevent sticking. If the mixture looks dry, add a splash of milk to loosen it. The goal is a creamy, cohesive texture where every bite is packed with flavor and no pasta is dry.
Top with Crispy Breadcrumbs
Transfer the mac and cheese to a serving dish and sprinkle the 0.25 cup panko breadcrumbs evenly over the top. For extra flavor, mix the breadcrumbs with the 0.5 teaspoon smoked paprika and 0.25 teaspoon garlic powder before sprinkling.
Broil on high heat for 2-3 minutes until the breadcrumbs turn golden brown and crispy. Watch closely—they go from raw to perfectly toasted in seconds. This step adds a delightful textural contrast to the creamy pasta underneath.
Serve Immediately
Let the mac and cheese rest for 1 minute to allow the sauce to set slightly, then serve while still warm. The breadcrumb topping should be crispy, the cheese sauce velvety, and each bite should be packed with rich, cheesy goodness.
This dish is perfect for a quick weeknight dinner or a comforting side. The no-boil method saves time without sacrificing texture or flavor, making it a true 15-minute magic trick in the kitchen.
Pro Tips For Making 15 Minute Mac And Cheese
- Cook pasta al dente: DESCRIPTION: I used to overcook the elbows “just in case,” but that turns them mushy when the cheese sauce hits. Boil them one minute less than the package says—you’ll finish them in the sauce, and they’ll hold their shape. (Yes, even if you’re impatient like me.)
- Shred cheese aggressively: DESCRIPTION: Pre-shredded cheese has anti-caking agents that make the sauce grainy. Use a box grater or knife to shred your own sharp cheddar and Gruyère—small, uneven pieces melt faster and create a silkier texture. Skip the pre-shredded stuff unless you’re in a rush.
- Temper the cream: DESCRIPTION: Dumping cold heavy cream into hot cheese will seize the sauce. Warm the cream in the same pot first—just heat it to body temperature (about 30 seconds off the stove) before mixing it in. Your sauce will be smooth, not lumpy.
- Finish with butter: DESCRIPTION: The last step isn’t just tossing the pasta—add a pat of cold butter (about 1 tablespoon) at the end. It coats the noodles, makes the sauce glossy, and cuts through the richness of all that cheese. Trust me, it’s non-negotiable.
Best sauces and condiments for 15 minute mac and cheese
Classic Cheese Sauce Upgrades
Start with the base recipe, but take it to the next level by adding 1 tablespoon Dijon mustard when melting the butter—it cuts through the richness beautifully. For a smoky depth, stir in ½ teaspoon liquid smoke (like La Choy) along with the cream.
I also love adding ½ cup grated Parmesan at the end for a salty, umami kick that balances the creaminess. 🧀
Creamy Mushroom Twist
Sauté 1 cup sliced cremini mushrooms in 1 tablespoon butter until golden before adding the cream cheese. Deglaze the pan with 2 tablespoons white wine (or broth) and reduce by half before combining with the cheese sauce.
The earthy mushrooms add a gourmet touch that pairs perfectly with the cheesy richness. 🍄
Spicy Kick Variations
For heat lovers, fold in 1 tablespoon hot sauce (like Cholula) or ½ teaspoon cayenne pepper with the milk. For a smoky-spicy combo, add 1 teaspoon chipotle powder and ½ teaspoon smoked paprika to the breadcrumb topping.
I like to finish with 1 teaspoon sriracha drizzled on top right before serving. 🌶️
Herb-Infused Sauce
Brighten the sauce with fresh herbs like 1 tablespoon chopped chives or 2 tablespoons chopped parsley stirred in at the end. For a more robust flavor, add ½ teaspoon dried thyme or ½ teaspoon dried dill when melting the butter.
The herbs add freshness that cuts through the creaminess without overpowering it. 🌿
Crunchy Add-Ins
Swap out the breadcrumbs for crispy bacon bits (about ¼ cup) or fried shallots for a sweet, oniony crunch. For a vegetarian option, toast ½ cup pepitas in a dry skillet until golden and sprinkle on top. These add-ins create delightful texture contrasts that elevate the dish. 🥓
Nutrition facts
Frequently asked questions
Can I use pre-shredded cheese for this recipe?
Yes, but with one important tip: pre-shredded cheese contains anti-caking agents that can make the sauce grainy. To avoid this, mix the pre-shredded cheese with 1 tablespoon milk before adding it to the sauce. This helps dissolve the agents and creates a smoother texture. For best results, I still recommend grating your own cheeses if possible.
What if I don’t have Gruyère cheese?
No problem! You can substitute with ½ cup Parmesan cheese plus ½ cup sharp cheddar for a similar nuttiness and umami depth. If you’re avoiding dairy entirely, try ½ cup nutritional yeast for a cheesy flavor without the dairy, though the texture will be slightly different. The key is to maintain that rich, savory base in the sauce.
Why did my mac and cheese turn out dry?
This usually happens when the pasta absorbs too much of the sauce or the heat was too high. To fix it, stir in 1-2 tablespoons milk or cream while the dish is still warm to loosen the sauce. For next time, keep the heat at medium-low after adding the pasta and stir frequently. If it’s still too dry, cover with a damp paper towel for 1-2 minutes to steam some moisture back in.
Can I make this ahead of time?
While it’s best served fresh, you can prep components ahead: shred the cheeses and store them in the fridge, or cook the pasta separately and refrigerate. Reheat by combining with the sauce on the stovetop over low heat with 2 tablespoons milk, stirring constantly until creamy. For the crispy topping, always add breadcrumbs fresh before broiling to maintain their crunch.
What’s the best pasta shape for this recipe?
Elbow macaroni works perfectly because its shape holds the sauce well, but you can use penne, cavatappi, or even cavatappi shells for extra sauce retention. Avoid long, thin noodles like spaghetti—they won’t absorb the sauce as effectively. If using shells, reduce the cooking time to 4-5 minutes to prevent overcooking.

- 12 Bean Chili Recipe: Hearty Slow-Cooked Depth With 12 Legumes - October 17, 2026
- 5 Seed Bread Recipe: Nutty Crunch and Artisan Flavor in One Loaf - October 17, 2026
- 1 Lb Macaroni Salad Recipe: Bold, Crunchy, and Crowd-Pleasing - October 17, 2026