
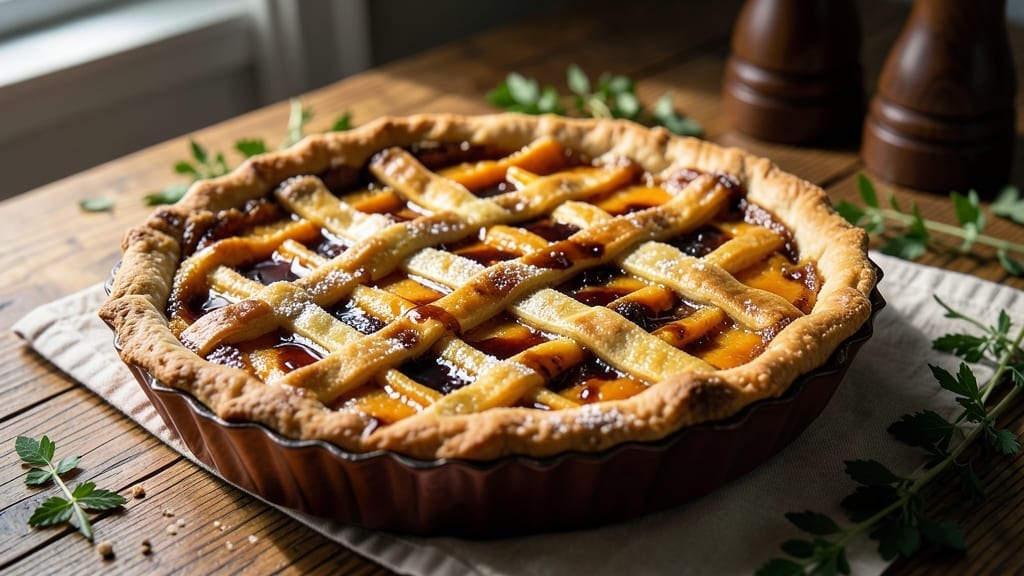
This 18th-century pumpkin pie recipe transports you straight to colonial-era kitchens where molasses, fresh pumpkin, and spiced rum created desserts far different from today’s versions.
The absence of refined sugar and pumpkin puree means the filling relies on fresh pumpkin purée, nutmeg, and cinnamon for depth—with rum adding warmth that modern recipes often overlook.
Historical accuracy isn’t just about ingredients; it’s about technique, like open-face baking in a Dutch oven to achieve that signature caramelized crust.
The pie’s foundation begins with a crust made from lard and flour—a nod to colonial resourcefulness—rather than butter, which was scarce. The filling, thickened with cornmeal instead of eggs, reflects early American adaptations to limited ingredients while delivering a texture that’s both rustic and satisfying.
What sets this apart is the rum infusion, which wasn’t just for flavor but for preservation, a practicality that still enhances the pie’s spiced complexity.
What you’ll achieve is a pie that tastes like stepping into a 1700s kitchen: rich, spiced, and subtly boozy, with a crust that’s tender yet sturdy enough to hold its shape.
The filling’s natural sweetness comes from molasses and fresh pumpkin, balanced by the rum’s depth—no artificial shortcuts, just the slow-cooked layers of history. This isn’t just dessert; it’s a piece of culinary heritage.
Perfect for history enthusiasts or those craving an authentic twist on a classic, this pie pairs beautifully with spiced cider or a dollop of whipped cream. The method is straightforward but demands patience—just as it did in the 18th century. Let’s bring this recipe to life, step by step.
Ingredients for 18th century pumpkin pie
Colonial ingredients transformed into a dessert that tastes like stepping into history.
| Ingredient | Amount | Notes |
|---|---|---|
| Fresh Pumpkin Purée 🎃 | 2 cups | From 1 small sugar pumpkin (3-4 lbs) |
| Molasses 🍯 | ½ cup | Unsulphured for authentic flavor |
| Dark Brown Sugar 🍚 | ¾ cup | Packed firmly for sweetness |
| Spiced Rum 🍹 | ¼ cup | 18th-century style (e.g., Captain Morgan) |
| All-Purpose Flour 🌾 | 2 ½ cups | For crust and filling thickener |
| Lard 🧈 | 1 cup | Leaf or leaf lard for flakiness |
| Cornmeal 🌽 | ¼ cup | Fine-ground for thickening |
| Ground Cinnamon 🌿 | 2 tbsp | Freshly ground preferred |
| Ground Nutmeg 🌶️ | 1 tsp | Freshly grated for potency |
| Ground Ginger 🌿 | 1 tsp | Freshly ground for warmth |
| Salt 🧂 | ½ tsp | Diamond Crystal preferred |
| Ice Water 💧 | ½ cup | For crust dough |
| Eggs 🥚 | 1 whole | For egg wash (optional) |
| Granulated Sugar 🍚 | ¼ cup | For crust sprinkle |
The pumpkin must be fresh and uncooked—no canned puree here. A small sugar pumpkin (3-4 lbs) yields about 2 cups of purée after roasting and mashing. For molasses, unsulphured varieties like Brammah’s or Blackstrap deliver the deep, rich flavor colonial cooks relied on. Spiced rum is non-negotiable; modern recipes often omit it, but it was essential for both flavor and preservation in the 18th century. Look for aged rums like Captain Morgan or Gosling’s—the caramel notes complement the molasses beautifully. Lard is critical for the crust; leaf lard creates flakier layers than butter, which was scarce in colonial kitchens. If you must substitute, vegetable shortening works in a pinch, though it lacks the same rustic charm.
No cornmeal? All-purpose flour can thicken the filling, but the texture won’t be as rustic. Ground spices should be freshly toasted and ground if possible—pre-ground spices lose potency quickly. For nutmeg, the freshly grated kind from a Microplane makes all the difference; pre-ground often tastes like dust. Brown sugar should be packed firmly into the measuring cup to mimic colonial practices. The egg wash is optional but adds a golden sheen to the crust. If you’re feeling particularly authentic, use ice water for the dough—colonial cooks didn’t have refrigeration, so they relied on cold water to keep the fat solid during mixing. Salt matters here; Diamond Crystal dissolves more slowly, enhancing flavor as the pie bakes.
Store the pumpkin purée in an airtight container in the fridge for up to 3 days—it’s best used fresh. The dough can be wrapped in parchment and chilled for 24 hours for easier handling. Once baked, the pie keeps well at room temperature for 2 days or in the fridge for 5 days. For longer storage, wrap tightly in parchment and foil—it’ll stay moist for 2 weeks. Leftovers reheat beautifully in a 350°F oven for 15 minutes. The rum-soaked filling intensifies in flavor over time, so the pie often tastes even better the next day. Serve with spiced cider or a dollop of homemade whipped cream for a truly colonial experience.
Why You’ll Love This Recipe
- No Puff Pastry Needed: I’ll admit it—this pie doesn’t require fancy crusts or hours of rolling dough. Just a quick flour-and-water mix for the crust, and you’re done. That spiced rum in the filling? It’s the secret that makes the whole thing taste like a cozy tavern dessert without the fuss.
- Molasses Magic: Between us, molasses is underrated in pies. Here, it’s the star—deep, caramel-rich, and cutting through the pumpkin’s sweetness like a warm hug. Plus, it’s cheaper than most pie fillings and lasts forever in your pantry.
- Weeknight or Holiday: Make it for a quiet Tuesday dinner or pull it out for Thanksgiving guests. The crust holds up beautifully, and the flavor only gets better the next day. (Yes, even on a Tuesday night.)
- Budget-Friendly Luxury: Fresh pumpkin purée and molasses keep costs low, but the spiced rum makes it feel special. It’s the kind of pie that tastes expensive but won’t break the bank—perfect for when you want to impress without overspending.
Step-by-step instructions for authentic 18th century pumpkin pie
This colonial-era method delivers a rich, spiced filling with a flaky lard crust—every detail matters.
👨🍳 Step 1: Prepare the Lard Crust with Precision
Cut the 1 cup lard into small cubes and place in a medium bowl. Add the 2.5 cups all-purpose flour, 0.25 cup cornmeal, 2 tbsp ground cinnamon, 1 tsp ground nutmeg, 1 tsp ground ginger, and 0.5 tsp salt. Use a pastry cutter or fork to work the mixture until it resembles coarse crumbs with pea-sized lard pieces remaining.
Gradually add the 0.5 cup ice water, 1 tablespoon at a time, mixing gently until the dough just comes together. Avoid overworking—handle only enough to form a cohesive mass. Shape into a disk, wrap in plastic, and refrigerate for at least 1 hour (or up to 24 hours). The cold rest is essential for a tender, flaky crust.
🍳 Step 2: Create the Spiced Rum-Infused Filling
In a large mixing bowl, combine the 2 cups fresh pumpkin purée, 0.5 cup molasses, 0.75 cup dark brown sugar, and 0.25 cup spiced rum. Whisk vigorously until fully incorporated—this step develops the signature depth of flavor. The rum adds warmth that was common in colonial desserts, while the molasses provides that characteristic caramel richness.
In a separate small bowl, whisk the 1 whole egg until smooth, then gently fold it into the pumpkin mixture. The egg helps bind the filling and creates a velvety texture. Sprinkle 0.25 cup granulated sugar over the top and fold just until combined. This final sugar addition balances the molasses sweetness and creates a subtle caramelized crust during baking.
🥘 Step 3: Assemble and Bake for Perfect Texture
Preheat your oven to 375°F. On a lightly floured surface, roll out the chilled lard crust to fit a 9-inch pie dish, leaving a ½-inch overhang around the edges. Transfer to the pie dish and trim the excess, leaving the overhang intact. Press gently to seal any cracks.
Pour the pumpkin filling into the prepared crust, spreading it evenly. For that authentic colonial touch, create a decorative lattice top by cutting the excess dough into strips and weaving them over the filling. Brush the lattice (and crust edges) with the 1 whole egg beaten with a splash of water for a golden finish. Sprinkle with additional 0.25 cup granulated sugar if desired.
⏰ Step 4: Bake Until Golden and Set
Place the pie on a parchment-lined baking sheet to catch any drips, then bake for 50-60 minutes until the crust is deep golden brown and the filling is set but still slightly jiggly in the center. The pie should have a rich caramel aroma—this indicates proper doneness. If the edges brown too quickly, cover them with aluminum foil after 30 minutes to prevent burning.
Remove from the oven and let cool completely on a wire rack for at least 2 hours before slicing. This resting period allows the filling to fully set and the flavors to meld. Serve warm or at room temperature, accompanied by whipped cream or a dollop of clotted cream for a true colonial-style presentation.
Pro Tips For Making 18th Century Pumpkin Pie
- STRAIN THAT PUREE: Skip the chunky bits—run your fresh pumpkin purée through a fine-mesh sieve before mixing with molasses and sugar. I learned this the hard way after biting into a pie with stringy texture that ruined the whole bite. Takes 2 minutes but makes a smoother filling every time.
- SALT THE MOLASSES: Add a pinch of salt to your molasses before combining it with the pumpkin purée. The molasses in this recipe is often unsalted, and the pie needs balance—skip this, and the sweetness will feel one-dimensional. Trust me, your taste buds will notice.
- BAKE LOW AND SLOW: Start at 350°F (175°C) and don’t rush it—this isn’t a modern pie that needs a hot oven. After 45 minutes, drop to 300°F (150°C) for the last 20-30 minutes. I used to blast it at 400°F, and the crust would burn before the center set. Patience here keeps the texture perfect.
- SWAP RUM FOR BRANDY (IF NEEDED): If spiced rum isn’t your thing, use the same amount of brandy—it’s got the same boozy depth without the molasses-heavy aftertaste. I was skeptical until I tried it, and the pie still tasted rich and complex. Just don’t skip the warming step—let the alcohol cook off properly.
Pro cooking tips for 18th century pumpkin pie
Colonial Crust Mastery
The lard crust is where authenticity shines—colonial cooks used it because butter was scarce and expensive. Cut the 1 cup lard into small cubes and work it into the flour with your fingers or a pastry cutter until you get a texture like coarse sand with pea-sized fat pieces.
This creates flaky layers when baked. I’ve found that leaf lard (from around the leaf fat of a pig) works best, but if you can’t find it, vegetable shortening is a decent substitute in a pinch.
Chill the dough for at least 1 hour before rolling—this prevents it from shrinking in the oven. 🧈
Rum Infusion Secrets
Don’t skip the spiced rum—it’s not just for flavor, but for preservation, just as colonial cooks used it. Measure ¼ cup and whisk it directly into the pumpkin mixture until fully incorporated. The alcohol will cook off during baking, leaving behind warm caramel notes that balance the molasses.
For extra depth, let the rum sit in the mixture for 10 minutes before adding the egg—this gives the spices time to bloom. I like using Captain Morgan or Gosling’s for their molasses-forward profiles. 🍹
Open-Face Baking Trick
Unlike modern pies, colonial versions often baked open-faced—no top crust. This allowed the filling to caramelize beautifully while keeping the texture lighter. If you want to go fully authentic, skip the lattice and bake the pie uncovered.
For extra insurance against a soggy bottom, pre-bake the crust (without filling) for 10 minutes at 375°F before adding the filling. This step is non-negotiable if you’re using fresh pumpkin purée, which releases more moisture than canned versions. ⏰
Molasses Substitution
If you can’t find unsulphured molasses, use dark corn syrup as a substitute, but reduce it by 10% since it’s sweeter. The key is balancing the molasses with dark brown sugar—the combo creates that signature caramelized depth.
I’ve also experimented with blackstrap molasses for an even richer, slightly bitter note, but it’s an acquired taste. Always pack the brown sugar firmly into the measuring cup to mimic colonial practices. 🍚
Spice Toasting Boost
For maximum potency, toast your ground cinnamon, nutmeg, and ginger in a dry skillet over medium heat for 2-3 minutes until fragrant. Let them cool, then grind them fresh if possible. Pre-ground spices lose their aroma quickly, and colonial cooks would have toasted their spices to enhance flavor.
This step makes a noticeable difference in the pie’s warmth and complexity. Store your toasted spices in an airtight container to preserve their freshness. 🌶️
Resting for Perfection
Never skip the 2-hour cooling period—this is where the magic happens. The filling continues to set and the flavors meld together. Colonial cooks didn’t have refrigeration, so they relied on patience to achieve the perfect texture.
If you’re short on time, chill the pie for at least 1 hour, but the longer it rests, the better it tastes. Serve at room temperature for the full experience—this pie was never meant to be eaten straight from the oven like modern versions. 💫
Nutrition facts
Frequently asked questions
Why does this recipe use lard instead of butter?
Lard was the preferred fat in 18th-century cooking because butter was scarce and expensive. It creates a flakier, more rustic crust that holds up better to the moist pumpkin filling. The recipe uses 1 cup leaf lard for that authentic texture—colonial cooks relied on it for its stability during baking.
Can I substitute rum with another liquid?
The rum isn’t just for flavor—it was also used for preservation in colonial times. You can replace it with ¼ cup apple cider or dark beer, but the depth of flavor will differ. For authenticity, use spiced rum like Captain Morgan—it adds warmth that balances the molasses perfectly.
How do I make fresh pumpkin purée?
Roast a 3-4 lb sugar pumpkin at 375°F for 45 minutes until tender, then scoop out the seeds and mash the flesh until smooth. You should get about 2 cups. No canned pumpkin here—fresh purée gives the filling a richer, more authentic texture.
Why does the crust need to rest before rolling?
Chilling the dough for at least 1 hour prevents shrinking during baking and makes it easier to handle. Colonial cooks didn’t have refrigeration, but they knew cold water and patience created the best crusts. The rest also helps the lard set properly for those signature flaky layers.
Can I make this pie ahead of time?
The pie tastes even better the next day as flavors meld. Assemble it 1 day ahead, refrigerate uncovered, then bake when ready. For longer storage, wrap tightly in parchment and foil—it keeps for 2 weeks at room temperature. The rum-infused filling improves with time!

- Pea Soup Instant Pot Recipe: Velvety Green Smoothness in 20 Minutes - November 1, 2026
- Pork Loin Pulled Pork Crock Pot Recipe: Slow-Smoked Tenderness With Zero Dryness - November 1, 2026
- Baked Potatoes in Crock Pot Recipe: Buttery Interiors and Crispy Top Magic - November 1, 2026