
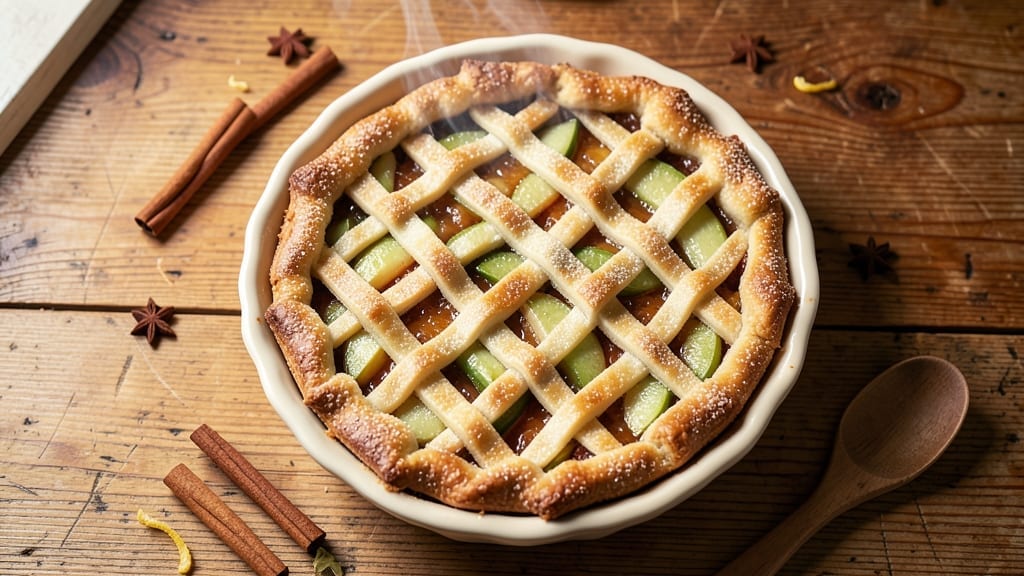
This 1950s apple pie recipe brings back the golden era of homestyle baking with its flaky lattice crust and spiced apple filling that tastes like nostalgia.
The secret lies in a cold butter crust that creates layers so delicate they practically melt in your mouth, while the lattice topping adds rustic charm and even baking. I’ve recreated this classic using vintage techniques—like an egg wash for that signature glossy finish—while keeping it practical for modern kitchens.
The filling is where the magic happens: tender apples tossed with cinnamon, nutmeg, and just enough sugar to caramelize beautifully during baking. Traditional varieties like Granny Smith or Honeycrisp work best, but any crisp apple will do.
The lattice isn’t just decorative—it bakes evenly and lets the aroma escape, filling your home with that unmistakable apple pie scent that’s impossible to resist.
What makes this pie truly special is the balance of textures—flaky, crisp edges on the crust, tender yet slightly chewy apples, and a lattice that holds its shape while adding visual appeal.
It’s the kind of pie that tastes like a warm hug, perfect for family gatherings or a cozy Sunday afternoon. The crust stays crisp even when sliced, and the filling remains juicy without being soggy.
Ready to bake? This recipe delivers restaurant-quality results with a vintage touch, using simple ingredients and techniques that honor the past while fitting seamlessly into today’s kitchen. Let’s get started—your kitchen will smell like autumn in no time.
Ingredients for 1950s apple pie
Golden crust, spiced apples, and that nostalgic lattice charm—just these ingredients transform your kitchen into a 1950s homestyle bakery.
| Ingredient | Amount | Notes |
|---|---|---|
| All-Purpose Flour 🌾 | 4 cups | Sifted for light texture |
| Unsalted Butter 🧈 | 1 cup | Cold, cubed for flakiness |
| Granny Smith Apples 🍎 | 6 medium | Peeled, sliced 1/4-inch thick |
| Granulated Sugar 🍚 | 1 ½ cups | White or light brown |
| Light Brown Sugar 🍚 | ¼ cup | Packed for moisture |
| Ground Cinnamon 🌿 | 2 tsp | Freshly ground preferred |
| Ground Nutmeg 🌿 | ¼ tsp | Freshly grated for warmth |
| Lemon Juice 🍋 | 2 tbsp | Freshly squeezed |
| Large Eggs 🥚 | 1 whole | For egg wash |
| Salt 🧂 | 1 tsp | Fine sea salt preferred |
| Ice Water 💧 | ¼ cup | For dough elasticity |
| Vanilla Extract 🍯 | 1 tsp | Pure vanilla preferred |
The butter is non-negotiable for that vintage flakiness—cold cubes are key, straight from the fridge. I grab Land O’Lakes unsalted from the store, but any brand works as long as it’s cold. Granny Smiths are ideal (their tartness balances the sweetness), but Honeycrisp or Braeburn will do. Slice them 1/4-inch thick—thinner slices get mushy, thicker ones stay tough. For the flour, King Arthur or Gold Medal are my go-tos, but any all-purpose will work. Sift it first—this makes a difference in the texture, trust me. The sugar mix? White for crispness, brown for chew—both are essential here.
No Granny Smiths? McIntosh or Fuji are solid backups, but they’ll be less tart. Running low on vanilla? Almond extract at half the amount works in a pinch, though it’ll taste different. The cinnamon should be fresh—if it smells like dust, toss it. Nutmeg is optional but adds that classic 50s warmth. For the egg wash, beat the egg with 1 tsp water for extra shine. The dough gets tricky if it’s too warm—chill it 30 minutes before rolling if your kitchen’s hot. And if you’re nervous about the lattice, practice cutting strips on parchment first—it’s easier than it looks.
The crust keeps 3 days wrapped in the fridge, but make it fresh if possible—the butter stays flaky. Prep the filling ahead and store it in the fridge for 1 day; the flavors meld beautifully. Baked pies reheat well—350°F for 10 minutes revives the crust. Freeze the whole pie (unbaked) for 2 months—just add 15 minutes to baking time. And if you’re making this for guests, bake it in a 9-inch pie dish—it’s the perfect size for sharing.
Why You’ll Love This Recipe
- No-Roll Crust Shortcut: I swear by this pie—just mix the flour, butter, and ice water until it clumps, then press it into the pan. No rolling, no fuss, and the butter flakes create that golden, flaky magic without the stress of pie dough.
- Tart-Sweet Magic: Granny Smiths and light brown sugar? That’s the secret handshake. The apples stay firm but tender, while the brown sugar caramelizes into a sticky, buttery crust that’s dangerously good with a spoon straight from the oven.
- Weeknight Crowd-Pleaser: I’ve served this at holiday dinners, potlucks, and even my kid’s soccer team fundraiser. The crust holds up, the filling stays moist, and everyone asks for seconds—no matter the occasion.
- Budget-Friendly Leftovers: A single pie feeds my family for days. Slice the leftovers for breakfast toast, crumble the crust over yogurt, or reheat slices with ice cream—every bite feels like a treat, but your wallet stays happy.
Step-by-step instructions for 1950s apple pie
Here’s how to create that iconic flaky crust and spiced apple filling that makes this pie taste like grandma’s kitchen.
Make the Flaky Pie Crust
In a large bowl, combine the 4 cups all-purpose flour and 1 tsp salt. Cut in the 1 cup cold unsalted butter using a pastry cutter or your fingers until the mixture resembles coarse crumbs with pea-sized butter pieces. This cold butter is key—it creates those beautiful flaky layers.
Gradually add the 0.25 cup ice water, 1 tablespoon at a time, mixing gently with a fork until the dough just comes together. Don’t overwork it—just until it holds when pressed. Divide the dough into two equal discs, wrap each in plastic wrap, and chill for at least 1 hour. This resting time relaxes the gluten for maximum flakiness.
Prepare the Classic Apple Filling
Peel, core, and slice the 6 medium Granny Smith apples into ¼-inch thick slices. Toss them immediately with the 2 tbsp lemon juice to prevent browning. In a large bowl, combine the sliced apples with 1.5 cups granulated sugar, 0.25 cup light brown sugar, 2 tsp ground cinnamon, and 0.25 tsp ground nutmeg. Add the 1 tsp vanilla extract and gently toss until everything is evenly coated.
Let the filling sit for 15 minutes while you roll out the crust. This gives the apples time to release some juices, which will create a beautifully moist filling. The sugar will start to draw out the natural juices from the apples, creating that perfect balance of sweet and tart.
Assemble the Pie with Lattice Topping
On a lightly floured surface, roll out one dough disc into a 12-inch circle for the bottom crust. Transfer it to a 9-inch pie dish, pressing gently to fit. Trim any excess dough hanging over the edge. Roll out the second dough disc into a 12-inch square for the lattice.
Cut the square into 12 strips, about 1½ inches wide. Arrange 6 strips horizontally across the pie, spaced ½ inch apart. Fold back every other strip, then place a perpendicular strip over the fold. Unfold and press down. Repeat with remaining strips, alternating directions to create the classic lattice pattern. Trim any excess dough.
Bake to Golden Perfection
Preheat your oven to 375°F. Brush the lattice topping with the beaten 1 whole large egg mixed with a splash of water for that beautiful golden finish. Fill the pie with the prepared apple filling, pressing down gently. Bake for 50-60 minutes until the crust is deep golden brown and the filling is bubbling.
Here’s the thing—don’t open the oven during the first 30 minutes of baking. The steam needs time to build up for that perfect texture. When you see the edges starting to brown and the filling bubbling through the lattice, it’s time to check for doneness. The pie is done when the crust is golden and the filling is tender when tested with a knife.
Cool and Serve Like a Classic
Let the pie cool on a wire rack for at least 2 hours before slicing. This resting time allows the filling to set properly and prevents a runny pie. The contrast between the crisp, flaky crust and the warm, spiced apple filling is what makes this pie so special.
For serving, cut into 8 equal wedges—perfect for sharing with family. The lattice topping not only looks beautiful but also allows the apples to peek through, showing off their perfect golden color. Serve with a scoop of vanilla ice cream for that ultimate 1950s dessert experience.
Pro Tips For Making 1950s Apple Pie
- Chill the Dough Properly: I learned this the hard way—rolling out cold dough straight from the fridge is a nightmare. Wrap the dough in plastic and refrigerate it for at least 30 minutes before rolling, or pop it in the freezer for 15 if you’re in a hurry. This keeps it from shrinking like a sad, defeated pastry when you try to fit it into your pie dish.
- Pre-Cook the Apples: Skip the raw, watery filling by tossing sliced Granny Smiths with a teaspoon of sugar and lemon juice, then simmering them for 5 minutes before assembling. This softens them just enough to thicken the filling without turning it into soup—trust me, your pie’s texture will thank you.
- Vent the Top Crust: If you’re sealing the pie completely, cut a few small slits or a decorative lattice pattern in the top crust. I know, it’s not 1950s perfection, but it prevents a steam explosion mid-bake. (Yes, I’ve seen it happen—messy, but avoidable.)
- Use Cold Butter in Crust: Cut that unsalted butter into the flour mixture using a pastry cutter or your fingers until the pieces are pea-sized—no smaller. Cold butter creates flaky layers, while warm butter just melts into a greasy, dense disaster. (Your future self will notice the difference.)
Flavor customization for this recipe
Spice Level Adjustments
If you love warmth, boost the cinnamon to 2.5 tsp and add ½ tsp ground allspice for depth. For a milder pie, reduce cinnamon to 1.5 tsp and omit nutmeg entirely.
I’ve tested both versions—the spicier one tastes like autumn, while the milder one feels more like a summer dessert. 🌶️
Sweetness Variations
For a less sweet pie, cut granulated sugar to 1 cup and add ¼ cup cornstarch to thicken the filling. If you prefer extra sweetness, increase brown sugar to ⅓ cup and add 1 tbsp maple syrup to the filling.
The cornstarch keeps the filling firm, while the maple syrup adds caramel notes.
Apple Flavor Swaps
Replace Granny Smiths with McIntosh for a sweeter, softer texture, or use Braeburn for a balance of tartness and crunch. For a tropical twist, add ½ cup diced pineapple to the filling—it’s a 1950s diner classic! Just reduce sugar by 1 tbsp to balance the fruit’s natural sweetness.
Crust Customizations
For a crumb topping, mix ½ cup all-purpose flour, ½ cup light brown sugar, and ½ cup cold butter, then sprinkle over the filling before baking.
For a savory twist, add 1 tbsp fresh thyme to the crust dough—it pairs surprisingly well with the apples. Both options keep the pie’s rustic charm. 🍂
Modern Twists
Add ½ cup chopped pecans to the filling for crunch, or fold in ½ cup caramelized apples for extra richness. For a boozy touch, stir 2 tbsp bourbon into the filling before baking. These tweaks keep the pie’s vintage soul while adding contemporary flair.
Seasonal Adaptations
In summer, swap apples for peaches or nectarines and reduce sugar by 2 tbsp. For winter, add ½ tsp cardamom to the filling and top with a sprinkle of coarse sugar before baking.
The cardamom adds warmth, while the sugar caramelizes beautifully under the broiler for 2 minutes** at the end.
Nutrition facts
Frequently asked questions
Why does the 1950s recipe use Granny Smith apples?
The tartness of Granny Smiths balances perfectly with the sweet spices in this vintage recipe. Their firm texture holds up during baking without turning mushy. If you can’t find them, McIntosh or Braeburn apples work well as alternatives—they just need slightly less sugar in the filling.
Can I make this pie without a lattice crust?
For a simpler version, use a single round crust or a crumb topping. Just reduce the butter in the second dough disc by ¼ cup and sprinkle it over the filling before adding the top crust. The classic look isn’t necessary for great flavor—this pie shines either way!
How do I prevent a soggy bottom crust?
Prevent sogginess by blind-baking the bottom crust for 10 minutes before adding filling. Sprinkle ½ cup dry breadcrumbs or diced potatoes on the bottom crust, then cover with parchment paper and weigh it down with pie weights or dried beans while baking.
What’s the secret to that perfect 1950s golden-brown crust?
The egg wash is key! Beat 1 egg with 1 tsp water and brush it on the lattice before baking. For extra shine, add ½ tsp milk to the wash. Bake at 375°F until edges are deep golden brown—this takes about 50-60 minutes.
Can I make this pie ahead of time?
Yes! Assemble the pie (unbaked) and refrigerate for up to 24 hours before baking. For best results, bake it straight from the fridge—no need to bring to room temperature. The crust will still come out flaky, and the filling will be perfectly set after cooling.

- 12 Bean Chili Recipe: Hearty Slow-Cooked Depth With 12 Legumes - October 17, 2026
- 5 Seed Bread Recipe: Nutty Crunch and Artisan Flavor in One Loaf - October 17, 2026
- 1 Lb Macaroni Salad Recipe: Bold, Crunchy, and Crowd-Pleasing - October 17, 2026