
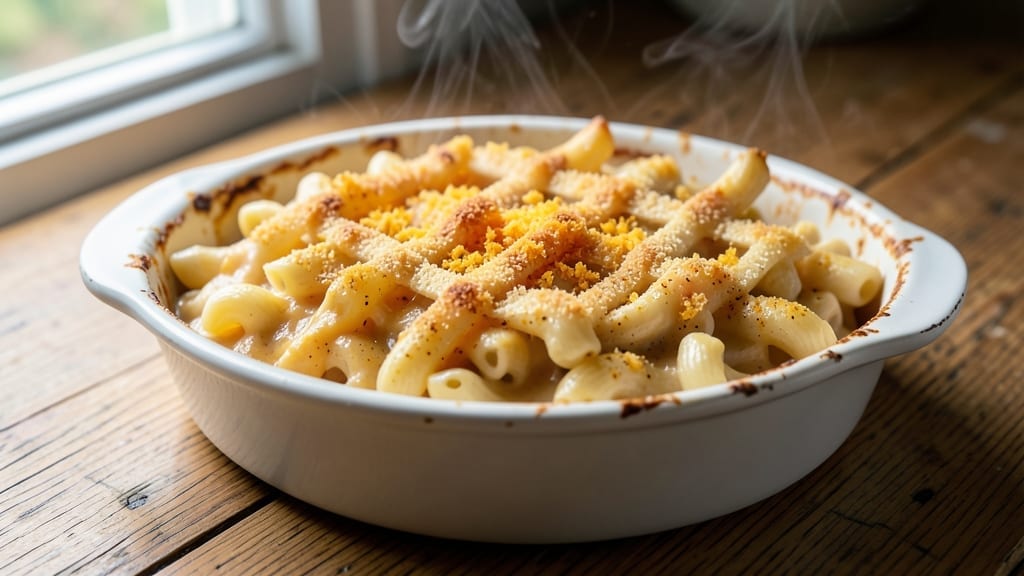
The 1950s mac and cheese recipe brings back the golden era of buttery, baked comfort food that made every dinner feel like a celebration. This classic version uses elbow macaroni, sharp cheddar, and a crispy breadcrumb topping that’s become a nostalgic staple—just like my grandmother used to make.
The slow-baked sauce creates that signature creamy, stretchy texture that’s impossible to resist.
This recipe stays true to the original techniques that made it a household favorite: boiling pasta until al dente, making a rich cheese sauce from scratch, and baking until the top turns golden and crispy. The secret to that perfect texture?
A touch of mustard powder and a splash of milk to keep the sauce smooth without curdling. It’s the kind of dish that feels like a warm hug on a chilly evening.
By the time it emerges from the oven, you’ll have a dish with tender pasta swimming in a velvety cheese sauce, topped with crispy, buttery breadcrumbs that add just the right crunch.
The aroma alone will have everyone gathering around the table, and the first bite delivers that nostalgic, comforting flavor that’s been missing from modern versions.
Serve it alongside classic 1950s sides like buttered green beans or cornbread for a meal that feels like stepping into a cozy diner from decades past. This isn’t just mac and cheese—it’s a taste of tradition, made easier for today’s kitchen. Let’s get cooking!
Ingredients for 1950s mac and cheese
Classic 1950s ingredients for that nostalgic, creamy, crispy mac and cheese magic.
| Ingredient | Amount | Notes |
|---|---|---|
| Elbow Macaroni 🍝 | 1 ½ lbs | Uncooked, standard elbow shape |
| Sharp Cheddar Cheese 🧀 | 2 cups | Shredded, aged 2+ years preferred |
| Milk 🥛 | 2 cups | Whole milk for creaminess |
| Unsalted Butter 🧈 | ½ cup | Cold, cubed for sauce |
| All-Purpose Flour 🌾 | ¼ cup | For thickening sauce |
| Mustard Powder 🌶️ | 1 tsp | Yellow mustard preferred |
| Salt 🧂 | 1 ½ tsp | Kosher salt, adjust to taste |
| White Pepper 🌶️ | ½ tsp | For classic 1950s flavor |
| Breadcrumbs 🍞 | ½ cup | Plain, dry, panko style |
| American Cheese Slices 🧀 | 4 slices | For extra stretchiness |
| Garlic Powder 🧄 | ½ tsp | For subtle depth |
| Onion Powder 🧅 | ½ tsp | For aromatic base |
| Black Pepper 🌶️ | ½ tsp | Freshly ground preferred |
| Water 💧 | 2 cups | For pasta boiling |
The cheddar makes or breaks this—sharp, aged cheddar is non-negotiable for that authentic 1950s flavor. Kraft Natural or Cabot are my go-tos, but any 2-year-aged cheddar works. The breadcrumbs? Panko-style gives you that perfect crispy topping. I always grab extra butter for the topping—Land O’Lakes or Plugrá work best for that rich, buttery flavor. For the pasta, elbow macaroni is traditional, but any short pasta shape will do. The key is cooking it just al dente so it doesn’t turn mushy when baked.
No sharp cheddar? Monterey Jack or Colby Jack in a pinch, but it won’t have the same tang. Out of breadcrumbs? Crushed cornflakes work in a bind—just toast them first for extra crunch. The American cheese slices are optional but add that signature stretchy texture. If you’re feeling fancy, swap the milk for half-and-half for extra creaminess, but whole milk is classic. The mustard powder is crucial—it keeps the sauce smooth and prevents curdling. No mustard powder? Dijon mustard at half the amount does the trick.
This dish reheats beautifully—honestly tastes better the next day. Store leftovers covered in the fridge for up to 5 days. For the crispy topping, assemble the dish ahead and refrigerate overnight—it’ll get even crunchier when baked. The cheese sauce freezes well too, just reheat it gently on the stove and add fresh breadcrumbs when baking. Double the recipe and freeze half for lazy weeknights—1950s comfort food never goes out of style.
Why You’ll Love This Recipe
- Pantry Staples Only: I swear by this recipe because it uses what’s already in my cupboard—no fancy ingredients, just elbow mac, sharp cheddar, and a splash of milk. Honestly, the only thing I measure is the flour, and even then, I eyeball it after the first time.
- Cheesy Crispy Magic: That buttery roux and sharp cheddar create a sauce so rich it clings to every noodle while still getting just crispy on the edges. Between us, the first bite makes me forget I’m even eating mac and cheese—it’s that good.
- Game Day Everyday: I make this for game nights, potlucks, or when I need a crowd-pleaser in 20 minutes. The leftovers? Even better reheated—my kids beg for it the next day, and I don’t even pretend to say no.
- Budget-Friendly Feast: Sharp cheddar stretches far, and elbow mac fills everyone up without breaking the bank. I’ll be real: this is my go-to when I’m feeding a house full of hungry people for under $10. Not the prettiest, but the taste makes up for it.
Step-by-step instructions for 1950s mac and cheese
Here’s how to make that nostalgic, crispy-topped mac and cheese your grandma would be proud of.
Cook the Elbow Macaroni to Perfect Al Dente
Bring a large pot of water to a rolling boil using the 2 cups water from your ingredients. Add a generous pinch of salt—this pasta needs flavor from the start. Toss in the 1.5 lbs elbow macaroni and cook until it’s 1 minute shy of the package directions for al dente. You want it to finish cooking in the oven, which helps it absorb that creamy sauce better.
Before draining, reserve 1 cup of pasta water—this starchy liquid is liquid gold for creating a silky sauce. Drain the pasta and return it to the pot, giving it a quick toss with a wooden spoon to break up any clumps. The pasta should be hot but not steaming when you move to the next step—this prevents the sauce from turning grainy.
Make the Classic Cheese Sauce
In a separate large bowl, combine the 2 cups sharp cheddar cheese, 2 cups milk, 0.5 cup unsalted butter, 0.25 cup all-purpose flour, 1 tsp mustard powder, 1.5 tsp salt, 0.5 tsp white pepper, 0.5 tsp garlic powder, and 0.5 tsp onion powder. The butter should be cold and cubed—this helps create those little butter pockets that make the sauce extra rich.
Mix everything together until the cheese is completely melted and the sauce is smooth. If it looks too thick, add 2-3 tablespoons of reserved pasta water to loosen it. The sauce should coat the back of a spoon but still be pourable. Here’s the thing—don’t skip the mustard powder. It might seem odd, but it cuts through the richness of the cheese and gives that authentic 1950s flavor.
Combine Pasta and Sauce
Add the hot pasta to the cheese sauce mixture and stir until every noodle is fully coated. The sauce should look glossy and cling to the macaroni. If it’s still too thick, add more pasta water 1 tablespoon at a time until it reaches a creamy consistency that coats the back of a spoon. The key here is to work quickly—you want to keep everything hot so the cheese doesn’t start to separate.
Taste the mixture and adjust the seasoning if needed. You might need a little more salt or black pepper to balance the flavors. Transfer the entire macaroni and cheese mixture to a greased 9×13-inch baking dish, spreading it out evenly. The dish should be about ¾ full—this gives room for the top to crisp up nicely.
Create the Crispy Topping
In a small bowl, mix together the 0.5 cup breadcrumbs, 0.5 tsp black pepper, and 0.5 tsp garlic powder. Sprinkle this mixture evenly over the top of the macaroni and cheese. Then, carefully place the 4 slices American cheese on top, slightly overlapping them so they create a continuous layer. This is what gives that classic crispy, stretchy top that everyone loves.
Here’s where it gets fun—pop the baking dish under the broiler for 2-3 minutes until the American cheese is deep golden brown and bubbly. Watch it closely so it doesn’t burn. The breadcrumbs should be crispy, and the cheese should have those beautiful golden-brown spots. If your oven runs hot, start checking at the 1-minute mark—every oven is different.
Bake to Melty Perfection
After broiling, reduce the oven temperature to 350°F and bake for 20-25 minutes until the edges are bubbly and the center is heated through. The macaroni and cheese should be hot all the way to the bottom of the dish—no cold spots allowed. If you’re unsure, check the temperature with an instant-read thermometer. It should read 165°F in the center.
Let the mac and cheese rest for 5 minutes before serving. This gives the cheese time to set slightly and makes it easier to slice. The result should be creamy, cheesy layers with that perfect crispy top that everyone reaches for first. Serve with a simple side salad or some steamed veggies for a complete 1950s-style meal that brings back all the cozy comfort food memories.
Pro Tips For Making 1950s Mac And Cheese
- STIR CONSTANTLY: That roux isn’t fooling anyone if you let it burn. Once you melt the butter and add the flour, keep that wooden spoon moving—no breaks, no excuses. I learned this the hard way when my first batch turned into a gray, sad paste instead of a creamy sauce.
- GRATE THE CHEESE FINE: Sharp cheddar loses its edge when it sits in clumps. Pulse it in a food processor or grate it yourself—no big chunks, no exceptions. The 1950s version was all about that smooth, velvety texture, and lumps just won’t cut it.
- SALT THE PASTA WATER: Underseasoned pasta is a crime in this dish. Use the full 1 tablespoon of salt in the boiling water—yes, even if you’re using salted butter later. The pasta needs to absorb flavor from the get-go, and you can’t fix it after draining.
- REST THE CHEESE SAUCE: Pour that hot sauce over the drained pasta? Bad move. Let it cool for 5 minutes first—just off the heat, covered. I was skeptical until I tried it; the sauce thickens properly and doesn’t turn grainy when you mix it in. (Your future self will thank you.)
Storing and reheating this 1950s mac and cheese
Refrigerator Storage
Store your 1950s mac and cheese in an airtight container with a tight-fitting lid to preserve that creamy texture. I use glass Pyrex containers because they prevent odors from seeping in and keep the dish fresh for up to 5 days in the fridge.
Let it cool completely before storing to avoid condensation, which can make the breadcrumb topping soggy. 🧊
Pro tip: If you’re planning to reheat, leave the crispy topping off and store it separately in a small container. This way, you can add fresh breadcrumbs after reheating to restore that perfect crunch. The cheese sauce actually tastes better the next day as the flavors meld together!
Freezer Storage
This dish freezes beautifully for up to 3 months if stored properly. Assemble the mac and cheese in your 9×13-inch baking dish, cover it tightly with plastic wrap pressed directly onto the surface, then seal with aluminum foil.
For individual portions, use freezer-safe containers with 1-inch headspace to prevent expansion cracks. 🧊
When ready to eat, thaw overnight in the fridge. For quick reheating, bake straight from frozen at 350°F for 30-35 minutes, adding fresh breadcrumbs and American cheese slices during the last 5 minutes to recreate that crispy topping.
The texture might be slightly denser after freezing, but the flavor remains just as nostalgic!
Oven Reheating
My preferred method for restoring that crispy texture is oven reheating. Place your refrigerated mac and cheese in a greased baking dish and cover it loosely with foil.
Bake at 350°F for 20-25 minutes until heated through to 165°F. For extra crispiness, broil for 1-2 minutes at the end and add fresh breadcrumbs. 🔥
For a shortcut, add 2-3 tablespoons of milk or water to the dish before reheating to prevent drying out. If the sauce looks too thick after reheating, stir in a splash of milk to restore that velvety consistency.
The key is patience—let it heat through gradually to avoid a rubbery texture.
Microwave Reheating
When you’re in a hurry, the microwave works in a pinch. Cover the mac and cheese with a damp paper towel and heat on 50% power for 2-3 minutes, stirring halfway.
Add 1-2 tablespoons of milk to loosen the sauce if needed. For the crispy topping, sprinkle fresh breadcrumbs on top and microwave for 30 seconds to revive the crunch. ⚡
Warning: Microwaving can make the pasta slightly mushy. To combat this, reheat only what you plan to eat immediately and serve with a side of buttered green beans or cornbread to balance the texture. The cheese sauce reheats beautifully, so don’t worry about losing that creamy goodness!
Nutrition facts
Frequently asked questions
Why does 1950s mac and cheese use elbow macaroni?
Elbow macaroni was the standard choice in the 1950s because its shape holds the creamy cheese sauce perfectly while baking. The nooks and crannies trap the sauce, creating that signature cheesy bite in every forkful. Plus, it was widely available and affordable during that era, making it a household staple.
Can I make this recipe without American cheese slices?
While American cheese gives that classic stretchy topping, you can substitute with extra sharp cheddar or Monterey Jack for a similar effect. For the crispy topping, focus on the breadcrumb layer—just add a sprinkle of paprika for color. The sauce will still be creamy and delicious without it.
What’s the secret to getting a crispy topping?
The crispy topping comes from three key steps: using panko-style breadcrumbs, broiling just until golden, and adding American cheese slices on top. Toast the breadcrumbs in a dry pan for 2 minutes before sprinkling to boost their crunch. Watch the broiler closely—it only takes 2-3 minutes to get that perfect golden-brown finish.
Can I make this mac and cheese ahead of time?
Yes! Assemble the dish up to 24 hours ahead and refrigerate uncovered. The next day, bake at 375°F for 25-30 minutes, adding fresh breadcrumbs and American cheese during the last 5 minutes for that crispy texture. The flavors actually deepen overnight, making it taste even more nostalgic.
What are the best sides to serve with this?
Classic 1950s pairings include buttered green beans, cornbread, or a simple tomato salad. For a heartier meal, add fried chicken or ham steak—just like your grandma might have served. The key is balancing the richness with something fresh and slightly acidic.

- 12 Bean Chili Recipe: Hearty Slow-Cooked Depth With 12 Legumes - October 17, 2026
- 5 Seed Bread Recipe: Nutty Crunch and Artisan Flavor in One Loaf - October 17, 2026
- 1 Lb Macaroni Salad Recipe: Bold, Crunchy, and Crowd-Pleasing - October 17, 2026