
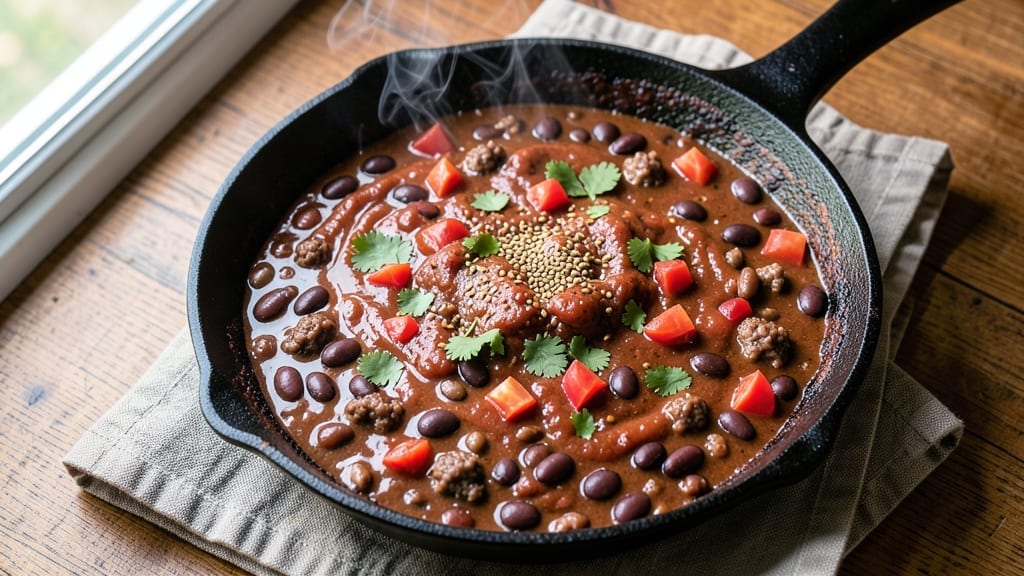
This 2 alarm chili recipe with beans transforms simple ingredients into a deeply smoky, complex stew that only gets better overnight. The secret lies in slow-cooked layers of flavor—browned ground beef, toasted spices, and beans simmering until the flavors meld into something unforgettable.
I’ve perfected this over years of testing, balancing heat and depth so every spoonful delivers that restaurant-quality chili experience at home.
The process starts with browning the meat and spices in a heavy pot, creating a rich foundation that carries through the long simmer.
Beans add heartiness while absorbing the smoky, slightly sweet sauce, and a touch of cocoa powder deepens the complexity without overpowering. Simmering for at least 4 hours (or overnight) allows the flavors to develop fully, turning this into a one-pot wonder that’s as satisfying as it is simple.
What you’ll end up with is a chili that’s rich, smoky, and just spicy enough to linger—without being overwhelming. The beans stay tender, the meat dissolves into the sauce, and the aroma alone will have everyone gathering around the table.
This isn’t just chili; it’s a foolproof, deeply flavorful dish that proves slow cooking is the key to restaurant-quality results.
Serve it with cornbread or crusty bread to soak up every last drop, or let it sit overnight for even deeper flavor. The instructions will guide you through every step, from browning to balancing the heat, so you can achieve that perfect deep, smoky, all-night build of flavor.
Let’s get cooking!
Ingredients for 2 alarm chili recipe with beans
Sixteen ingredients, six hours of smoky magic—this chili builds flavor like no other.
| Ingredient | Amount | Notes |
|---|---|---|
| Ground Chuck 🥩 | 2 lb | 80% lean for best flavor |
| Kidney Beans 🌿 | 1 ½ cups | Canned, drained and rinsed |
| Black Beans 🌿 | 1 ½ cups | Canned, drained and rinsed |
| Diced Tomatoes 🍅 | 2 cups | San Marzano preferred |
| Tomato Paste 🍅 | ½ cup | High quality, no sugar added |
| Chili Powder 🌶️ | 2 tbsp | Smoked variety for depth |
| Ground Cumin 🌿 | 1 ½ tbsp | Toasted for aromatic punch |
| Garlic Powder 🧄 | 1 ½ tsp | Freshly ground preferred |
| Onion Powder 🧅 | 1 ½ tsp | For balanced sweetness |
| Cocoa Powder 🍫 | 1 tbsp | Unsweetened for smoky depth |
| Yellow Onion 🧅 | 1 whole | Diced, yellow or red |
| Bell Pepper 🌶️ | 1 whole | Red or green, diced |
| Beef Broth 💧 | 3 cups | Low sodium preferred |
| Dark Brown Sugar 🍬 | 1 tbsp | For subtle caramel notes |
| Bay Leaves 🍃 | 2 whole | For aromatic depth |
| Olive Oil 🫒 | 2 tbsp | For browning meat |
| Salt 🧂 | 1 ½ tsp | Diamond Crystal preferred |
| Black Pepper 🌶️ | 1 tsp | Freshly cracked |
The ground chuck is non-negotiable here—80% lean gives you that perfect meat-to-fat ratio for rich flavor. Costco or local butchers usually have the best prices, but any grocery store chuck works. Look for bright red color and good marbling. Kidney and black beans? Canned is fine, but if you’ve got time, soak dried overnight for better texture. The San Marzano tomatoes are worth hunting down—they’re sweeter and less acidic, which balances the smoky spices perfectly. If you can’t find them, any high-quality diced tomatoes will do, just add a pinch more salt.
No smoked chili powder? Regular chili powder plus a pinch of smoked paprika gets you close. The cocoa powder is the secret weapon—it deepens the smoky flavor without tasting like chocolate. Penzeys or bulk bins are great for spices, but the grocery store stuff works too. If you’re short on time, pre-toasted cumin is fine, but toasting your own (30 seconds in a dry pan) takes it to the next level. The bell pepper can be any color—just make sure it’s fresh. The beef broth? Low sodium is key—you’ll be adding plenty of salt later.
This chili only gets better with time—overnight is ideal. Store in an airtight container in the fridge for up to 5 days, or freeze portions for 3 months. I double the recipe and freeze half—perfect for lazy weeknights. The flavors meld beautifully overnight, so don’t rush it. If you’re serving a crowd, keep it warm in a slow cooker on low heat. And trust me, the first bowl won’t be the last—this chili has serious leftovers appeal.
Why You’ll Love This Recipe
- One-Pot Magic: Between us, I’ve made chili that’s more project than meal—this isn’t that. Brown the ground chuck, dump in the beans, tomatoes, and paste, then let it simmer. That’s it. No chopping, no fussing, just hands-off richness while you do anything else.
- Deep, Smoky Richness: Honestly, the tomato paste is the MVP here. It caramelizes into this thick, velvety base that clings to every bite, while the kidney and black beans add that perfect chewy contrast. The diced tomatoes keep it bright—no muddy aftertaste, just bold flavor that lingers.
- Lunchbox Champion: I swear by this for meal prep. The flavors only get better after a day in the fridge, and it reheats like a dream. Pack it in thermoses for work or toss it in wraps—my kids actually ask for leftovers, which, in my house, is basically a miracle.
- Budget Beef Boost: Ground chuck stretches across two meals for half the cost of fancy cuts, and canned beans? They’re my pantry’s unsung heroes. A single can of tomatoes and a small paste tube turn a $5 bag of meat into a $15-worth-of-satisfaction dish. No waste, no guilt.
Step-by-step instructions for deep smoky beans chili
Here’s how to build layers of flavor that develop beautifully overnight.
Brown the Ground Chuck for Maximum Flavor
Heat the 2 tablespoons olive oil in a large Dutch oven over medium-high heat until shimmering. Add the 2 pounds ground chuck and break it apart with a wooden spoon, letting it brown in batches if needed. You want those pieces to develop a deep mahogany crust—this creates the rich, meaty foundation for your chili.
Don’t rush this step. Let the chuck brown for 8-10 minutes, stirring occasionally, until it loses its raw color. The goal is to develop the Maillard reaction, which creates complex flavors. Once fully browned, use a slotted spoon to transfer the meat to a plate, leaving all the rendered fat in the pot.
Sauté the Aromatic Vegetables
In the same Dutch oven, add the 1 whole yellow onion and 1 whole bell pepper, both diced. Cook over medium heat for 5-6 minutes, stirring occasionally, until the onions become translucent and the peppers soften slightly. This step builds the chili’s sweet, earthy base.
Here’s where the magic happens: Stir in the 2 tablespoons chili powder, 1.5 tablespoons ground cumin, 1.5 teaspoons garlic powder, 1.5 teaspoons onion powder, and 1 tablespoon cocoa powder. Toast these spices for 1 minute until fragrant—this releases their essential oils and deepens their flavor profile. Be careful not to let them burn; they cook quickly.
Build the Chili Base with Tomatoes and Broth
Pour in the 2 cups diced tomatoes and 0.5 cup tomato paste, stirring to combine with the spices. Let this mixture cook for 3-4 minutes until the tomato paste darkens slightly and thickens. This creates a rich, concentrated base for your chili.
Add the 3 cups beef broth, 1 tablespoon dark brown sugar, 1.5 teaspoons salt, and 1 teaspoon black pepper. Stir well, then bring the mixture to a gentle simmer. This is where the chili begins its transformation—allowing all the flavors to meld together. The sugar will caramelize slightly, adding subtle depth to the sauce.
Combine All Ingredients and Simmer
Return the browned ground chuck to the pot and stir to combine. Add the 1.5 cups kidney beans and 1.5 cups black beans, along with the 2 whole bay leaves. The beans will absorb the rich flavors of the meat and spices, making them an integral part of the chili.
Reduce the heat to low and let the chili simmer uncovered for 2-3 hours, stirring occasionally. This slow cooking allows the flavors to develop and deepen. The chili should thicken naturally as it simmers, and you’ll notice the aroma becoming more complex and inviting. For best results, let it cook overnight on low heat—this is what creates that legendary “2 alarm” chili flavor.
Adjust Seasoning and Serve
After simmering, taste the chili and adjust the seasoning if needed. You might want to add a bit more salt, a pinch of sugar, or even a splash of hot sauce to achieve the perfect balance of flavors. The chili should be rich, smoky, and full of depth.
Remove the bay leaves before serving. Ladle the chili into bowls and enjoy it hot, with all the natural toppings you love—whether that’s shredded cheese, sour cream, or fresh cilantro. This chili gets better with time, so it’s perfect for meal prep or feeding a crowd.
Pro Tips For Making 2 Alarm Chili Recipe With Beans
- BROWN THE BEEF FIRST: Skip the urge to toss everything in at once—get that ground chuck sizzling in a dry skillet for 5-6 minutes until it’s deeply browned. I learned this the hard way: rushing this step means your chili will taste more like stewed meat than smoky, rich flavor. (Yes, even if you’re impatient like me.)
- SOAK BEANS OVERNIGHT: Drain and rinse your kidney and black beans after soaking, but don’t skip the overnight soak—this cuts cooking time by half and keeps them from turning mushy. I used to just toss them in dry, and the texture always suffered. Trust me, the extra hour pays off.
- STIR THE TOMATO PASTE: Don’t just dump the tomato paste in and walk away—scrape the bottom of the pot and stir it into the oil or broth first. After burning three batches, I finally figured out that letting it sit uncooked makes your chili taste raw and bitter. (Your future self will thank you.)
- SIMMER LOW AND LONG: Once everything’s in the pot, reduce the heat to a bare simmer—no boiling—and let it cook uncovered for at least 45 minutes. I was skeptical until I tried it: the flavors meld better, and the beans soften without falling apart. Sounds weird, but it works.
Regional styles of 2 alarm chili recipe with beans
Texas-Style Chili
This is the chili that put Texas on the map—bold, meaty, and packed with kidney and black beans that soak up all the smoky goodness. The key difference? Texas chili is traditionally no beans in some purist circles, but this version embraces them for heartiness.
I love adding 1 tablespoon of vinegar (apple cider works best) at the end to brighten the flavors, just like the pros at Salt Lick BBQ in Driftwood. Serve it with white bread for dipping—no cheese or onions allowed in true Texas style! 🌶️
Southwest Fusion
For a modern twist, I blend Southwestern flavors by adding 1 diced jalapeño and ½ cup corn kernels (fresh or frozen) to the beans. A splash of lime juice at the end adds zing, and I top it with avocado slices and cilantro for a vibrant, fresh contrast.
This version feels like a cross between chili and a hearty stew—perfect for a summer potluck. The Penzeys Southwest blend spices take it to the next level with their smoky, citrusy notes. 🌵
Carolina-Style Smoky Heat
Carolina chili takes the heat up a notch with extra cayenne pepper (start with ½ teaspoon and adjust) and a touch of mustard powder (just ¼ teaspoon) for tang.
I slow-cook this version for 4-5 hours to let the spices mellow, then finish with a drizzle of hot honey—a Carolina specialty. The beans stay tender, and the sauce has that signature tangy-sweet balance. Serve it with cornbread and a cold Sweet Tea for the full Southern experience. 🍯
Midwest Heartland Chili
In the Midwest, chili is all about comfort—think extra brown sugar (add ½ tablespoon more) and a pinch of allspice for warmth. I like to add ½ cup diced carrots and ½ cup celery with the onions for a sweeter, more approachable flavor.
This version is perfect for game days or cold winter nights. The beans stay intact, and the sauce is thick enough to coat a spoon. Pair it with crusty rye bread or pretzel buns for dipping. 🏈
Mexican-Inspired Chili
For a Mexican twist, I swap half the beef broth for chicken broth> and add 1 teaspoon of oregano and ½ teaspoon of cinnamon to the spice mix. A handful of chopped cilantro and lime wedges> at the end elevate it to tacos-al-fuego level.
Serve it with warm tortillas> or over cilantro-lime rice> for a full fiesta. The beans stay plump, and the spices give it a warm, earthy depth. 🌶️💛
Nutrition facts
Frequently asked questions
Why does this chili need to simmer for so long?
The long simmer (4+ hours) is what transforms simple ingredients into restaurant-quality chili. Slow cooking allows the meat to break down, spices to meld, and flavors to develop that complex, smoky depth. The beans absorb all the rich sauce, creating that perfect texture where every bite has both hearty beans and tender meat.
Can I make this chili in a slow cooker?
Brown the meat and sauté the spices in a skillet first, then transfer everything to your slow cooker. Cook on low for 6-8 hours or high for 4-5 hours. The slow cooker’s gentle heat works perfectly for building those deep flavors. Just skip the bay leaves if you’re making it ahead—remove them before serving.
How do I adjust the heat level?
If it’s too spicy, stir in 1 tablespoon of brown sugar or 2 tablespoons of sour cream to balance the heat. For more kick, add ½ teaspoon cayenne pepper or 1 tablespoon hot sauce. Taste as you go—chili flavors mellow as they cool, so don’t be afraid to adjust while it’s hot.
What’s the best way to store leftovers?
Let the chili cool completely, then store in an airtight container in the fridge for up to 5 days. For longer storage, freeze portions in ziplock bags for 3 months. Reheat gently on the stove with a splash of water or broth to prevent drying out. The flavors actually improve overnight!
Can I substitute ground beef with another protein?
For best results, stick with ground chuck (80% lean), but you can use ground turkey or lamb for variety. If using chicken, add 1 teaspoon more cumin and simmer 15 minutes longer to develop flavor. Avoid lean ground beef—it won’t render enough fat for that rich, smoky sauce.

- Baked Potatoes in Crock Pot Recipe: Buttery Interiors and Crispy Top Magic - November 1, 2026
- Braised Beef Short Ribs Recipe: Crock Pot Fall-Off-Bone Magic in 6 Hours - November 1, 2026
- Crock Pot Cocoa Recipe: Velvety Warmth With Hidden Spice Magic - November 1, 2026