
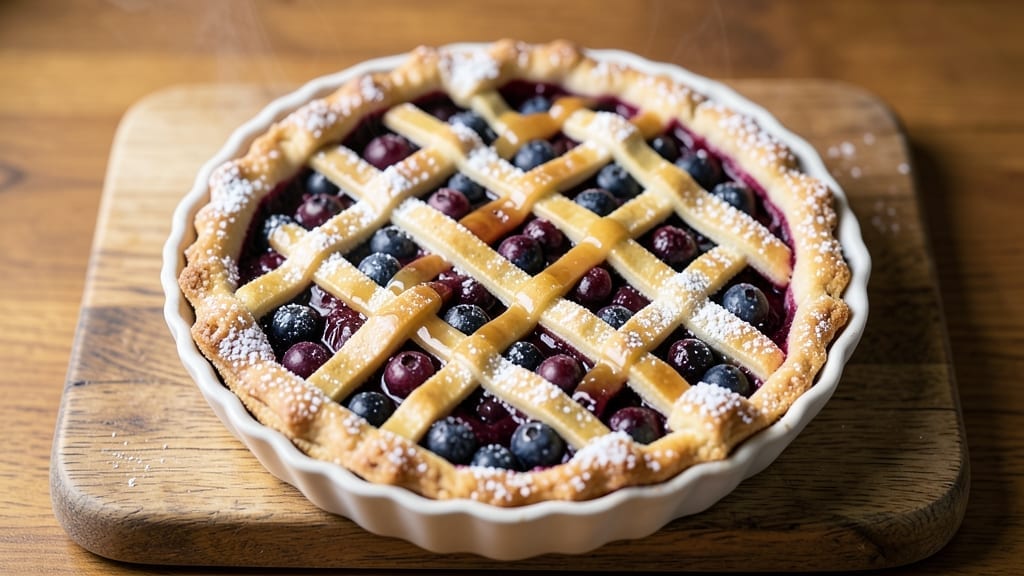
A 2-crust blueberry pie delivers the perfect balance of juicy, sweet-tart berries encased in layers of buttery, flaky pastry. The secret lies in a thickened filling that stays luscious yet holds its shape, while the lattice top ensures crisp edges and golden-brown crust.
I’ve perfected this recipe over years of summer baking, ensuring every slice delivers that first burst of blueberry flavor through the flaky layers.
This recipe starts with a foolproof pie crust that’s rolled out just thick enough to hold its shape during baking, yet still yields that signature flakiness. The filling combines fresh blueberries with a sugar balance that enhances their natural sweetness without overpowering it, while cornstarch creates that perfect thickened consistency.
What sets this apart is the double-crust design with a lattice top—it creates stunning visual appeal while allowing steam to escape, preventing a soggy bottom.
By the time it emerges from the oven, you’ll have a pie with a golden, crackly crust surrounding a filling that’s just thick enough to hold its shape when sliced, yet still juicy enough to make each bite worth savoring.
The aroma alone will have everyone gathering in the kitchen, and the contrast of warm crust with cool, tangy berries creates an experience that rivals any bakery version. This is the kind of pie that becomes an annual tradition.
The best part? This recipe scales beautifully for gatherings while still working perfectly for a single serving. Serve it warm with vanilla ice cream or whipped cream for the ultimate dessert experience. Let’s get baking—your taste buds will thank you.
Ingredients for 2 crust blueberry pie
Juicy blueberries meet buttery crust perfection—these ingredients transform summer’s best fruit into a showstopping dessert everyone will beg for seconds of.
| Ingredient | Amount | Notes |
|---|---|---|
| Fresh Blueberries 🫐 | 5 cups | Washed and dried thoroughly |
| Granulated Sugar 🍚 | 1 ½ cups | Light brown sugar for depth |
| All-Purpose Flour 🌾 | ½ cup | For thickening filling |
| Cornstarch 🌾 | ¼ cup | Essential for perfect texture |
| Lemon Juice 🍋 | 2 tbsp | Freshly squeezed for brightness |
| Unsalted Butter 🧈 | 1 cup | Cold, cubed for crust |
| All-Purpose Flour 🌾 | 2 ½ cups | Plus 1 tbsp for rolling |
| Kosher Salt 🧂 | ½ tsp | Fine grain preferred |
| Ice Water 💧 | ½ cup | For pie crust binding |
| Vanilla Extract 🌸 | 1 tsp | Pure for authentic flavor |
| Egg 🥚 | 1 whole | For egg wash |
| Granulated Sugar 🍚 | 1 tbsp | For egg wash |
Blueberries are the star, so pick the freshest, firmest berries you can find—those plump, deep purple ones at Whole Foods or local farmers markets make all the difference. If you’re using frozen, thaw them first and pat completely dry to avoid a soggy filling. The sugar balance is key: light brown sugar adds caramel depth while keeping the filling from being cloyingly sweet. For the crust, butter should be cold and cubed—this ensures maximum flakiness. I always use King Arthur flour for pie crusts because it holds up better to rolling and baking, but any all-purpose will work in a pinch.
No fresh blueberries? Frozen works perfectly—just don’t thaw them until you’re ready to use. Running short on brown sugar? White sugar plus 1 tsp molasses gives that same rich flavor. The cornstarch is non-negotiable for that perfect thickened consistency—it prevents a runny filling while keeping it juicy. For the crust, substitute shortening for half the butter if you want extra flakiness, though it won’t be quite as flavorful. And if you’re feeling fancy, add 1 tsp lemon zest to the filling for an extra bright pop of flavor that pairs beautifully with the berries.
This pie keeps beautifully—3-4 days at room temperature wrapped tightly in plastic, or up to 3 months in the freezer for those lazy summer days. I always make two pies when company’s coming over—one for today, one for tomorrow. The crust stays crisp for days if you store it properly. For reheating, 350°F for 10-15 minutes brings back all that golden flakiness. And trust me, the aroma alone will have everyone gathering in the kitchen while it warms up.
Why You’ll Love This Recipe
- No-Fuss Assembly: I swear, this pie comes together faster than you can hum “Sweet Caroline.” Toss those blueberries in sugar and cornstarch—no fancy layering, no stress—just dump, fold, and bake. The crusts go on like wrapping paper, and honestly? The hardest part is waiting for it to cool.
- Tart-Sweet Magic: That lemon juice isn’t just for show—it cuts through the sugar and makes every bite sing. The blueberries stay juicy but not mushy, and the crust? Buttery perfection with that crispy edge you crave. One slice and you’ll understand why I keep making it.
- Weekend or Weeknight: Between us, this pie shines at brunch with mimosas or as a dessert after a casual dinner. I’ve served it at potlucks where it disappears in 20 minutes, and it’s just as welcome on a lazy Sunday as it is when I’m feeding a crowd. No occasion feels too small—or too fancy—for this.
Step-by-step instructions for 2-Crust blueberry pie
Here’s how to create that perfect balance of luscious blueberry filling and irresistibly flaky crust.
Prepare the Blueberry Filling
In a large bowl, combine the 5 cups fresh blueberries with the 1.5 cups granulated sugar, 0.5 cup all-purpose flour, 0.25 cup cornstarch, 2 tbsp lemon juice, and 1 tsp vanilla extract. Gently stir until the sugar dissolves and the cornstarch blends evenly. This mixture should coat the back of a spoon—if it’s too thick, add 1-2 tablespoons ice water to loosen it.
Let the filling sit for 10 minutes at room temperature while you work on the crust. This resting period allows the blueberries to release their juices and creates a more cohesive filling. You’ll notice the mixture will thicken slightly as the cornstarch activates—this is exactly what we want for that perfect pie texture.
Make the Pie Crust Dough
In a large mixing bowl, combine the 2.5 cups all-purpose flour with the 0.5 tsp kosher salt. Cut in the 1 cup unsalted butter using a pastry cutter or your fingers until the mixture resembles coarse crumbs with pea-sized butter pieces. This texture is crucial for creating those flaky layers.
Gradually add the 0.5 cup ice water, 1 tablespoon at a time, mixing gently with a fork until the dough just comes together. Be careful not to overmix—you want to handle it as little as possible to avoid developing gluten. Once combined, turn the dough onto a lightly floured surface and divide it into two equal portions.
Roll and Assemble the Crusts
Working with one portion at a time, roll the dough into a 12-inch circle on a floured surface, about ⅛-inch thick. Transfer it to a 9-inch pie dish, gently pressing it into the bottom and up the sides. Trim any excess dough hanging over the edge. Repeat with the second portion to create the top crust.
Here’s the secret to that perfect lattice pattern: Cut the top crust into 12 strips, about 1-inch wide. Arrange 6 strips horizontally across the pie, spacing them about ½-inch apart. Fold back every other strip and lay the remaining strips perpendicular, then unfold the folded strips to create the classic lattice design. This allows steam to escape while keeping the filling juicy.
Fill and Bake the Pie
Pour the blueberry filling into the bottom crust, spreading it evenly. Brush the edges of the bottom crust with the 1 whole egg beaten with 1 tablespoon granulated sugar for that beautiful golden finish. Place the lattice top crust over the filling, pressing gently to seal.
Brush the top crust with the remaining egg wash. Bake in a preheated 375°F oven for 50-55 minutes, until the crust is deep golden brown and the filling is bubbling. The edges should be crisp, and you should see the lattice pattern clearly defined. If the crust browns too quickly, tent it loosely with foil after 30 minutes to prevent burning.
Cool and Serve
Remove the pie from the oven and let it cool on a wire rack for 2 hours. This resting period is crucial—it allows the filling to set properly and prevents a soggy crust. The pie will look perfect with its golden crust and juicy blueberries peeking through the lattice.
Slice and serve warm with a scoop of vanilla ice cream or whipped cream. The contrast of the warm pie with cold ice cream creates an experience that’s simply irresistible. Each bite should deliver that perfect combination of flaky crust and bursting blueberry juice—just as promised!
Pro Tips For Making 2 Crust Blueberry Pie
- Prep Berries First: Toss blueberries with 2 tablespoons sugar and 1 tablespoon cornstarch before baking—this prevents a watery filling later. I learned this the hard way after slicing into a pie that looked more like soup than dessert.
- Blind-Bake the Bottom: Weigh down the bottom crust with pie weights or dried beans for 15 minutes at 375°F before adding filling—this stops soggy bottoms. Yes, it’s an extra step, but your crust will thank you.
- Skip the Overmixing: Stir the filling just until combined—lumpy is better than tough. Cornstarch and flour thicken best when they’re not overworked, and you’ll avoid a gluey texture.
- Vent the Top Crust: Cut 4-5 steam vents in the top crust right before baking—this releases trapped air and prevents a puffed, uneven finish. I used to skip this and ended up with a lopsided pie every time.
Flavor customization for 2 crust blueberry pie
Sweet-Tart Balance
Blueberries are naturally tart, so I balance them with 1.5 cups granulated sugar—about 3 tablespoons per cup of berries. For deeper flavor, swap ½ cup for light brown sugar.
If your berries are extra sweet, reduce sugar to 1.25 cups and add 1 teaspoon lemon zest to brighten the filling. 🍯
Spiced Variations
Add warmth with ½ teaspoon cinnamon or ¼ teaspoon nutmeg to the filling for a cozy twist. For a boozy kick, stir in 1 tablespoon bourbon or brandy with the vanilla extract.
I love a star anise-infused touch—simmer 1 star anise pod in the filling for 5 minutes, then remove it before baking.
Crust Enhancements
For extra flakiness, replace 2 tablespoons butter with 2 tablespoons shortening in the crust. Add 1 tablespoon cornmeal to the flour for a nutty depth. A pinch of cayenne in the crust gives subtle heat that pairs beautifully with the berries. 🌶️
Topping Ideas
Skip the lattice for a crumbled oat streusel—mix ½ cup oats, ¼ cup flour, ¼ cup brown sugar, and 2 tablespoons cold butter. Press onto the top crust before baking. For a rustic look, use thinly sliced almonds or pecans on top of the lattice.
Filling Thickener Swaps
Swap cornstarch for ½ cup tapioca starch for a glossier finish or 2 tablespoons arrowroot powder for a lighter texture. For a gluten-free option, use ½ cup gluten-free flour blend plus 2 tablespoons cornstarch. Always adjust liquid as needed—these thickeners behave differently!
Seasonal Twists
In summer, add fresh mint leaves (finely chopped) to the filling for a refreshing contrast. For fall, stir in diced apples or pears with the blueberries. Winter calls for warm spices—try ½ teaspoon cardamom or orange zest for a festive touch. ✨
Nutrition facts
Frequently asked questions
Can I use frozen blueberries instead of fresh?
Yes! Frozen blueberries work perfectly—just thaw them first and pat completely dry to prevent a soggy filling. Use the same 5 cups measurement, but you may need to add 1-2 extra tablespoons cornstarch since frozen berries release more moisture during baking.
Why does my blueberry pie filling get watery?
This usually happens when the cornstarch isn’t properly blended or the filling isn’t thickened enough. Make sure to mix the cornstarch thoroughly with the flour before adding to the berries, and always let the filling rest for 10 minutes before baking—this gives the thickeners time to activate.
How do I prevent a soggy bottom crust?
The secret is baking the bottom crust alone first! Blind-bake it at 375°F for 10 minutes with pie weights or dried beans before adding the filling. This creates a sturdy base that won’t absorb moisture from the juicy blueberries.
Can I make this pie ahead of time?
This pie actually tastes better the next day. Assemble it completely (including the lattice top) and refrigerate for up to 24 hours before baking. For longer storage, freeze the unbaked pie (wrapped tightly) for up to 3 months—just add 10-15 minutes to baking time when thawed.
What’s the best way to slice a lattice crust?
Use a sharp knife and go slow! Cut straight down through the lattice strips without twisting—this prevents tearing the delicate design. For cleaner slices, dip the knife in hot water between cuts. Each slice should show off that beautiful golden lattice pattern while keeping the filling intact.

- Pea Soup Instant Pot Recipe: Velvety Green Smoothness in 20 Minutes - November 1, 2026
- Pork Loin Pulled Pork Crock Pot Recipe: Slow-Smoked Tenderness With Zero Dryness - November 1, 2026
- Baked Potatoes in Crock Pot Recipe: Buttery Interiors and Crispy Top Magic - November 1, 2026