
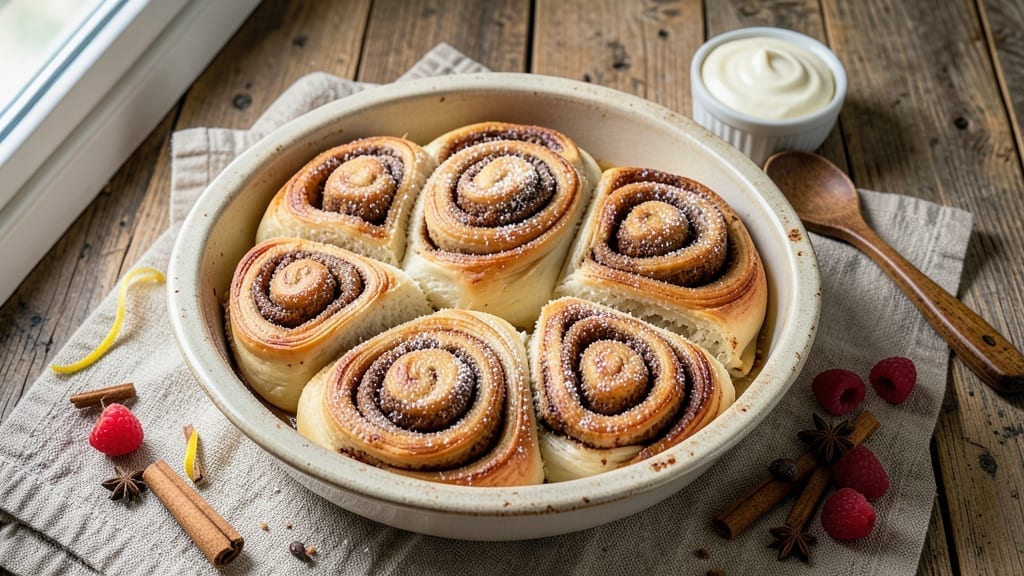
This 2-day cinnamon roll recipe transforms a weekend project into a showstopping breakfast with pull-apart softness and velvety cream cheese frosting. The secret lies in slow fermentation—letting the dough work its magic overnight for deeper flavor and tender crumb.
I’ve perfected this method after years of trial and error, ensuring every bite delivers that perfect balance of buttery dough, spiced filling, and sweet frosting.
The Day 1 process is where the magic begins: mixing a rich yeast dough, kneading until silky, and letting it proof slowly in the fridge. This chilled rise prevents overproofing and develops gluten for that signature tender yet sturdy texture.
By morning, your dough will be ready for rolling, filling, and cutting—no rushed morning prep required. The cinnamon-sugar butter mixture gets tucked between layers, creating pockets of gooey sweetness that bake into perfection.
On Day 2, you’ll roll, cut, and proof the dough again before baking to a golden brown. The cream cheese frosting—thick, tangy, and just sweet enough—ties everything together.
What you’ll end up with is a tray of restaurant-quality cinnamon rolls that disappear faster than you can say “second cup of coffee.” These aren’t just rolls; they’re a weekend tradition worth repeating.
Pair them with a bold cup of coffee or warm milk for the ultimate brunch experience. The 2-day method ensures you’re not stuck in the kitchen on a Saturday morning, and the results? Worth every minute of wait. Let’s get started on creating your perfect batch.
Ingredients for 2 day cinnamon roll
Weekend magic starts with these 14 ingredients—flour, butter, and a little patience.
| Ingredient | Amount | Notes |
|---|---|---|
| All-Purpose Flour 🌾 | 5 cups | Plus 1 cup for rolling (spooned & leveled) |
| Granulated Sugar 🍚 | ¼ cup | For dough (plus extra for filling) |
| Active Dry Yeast 🍞 | ¼ oz | 1 packet (2 1/4 tsp) |
| Unsalted Butter 🧈 | ¾ cup | Cold, cubed (for dough) |
| Large Eggs 🥚 | 2 whole | Room temperature |
| Whole Milk 🥛 | ¾ cup | Warmed to 110°F |
| Salt 🧂 | ½ tsp | Fine sea salt |
| Cinnamon 🌶️ | ½ cup | Ground, for filling |
| Light Brown Sugar 🍚 | ½ cup | Packed, for filling |
| Unsalted Butter 🧈 | ½ cup | Melted, for filling (softened) |
| Cream Cheese 🧀 | 8 oz | Room temperature (for frosting) |
| Powdered Sugar 🍚 | 3 cups | For frosting (sifted) |
| Vanilla Extract 🌿 | 1 tsp | Pure, for frosting |
| Heavy Whipping Cream 🥛 | ¼ cup | Cold, for frosting |
The flour is non-negotiable here—King Arthur or Gold Medal are my go-tos for that perfect tender crumb. King Arthur has a higher protein content, which gives you that signature pull-apart texture, but Gold Medal works too if that’s what you’ve got. For the butter, Plugrá or Land O’Lakes are reliable, but European-style butter like President or Kerrygold will take these to the next level. The yeast? Fresh is best—check the date on that packet. If it’s over 3 months old, toss it. And for the milk, warm it to 110°F (like baby bath water) to activate the yeast without killing it. Trust me on this one—lukewarm milk is the difference between fluffy dough and sad, flat rolls.
No cream cheese? Substitute with a mix of sour cream and butter—same tangy richness. Running low on brown sugar? White sugar plus a pinch of molasses works in a pinch. The cinnamon can be swapped for pumpkin pie spice if you’re feeling festive, but classic cinnamon is the star here. For the frosting, if you can’t find powdered sugar, blend granulated sugar in a food processor—it’s not ideal, but it’ll get the job done. And if you’re making these ahead, freeze the unbaked rolls (before the second proof) for up to 3 months. Just thaw overnight in the fridge before baking. The dough can also be refrigerated for up to 24 hours between Day 1 and Day 2 if you need to pause.
The dough keeps best in the fridge between steps—cover tightly with plastic wrap to prevent drying. The unbaked rolls can sit overnight in the fridge before baking, which actually enhances the flavor. For the frosting, mix it up the day of serving—it thickens as it sits, and you want that perfect spreadable consistency. These rolls reheat beautifully—350°F for 5-10 minutes revives that gooey goodness. And if you’re ambitious, make a double batch—they freeze beautifully for last-minute breakfasts. Just wrap them individually in plastic wrap, then in foil, and they’ll stay fresh for up to 3 months.
Why You’ll Love This Recipe
- No-Knead Magic: I swear by this dough—just mix, cover, and let the yeast do the work while you sleep. The butter gets folded in like a dream, and by morning, you’ve got pillowy layers without a single sweat.
- Warm Spice Bomb: That first bite? Pure cinnamon-sugar bliss with a buttery crust that cracks just enough to let the filling ooze out. Honestly, the sugar and butter combo in the dough makes these taste like a bakery’s secret.
- Weekend Prep, All Week Payoff: Make the dough on Friday, bake on Sunday, and reheat for breakfast all week. Between us, my kids’ school lunches just got 10x cooler—and I’m not even kidding.
- Pantry Staple Power: Flour, sugar, yeast, butter, eggs—you’re probably already stocked. I’ve made these for under $10 a batch, and they’re the kind of treat that makes even a simple dinner feel special.
Step-by-step instructions for homemade cinnamon rolls
Let’s make these pull-apart soft rolls with a gooey cinnamon center and dreamy cream cheese frosting!
Mix the Dough and Let It Rise
In a large bowl, combine the 5 cups all-purpose flour, 0.25 cup granulated sugar, 0.5 teaspoon salt, and 0.25 ounce active dry yeast. Mix well to distribute the yeast evenly. Add the 0.75 cup cold cubed unsalted butter and cut it into the flour mixture using a pastry cutter or your fingers until the mixture resembles coarse crumbs.
Make a well in the center and pour in the 2 large eggs and 0.75 cup warmed whole milk (about 110°F). Mix with a wooden spoon until the dough comes together. Knead the dough on a lightly floured surface for about 8-10 minutes until smooth and elastic. This step develops the gluten, which gives your rolls that perfect soft texture.
Place the dough in a lightly greased bowl, cover it with a damp kitchen towel, and let it rise in a warm place for 1-2 hours, or until it has doubled in size. You’ll know it’s ready when the dough puffs up and leaves an indentation when gently pressed with your finger. Patience here ensures fluffy, airy rolls!
Prepare the Cinnamon Filling and Roll Out the Dough
While the dough rises, prepare the cinnamon filling by mixing 0.5 cup light brown sugar, 0.5 cup ground cinnamon, and 0.5 cup melted unsalted butter in a small bowl until well combined. This mixture is what makes these rolls irresistible!
Once the dough has risen, punch it down to release any air bubbles and roll it out on a lightly floured surface into a 12×18-inch rectangle, about 1/8-inch thick. This is where the fun begins—spread the cinnamon mixture evenly over the dough, leaving a 1-inch border around the edges. This border keeps the filling contained and prevents it from leaking out.
Starting from the long side, tightly roll the dough into a log. Use a sharp knife to cut the log into 12 equal pieces. Place each piece in a greased 9×13-inch baking dish, leaving a little space between them. They’ll puff up as they bake, so don’t crowd them. Cover the dish with a damp towel and let the rolls rise for another 30-45 minutes until they’ve grown noticeably.
Bake to Golden Perfection
Preheat your oven to 350°F. Bake the cinnamon rolls for 25-30 minutes, or until they are golden brown on top and the edges are set. The rolls are done when they pull away slightly from the sides of the baking dish and smell like pure cinnamon heaven. If you poke one gently with a toothpick, it should come out clean.
Let the rolls cool in the baking dish for 10 minutes before transferring them to a wire rack. This resting period allows the filling to set slightly, making it easier to slice and serve. The aroma filling your kitchen right now? That’s the smell of success!
Make the Cream Cheese Frosting
While the rolls are cooling, make the frosting by beating the 8 ounces room temperature cream cheese with an electric mixer until smooth. Gradually add the 3 cups powdered sugar and mix until fully incorporated. Add the 1 teaspoon vanilla extract and 0.25 cup cold heavy whipping cream, mixing until light and fluffy. This frosting is the star of the show—creamy, sweet, and perfectly balanced with the spiced rolls.
Once the rolls have cooled slightly, spread the frosting evenly over the top and sides. For that classic look, use a spatula to create a swirl pattern. Serve immediately while the frosting is still soft and spreadable. These rolls are best enjoyed fresh out of the oven, straight from the pan!
Pro Tips For Making 2 Day Cinnamon Roll
- Chill the Dough Properly: After the first rise, refrigerate the dough for at least 12 hours—not just a few. I used to rush this and end up with dense rolls; the slow fermentation in the fridge develops flavor and makes rolling out the dough way easier. (Yes, even if you’re impatient like me.)
- Use Cold Butter for Filling: Take the butter for the cinnamon-sugar mix straight from the fridge—cold, but not rock-hard. It’ll spread evenly when you roll it in, and the rolls stay flaky instead of turning greasy. If it’s too soft, pop it in the freezer for 10 minutes first.
- Don’t Overfill the Rolls: Less is more here. Pack the cinnamon-sugar-butter mix lightly—think 1-2 teaspoons per roll, not a heaping spoonful. Overfilling makes them gummy and messy when baking, and trust me, you don’t want to deal with that.
- Proof Rolls at Room Temp: Take the shaped rolls out of the fridge and let them proof at room temperature for 45-60 minutes—not in a warm oven. This ensures even rising without overproofing, which collapses the structure. Skip the oven unless you’re in a hurry, and even then, watch them closely.
Dietary considerations for this dish
Gluten-Free Adaptation
For a gluten-free version, swap the all-purpose flour with a 1:1 gluten-free baking flour blend like King Arthur Measure for Measure or Bob’s Red Mill. Add 1 teaspoon xanthan gum to help bind the dough—this is non-negotiable for that signature pull-apart texture.
The dough will be stickier, so use a silicon baking mat instead of flouring your surface. Reduce the milk to 0.5 cup and add 1 extra tablespoon of melted butter to compensate for the drier blend.
Proofing times may extend by 30-45 minutes, so keep an eye on it! 🌾
Dairy-Free Options
Skip the butter in the dough and use coconut oil instead—it adds richness without dairy. For the filling, melt ½ cup coconut oil or vegan butter like Miyoko’s and mix with the cinnamon-sugar.
The frosting becomes dairy-free by using vegan cream cheese (like Kite Hill) and coconut cream instead of heavy whipping cream. The texture will be slightly lighter, but still delicious with a tangy kick!
Lower Sugar Swaps
Cut sugar by 30% in the dough and replace ¼ cup granulated sugar with unsweetened applesauce—it keeps the dough moist without adding sweetness. For the filling, reduce the brown sugar to ¼ cup and add 1 teaspoon vanilla bean paste for depth.
The frosting can be lightened by swapping 1 cup powdered sugar for sugar-free powdered sweetener (like Swerve) and adding 1 tablespoon lemon juice for brightness. Trust me, it’s still indulgent!
Nut-Free Kitchen
This recipe is already nut-free, but if you’re concerned about cross-contamination, use a dedicated nut-free workspace and tools. The cinnamon and spices should be stored in sealed containers to prevent any accidental mixing.
For extra safety, bake the rolls on a parchment-lined baking sheet instead of the dish to minimize risk. The frosting remains nut-free as long as you avoid pre-mixed sweeteners with additives.
Vegan-Friendly Version
Transform this into a fully vegan recipe by using flax eggs (2 tablespoons ground flaxseed + 6 tablespoons water per egg) and vegan butter for both the dough and filling.
Replace the milk with unsweetened almond or oat milk, and the cream cheese frosting with a mix of vegan cream cheese and coconut cream. The texture will be slightly denser, but the flavors hold up beautifully with a warm cup of chicory coffee or almond milk latte.
Nutrition facts
Frequently asked questions
Why does this recipe use a 2-day method instead of baking them the same day?
The overnight chilling between steps develops deeper flavor and creates a tender, pull-apart texture that same-day recipes can’t match. The slow fermentation allows gluten to relax, preventing tough dough while building complex flavors. Plus, you won’t be stuck in the kitchen on a Saturday morning!
Can I make these cinnamon rolls without a stand mixer?
The dough only needs 8-10 minutes of hand-kneading on a floured surface. For the frosting, use a hand mixer or even a whisk—just beat the cream cheese until smooth before adding other ingredients. The texture won’t be as light, but they’ll still be delicious with that perfect cinnamon-sugar filling.
How do I prevent my cinnamon rolls from sticking to the baking dish?
Grease your 9×13-inch baking dish thoroughly with butter, then dust with flour or use a nonstick baking spray. For extra insurance, line the dish with parchment paper (cut to fit) before adding the rolls. This creates a barrier that prevents sticking while making cleanup a breeze. Just remember to cut the parchment before baking!
My rolls didn’t rise much after the second proof—what went wrong?
This usually happens when the kitchen is too cold or the yeast was inactive. Keep your workspace at 70-75°F and test your yeast first by mixing it with warm milk and sugar—it should foam within 5-10 minutes. If your kitchen is chilly, place the proofing dough near a warm oven (with light on) or use a proofing box. Also ensure your dough was punched down completely after the first rise.
Can I make the frosting ahead of time?
Yes, but mix it 1 day ahead and store it in the fridge. Before using, let it sit at room temperature for 15-20 minutes to soften. For the best texture, whip it again briefly with a mixer to restore fluffiness. If it separates, just beat it until smooth again. The frosting keeps well for up to 3 days in the fridge.

- Pea Soup Instant Pot Recipe: Velvety Green Smoothness in 20 Minutes - November 1, 2026
- Pork Loin Pulled Pork Crock Pot Recipe: Slow-Smoked Tenderness With Zero Dryness - November 1, 2026
- Baked Potatoes in Crock Pot Recipe: Buttery Interiors and Crispy Top Magic - November 1, 2026