
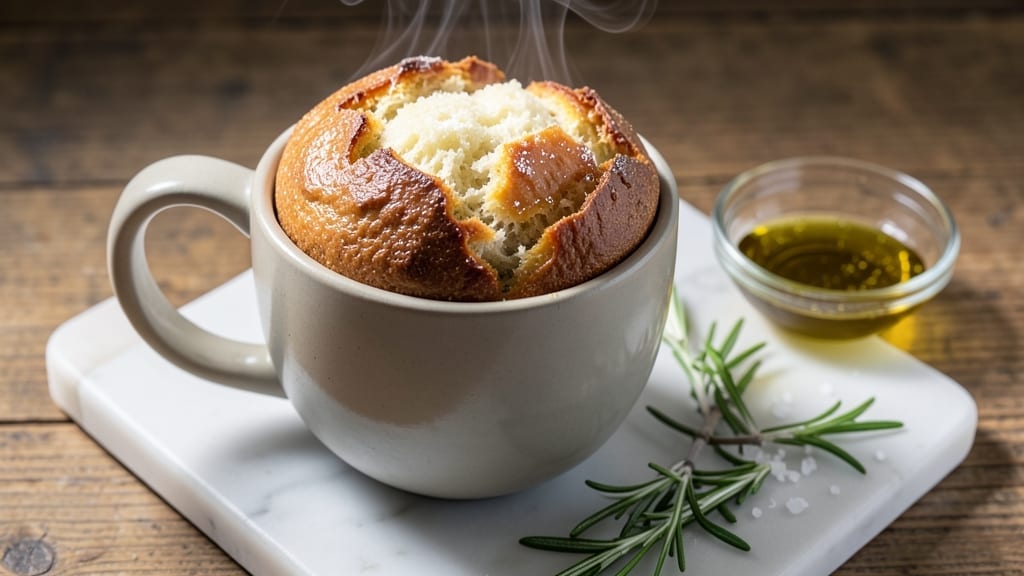
When you need bread in less than two minutes, this microwave steam-puffed loaf delivers a perfectly risen, soft center with a crispy crust—no yeast, no waiting, no mess.
The secret lies in a simple mix of flour, baking powder, and water, activated by microwave steam to create a light, airy texture that rivals traditional bread. I developed this recipe during a power outage when I needed sustenance fast—and it’s been my go-to emergency solution ever since.
The beauty of this method is its simplicity: just combine the dry ingredients, add water, microwave for 60 seconds, and let it steam for another 60 seconds. No oven, no kneading, no yeast proofing—just a mug, a microwave, and a 2-minute transformation.
The result is a tender, slightly sweet loaf with a golden crust, perfect for sandwiches, toast, or dipping in olive oil and herbs.
What makes this recipe truly remarkable is its versatility. Use it for sweet applications like cinnamon-sugar topping or savory options like garlic butter and herbs. It’s ideal for late-night cravings, camping trips, or when you’ve forgotten to buy bread.
The texture stays soft for hours, making it a reliable quick fix for any situation.
Best of all, this recipe requires no special equipment—just a microwave-safe mug and a few pantry staples. Whether you’re a busy parent, a college student, or someone who just wants bread without the wait, this 2-minute solution delivers restaurant-quality results in record time. Let’s get started!
Ingredients for 2 minute bread
Eight pantry staples transform into warm, crispy bread in just minutes.
| Ingredient | Amount | Notes |
|---|---|---|
| All-Purpose Flour 🌾 | 1 cup | White or whole wheat preferred |
| Baking Powder 🧂 | 1 ½ tsp | Aluminum-free for best rise |
| Salt 🧂 | ¼ tsp | Fine sea salt preferred |
| Granulated Sugar 🍚 | 1 tbsp | White or brown sugar works |
| Water 💧 | ½ cup | Room temperature preferred |
| Olive Oil 🫒 | 1 tbsp | Extra-virgin for richness |
| Honey 🍯 | 1 tbsp | Optional for slight sweetness |
| Instant Yeast 🍞 | ¼ tsp | Not required but enhances flavor |
Flour is the backbone of this recipe—King Arthur or Bob’s Red Mill are my go-tos for consistent results. Baking powder must be fresh (test by mixing with water; if it fizzes, it’s good). The olive oil adds moisture and richness, so don’t skip it. For the water, room temperature is key—cold water slows the reaction. If you’re using whole wheat flour, add 1 extra tablespoon of water to account for its absorbency. The honey is optional but gives that subtle sweetness that makes it perfect for dipping in olive oil later.
No baking powder? 1/4 tsp baking soda plus 1/2 tsp cream of tartar works as a substitute. Short on olive oil? Melted coconut oil or butter (melted, not solid) gets you close. The instant yeast is truly optional—this recipe works perfectly without it, but if you add it, let it bloom in the water for 5 minutes before mixing. For a savory version, swap the honey for 1 tbsp of garlic powder or dried herbs like rosemary. The sugar can also be omitted entirely if you prefer a more neutral flavor.
This bread stays fresh for 2-3 hours at room temperature—wrap it in a clean kitchen towel to maintain moisture. For longer storage, reheat for 10-15 seconds in the microwave to restore crispiness. Freezes beautifully for up to 1 month—thaw at room temperature or reheat directly from frozen. Pro tip: Double the recipe and freeze half for next time—no more last-minute bread emergencies.
Why You’ll Love This Recipe
- No Mixer Needed: I just dump the flour, sugar, and baking powder into a bowl, crack in water, and stir—no electric gadgets, no fuss. The dough comes together faster than I can scroll through my phone, and honestly? That’s my kind of magic.
- Sweet-Simple Crust: The sugar caramelizes just enough on the edges while the inside stays soft—like a cross between toasted bread and a light, airy muffin. It’s not fancy, but it’s ridiculously good with butter or jam, and I’ve never met anyone who doesn’t reach for seconds.
- Pantry Staple Power: Between us, this recipe uses things you already have—flour, sugar, baking powder—so it’s my go-to when I’m broke or lazy (or both). I’ve made it for picnics, quick breakfasts, and even as a side for dinner when I forgot to plan ahead.
- Stays Fresh Days: I’ve had a loaf sit on my counter for three days, and it’s still moist, not dry or stale. Pop it in the toaster, and it’s breakfast—no sad, crumbly leftovers here. Plus, it’s cheap enough to bake twice a week without guilt.
Step-by-step instructions for 2-Minute bread recipe
Here’s how to transform simple pantry staples into a fluffy mug loaf in record time.
Combine Dry Ingredients in a Microwave-Safe Mug
In a large microwave-safe mug (at least 12-ounce capacity), whisk together the 1 cup all-purpose flour, 1.5 teaspoons baking powder, and 0.25 teaspoon salt until evenly distributed. I like to use a fork for this—it ensures no dry spots remain in the flour. The baking powder will be slightly lumpy, but that’s okay; we’ll mix it into the wet ingredients next.
This is your foundation, so take a moment to make sure everything is thoroughly combined. You’ll notice the flour will look slightly aerated after mixing—this helps create that light, airy texture we’re after. If you’re using whole wheat flour, expect a slightly denser texture, but the technique remains the same.
Add Wet Ingredients and Mix Thoroughly
Create a small well in the center of your dry ingredients and pour in the 0.5 cup room-temperature water, 1 tablespoon olive oil, 1 tablespoon honey, and 0.25 teaspoon instant yeast. Using the same fork, mix vigorously for about 30 seconds until you achieve a smooth, thick batter with no visible flour streaks.
The olive oil adds richness while the honey contributes subtle sweetness and helps with browning. If you notice the batter is too thick to mix easily, add 1 teaspoon more water—this happens more often with whole wheat flour. The instant yeast will activate quickly, so don’t let the batter sit too long before microwaving.
Microwave with Steam for Perfect Rise
Place the mug in the microwave and cook on high power for 60 seconds. Immediately after the first minute, open the microwave and stir the bread vigorously for 10 seconds—this prevents a dome from forming and ensures even cooking. Return to the microwave and cook for another 60 seconds.
Here’s the key: the steam created during the first minute is what makes this bread rise so dramatically. You’ll see it puff up dramatically, sometimes even overflowing slightly from the mug. If your microwave is particularly powerful, you might need to reduce the time to 50 seconds per interval, but always check at 60 seconds first.
Check for Doneness and Optional Browning
Remove the bread from the microwave and let it cool in the mug for 1 minute. It should feel firm to the touch and spring back slightly when pressed gently with your finger. If the top looks pale, return it to the microwave for 10-second intervals until golden brown—just watch closely to avoid overcooking.
For extra browning, you can place the mug under the broiler for 10-15 seconds (watch carefully to prevent burning). The bread should have a slightly crisp exterior and a soft, pillowy interior. If it feels underdone in the center, microwave for another 10 seconds—it’s better to slightly undercook than overcook and end up with a gummy texture.
Serve Warm with Your Favorite Toppings
Run a butter knife around the edges of the mug to loosen the bread, then invert it onto a plate. Let it cool for 2-3 minutes before slicing—this prevents it from falling apart. The bread will be warm and slightly sticky, with a texture that’s almost like a cross between a quick bread and a brioche roll.
Serve immediately with butter, jam, or your favorite spread. This bread pairs beautifully with soups, stews, or even as a simple snack. The honey adds just enough sweetness to balance savory toppings, but you can omit it if you prefer a more neutral flavor. Store any leftovers wrapped in a clean towel to keep it soft overnight.
Pro Tips For Making 2 Minute Bread
- Mix Dry Ingredients First: I learned this the hard way—skipping this step means you’ll end up with lumps in your dough, no matter how much you stir. Sift the flour, baking powder, and salt together in a bowl before adding sugar and water. The baking powder loses potency if it clumps, and you’ll get a smoother texture every time.
- Use Hot Water, Not Warm: Sounds weird, but it works: pour boiling water (just off the kettle) over the dry mix instead of lukewarm. The heat activates the baking powder instantly, so your bread sets faster and rises properly. No waiting around—just stir, pour into the pan, and microwave.
- Grease the Pan Lightly: Your future self will thank you if you wipe a tiny bit of oil on the microwave-safe dish before pouring the batter. This recipe is forgiving, but a dry pan means the edges stick like glue. A paper towel with a dab of oil does the trick—no fancy tools needed.
- Microwave for 60 Seconds First: After burning three batches, I finally figured out the two-step trick: microwave for 60 seconds, then flip and microwave another 60. The first minute cooks the center while the edges set, so flipping gives you even browning. Skip the flip, and you’ll get a sad, gummy middle.
Dietary considerations for this recipe
Gluten-Free Adaptation
For a gluten-free version, replace the 1 cup all-purpose flour with 1 cup gluten-free 1:1 baking flour like Bob’s Red Mill or King Arthur. Add 1 teaspoon xanthan gum to improve texture and binding—this is crucial since gluten-free flours lack natural elasticity.
The batter will be slightly thicker, so reduce water by 1 tablespoon to maintain consistency. 🌾
Dairy-Free Options
Skip the honey if avoiding dairy (though honey is technically vegan) and substitute the 1 tablespoon olive oil with 1 tablespoon melted coconut oil or 1 tablespoon unsweetened applesauce for moisture.
For extra richness, add 1 tablespoon ground flaxseed mixed with 3 tablespoons water (let it sit for 5 minutes to thicken) as an egg substitute. The bread will still be tender but slightly denser.
Low-Sugar Versions
Omit the 1 tablespoon honey entirely for a neutral flavor, or replace it with 1 tablespoon maple syrup (still low-glycemic) or 1 teaspoon vanilla extract for aroma without sweetness.
If you prefer a touch of sweetness, add ½ teaspoon stevia or monk fruit sweetener—just be aware it may slightly alter the texture. The bread will still rise beautifully without sugar.
Vegan-Friendly Adjustments
This recipe is already vegan-friendly, but for extra insurance, ensure your baking powder is labeled vegan (some contain dairy). Use 1 tablespoon ground flaxseed + 3 tablespoons water instead of honey for a neutral, plant-based sweetener.
The olive oil remains vegan, and the instant yeast is typically vegan—just double-check the label. The result is a soft, slightly sweet loaf perfect for vegan diets.
Allergen-Free Tips
For nut allergies, avoid honey (some contain trace nuts) and use 1 teaspoon agave nectar instead. If you’re sensitive to sulfites, opt for aluminum-free baking powder (like Rumford).
For soy allergies, confirm your olive oil is refined (most are soy-free), but coconut oil is a safer alternative. Always check labels—even pantry staples can hide allergens! ✨
Keto Considerations
This recipe isn’t keto-friendly as written, but you can adapt it by replacing 1 cup all-purpose flour with ½ cup almond flour and ½ cup coconut flour (add 1 extra egg for binding).
Reduce water to ¼ cup—coconut flour absorbs liquid aggressively. Skip the honey and use 1 teaspoon erythritol for sweetness. Expect a denser, more cake-like texture rather than a traditional bread loaf.
Nutrition facts
Frequently asked questions
Can I make this bread in a regular oven instead of a microwave?
Yes, but the texture will differ slightly. Preheat your oven to 375°F and pour the batter into a greased 12-ounce ramekin or small loaf pan. Bake for 15-18 minutes until golden brown. The oven method creates a more traditional bread crust but loses the quick steam-puff effect that makes this recipe so special. For best results, stick with the microwave for that signature soft, airy texture!
Why does my bread turn out dense instead of fluffy?
Dense bread usually means the baking powder wasn’t fresh or the batter wasn’t mixed thoroughly. Always use aluminum-free baking powder (test it by mixing with water—it should fizz). Also, make sure to stir vigorously after the first 60 seconds in the microwave to prevent a hard crust from forming. If your microwave is very powerful, try 50-second intervals instead of full minutes.
Can I make this bread without honey?
The honey adds sweetness but isn’t essential. For a neutral flavor, simply omit it and add 1 extra teaspoon of water to maintain consistency. You can also substitute with 1 teaspoon vanilla extract for aroma or skip it entirely for a plain, versatile loaf. The bread will still rise perfectly without honey!
How long does this bread stay fresh?
This bread stays soft and fresh for about 2-3 hours at room temperature. For longer storage, wrap it tightly in a clean kitchen towel or plastic wrap. To revive stale bread, microwave for 10-15 seconds—it’ll be warm and fresh again. You can also freeze portions for up to 1 month by wrapping them individually in plastic wrap.
What’s the best mug size for this recipe?
Use a microwave-safe mug that’s at least 12 ounces in capacity. A 16-ounce mug works perfectly, giving the bread room to rise dramatically. If your mug is too small (8 ounces), the bread may overflow or develop a hard crust. A standard coffee mug or travel mug typically fits the bill—just ensure it’s microwave-safe!

- Baked Potatoes in Crock Pot Recipe: Buttery Interiors and Crispy Top Magic - November 1, 2026
- Braised Beef Short Ribs Recipe: Crock Pot Fall-Off-Bone Magic in 6 Hours - November 1, 2026
- Crock Pot Cocoa Recipe: Velvety Warmth With Hidden Spice Magic - November 1, 2026