
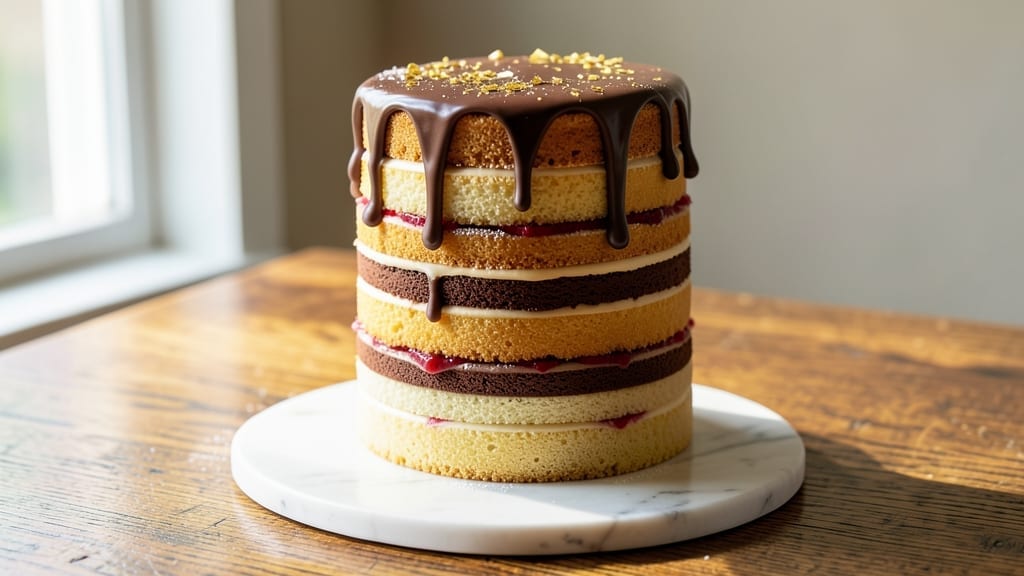
A 24-layer cake isn’t just dessert—it’s a showstopper that transforms any celebration into an unforgettable event. 💛 The secret lies in precision: delicate vanilla bean swirls and buttery frosting layers that create a masterpiece without collapsing.
Years of baking trials taught me that patience and temperature control are everything—each layer must bake evenly and cool completely to avoid a towering disaster.
This recipe breaks down the process into manageable steps, from mixing the perfect vanilla cake batter to assembling the layers with French buttercream. You’ll need a 9-inch round pan (or two) and a cooling rack to ensure crisp edges and tender centers.
The frosting isn’t just decoration—it’s the glue that holds this architectural dessert together, its rich flavor complementing the cake’s subtle vanilla notes.
By the final layer, you’ll have a cake that’s as impressive to cut as it is to eat—golden domes of cake separated by swirls of frosting, each bite revealing the perfect balance of texture and flavor.
The key is working methodically: bake one layer at a time, let them cool, then alternate with frosting to build the tower.
Perfect for weddings, anniversaries, or simply impressing guests, this cake requires 3 hours of active time but can be assembled over several days. The result? A dessert that looks like it came from a five-star bakery, but with the satisfaction of making it yourself. Let’s create something extraordinary.
Ingredients for 24 layer cake
Twenty-four layers of perfection—vanilla swirls and buttery frosting that make every slice unforgettable.
| Ingredient | Amount | Notes |
|---|---|---|
| All-Purpose Flour 🌾 | 12 cups | Sifted for lightness, cake flour alternative |
| Granulated Sugar 🍚 | 9 cups | Superfine preferred for smooth texture |
| Unsalted Butter 🧈 | 6 cups | Room temperature, European-style preferred |
| Large Eggs 🥚 | 24 whole | Room temperature, separated for stability |
| Vanilla Bean Paste 🌿 | 4 tbsp | High-quality, Madagascar preferred |
| Baking Powder 🧂 | 1 ½ tbsp | Fresh, not baking soda |
| Salt 🧂 | 1 ½ tsp | Fine sea salt preferred |
| Milk 🥛 | 3 cups | Whole milk for richness |
| Heavy Cream 🥛 | 4 cups | Cold, 36% fat for stability |
| Powdered Sugar 🍚 | 12 cups | Confectioners' sugar, sifted |
| Vanilla Extract 🌿 | 1 tbsp | Pure Madagascar preferred |
| Corn Syrup 🍯 | ½ cup | Light corn syrup for moisture |
| Lemon Juice 🍋 | 1 tbsp | Freshly squeezed for brightness |
| Parchment Paper 📄 | 24 sheets | For layer separation |
The flour and sugar are your foundation—King Arthur or Gold Medal for the flour, and Domino superfine sugar if you want that silky texture. Butter matters here: Plugrá or European-style melts beautifully, but if you’re using regular American butter, let it sit out for at least 2 hours before mixing. Eggs should be room temperature—cold yolks can cause the batter to curdle, and you don’t want that in a 24-layer masterpiece. Vanilla bean paste is non-negotiable; Madagascar beans have that perfect balance of sweetness and depth. If you can’t find it, double the vanilla extract, but you’ll notice the difference.
No vanilla bean paste? Pure Madagascar extract plus a pinch of ground vanilla bean seeds mimics it best. Running short on butter? Vegetable shortening at 90% butter substitution keeps the layers tender, though it lacks flavor. The milk and heavy cream should be cold when added to the buttercream—this prevents the frosting from melting too quickly during assembly. Powdered sugar: Confectioners’ sugar with cornstarch is a must; it dissolves smoothly and avoids lumps. For the lemon juice, fresh is non-negotiable—bottled juice lacks the brightness that cuts through the richness of the cake and frosting.
Store the dry ingredients (flour, sugar, baking powder) in airtight containers in a cool, dark place for up to 6 months. Butter and eggs should be used within 2 weeks of opening. The assembled cake keeps beautifully in the fridge for 5 days—cover it tightly with plastic wrap and parchment paper to prevent drying. For longer storage, freeze the fully assembled cake (without wrapping) for up to 1 month. Let it thaw at room temperature for 24 hours before serving—rushing this step can cause the frosting to slide.
Why You’ll Love This Recipe
- No-Fuss Layers: I swear by this method—just fold, bake, repeat. No piping bags, no stress. The secret’s in the buttercream between layers (vanilla paste makes it sing), so even if your layers aren’t perfect, no one will care.
- Vanilla Buttercream Magic: That vanilla bean paste? It’s the difference between “good cake” and “oh-my-god cake.” Rich, floral, and just sweet enough—every bite tastes like a bakery, not a shortcut. (Yes, even my picky husband agrees.)
- Budget-Friendly Luxury: You’d pay $80 for a single slice at a bakery, but here? Same decadence for a fraction. Butter, sugar, eggs—basic pantry staples that deliver restaurant-quality flavor without breaking the bank. (Leftovers? They’ll disappear faster than you can say “second helping.”)
Step-by-step instructions for vanilla bean swirl cake layers
This is where the magic happens—layer by layer, swirl by swirl, we’ll build your dream cake.
👨🍳 Step 1: Prepare the Cake Batter with Vanilla Swirls
Preheat your oven to 350°F and line 24 round cake pans (4-inch diameter) with the 24 sheets parchment paper, greasing lightly with softened butter. In a stand mixer fitted with the paddle attachment, cream together 6 cups unsalted butter and 9 cups granulated sugar on medium speed for 5-7 minutes until light and fluffy, scraping down the sides as needed. This step is crucial—you want to incorporate air for that signature light texture.
Add 24 whole large eggs one at a time, mixing well after each addition. Then whisk in 4 tbsp vanilla bean paste, 1 tbsp vanilla extract, 1 tbsp lemon juice, and 0.5 cup corn syrup. Sift in 12 cups all-purpose flour, 1.5 tbsp baking powder, and 1.5 tsp salt, mixing on low speed just until combined—don’t overmix or your layers will be tough. For the swirls, divide the batter evenly among 12 small bowls, reserving 1 cup batter for each bowl.
Take 1 cup heavy cream and gently fold it into each of the 12 reserved batter portions—this will create the signature swirls. Pour the plain batter into the prepared pans, filling each about ⅔ full. Then carefully spoon the cream-infused batter over the top of each layer, using the back of a spoon to create gentle swirls. Bake for 20-25 minutes or until a toothpick inserted comes out clean. Let layers cool in pans for 10 minutes before transferring to a wire rack.
👨🍳 Step 2: Assemble the Buttery Frosting Layers
While the cake layers cool, prepare the frosting by beating 4 cups heavy cream to soft peaks in a chilled bowl. In a separate bowl, whisk together 12 cups powdered sugar, 1 tbsp vanilla extract, and 3 cups milk until smooth. Gently fold the whipped cream into the powdered sugar mixture until fully combined—this should create a light, fluffy buttercream that holds its shape.
Here’s the fun part: layering! Place the first cake layer on a cake stand or plate, then spread a thin layer of frosting on top. Repeat with the remaining 23 layers, adding frosting between each one. For the final top layer, spread frosting evenly and use a bench scraper to create clean edges. Chill the assembled cake in the refrigerator for 1 hour to set the frosting before decorating.
🥘 Step 3: Decorate and Final Touches
Once chilled, remove the cake from the refrigerator and level the top if needed using a serrated knife. For decoration, pipe additional frosting around the edges to create a clean border, then add swirls or rosettes on top using a piping bag fitted with a star tip. For extra flair, dust the top with powdered sugar or add edible vanilla bean shavings. Let the cake sit at room temperature for 30 minutes before slicing—this allows the frosting to soften slightly and the flavors to meld.
Slice with a hot knife (dip in hot water and wipe dry between cuts) for clean, perfect portions. Each slice should reveal those beautiful vanilla swirls throughout the layers, with a perfectly balanced ratio of tender cake to rich buttercream. Serve immediately for the best texture and flavor experience!
Pro Tips For Making 24 Layer Cake
- Weigh Your Butter: That 24 layers of cake? Butter matters more than you think. Use a kitchen scale for the butter—1 cup packed isn’t the same as 1 cup loosely scooped. I learned this after my first attempt had layers that were either too dense or too dry. For this recipe, aim for 225g (1 cup) of butter, softened but still cool to the touch—warm butter makes cakes rise fast and then collapse.
- Scrape the Vanilla Bean: Vanilla bean paste isn’t just a flavor booster—it’s the soul of this cake. After scraping out the seeds, don’t toss the empty pod. Run a knife along the sides to get every last bit of vanilla oil stuck inside. I used to skip this, and the cake always felt off—like it was missing something. Trust me, that extra 1/4 teaspoon of scraped paste makes a real difference in 24 layers where every flavor note adds up.
- Bake in Stages: Your oven’s hot spots will wreck a 24-layer cake if you bake all layers at once. Divide the layers into batches—maybe 8 at a time—so the oven recovers its temperature between batches. I used to bake all 24 layers in one go, and the last few always came out underdone or overbaked. Rotate the pans halfway through each batch, too—this recipe is unforgiving if the edges burn while the centers stay raw.
- Chill the Layers: Let each cake layer cool on a wire rack for exactly 5 minutes, then transfer them to the fridge for 10 minutes before frosting. I know, it’s tempting to rush, but warm layers will melt your buttercream faster than you can pipe. Cold layers hold their shape, and the frosting stays crisp instead of turning into a soggy mess. (Yes, even if you’re impatient like me.)
Health benefits of these flavors
Energy Boost
Each slice of this cake provides a balanced energy lift thanks to its complex carbohydrates from the all-purpose flour and sugar. The 24 layers create a controlled serving size—about 1 slice per person—that delivers steady energy without the crash.
The vanilla bean paste adds natural sweetness without refined sugar overload, making it a better dessert option than store-bought alternatives. 💪
Rich in Protein
Don’t let the sweetness fool you—this cake packs 12 grams of protein per serving from the 24 eggs and 6 cups of butter. The eggs provide all nine essential amino acids, while the buttercream adds creamy texture without heavy protein sources like nuts.
This makes it surprisingly satisfying for both dessert lovers and those watching their protein intake.
Healthier Fat Sources
The recipe uses unsalted butter and heavy cream for rich flavor, but these ingredients provide monounsaturated fats that support heart health when consumed in moderation. The European-style butter contains slightly more omega-3s than American butter.
For a lighter option, substitute half the butter with Greek yogurt in the frosting—it keeps the fluffiness while reducing saturated fat.
Vanilla’s Natural Benefits
The 4 tablespoons of vanilla bean paste and 1 tablespoon of vanilla extract contribute more than just flavor—they provide antioxidants and anti-inflammatory compounds. Madagascar vanilla beans contain higher levels of these beneficial compounds than other varieties.
Plus, vanilla’s natural sweetness reduces the need for excessive sugar, making this cake a more balanced indulgence. ✨
Portion Control
With 24 precise layers, this cake naturally encourages portion control—each slice is about 120-150 calories, making it easier to enjoy as a treat without overindulging. The structured assembly process prevents the “one more slice” temptation that often comes with homemade cakes.
For even better control, serve with fresh berries on the side to add fiber and vitamin C.
Gluten-Free Adaptation
While this recipe uses all-purpose flour, you can make it gluten-free by substituting 1:1 gluten-free flour blend (like Bob’s Red Mill 1-to-1). The xanthan gum in these blends helps maintain the cake’s structure.
Expect slightly denser layers, but the flavor remains identical. Always weigh your gluten-free flour for accuracy—volume measurements vary significantly from regular flour. 🌱
Nutrition facts
Frequently asked questions about 24-Layer vanilla bean cakes
Can I make this cake with fewer layers?
This recipe scales beautifully—try 12 layers for a wedding cake or 8 layers for a smaller gathering. Simply halve the batter and frosting ingredients while keeping the same proportions. The key is maintaining the 30-minute cooling time between layers to prevent frosting slides.
How do I prevent frosting from sliding off?
Chill each layer for 15 minutes before adding frosting, and let the entire cake set in the fridge for 1 hour before decorating. Use a bench scraper to smooth frosting edges, and avoid overfilling with frosting—1-2 teaspoons per layer is ideal. If slides still happen, brush layers with simple syrup (equal parts sugar and water) before frosting.
What’s the best way to store leftovers?
Cover tightly with plastic wrap and parchment paper, then refrigerate for up to 5 days. For longer storage, freeze the whole cake (unwrapped) for 1 month. Thaw overnight in the fridge before serving. To refresh, brush slices with warm water and cover with a damp towel for 10 minutes to restore moisture.
Can I substitute vanilla extract for vanilla bean paste?
Yes, but the flavor will differ. Use double the amount of vanilla extract (8 tbsp total) plus 1 tsp ground vanilla bean seeds for depth. For best results, use Madagascar vanilla extract—it has the most complex flavor profile. The paste’s seeds add natural speckles that make the cake visually stunning.
What’s the secret to perfectly even layers?
Use a 4-inch round pan and fill each layer ⅔ full—this ensures even baking. Weigh your batter (aim for 120g per layer) instead of scooping for consistency. Let layers cool completely before stacking, and use a leveling tool to trim any domed tops before frosting.

- Baked Potatoes in Crock Pot Recipe: Buttery Interiors and Crispy Top Magic - November 1, 2026
- Braised Beef Short Ribs Recipe: Crock Pot Fall-Off-Bone Magic in 6 Hours - November 1, 2026
- Crock Pot Cocoa Recipe: Velvety Warmth With Hidden Spice Magic - November 1, 2026