
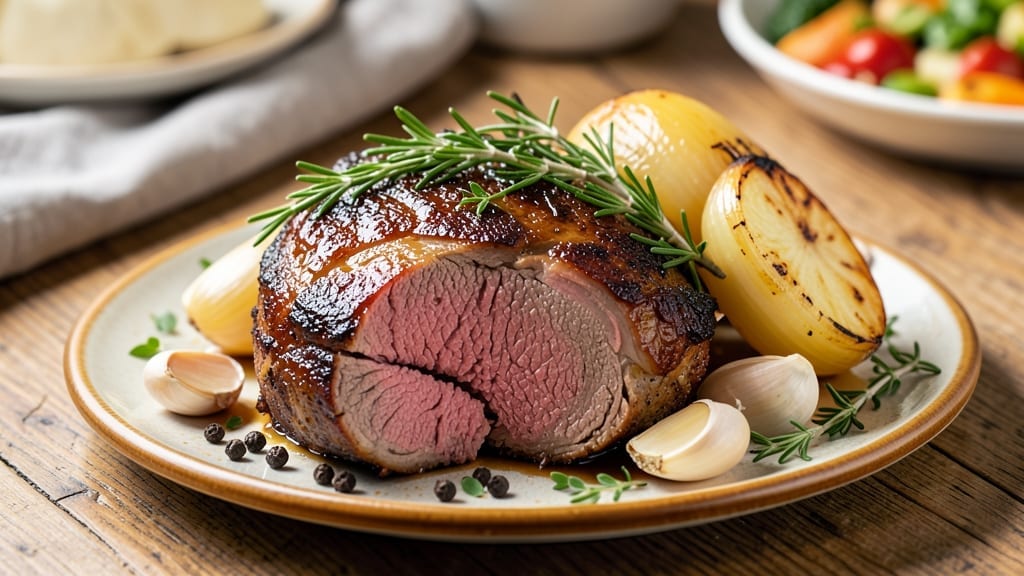
A 2.5 lb chuck roast transformed into tender, fall-apart shreds is the ultimate slow-cooked triumph—rich, flavorful, and effortlessly impressive. The secret lies in patience: searing the meat first locks in juices, while a long braise in the oven or Instant Pot breaks down tough fibers into melt-in-your-mouth perfection.
This method delivers restaurant-quality results with minimal effort, making it ideal for busy weeknights or special gatherings.
Start with a dry rub of garlic, rosemary, and black pepper for depth, then sear the roast until deeply browned—this step builds flavor that carries through hours of cooking.
Whether you use a Dutch oven for classic braising or an Instant Pot for hands-off convenience, the goal is the same: cook until the internal temperature reaches 160°F for well-done, shreddable meat.
The slow process ensures every bite is succulent, not chewy, and the aromas filling your kitchen will have everyone anticipating dinner.
By the time it’s done, your chuck roast will be so tender it practically falls apart at the touch, coated in a glossy, savory sauce that clings to every strand.
Serve it sliced thick over mashed potatoes, tucked into crusty bread, or alongside roasted vegetables—each bite delivers that perfect balance of richness and tenderness. This is comfort food at its finest, elevated by technique without sacrificing simplicity.
Leftovers reheat beautifully, making this recipe a meal-prep favorite, and the versatility extends to sandwiches, tacos, or even hearty soups. The key to success? Time and attention to detail—searing, braising, and resting properly. Let’s get started on a dish that turns a simple cut of beef into a showstopper.
Ingredients for 2.5 lb chuck roast
Sixteen ingredients for a dish that tastes like love—rich, tender, and impossible to resist.
| Ingredient | Amount | Notes |
|---|---|---|
| Chuck Roast 🥩 | 2 ½ lb | With good marbling, trim excess fat |
| Yellow Onion 🧅 | 1 whole | Cut into 8 wedges, skin on |
| Garlic Cloves 🧄 | 6 cloves | Smashed but not minced |
| Fresh Rosemary 🌿 | ¼ cup | Chopped, stems removed |
| Fresh Thyme 🌿 | ¼ cup | Leaves only, stems discarded |
| Ground Black Pepper 🌶️ | 1 ½ tbsp | Freshly cracked, coarse grind |
| Kosher Salt 🧂 | 2 tbsp | Diamond Crystal preferred |
| Olive Oil 🫒 | ½ cup | Extra-virgin, high smoke point |
| Beef Broth 💧 | 3 cups | Low-sodium preferred |
| Dry Red Wine 🍷 | 1 cup | Bold, like Cabernet Sauvignon |
| Tomato Paste 🍅 | 2 tbsp | Smooth, not chunky |
| Balsamic Vinegar 🍶 | 1 tbsp | Aged, for depth |
| All-Purpose Flour 🌾 | 2 tbsp | For thickening sauce |
| Fresh Parsley 🌿 | ¼ cup | Chopped, for garnish |
The chuck roast is non-negotiable here—look for good marbling (those white fat streaks) at the butcher counter or meat department. Costco and Whole Foods carry excellent cuts, but your local butcher will often have the freshest selection. Trim any large fat deposits, but leave smaller ones—they render down during cooking and keep the meat juicy. For the herbs, fresh is ideal, but if you’re in a pinch, dried rosemary and thyme work at one-third the amount. The garlic? Smash the cloves with the flat side of your knife before adding—this releases more flavor without turning to paste.
No red wine? Substitute beef broth with a splash of balsamic—it adds that same tangy depth. The tomato paste can be skipped if you’re sensitive to acidity, but trust me on the balsamic vinegar—it’s what ties everything together. For the flour, if you’re watching carbs, swap it for cornstarch (use half the amount). The beef broth should be low-sodium—Pacific Foods or Swanson are solid choices, but homemade is always better. And if you’ve got fresh bay leaves? Add one or two—they disappear during cooking but add incredible aroma.
This dish tastes even better the next day, so make extra. Store leftovers in an airtight container in the fridge for up to 5 days, or freeze portions for 3 months. The sauce thickens as it cools, so add a splash of broth when reheating. For meal prep, portion the shredded meat into containers with the sauce—it reheats beautifully. The roasted onions keep well too; store them separately and toss them back in when reheating. And save those herb stems—they make great bouillon for future braises.
Why You’ll Love This Recipe
- Set It & Forget: I swear by this—toss the roast, onions, and garlic in a pot with rosemary and thyme, add enough liquid to cover, and let it simmer. The beauty? You can walk away. By the time you’re done with laundry or emails, dinner’s ready. No hovering, no stress.
- Herb-Packed Magic: That first whiff of rosemary and thyme hitting the hot oil? Instant flavor explosion. The garlic softens just enough to melt into the meat, while the onions caramelize at the edges—no fancy technique, just pure, rich depth. My husband licks his plate. (Yes, even on a Tuesday night.)
- Leftovers That Win: This recipe begs to be made in bulk. The meat gets tender enough to shred for tacos, sandwiches, or pasta the next day. Honestly, I’ve had it cold in a wrap with pickles and it still tasted like a hug. And the best part? It’s cheaper than takeout per serving.
- Budget-Friendly Powerhouse: A 2.5 lb chuck roast feeds four for under $15—no lies. The onions and garlic are pennies, and fresh herbs stretch further than you’d think. I’ll be real: this is the kind of meal that makes me feel like I’m feeding a crowd without breaking the bank. (My wallet thanks me every time.)
Step-by-step instructions for slow-braised chuck roast
Here’s how to transform a tough cut into melt-in-your-mouth shreds with rich, complex flavor.
Sear the Chuck Roast for Maximum Flavor
Heat a heavy Dutch oven over medium-high heat until very hot. Add 0.5 cup olive oil and swirl to coat the bottom. Place the 2.5 lb chuck roast in the pan, fat-side down, and sear undisturbed for 5-6 minutes until deeply browned. Flip and sear the other side for another 5-6 minutes.
This initial sear creates the Maillard reaction that builds deep, caramelized flavors. Don’t rush this step—you want that crust to form before you add any liquid. If the pan gets too hot, reduce to medium heat to prevent burning. Remove the roast and set aside on a plate.
Build the Aromatic Base
In the same Dutch oven, add the 8 wedges of yellow onion and cook for 5 minutes until softened and slightly caramelized. Add the 6 smashed garlic cloves, 0.25 cup chopped fresh rosemary, 0.25 cup fresh thyme leaves, 1.5 tbsp ground black pepper, and 2 tbsp kosher salt. Stir and cook for 1 minute until fragrant.
The onions should be golden in spots by now, adding sweetness that balances the savory meat. Here’s where the magic happens—those herbs and spices are infusing into the rendered beef fat, creating layers of flavor. Don’t skip this step; it’s the foundation of your braising liquid.
Deglaze and Simmer the Braising Liquid
Pour in the 1 cup dry red wine and scrape up all the browned bits from the bottom of the pan with a wooden spoon. Let it simmer for 3 minutes until reduced by half. Add the 2 tbsp tomato paste and 1 tbsp balsamic vinegar, stirring until fully incorporated.
The wine reduces quickly, concentrating its flavors while dissolving the tomato paste and vinegar into a rich base. This step develops the sauce’s depth—don’t be tempted to rush it. The balsamic vinegar adds a subtle tang that cuts through the richness of the beef and wine.
Braise Until Fork-Tender
Return the chuck roast to the Dutch oven, fat-side up. Pour in the 3 cups beef broth until the roast is about ¾ submerged. Bring to a simmer, then reduce heat to low. Cover and transfer to a 325°F oven. Braise for 3 hours, then check for doneness.
Use a meat thermometer to test the internal temperature—it should read 200-205°F when fork-tender. If it’s not there yet, return to the oven for another 30-45 minutes. The liquid should reduce significantly, creating a thick, flavorful sauce. Here’s the thing—patience is key. The longer it cooks, the more tender and flavorful it becomes.
Thicken the Sauce and Finish
Remove the roast and transfer it to a cutting board. Skim off any excess fat from the braising liquid, then sprinkle in the 2 tbsp all-purpose flour, stirring vigorously for 2 minutes until the sauce thickens slightly. Return the roast to the Dutch oven and simmer uncovered for 5 minutes to meld the flavors.
This final step transforms the sauce from a simple reduction to a velvety coating. The flour doesn’t just thicken—it absorbs the deep flavors developed during the long braise. Garnish with 0.25 cup chopped fresh parsley just before serving to add a fresh, bright contrast to the rich meat.
Pro Tips For Making 2.5 Lb Chuck Roast
- SEAR THE ROAST FIRST: After patting the chuck dry, hit it with a hot cast-iron or heavy skillet for 3-4 minutes per side until deep brown—this isn’t just for looks. The crust locks in flavor and keeps the meat from drying out later. I used to skip this, and my roast always tasted bland no matter how long I braised it.
- CHOP ONIONS UNEVENLY: Instead of perfect dice, rough-chop the yellow onion into ¼-inch chunks with varying sizes—some bigger, some smaller. They’ll caramelize at different rates, creating pockets of sweetness and texture. My grandmother swore by this, and she was right: uniform pieces burn before they soften.
- DON’T OVERLOAD THE HERBS: Fresh rosemary and thyme are potent—use about 2 sprigs each, tied together, and remove them after the first 30 minutes of cooking. Too much herb can turn bitter, and you’ll taste the stems. I learned this the hard way when my roast ended up tasting like a Christmas wreath.
- REST BEFORE SLICING: Pull the roast from the pot, tent it loosely with foil, and let it sit for 10-15 minutes before slicing—yes, even if you’re starving. This lets the juices redistribute, or you’ll end up with dry, stringy meat. I know, I know, but trust the process. Your future self will thank you.
Storing and reheating this recipe
Refrigerator Storage
Let your chuck roast cool to room temperature (about 1 hour) before storing. Transfer to an airtight container with a tight-fitting lid—I love using Glasslock containers for their seal.
Store in the fridge for up to 5 days, but I find the flavor actually deepens after 24 hours as the juices redistribute. The sauce will thicken slightly, so add a splash of beef broth when reheating. 💫
Freezer Prep Tips
For long-term storage, portion the roast into freezer-safe bags or glass containers with 1 inch headspace to prevent ice crystals. I like adding a splash of beef broth to each bag before sealing—this preserves moisture and prevents dryness.
Label with the date and freeze for up to 3 months. Thaw overnight in the fridge before reheating. Never microwave directly from frozen!
Stovetop Reheating
My preferred method brings back all that rich flavor. Place the chuck roast and sauce in a heavy-bottomed pot, add ¼ cup beef broth, and heat over medium-low heat for 10-15 minutes, stirring occasionally.
The slow reheat prevents the meat from drying out. If the sauce seems too thick, add another splash of broth. Garnish with fresh parsley right before serving for that restaurant-quality touch. 🔥
Slow Cooker Revival
For a hands-off approach, transfer the roast to a slow cooker on low heat for 2-3 hours with ½ cup beef broth. The gentle heat keeps everything moist and melts the flavors back together.
I sometimes add a bay leaf for extra aroma. This method works especially well if you’re making a big batch for meal prep—just divide into containers afterward.
Microwave Shortcut
When you’re in a rush, use the microwave on 50% power in 2-minute intervals, stirring between each. Cover loosely with a microwave-safe lid or damp paper towel to retain moisture.
Add 2 tablespoons beef broth if the meat looks dry. The texture won’t be quite as tender as stovetop, but it’s a decent emergency fix for busy weeknights. 💡
Sauce Refresh
If the sauce has separated or lost some richness after storage, revive it by heating in a small saucepan with 1 tablespoon butter and 1 teaspoon balsamic vinegar until smooth.
This restores depth and balances any flatness from reheating. A sprinkle of fresh thyme or rosemary also brightens things up—just like when we made it fresh!
Nutrition facts
Frequently asked questions
Can I use a different cut of beef instead of chuck roast?
While chuck roast is ideal for this recipe, you can substitute with chuck eye roast or bottom round roast. Avoid leaner cuts like sirloin—they lack the connective tissue needed for tenderizing. If using round, increase cooking time by 30-45 minutes since it’s tougher. The flavor profile will differ slightly, but the technique remains the same.
How do I know when the chuck roast is fully cooked?
Use a meat thermometer to check the internal temperature—it should reach 200-205°F for perfectly fork-tender results. At this point, the meat will practically fall apart when pressed with a fork. If you prefer medium-rare, aim for 145°F, but remember chuck roast benefits from longer cooking to break down fibers. Never rely on color alone!
Can I make this in an Instant Pot instead of the oven?
Sear the roast first as directed, then add all ingredients to your Instant Pot. Cook on high pressure for 60 minutes, followed by a 15-minute natural release. The pressure cooker cuts time significantly while delivering the same melt-in-your-mouth texture. Just reduce the broth by ½ cup since the Instant Pot builds more steam than an oven.
What’s the best way to serve leftover chuck roast?
Shred the cooled roast and use it in sandwiches, tacos, or pasta dishes. For sandwiches, pile it on crusty bread with caramelized onions and a drizzle of the braising sauce. For tacos, mix with black beans and top with avocado. The meat also reheats beautifully in soups or casseroles—just add a splash of broth to restore moisture. Leftovers taste even better the next day!
Why did my chuck roast turn out tough instead of tender?
This usually happens when the meat isn’t cooked long enough or the temperature isn’t controlled properly. Ensure you’re cooking at 325°F (or equivalent pressure settings) and checking the internal temperature with a thermometer. If you rushed the process, try increasing cooking time by 30-60 minutes next time. Also, avoid overcrowding the pan during searing—this prevents proper browning.

- 12 Bean Chili Recipe: Hearty Slow-Cooked Depth With 12 Legumes - October 17, 2026
- 5 Seed Bread Recipe: Nutty Crunch and Artisan Flavor in One Loaf - October 17, 2026
- 1 Lb Macaroni Salad Recipe: Bold, Crunchy, and Crowd-Pleasing - October 17, 2026