
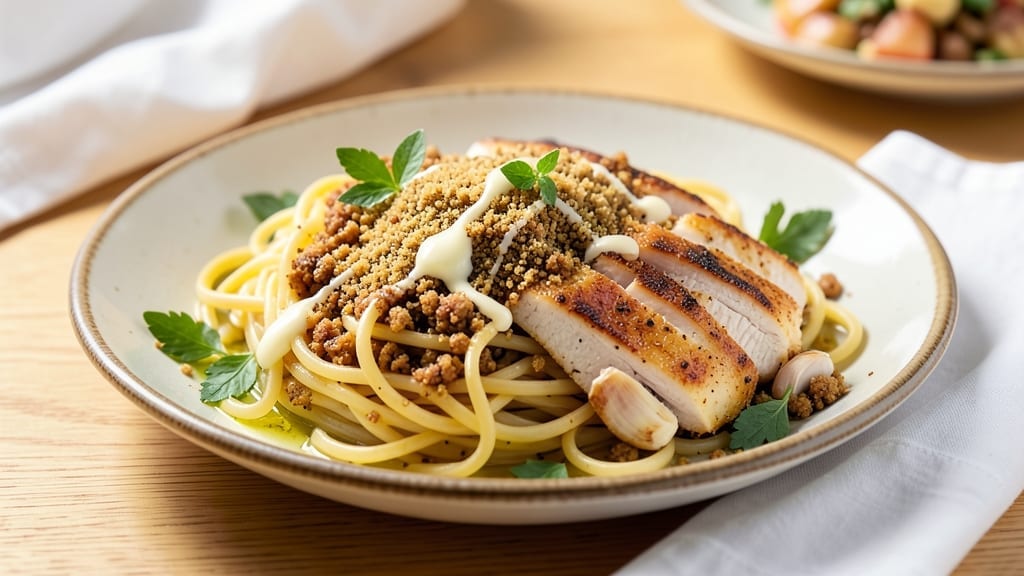
The 3-2-1 pasta recipe transforms ordinary spaghetti into a restaurant-worthy dish with crispy garlic bread crumbs and perfectly al dente noodles—no fancy techniques required. 💛 The secret lies in timing: start with protein, then pasta, and finish with the sauce, ensuring every bite is balanced and flavorful.
This method guarantees a dish that’s foolproof yet impressive, perfect for weeknights or dinner parties.
This recipe builds on the classic 3-2-1 principle—3 minutes for searing protein, 2 minutes for pasta cooking, and 1 minute for sauce finishing—but adds a crispy garlic bread crumb topping that elevates it to new heights.
The bread crumbs provide texture contrast while absorbing any excess sauce, creating a satisfying bite with every forkful. No special equipment is needed, just a few pantry staples and a little patience.
What you’ll end up with is a plate of al dente pasta coated in rich, flavorful sauce, topped with golden, crispy garlic bread crumbs that add a delightful crunch. The protein stays tender, the pasta holds its shape, and the sauce clings perfectly—no soggy noodles or dry meat here.
It’s the kind of dish that feels like a chef’s creation but comes together in under 30 minutes.
Whether you’re feeding a family or hosting guests, this recipe scales effortlessly. Swap proteins for chicken, shrimp, or mushrooms, and adjust the sauce to your taste—tomato, cream, or pesto all work beautifully.
The crispy garlic bread crumb topping is the star, turning a simple pasta dish into something unforgettable. Let’s get cooking!
Ingredients for 3 2 1 pasta
Pantry staples and fresh ingredients transform into this restaurant-quality 3-2-1 pasta masterpiece.
| Ingredient | Amount | Notes |
|---|---|---|
| Spaghetti 🍝 | ½ lb | High-quality, dried pasta |
| Italian Seasoned Breadcrumbs 🍞 | ¾ cup | Panko for extra crispiness |
| Garlic Cloves 🧄 | 6 cloves | Freshly minced, divided |
| Extra-Virgin Olive Oil 🫒 | ½ cup | High-quality, fruity |
| Unsalted Butter 🧈 | 4 tbsp | Cold, cubed for topping |
| Chicken Breast 🍗 | 1 ½ lb | Boneless, skinless, sliced |
| Marinara Sauce 🍅 | 2 cups | High-quality, homemade preferred |
| Fresh Parsley 🌿 | ¼ cup | Chopped, for garnish |
| Diamond Crystal Kosher Salt 🧂 | 1 ½ tsp | Divided for seasoning |
| Freshly Ground Black Pepper 🌶️ | ½ tsp | Divided for seasoning |
| Vegetable Oil 🫒 | ½ cup | For protein searing |
| Parmesan Cheese 🧀 | ¼ cup | Freshly grated, for garnish |
| Red Pepper Flakes 🌶️ | ½ tsp | Optional, for heat |
| Dried Oregano 🍃 | ½ tsp | For sauce enhancement |
| Fresh Basil Leaves 🌿 | ⅛ cup | Chopped, for sauce |
The spaghetti should be high-quality—look for brands like De Cecco or Barilla at specialty stores or the Italian section of your grocery store. The garlic is non-negotiable; Whole Foods or local farmers markets carry the freshest cloves, but even the grocery store variety works if it’s plump and firm. For the breadcrumbs, Panko is essential—it stays crispy and absorbs flavors beautifully. I always toast my Italian seasoned breadcrumbs for 5 minutes at 350°F before using to intensify their flavor. The extra-virgin olive oil should be fruity and peppery; California Olive Ranch or Colavita are excellent choices for consistent quality.
No Panko? Crushed cornflakes or matzo crackers work in a pinch—just pulse them in a food processor. Running short on fresh garlic? Garlic powder at half the amount gets you close, but the flavor won’t be as vibrant. The chicken breast can be swapped for shrimp, mushrooms, or even crispy tofu—just adjust the cooking time. For the marinara sauce, homemade is ideal (San Marzano tomatoes are the gold standard), but Rao’s or Barilla jarred sauces are solid shortcuts. If you’re using jarred, simmer it for 5 minutes to deepen the flavors. The Parmesan must be freshly grated—pre-shredded contains anti-caking agents that prevent proper melting.
Store uncooked pasta in a cool, dry place for up to 12 months, and breadcrumbs in an airtight container for 3 months. Fresh garlic keeps in the fridge for 1 week or frozen for 6 months. The marinara sauce can be prepped ahead and stored for 5 days in the fridge or 3 months frozen. For the crispy garlic bread crumb topping, make it fresh before serving—it loses crispiness within 15 minutes. Portion the sauce and protein separately to reheat efficiently; the sauce reheats beautifully while the protein should be warmed gently to avoid drying. This dish tastes even better the next day as flavors meld.
Why You’ll Love This Recipe
- Here’s what sold me: that buttery breadcrumb crust clinging to al dente pasta, crispy on the outside but still creamy inside. The garlic sizzles in the olive oil until it’s just golden—not overpowering, just there, like a warm hug for your taste buds. Honestly, I’ve made it three times this week, and I’m not tired of it.
- Three-Ingredient Magic: I swear, the name isn’t just clever—it’s the whole game. Three steps: boil spaghetti, toast breadcrumbs with butter and garlic, then toss. That’s it. No chopping, no peeling, no stress. The only prep is cracking open a jar of olive oil and setting a timer.
- Crispy-Creamy Crunch: Here’s what sold me: that buttery breadcrumb crust clinging to al dente pasta, crispy on the outside but still creamy inside. The garlic sizzles in the olive oil until it’s just golden—not overpowering, just there, like a warm hug for your taste buds. Honestly, I’ve made it three times this week, and I’m not tired of it.
- Weeknight to Potluck: Between us, this is my secret weapon for when I’m exhausted but need to feed people. Toss it together for myself on Tuesdays, double the batch for a picnic, or bring it to a holiday gathering—no one will guess it’s this unfussy. The breadcrumbs keep it interesting, so it never feels like “just pasta.”
Step-by-step instructions for al dente noodles with crispy garlic bread crumbs
Master the 3-2-1 technique for perfect pasta with crispy garlic breadcrumb topping every time.
🍳 Step 1: Cook the Spaghetti to Al Dente Perfection
Bring a large pot of water to a rolling boil and add 1.5 teaspoons of the kosher salt. Add the 0.5 lb spaghetti and cook according to package directions, but start checking for doneness 1 minute early. You’re aiming for al dente—when you bite into a strand, it should offer slight resistance but still be tender.
Reserve 1 cup of pasta water before draining. This starchy liquid is crucial for creating a silky sauce later. Drain the pasta and return it immediately to the pot off the heat. Toss with 1 tablespoon of the extra-virgin olive oil to prevent sticking and keep the strands separate.
🍳 Step 2: Prepare the Garlic Bread Crumb Topping
In a small skillet over medium heat, toast 0.75 cup Italian seasoned breadcrumbs for 2-3 minutes until golden brown and fragrant. Remove from heat and set aside. In the same skillet, melt 2 tablespoons of the butter over low heat, then add 3 cloves minced garlic and cook for 30 seconds until fragrant but not browned.
Combine the toasted breadcrumbs with the garlic butter mixture, then stir in 2 tablespoons of the extra-virgin olive oil and 0.25 cup Parmesan cheese. This creates the crispy, flavorful topping that defines the 3-2-1 method. Keep this mixture warm while you prepare the sauce.
🍳 Step 3: Create the Sauce Base with Marinara and Aromatics
In a large skillet over medium heat, add 0.5 cup vegetable oil and heat until shimmering. Add the 1.5 lb sliced chicken breast and cook for 4-5 minutes per side until golden brown and cooked through. Remove chicken and set aside.
In the same skillet, add 2 cups marinara sauce, 0.5 teaspoon dried oregano, and 0.5 teaspoon red pepper flakes. Simmer for 5 minutes to let the flavors meld. Stir in 0.125 cup chopped fresh basil leaves and 0.25 cup chopped fresh parsley just before removing from heat.
🥘 Step 4: Combine Everything for the 3-2-1 Technique
Return the cooked chicken to the sauce and toss to coat. Add the al dente spaghetti to the skillet and combine thoroughly. If the sauce seems too thick, add 2-3 tablespoons of the reserved pasta water to loosen it. The pasta should be well-coated with sauce but still maintain its individual strands.
Transfer the pasta mixture to a serving dish and top immediately with the garlic breadcrumb mixture. The contrast of crispy topping against warm, saucy pasta is what makes this dish exceptional. Sprinkle with additional Parmesan cheese and fresh parsley for freshness.
🔥 Step 5: Broil for Crispy Perfection (Optional but Recommended)
For maximum crispiness, transfer the dish to a broiler-safe skillet and place under the broiler for 2-3 minutes, watching closely to prevent burning. The breadcrumbs should become deeply golden and crispy throughout. If your oven doesn’t have a broiler function, simply sprinkle additional breadcrumbs on top and broil until golden.
Serve immediately while the pasta is hot and the breadcrumbs are crispy. The 3-2-1 technique ensures you get perfectly cooked pasta topped with a flavorful, textured finish that elevates this simple dish to restaurant-quality status.
Pro Tips For Making 3 2 1 Pasta
- CRANK THE HEAT FOR GARLIC: Don’t simmer your garlic—sizzle it. After toasting the breadcrumbs, turn the heat to medium-high and fry the minced garlic in the butter and oil until it’s golden and smells like a garlic festival. I learned this the hard way: soft garlic just tastes sad in this dish.
- TOAST BREADCRUMBS UNTIL GOLDEN: Skip the “lightly toasted” step—push those breadcrumbs until they’re deep golden, almost brown in spots. That’s when the Italian seasoning really sings. Use a spoon to stir constantly, or they’ll burn before they crisp. (Yes, even if you’re impatient like me.)
- SAVE THE PASTA WATER—BUT NOT ALL OF IT: Reserve a splash of starchy pasta water before draining, but don’t go overboard—just enough to loosen the sauce when tossing. Too much, and your dish turns into a soupy mess. (Your future self will thank you for measuring that cup.)
- USE COLD BUTTER FOR CRISPY BREADCRUMBS: Take the unsalted butter straight from the fridge and cut it into small cubes before toasting the breadcrumbs. It melts slower, keeping the crumbs crispier longer. I was skeptical until I tried it—now I never melt it first.
Make-ahead tips for this recipe
Prep Components Ahead
Start by prepping the garlic breadcrumb topping up to 24 hours in advance—it keeps well in an airtight container at room temperature. Toast the Italian seasoned breadcrumbs at 350°F for 5 minutes, then mix with melted butter, minced garlic, and Parmesan cheese.
Store in the fridge until ready to use. This saves you from last-minute scrambling and ensures crispiness. 💫
Sauce Prep Timeline
Make the marinara sauce the night before and store it in the fridge. When ready to cook, simmer it for 5 minutes to revive the flavors. I also pre-chop the fresh herbs (parsley, basil) and store them in a small container with a splash of water to keep them vibrant.
This makes assembly day a breeze—just heat and go. ✨
Protein Prep Shortcut
Slice the chicken breast into thin strips and marinate in olive oil, salt, and pepper up to 4 hours ahead. Store in a sealed container in the fridge. When cooking day arrives, simply sear the prepped chicken for 4-5 minutes per side—no extra prep needed.
For shrimp or mushrooms, cook them just before combining with pasta to avoid overcooking. 🔥
Pasta Prep Hack
Cook the spaghetti just before serving—it’s the only component that shouldn’t be prepped ahead. However, you can boil water in advance and keep it hot on low heat while you finish other steps.
Reserve 1 cup pasta water in a small container nearby for quick access when tossing. This keeps your workflow smooth and prevents soggy noodles. 💡
Assembly Efficiency
Use the 3-2-1 timing method to streamline assembly: while the pasta cooks (2 minutes), finish the sauce and sear the protein (3 minutes). The 1-minute toss combines everything at the end.
Pre-portion the garlic breadcrumb topping into small bowls so it’s ready to sprinkle immediately after plating. This keeps everything hot and crispy. 🌟
Leftovers Strategy
Store leftovers in airtight containers with parchment paper between layers to prevent sticking. Reheat the sauce and pasta together on the stovetop over medium-low heat for 5-7 minutes, stirring occasionally.
Add a splash of reserved pasta water if needed. The garlic breadcrumbs should be made fresh when reheating—sprinkle them on top just before serving for maximum crispiness. 💛
Nutrition facts
Frequently asked questions
What’s the secret to perfect al dente pasta in the 3-2-1 method?
Start checking for doneness 1 minute before the package suggests, then taste-test immediately. The pasta should have a slight bite—if it’s too soft, it’s overcooked. Reserve 1 cup pasta water before draining to help emulsify the sauce later. Toss the drained pasta with 1 tbsp olive oil right away to prevent sticking.
Can I use this method with other pasta shapes besides spaghetti?
The 3-2-1 technique works with any long pasta like linguine, fettuccine, or even bucatini. For shorter shapes like penne or rigatoni, adjust the cooking time slightly—these need 1-2 extra minutes to reach al dente. The crispy breadcrumb topping still works perfectly!
How do I keep the garlic breadcrumb topping crispy?
Toast the breadcrumbs until golden brown (2-3 minutes at medium heat) and mix them with cold butter to lock in crispiness. Make the topping fresh before serving—it loses crunch within 15 minutes. For extra insurance, broil the dish for 2-3 minutes right before serving.
What if my sauce is too thick after combining with pasta?
Add 2-3 tbsp reserved pasta water, 1 tbsp at a time, while stirring until the sauce reaches a silky consistency. The starch in the pasta water acts as a natural thickener when needed. Never add water directly—it breaks the sauce’s emulsification.
Can I make this recipe vegetarian or vegan?
Swap chicken for mushrooms, tofu, or chickpeas—just adjust cooking times. Use vegan butter and omit Parmesan (or use nutritional yeast). The crispy breadcrumb topping remains the same! For extra flavor, add 1 tsp smoked paprika to the sauce.

- Pea Soup Instant Pot Recipe: Velvety Green Smoothness in 20 Minutes - November 1, 2026
- Pork Loin Pulled Pork Crock Pot Recipe: Slow-Smoked Tenderness With Zero Dryness - November 1, 2026
- Baked Potatoes in Crock Pot Recipe: Buttery Interiors and Crispy Top Magic - November 1, 2026