
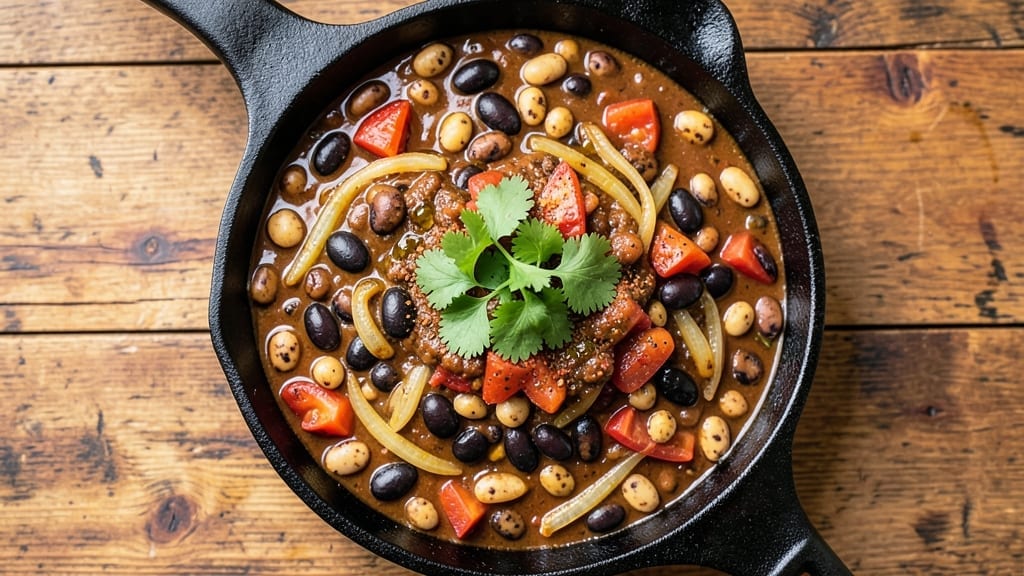
This vegetarian 3 bean chili recipe delivers all the hearty satisfaction of a classic chili—without a single ounce of meat. The secret lies in a perfect blend of kidney, black, and pinto beans, simmered with smoky spices and rich broth until every bite is tender and packed with flavor.
What makes this recipe stand out is how it transforms simple pantry staples into a restaurant-quality meal that’s ready in just one pot and 45 minutes.
The foundation of this chili is a deep, aromatic base built from cumin, chili powder, and garlic, which infuse the beans and vegetables with layers of warmth.
Unlike many vegetarian chilis that rely on processed meat substitutes, this version gets its heartiness from the beans themselves—soaked overnight for maximum tenderness and texture. The result is a chili that’s thick, flavorful, and satisfying enough to serve as the centerpiece of any meal.
By the time you’re ready to serve, you’ll have a pot of chili that’s rich in color and depth, with beans that melt in your mouth and a broth that’s just the right consistency—neither too thin nor too thick.
The spices develop as they simmer, creating a balance of smoky, slightly sweet, and tangy flavors that keep you coming back for another bowl. Top it with avocado, sour cream, or cilantro for a fresh contrast that elevates every spoonful.
This chili is perfect for meal prepping, freezer-friendly, and scales easily to feed a crowd. Whether you’re looking for a cozy weeknight dinner or a dish to bring to a potluck, this recipe delivers on flavor, simplicity, and heartiness. Let’s get cooking!
Ingredients for 3 bean chili recipe no meat
Pantry staples plus a few fresh flavors—this chili is all about simple ingredients done right.
| Ingredient | Amount | Notes |
|---|---|---|
| Kidney Beans (dried) 🌱 | 1 cup | Soaked overnight for tenderness |
| Black Beans (dried) 🌱 | 1 cup | Soaked overnight for tenderness |
| Pinto Beans (dried) 🌱 | 1 cup | Soaked overnight for tenderness |
| Vegetable Broth 💧 | 4 cups | Low-sodium preferred |
| Diced Tomatoes (canned) 🍅 | 1 can | 15 oz, fire-roasted preferred |
| Onion (yellow) 🧅 | 1 whole | Diced, medium size |
| Garlic Cloves 🧄 | 4 cloves | Minced, fresh preferred |
| Ground Cumin 🌿 | 2 tsp | Toasted for deeper flavor |
| Chili Powder 🌶️ | 2 tbsp | Smoked or mild variety |
| Dried Oregano 🍃 | 1 tsp | Mexican oregano if available |
| Salt 🧂 | 1 tsp | Kosher or sea salt |
| Black Pepper 🌶️ | ½ tsp | Freshly ground preferred |
| Cayenne Pepper 🔥 | ¼ tsp | Adjust for heat preference |
| Bell Pepper (red) 🌶️ | 1 whole | Diced, any color |
| Tomato Paste 🍅 | 2 tbsp | Squeeze tube preferred |
The beans are the heart of this chili. Dried beans give the best texture, but canned work in a pinch—just rinse them well. Soaking overnight makes them tender and reduces cooking time. Trader Joe’s has great dried beans in bulk, but any grocery store carries them. Look for kidney, black, and pinto—those three together give you the perfect mix of colors and flavors. If you’re short on time, canned beans are fine, but they won’t have that same melt-in-your-mouth texture. The tomato paste? Squeeze tubes from Trader Joe’s are perfect—no waste, and they keep forever.
No fire-roasted tomatoes? Regular diced tomatoes work fine. Fresh garlic is ideal, but jarred minced garlic is a decent swap (just use half the amount). Want more depth? Add a splash of balsamic vinegar or a pinch of cocoa powder. The bell pepper can be any color—red, yellow, or green. If you’re missing one of the spices, Mexican seasoning blends from the Latin aisle at Walmart or Kroger are a lifesaver. They’ve got all the spices you need in one packet. For extra richness, stir in a spoonful of nutritional yeast at the end—it adds a cheesy, umami kick without any dairy.
This chili tastes even better the next day—make extra and freeze portions. Keeps in the fridge for 5-6 days and freezes for up to 3 months. I always double the recipe and portion it into containers so I’ve got lunches sorted for the week. The beans get even more tender after sitting overnight, so reheat gently on the stove with a splash of broth to keep it from drying out. Top with avocado, cilantro, or a dollop of sour cream when serving—fresh toppings make all the difference.
Why You’ll Love This Recipe
- No-Soaking Needed: I’ll admit, I used to dread overnight soaking—but these dried beans? Just an hour in hot water, then straight into the pot. No fuss, no waiting around, and the texture still comes out tender and rich.
- Three Beans, One Magic: Honestly, the combo of kidney, black, and pinto beans is where this dish shines. The kidney beans add that hearty bite, black beans bring deep earthiness, and pinto? Creamy perfection. Together, they’re better than any single bean could be alone.
- Game for Any Day: Between us, this chili works for lazy Mondays and potlucks. Serve it over rice for a full meal, or just scoop it straight from the pot with a spoon. My college-aged son even brought a jar to share at his dorm—no judgment there.
- Budget Meets Feast: A big pot of this costs me less than $5 for six servings. The dried beans stretch forever, and canned tomatoes keep it simple without breaking the bank. Leftovers? They taste even better the next day—proof that good food doesn’t need a fancy price tag.
Step-by-step instructions for hearty veggie-packed chili
This chili comes together in one pot with minimal cleanup—just follow these simple steps.
Soak and Prepare the Beans
Start by draining and rinsing the 1 cup dried kidney beans, 1 cup black beans, and 1 cup pinto beans thoroughly. Place them in a large bowl and cover with plenty of water—at least 8 cups—to ensure they’re completely submerged. Let them soak overnight or for at least 8 hours at room temperature. This step guarantees tender beans that hold their shape beautifully in the final dish.
After soaking, drain the beans again and give them a quick rinse. The next morning, place them in a large pot with 4 cups vegetable broth and bring to a boil. Reduce heat to a simmer and cook for 20 minutes, stirring occasionally. This pre-cooking step helps break down the beans’ skins and ensures they blend seamlessly into the chili later.
Sauté Aromatics and Spices
While the beans simmer, dice the 1 whole yellow onion and 1 whole red bell pepper into small, even pieces. In a separate large pot (or the same one if you’ve drained the beans), heat 1 tablespoon olive oil over medium heat. Add the onions and cook for 5 minutes until they soften and begin to caramelize slightly.
Add the minced 4 cloves garlic, 2 tablespoons chili powder, 2 teaspoons ground cumin, 1 teaspoon dried oregano, 1 teaspoon salt, ½ teaspoon black pepper, and ¼ teaspoon cayenne pepper. Stir constantly for 1 minute until the spices become fragrant and the garlic turns golden. This aromatic base is the flavor foundation of your chili, so don’t rush this step.
Build the Chili Base
Add the pre-cooked beans (with their broth) to the pot with the sautéed aromatics. Stir in the 1 can diced tomatoes (with juices) and 2 tablespoons tomato paste, breaking up any lumps. Bring the mixture to a gentle boil, then reduce heat to low-medium and let it simmer uncovered for 45 minutes, stirring occasionally. The chili should thicken gradually as the beans release starch and the liquid reduces.
After 45 minutes, taste the chili and adjust seasoning if needed. You might need a pinch more salt or cayenne for your preferred heat level. The beans should be tender but still hold their shape—if they’re too mushy, simmer for another 10 minutes uncovered to thicken the sauce further.
Simmer to Perfection
Continue simmering the chili for an additional 30-45 minutes until it reaches your ideal consistency—thick enough to coat the back of a spoon but still spoonable. The flavors will deepen and meld together beautifully during this time. If the chili becomes too thick, add ½ cup hot vegetable broth to loosen it.
For the final touch, taste again and make any necessary adjustments. The chili should have a rich, smoky depth from the spices, with bright acidity from the tomatoes and natural sweetness from the bell pepper. Let it sit off the heat for 5 minutes before serving—this resting period allows the flavors to settle and the chili to thicken slightly more.
Serve and Enjoy
Ladle the chili into bowls and serve immediately with your favorite toppings—sour cream, shredded cheese, chopped cilantro, or a dollop of Greek yogurt work beautifully. The chili will continue to thicken slightly as it cools, so don’t worry if it looks a bit looser right out of the pot.
This hearty chili keeps well in the refrigerator for 3-4 days or freezes beautifully for up to 3 months. The flavors actually improve over time as they meld together further, making it perfect for meal prep. Enjoy your comforting, protein-packed one-pot meal that’s ready in just one pot!
Pro Tips For Making 3 Bean Chili Recipe No Meat
- SOAK BEANS OVERNIGHT: I learned this the hard way—rushing dried beans with a quick soak leaves them gummy and uneven. Skip the 15-minute soak and let them sit in cold water for 8+ hours (or at least 2 hours if you’re in a hurry). Drain, rinse, and start cooking—your beans will soften evenly and avoid that sad, mushy texture.
- CRUSH HALF THE BEANS: Does it look weird? Yes. Does it work? Every single time. After simmering for 45 minutes, pull out about half the beans and lightly crush them with a wooden spoon or potato masher. This breaks down some of the starch, thickening the chili naturally without relying on extra flour or cornstarch.
- SIMMER LOW AND LONG: I used to walk away after the beans were tender, but that’s where the chili falls flat. Let it bubble gently for another 30–45 minutes after the beans are done—this lets the flavors meld and the broth reduce just enough to coat the beans perfectly. (Yes, even if you’re impatient like me.)
- SAUTÉ TOMATOES FIRST: Skip adding diced tomatoes straight to the pot—they’ll just turn to mush. Instead, drain and chop them, then sauté in a dry skillet over medium heat for 3–4 minutes until the edges start to brown. The concentrated flavor makes a real difference in the final chili. (Your future self will thank you.)
Storing and reheating this recipe
Refrigerator Storage
Let your chili cool to room temperature for 1-2 hours before transferring to airtight containers—I use glass Pyrex with snap-on lids for best results. Store in the fridge at 40°F or below for up to 5-6 days.
The flavors actually deepen overnight as the spices meld together beautifully. I always portion mine into quart-sized containers for easy reheating and serving. 🥫
Freezer Storage
This chili freezes exceptionally well for up to 3 months without losing quality. I recommend using quart-sized freezer bags or glass containers with tight-sealing lids—leave 1 inch of headspace for expansion.
Label with the date and freeze flat for efficient storage. Thaw overnight in the fridge before reheating for best texture. 🧊
Stovetop Reheating
For the best texture, reheat chili on the stovetop over medium-low heat. Transfer to a pot and add ¼ cup vegetable broth to prevent drying. Stir frequently and simmer for 10-15 minutes until heated through (165°F internal temperature).
Taste and adjust seasoning—chili often needs a pinch more salt after reheating. 🔥
Microwave Reheating
For quick reheating, transfer chili to a microwave-safe bowl and cover with a damp paper towel. Heat on 70% power in 2-minute intervals, stirring between each, until hot.
Add 1-2 tablespoons broth or water if it looks too thick. This method works best for single servings and takes about 4-5 minutes total. ✨
Freezer to Fridge Transition
When moving chili from freezer to fridge, thaw it in the refrigerator overnight for best results. If you need it faster, use the cold water bath method: Seal chili in its container and submerge in cold water, changing the water every 30 minutes until thawed.
Never microwave to thaw—it creates uneven heating that can ruin the texture. 💡
Reheating Tips
Always reheat chili to 165°F internal temperature to ensure food safety. I like adding a splash of lime juice or apple cider vinegar when reheating to brighten flavors. For extra richness, stir in 1 tablespoon olive oil during reheating.
The chili will thicken slightly as it cools, so don’t worry if it looks looser when hot. 💪
Nutrition facts
Frequently asked questions
Can I substitute canned beans for dried beans in this recipe?
Yes! Use 2 (15 oz) cans of each bean type (kidney, black, pinto) instead of dried. Drain and rinse them well, then add them directly to the pot after sautéing the aromatics. The chili will be ready faster, but the texture won’t be quite as tender as with soaked dried beans. For best results, choose low-sodium varieties.
How can I make this chili spicier?
Add ½ teaspoon extra cayenne pepper or 1-2 dashes of hot sauce when tasting the chili. For smoky heat, stir in ½ teaspoon smoked paprika or a pinch of chipotle powder. If you love intense heat, try adding 1 chopped jalapeño with the bell pepper. Always taste first!
What are the best toppings for this vegetarian chili?
Classic options include avocado slices, sour cream, shredded cheese, or fresh cilantro. For extra protein, add crumbled tofu or black beans. A squeeze of lime or a sprinkle of cotija cheese adds brightness. Keep it light—toppings should complement, not overpower, the chili’s flavors.
Can I make this chili in an Instant Pot?
Sauté the onions, garlic, and spices as directed, then add all ingredients except the tomato paste. Cook on high pressure for 15 minutes, then quick-release. Stir in the tomato paste and simmer on sauté mode for 10 minutes to thicken. The Instant Pot cuts cooking time to about 30 minutes total!
Why did my chili turn out too thick?
This usually happens when beans release too much starch. Thin it with ½ cup hot broth or water while simmering. For next time, simmer uncovered for 5-10 minutes longer to reduce liquid gradually. If it’s still too thick, stir in 1 tablespoon cornstarch mixed with 2 tbsp water and simmer for 2 minutes.

- 12 Bean Chili Recipe: Hearty Slow-Cooked Depth With 12 Legumes - October 17, 2026
- 5 Seed Bread Recipe: Nutty Crunch and Artisan Flavor in One Loaf - October 17, 2026
- 1 Lb Macaroni Salad Recipe: Bold, Crunchy, and Crowd-Pleasing - October 17, 2026