
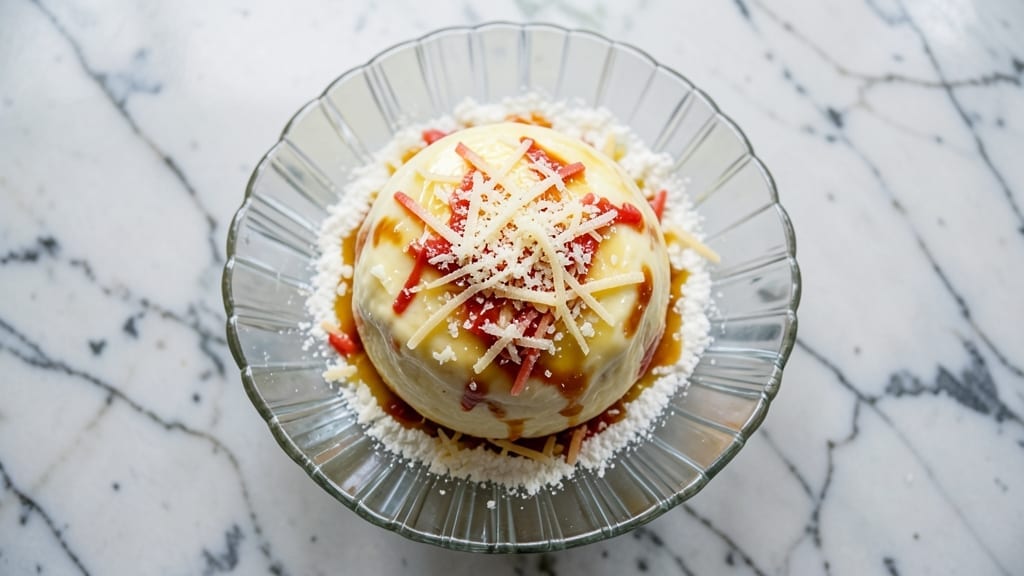
A 3 cheese cheese ball recipe with a crunchy parmesan crust and gooey melts inside is the ultimate party appetizer that disappears faster than you can say “refill the bowl.”
The secret lies in the perfect balance of sharp cheddar, creamy mozzarella, and rich cream cheese—all baked until golden and crispy on the outside while staying tender and stretchy within.
This isn’t your childhood cheese ball; it’s a sophisticated, restaurant-worthy bite that pairs beautifully with crackers, nuts, or even as a standalone snack for game day or holiday gatherings.
The magic happens in the baking process, where the parmesan crust develops that irresistible crunch while the cheese inside melts into a gooey, pull-apart texture. Unlike store-bought versions, this recipe uses real cheese—no fillers or preservatives—so every bite is rich, flavorful, and satisfying.
The best part? It’s easy to make ahead, stays fresh in the fridge for up to a week, and can even be frozen for later. Whether you’re hosting a crowd or just craving a salty, cheesy snack, this cheese ball delivers on flavor and texture.
What sets this recipe apart is the dual texture: the crispy, golden crust from the parmesan coating contrasts perfectly with the creamy, stretchy cheese center. The combination of cheeses ensures a balanced flavor profile—sharp, creamy, and slightly tangy—while the baking time is carefully timed to avoid overcooking.
Once you try this version, you’ll never go back to the bland, store-bought kind. Serve it with your favorite dipping sauce or let guests dig in with crackers and veggies for the ultimate crowd-pleaser.
For those who love to customize, this recipe is endlessly adaptable. Add a pinch of garlic powder, dried herbs, or even a dash of smoked paprika for extra depth. You can also mix in cooked bacon or sun-dried tomatoes for a heartier bite.
The possibilities are endless, but the foundation of three cheeses ensures a foolproof, delicious result every time. Let’s get started on creating the perfect cheese ball!
Ingredients for 3 cheese cheese ball
Three cheeses, one golden crust, endless cheesy cravings satisfied—this is your ultimate party bite.
| Ingredient | Amount | Notes |
|---|---|---|
| Sharp White Cheddar Cheese 🧀 | 8 oz | Aged for maximum sharpness |
| Mozzarella Cheese 🧀 | 8 oz | Low-moisture, shredded |
| Cream Cheese 🧈 | 8 oz | Full-fat for creaminess |
| Parmesan Cheese 🧀 | 1 cup | Freshly grated, block form |
| Butter 🧈 | 2 tbsp | Unsalted, softened |
| All-Purpose Flour 🌾 | 2 tbsp | For binding |
| Garlic Powder 🧄 | 1 tsp | For subtle depth |
| Dried Parsley 🌿 | 1 tsp | Finely chopped |
| Salt 🧂 | ½ tsp | Diamond Crystal preferred |
| Black Pepper 🌶️ | ¼ tsp | Freshly cracked |
| Worcestershire Sauce 🍶 | 1 tbsp | For umami richness |
| Crackers 🍞 | 1 package | For serving (optional) |
| Nuts 🥜 | ½ cup | Almonds or cashews, chopped |
The cheeses are non-negotiable here. Sharp white cheddar brings that tangy bite, while low-moisture mozzarella keeps it creamy without getting soggy. Cream cheese binds everything together like glue—don’t skimp on the full-fat version, trust me on that. For the Parmesan crust, grab a block from the deli counter (pre-grated gets clumpy and lacks that golden crunch). I always buy extra since it keeps for months in the freezer. The Worcestershire sauce might seem odd, but it adds this incredible savory depth that makes the whole thing pop—Lea & Perrins is my go-to brand for this recipe.
No sharp cheddar? Extra-sharp white cheddar works in a pinch, but it won’t have the same punch. Mozzarella getting old and rubbery? Fresh mozzarella from a wedge changes the game—it melts beautifully and keeps things stretchy. Forgot Worcestershire? A splash of soy sauce plus a pinch of smoked paprika mimics that umami kick. The nuts and crackers are totally optional but take this from good to showstopper—Trader Joe’s almonds are my secret weapon for texture. Pro tip: Toast the nuts first if you want extra crunch. And if you’re feeling fancy, swap half the mozzarella for smoked gouda for a smoky twist.
This cheese ball is a fridge staple—5-7 days wrapped in parchment and stored in an airtight container. For parties, I like to make it a day ahead so the flavors meld even more. Freezes beautifully too—up to 3 months if you wrap it tightly in plastic wrap plus foil. The crust stays crispy even after freezing, which is honestly a miracle. Serve it at room temperature for the best texture, and always have extra crackers on hand—it disappears faster than you can say “refill the bowl.” Leftovers? Toss them in a pan with a splash of milk and make a cheesy grilled sandwich. No waste here!
Why You’ll Love This Recipe
- No Mixer Needed: The sharp cheddar and mozzarella blend so smoothly with softened cream cheese and butter—no pulsing required. I just use a fork and my hands, and the texture comes together like magic.
- Salty-Sweet Magic: That sharp white cheddar brings the tang, the mozzarella melts into creamy pockets, and the parmesan adds nutty depth. Honestly, it’s the kind of flavor that disappears in seconds but lingers all day.
- Party in a Bowl: Roll it into bite-sized balls, slice it for crackers, or cube it for nachos—this cheese ball works for game day, holiday platters, or just because. My kids grab it straight from the fridge when they’re hungry.
- Cheap & Lasts Forever: A block of cheddar and a tub of cream cheese stretch into weeks of snacking. I’ve had this recipe for years, and it’s still my go-to for when I need something filling without breaking the bank.
Step-by-step instructions for 3 cheese cheese ball
Here’s how to create a showstopping cheese ball with a perfect balance of textures and flavors.
Mix the Cheese Base
In a large mixing bowl, combine the 8 oz sharp white cheddar cheese, 8 oz mozzarella cheese, and 8 oz cream cheese. Use a wooden spoon or silicone spatula to work the cheeses together until they form a smooth, creamy mixture. I like to press the cheeses against the sides of the bowl to ensure they melt completely and incorporate air.
This step is crucial for texture—you want the cheeses to blend seamlessly. If any lumps remain, use a hand mixer on low speed for 30 seconds to fully emulsify. The mixture should be soft enough to shape but not sticky. Set the bowl aside while you prepare the remaining ingredients.
Add Seasonings and Binders
To the cheese mixture, add the 2 tbsp softened butter, 2 tbsp all-purpose flour, 1 tsp garlic powder, 1 tsp dried parsley, 0.5 tsp salt, 0.25 tsp black pepper, and 1 tbsp Worcestershire sauce. Mix thoroughly until all the seasonings are evenly distributed throughout the cheese.
The Worcestershire sauce adds a subtle umami depth that elevates the flavor profile. Don’t skip this step—it’s what transforms a good cheese ball into an exceptional one. The flour helps bind everything together, ensuring the cheese ball holds its shape when coated in the parmesan crust.
Shape and Coat with Parmesan
Transfer the cheese mixture to a piece of parchment paper and shape it into a ball, about 3 inches in diameter. Press gently to create a smooth surface. In a shallow bowl, combine the 1 cup freshly grated parmesan cheese with the 0.5 cup chopped nuts. Roll the cheese ball in this mixture until it’s completely coated, pressing gently to adhere.
Here’s the thing—don’t be afraid to get your hands involved. Press the parmesan and nuts firmly into the cheese ball so they stick. This creates that signature crunchy crust that makes this cheese ball irresistible. Place the coated cheese ball on a parchment-lined plate and refrigerate for at least 1 hour to firm up.
Serve with Crunchy Crackers
Once the cheese ball is firm, slice it into wedges using a sharp knife. Serve immediately with the package of crackers on the side for dipping. The contrast of the creamy cheese with the crunchy parmesan crust and crackers makes every bite unforgettable.
For an extra touch, garnish the cheese ball with additional chopped nuts or a sprinkle of dried parsley before serving. This cheese ball keeps well in the refrigerator for up to 5 days, making it perfect for parties or gatherings. The flavors only improve as it sits, allowing the seasonings to meld together beautifully.
Pro Tips For Making 3 Cheese Cheese Ball
- Grate Cheese Fresh: I learned this the hard way—pre-shredded cheese has anti-caking agents that make the cheese ball dry and crumbly. Use a box grater for sharp white cheddar and mozzarella, and freshly grate the parmesan too. It’s a little more work, but the texture stays creamy and cohesive.
- Mix Over Ice: The cream cheese and butter soften too fast when mixed with warm hands. Place your mixing bowl in a larger bowl of ice water while combining everything—this keeps the base cool and prevents greasiness. Trust me, your cheese ball won’t turn into a sad, oily blob.
- Skip the Overmixing: After burning three batches, I finally figured out that overworking the mixture makes it tough. Stir just until the butter and cream cheese are fully incorporated—maybe 2 minutes max. The cheese ball needs to stay tender, not turn into a chewy rubber ball.
- Chill in Layers: Sounds weird, but it works: shape the cheese ball, then wrap it tightly in plastic and refrigerate for 1 hour before rolling it in seasoning. If you roll it right away, the coating sticks unevenly and falls off. Patience here makes all the difference for a clean, crisp finish.
Storing and reheating your 3 cheese cheese ball
Fridge Storage Tips
Store your cheese ball in an airtight container lined with parchment paper to prevent sticking. I always wrap it tightly in plastic wrap first, then place it in the fridge.
The flavors actually deepen over 3-5 days, making it perfect for parties. Keep it at 40°F or below to maintain freshness and prevent bacterial growth. 🧀
Freezer Magic
This cheese ball freezes beautifully for up to 3 months without losing its signature crunch. First, wrap it in plastic wrap, then foil for extra protection. When ready to serve, thaw in the fridge overnight.
The texture remains crispy on the outside and creamy inside—no soggy surprises here. I’ve even made double batches for holidays! ❄️
Reheating Secrets
For the best texture, serve at room temperature. If you need to warm it slightly, place wedges in a 200°F oven for 5-7 minutes until just heated through.
Microwave reheating works in a pinch, but it can make the crust lose its crunch. I prefer the oven method for maintaining that perfect balance of textures. 🔥
Make-Ahead Party Hack
Make the cheese ball 24 hours ahead of your gathering. The flavors meld beautifully overnight, and it’s one less thing to worry about on party day. Store it in the fridge until ready to serve, then slice just before guests arrive. This is my go-to strategy for stress-free entertaining. 🎉
Reviving Leftovers
If your cheese ball starts to lose its crunch after a few days, pop it in the oven at 350°F for 5 minutes to refresh the crust.
You can also create a cheesy grilled sandwich by slicing the ball in half and grilling it between bread with a splash of milk. No waste here—just creative solutions! 💡
Serving Temperature
Always serve at room temperature for the best texture. The contrast between the creamy center and crispy crust is what makes this cheese ball special. Let it sit for 15-20 minutes before serving if it’s straight from the fridge. The temperature adjustment makes all the difference in texture. 🌟
Nutrition facts
Frequently asked questions
Can I make this cheese ball without cream cheese?
The cream cheese is essential for binding the mixture and creating that signature creamy texture. If you absolutely must substitute, try 1/2 cup sour cream plus 1/2 cup ricotta cheese—this combo mimics the fat content and binding properties. The result won’t be identical, but it’ll still hold together. Never skip the fat content entirely, or your cheese ball will crumble instead of slice neatly.
Why does my cheese ball get oily or greasy?
Oiliness usually happens when the cheese mixture isn’t fully emulsified or when using high-moisture cheeses like fresh mozzarella. To fix this, press the cheeses against the bowl sides while mixing to incorporate air. For extra insurance, add 1 extra tbsp flour to absorb excess moisture. Also, let the cheese ball rest in the fridge for at least 2 hours before slicing—this helps the oils redistribute evenly.
Can I bake this cheese ball instead of just coating it?
For a baked version, shape the cheese ball, coat it in parmesan, then bake at 375°F for 15-20 minutes until the crust is golden and firm. This creates a warm, gooey center with a crispy exterior. For even better results, brush the crust with 1 tbsp melted butter before baking. Just watch closely—they burn fast! The baked version is perfect for holiday gatherings where you want warm appetizers.
What are the best cheeses to use for extra flavor?
For a smoky twist, swap half the cheddar for smoked gouda. Need something spicy? Mix in 1/2 cup pepper jack with the mozzarella. For a tangy kick, try blue cheese crumbles (1/4 cup)—it adds complexity that pairs perfectly with the parmesan crust. Always balance bold cheeses with milder ones to avoid overpowering the flavor. The key is maintaining that creamy texture while adding depth.
How do I keep the cheese ball from sticking to the parchment?
Use a high-quality parchment paper and make sure it’s completely flat under the cheese ball. For extra insurance, lightly dust the parchment with cornstarch or flour before shaping. When transferring the cheese ball to the fridge, place it on a wire rack over a plate—this allows air circulation and prevents moisture buildup. The cheese ball should release cleanly after 1 hour of chilling.

- Baked Potatoes in Crock Pot Recipe: Buttery Interiors and Crispy Top Magic - November 1, 2026
- Braised Beef Short Ribs Recipe: Crock Pot Fall-Off-Bone Magic in 6 Hours - November 1, 2026
- Crock Pot Cocoa Recipe: Velvety Warmth With Hidden Spice Magic - November 1, 2026