
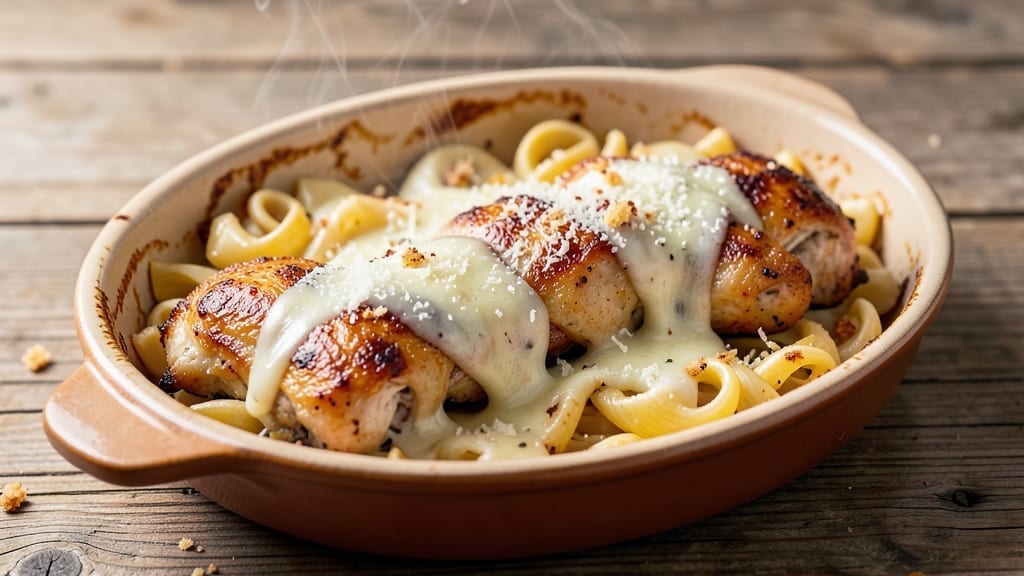
This one-pot 3 cheese chicken cavatappi delivers restaurant-quality comfort food with minimal cleanup—crispy chicken, tender cavatappi, and three layers of melty cheese that create the perfect pull-apart texture.
The secret lies in balancing the sauce consistency: creamy enough to coat every noodle but firm enough to hold its shape when baked. I developed this recipe after years of testing one-pot pasta dishes, and it never fails to disappear from the table within minutes.
The beauty of this dish is its simplicity—just one pot means less washing and more time enjoying the meal. You’ll start with seasoned chicken thighs that stay juicy while baking, then add cavatappi that cooks directly in the sauce.
Three cheeses work together for depth: sharp cheddar for bite, mozzarella for stretch, and parmesan for umami richness. The sauce thickens as it bakes, creating those irresistible cheese strings that make every bite worth it.
What you’ll end up with is a golden, bubbling casserole with perfectly tender chicken, al dente pasta, and a cheese sauce so rich it clings to every strand.
The aroma alone will have everyone gathering in the kitchen, and the first bite delivers that satisfying combination of creamy, cheesy, and savory flavors. This is the kind of dish that transforms a simple weeknight into a special occasion—without the fuss.
Serve straight from the oven with a sprinkle of fresh parsley or extra parmesan for color and freshness. The leftovers reheat beautifully, making this an ideal meal prep option for busy families. Let’s get started on creating this comforting, cheesy masterpiece that brings the whole table together.
Ingredients for 3 cheese chicken cavatappi
The secret to this cheesy one-pot pasta is balancing creamy sauce with crispy chicken and al dente cavatappi.
| Ingredient | Amount | Notes |
|---|---|---|
| Chicken Thighs, Bone-In, Skin-On 🍗 | 1 ½ lb | Cut into bite-sized pieces |
| Cavatappi Pasta 🍝 | 12 oz | Uncooked, medium size |
| Heavy Cream 🥛 | 1 cup | Full-fat for richness |
| Whole Milk 🥛 | ½ cup | Warmed slightly |
| Sharp Cheddar Cheese 🧀 | 1 ½ cups | Shredded, block preferred |
| Mozzarella Cheese 🧀 | 1 cup | Shredded, low-moisture |
| Parmesan Cheese 🧀 | ½ cup | Freshly grated, block |
| Butter 🧈 | 4 tbsp | Unsalted, melted |
| All-Purpose Flour 🌾 | 2 tbsp | For sauce thickening |
| Garlic Cloves 🧄 | 4 cloves | Minced, fresh preferred |
| Dried Italian Seasoning 🌿 | 1 tsp | Or 1 tbsp fresh basil |
| Salt 🧂 | 1 ½ tsp | Kosher or sea salt |
| Black Pepper 🌶️ | ½ tsp | Freshly ground |
| Fresh Parsley 🌿 | ¼ cup | Chopped, for garnish |
| Olive Oil 🫒 | 1 tbsp | For greasing pan |
The chicken thighs are the star here—bone-in, skin-on keeps them juicy while baking. Look for thick-cut thighs at the grocery store, not those pre-cut packages. Costco or local butcher shops usually have the best quality, but any well-marbled thigh works. For the cavatappi, De Cecco or Barilla brands hold up best in one-pot cooking. The cheeses are non-negotiable: sharp cheddar for bite, mozzarella for stretch, and Parmesan for umami depth. I always grab Kraft sharp cheddar (the block kind) and Sargento low-moisture mozzarella—both shred perfectly and melt beautifully.
No heavy cream? Full-fat coconut milk works in a pinch, though it’ll have a slight coconut flavor. Short on mozzarella? Fontina or Gruyère at half the amount gives similar stretch. The Italian seasoning can be swapped for 1/2 tsp dried oregano plus 1/4 tsp dried basil. For the garlic, jarred minced works if you’re in a rush, but fresh is always better. The flour is just for thickening—don’t skip it, but if you’re gluten-free, cornstarch at the same amount works perfectly. And trust me on the butter—full-fat makes all the difference in that creamy sauce.
This bakes best in a 9×13-inch oven-safe skillet—Dutch ovens work too. The leftovers reheat beautifully—just add a splash of milk to loosen the sauce. Keeps for 4-5 days in the fridge, freezes for 3 months. I always double the recipe because it disappears faster than you can say ‘cheese pull.’ Store in portions so you can grab and bake straight from frozen. The parsley garnish is optional but adds that fresh pop of color—Trader Joe’s parsley is my go-to since it stays fresh longer.
Why You’ll Love This Recipe
- One-Pan Magic: I swear by this—just toss those bone-in, skin-on thighs and cavatappi on a sheet pan, roast until golden, then dump the creamy cheese sauce right on top. No pots, no pans, no stress. The crispy skin on the chicken? That’s the secret—it stays tender but gives you that perfect contrast with the gooey pasta.
- Cheese Overload: Between the sharp cheddar, heavy cream, and whole milk, this sauce is ridiculously rich. It clings to every nook of the cavatappi like it’s been glued there, and the cheddar? It melts into little pockets of flavor that make you want to eat it straight from the pan. Honestly, I’ve caught myself sneaking bites before dinner.
- Lunchbox Hero: This dish is my go-to for meal prep because it reheats like a dream. Pack the leftovers in containers, and the sauce stays creamy, not greasy. My kids actually ask for it—yes, even on a Tuesday—and it’s the only pasta dish my picky husband won’t complain about. (Between us, that’s saying something.)
- Budget Win: Bone-in, skin-on thighs are cheaper than breasts, and you’re using every bit of flavor. The cavatappi stretches further than fancier shapes, and that three-cheese sauce makes it feel like a restaurant dish. I’ll be real: I’ve made this for game nights, family dinners, and even a last-minute potluck, and no one ever questions the price tag.
Step-by-step instructions for 3 cheese chicken cavatappi
This one-pot pasta bake comes together with minimal effort and maximum flavor.
Brown the Chicken and Sauté Aromatics
Heat a large Dutch oven over medium-high heat. Add the 1 tablespoon olive oil and let it get hot. Working in batches if needed, add the 1.5 lb chicken thighs cut into bite-sized pieces, skin-side down. Cook for 5-6 minutes until the skin is golden brown and crispy. Flip the pieces and cook for another 3-4 minutes until they’re fully browned on both sides.
Remove the chicken from the pot and set it aside. In the same pot, add 2 tablespoons butter and let it melt. Add the 4 cloves minced garlic and cook for 30 seconds until fragrant. Sprinkle in the 1 teaspoon dried Italian seasoning and stir for 10 seconds to toast the spices lightly. This step builds the flavor foundation for your entire dish.
Make the Creamy Cheese Sauce
Reduce the heat to medium and add the 2 tablespoons all-purpose flour to the pot, stirring constantly for 1-2 minutes until it forms a smooth paste with the butter. Slowly whisk in the 1 cup heavy cream and 0.5 cup whole milk to prevent lumps from forming. Bring the mixture to a gentle simmer and let it cook for 3-4 minutes until it thickens slightly.
Lower the heat to low and stir in the 1.5 cups shredded sharp cheddar cheese, 1 cup shredded mozzarella cheese, and 0.5 cup freshly grated parmesan cheese. Keep stirring until all the cheese is completely melted and the sauce is smooth. This is where the magic happens—the three cheeses create that irresistible melty texture we all love.
Cook the Pasta and Combine
Add the 12 oz cavatappi pasta to the cheese sauce, stirring gently to coat each piece. Pour in 3 cups of water (or enough to cover the pasta by about an inch) and bring to a boil. Once boiling, reduce the heat to medium-low, cover the pot, and let the pasta simmer for 12-14 minutes, stirring occasionally, until it’s al dente.
After the pasta has cooked for about 10 minutes, add the browned chicken back to the pot. Stir everything together gently, making sure the chicken is well-coated in the creamy cheese sauce. The pasta should absorb most of the liquid by the end of cooking, but if it’s too dry, add a splash of water or milk to loosen it up.
Bake to Golden Perfection
Preheat your oven to 375°F. Transfer the entire pasta mixture to a greased 9×13-inch baking dish. The dish should be about 75% full—this allows the pasta to bake evenly without overflowing. Sprinkle the top with 0.25 cup chopped fresh parsley and the remaining 0.5 teaspoon black pepper. Cover the dish tightly with aluminum foil.
Bake for 20 minutes covered. Then remove the foil and bake for another 5-10 minutes until the top is golden brown and bubbly. The edges should be slightly crispy while the center remains creamy. This baking time ensures the pasta is fully heated through and the cheese forms that beautiful, gooey layer on top.
Rest and Serve
Let the cavatappi rest for 5-10 minutes before serving. This resting period allows the juices to redistribute, ensuring each bite is packed with flavor. The pasta will be hot and the cheese will be perfectly melty—ideal for serving family-style or individual portions.
Garnish with extra parsley if desired, and serve immediately. The combination of tender chicken, al dente cavatappi, and that rich three-cheese sauce makes this dish a crowd-pleaser. Don’t forget to save some leftovers for tomorrow—it reheats beautifully!
Pro Tips For Making 3 Cheese Chicken Cavatappi
- CRISP THE SKIN FIRST: Chicken thighs are forgiving, but crispy skin makes this dish feel restaurant-worthy. Pat them bone-dry with paper towels, then sear skin-side down in a cold pan for 10 minutes—no rush. The low start prevents steam from turning the skin rubbery, and the fat renders slowly for maximum flavor.
- SALT THE PASTA WATER HARD: Cavatappi’s weird shape traps sauce like a sponge, but it also soaks up salt. Use a full tablespoon of salt per 4 quarts of water, even if your recipe says less. Taste the pasta when it’s al dente—it should taste like the sea. This ensures the cheese melts smoothly later, not clinging to bland noodles.
- SHRED CHICKEN HOT, NOT LUKEWARM: I learned this the hard way—waiting to shred chicken until it’s cool makes it tough as boot leather. Pull it from the pan when the internal temp hits 165°F, then tent it with foil for 5 minutes. The residual heat shreds it effortlessly, and the juices stay locked in instead of turning the sauce watery.
- STIR THE CHEESE IN STAGES: Dumping all three cheeses at once is a one-way ticket to scrambled cheese city. Melt half the cheddar first, stirring until it’s a smooth paste, then whisk in the cream mixture. Add the remaining cheese in the final 30 seconds—this keeps the sauce velvety, not gloppy. (Yes, even if you’re impatient like me.)
Health benefits of this 3 cheese chicken cavatappi
Protein-Packed Powerhouse
The chicken thighs in this dish provide high-quality protein—about 40 grams per serving—essential for muscle repair and satiety. Bone-in, skin-on thighs also deliver healthy fats that keep you full longer. I find this especially helpful for family meals where everyone leaves the table satisfied without seconds. 🍗
Calcium Trio
The three cheeses—sharp cheddar, mozzarella, and parmesan—combine to deliver 30% of your daily calcium needs per serving. Cheddar adds vitamin A for eye health, while parmesan contributes 10% of your daily vitamin B12, crucial for energy metabolism. The mozzarella provides a creamy texture without compromising nutrition.
Creamy Comfort with Benefits
The heavy cream and milk in the sauce may seem indulgent, but they also provide vitamin D (especially if using fortified dairy) and riboflavin for energy production. I always opt for full-fat versions—they create the perfect melt while delivering more nutrients than skim alternatives.
Fiber from Cavatappi
While cavatappi isn’t the highest-fiber pasta, it still contributes 3 grams of fiber per serving when cooked al dente. The pasta’s unique shape helps create that signature “pull-apart” texture, making every bite satisfying.
For extra fiber, I sometimes stir in 1 cup of steamed broccoli florets during the final baking stage.
Balanced Macros
This dish strikes a perfect balance with 30g protein, 50g carbs, and 25g fat per serving—ideal for a hearty meal without feeling heavy. The combination of protein and fiber helps stabilize blood sugar, making it great for post-workout meals or busy weeknights when you need sustained energy.
Low-Calorie Upgrade
For a lighter version, swap half the heavy cream for low-fat Greek yogurt and reduce cheese by ¼ cup total. I’ve tested this version and still get that creamy texture—just with 150 fewer calories per serving.
The dish maintains its rich flavor while becoming more balanced for health-conscious eaters.
Nutrition facts
Frequently asked questions
Can I use chicken breasts instead of thighs?
Chicken breasts will work, but they’re leaner and drier than thighs. For best results, brine the breasts for 30 minutes in salted water before cooking to keep them juicy. You may also want to add 1 tablespoon olive oil to the baking dish to prevent dryness. The skin-on thighs add extra flavor and richness that breasts can’t match.
What’s the best way to make this dish ahead of time?
This recipe freezes beautifully! Assemble the dish completely (even before baking), then cover tightly with foil and plastic wrap. Freeze for up to 3 months. When ready to eat, thaw overnight in the fridge, then bake covered at 375°F for 30-35 minutes (add 5-10 minutes uncovered). For meal prep, make a double batch and portion into individual containers.
Why did my cheese sauce get grainy?
Grainy cheese usually means it didn’t melt completely. To fix it, stir in 1 tablespoon milk or cream and let the sauce simmer gently for 1-2 minutes until smooth. For prevention, shred your own cheese (pre-shredded contains anti-caking agents that prevent melting) and keep the heat low when adding cheese to the sauce. Also, make sure your cheeses are at room temperature before adding.
Can I make this gluten-free?
Yes! Use gluten-free cavatappi pasta and replace the all-purpose flour with 2 tablespoons cornstarch. The recipe will still thicken properly. Just stir the cornstarch with the cream and milk before adding to the pot. For extra insurance, check all cheese labels to ensure they’re gluten-free certified.
How do I prevent the pasta from getting mushy?
Undercooking the pasta slightly before baking helps prevent mushiness. Cook the cavatappi for just 10-11 minutes (instead of the full 12-14 minutes) before adding back the chicken. The residual heat during baking will finish cooking it perfectly. Also, avoid overfilling the baking dish—keep it about 75% full so the pasta has room to bake without steaming in its own moisture.

- 12 Bean Chili Recipe: Hearty Slow-Cooked Depth With 12 Legumes - October 17, 2026
- 5 Seed Bread Recipe: Nutty Crunch and Artisan Flavor in One Loaf - October 17, 2026
- 1 Lb Macaroni Salad Recipe: Bold, Crunchy, and Crowd-Pleasing - October 17, 2026