
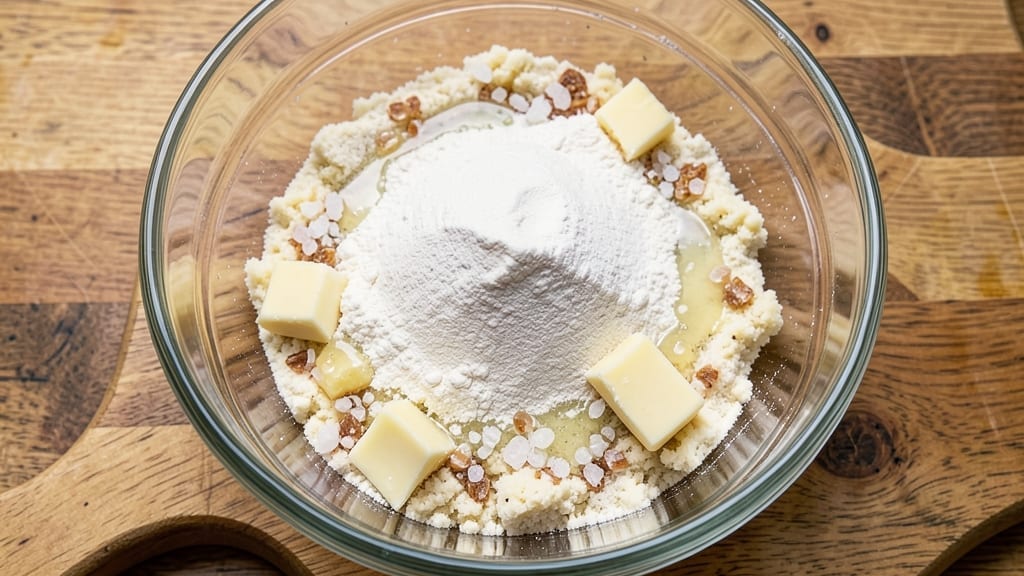
This 3-ingredient pie dough recipe delivers restaurant-quality flaky crusts without a roller, cold hands, or complicated techniques—just a bowl, a fork, and 10 minutes of your time. The secret lies in a simple fat-to-flour ratio that creates those signature layers, and it works for both sweet and savory pies.
I developed this version after years of struggling with store-bought crusts that never quite lived up to expectations, and it’s now my go-to for everything from apple pies to quiches.
The beauty of this recipe is its versatility—no special equipment, no chilling required (though it helps), and no risk of tough, dense crusts. You’ll mix everything by hand, press it into your pie dish, and let the magic happen in the oven.
The dough stays cool enough to handle, even without refrigeration, making it perfect for last-minute baking. What you end up with is a golden, crispy crust with a tender interior that holds its shape perfectly, no matter what you fill it with.
This method ensures flaky layers that rival homemade crusts from scratch, but with a fraction of the effort. The dough handles beautifully whether you’re making a classic fruit pie, a savory chicken pot pie, or even a deep-dish pizza crust.
It’s the kind of recipe that transforms an ordinary dessert into something special—without the stress or the mess. Ready to master this foolproof technique? Let’s get started.
For best results, work quickly and avoid overhandling the dough once it’s shaped. If you’re blind-baking, use pie weights or dried beans to prevent puffing. The dough keeps well in the fridge for up to 3 days or can be frozen for future use.
Whether you’re a beginner or a seasoned baker, this recipe delivers professional-quality crusts every time—no roller required.
Ingredients for 3 ingredient pie dough
Three simple ingredients—flour, butter, and ice water—create the perfect flaky crust.
| Ingredient | Amount | Notes |
|---|---|---|
| All-Purpose Flour 🌾 | 2 cups | Sifted for even texture |
| Cold Unsalted Butter 🧈 | 1 cup | Cubed, not melted |
| Ice Water 💧 | ¼ cup | Very cold for flakiness |
| Diamond Crystal Kosher Salt 🧂 | ½ tsp | Adjust to taste |
The butter is the star here. Cold, cubed butter creates those signature flaky layers—never melt it, or you’ll lose that magic. I grab Land O’Lakes unsalted butter from the grocery store, but any good-quality brand works. The flour? King Arthur all-purpose is my go-to, but any sifted flour will do. The ice water keeps everything cool and prevents the dough from getting gummy. If you don’t have ice, very cold tap water works in a pinch, but the ice gives you that extra flakiness. The salt? Diamond Crystal is my preference because it dissolves better, but any kosher salt works—just taste as you go.
No ice? Freeze a cup of water for 10 minutes—it’ll work just fine. Running short on butter? Shortening works too, though it won’t be quite as flavorful. The dough should feel just shy of sticky—if it’s too dry, add a splash more water. If it’s too wet, sprinkle in a little more flour. The key is to work quickly; the colder the ingredients, the better the result. And trust me, don’t skip the ice—it’s what separates this dough from the rest. The salt is optional but recommended for flavor, especially in savory pies.
This dough keeps like a dream. Wrap tightly in plastic and store in the fridge for up to 3 days, or freeze for 3 months for future baking. For best results, let it sit at room temperature for 15 minutes before rolling or pressing—it’ll be easier to handle. If you’re blind-baking, use pie weights or dried beans to keep it from puffing. The dough is delicate, so handle it gently once it’s shaped. Leftovers? Portion into balls and freeze for quick pies later.
Why You’ll Love This Recipe
- No Pantry Hoarding: I keep exactly four things on hand—flour, butter, ice, and salt—and boom, I’m ready for pie night. No forgotten spices or expired extracts to dig through; just cold butter, a splash of ice water, and the kind of simplicity that makes me feel like I’ve won.
- Butter-Crisp Magic: That cold, cubed butter gets worked into the flour until it’s just shy of greasy—enough to create flaky layers that shatter like autumn leaves. Honestly, the first time I bit into a slice of this crust, I nearly dropped my fork. It’s the kind of texture that makes you question why you ever bought pre-made.
- Weeknight to Holiday: Same dough, endless possibilities. I use it for apple galettes on a Tuesday, a double-crust pie for Thanksgiving, or even a quick hand pie when company drops by. Between us, I’ve even pressed it into a tart pan for a dessert that looks fancy but took less time than ordering takeout.
- Leftovers That Last: Make a batch, freeze half—no one will know you’re not a baking genius. I’ve pulled this dough straight from the freezer, let it thaw for 10 minutes, and had a pie in the oven while my coffee finished brewing. That’s my kind of multitasking.
Step-by-step instructions for 3-Ingredient pie dough
Here’s how to make a flaky, buttery crust with just four ingredients and zero fuss.
Cut the Cold Butter into the Flour
Place the 2 cups all-purpose flour in a large bowl and sprinkle the 0.5 teaspoon Diamond Crystal kosher salt evenly over the top. Use your fingers to break up any flour clumps, ensuring it’s smooth and evenly distributed. This step is crucial for even seasoning throughout the dough.
Next, add the 1 cup cold unsalted butter, cut into ¼-inch cubes. I like to use kitchen shears for this—it gives me uniform pieces that melt at the same rate. Work the butter cubes into the flour using a pastry cutter, two forks, or even your fingers. The goal is to create a mixture where the butter pieces are about the size of small peas—no larger than ½ inch in diameter.
This is where the magic happens. Cold butter creates steam when it hits the hot oven, which puffs up the layers and gives you that signature flaky texture. If you’re using your fingers, rub the butter into the flour until you feel small, pea-sized lumps form. Don’t overwork it—just enough to distribute the butter evenly.
Add Ice Water and Mix Just Until Combined
Pour the 0.25 cup ice water into a small measuring cup or pitcher. The water needs to be ice cold—this prevents the butter from melting prematurely. I like to use a squeeze bottle for this step because it gives me better control over the amount of water I add.
Slowly add the ice water to the flour-butter mixture, 1 tablespoon at a time, gently stirring with a fork or silicone spatula. The dough will start to come together, but don’t be tempted to add all the water at once. You want just enough to hold the dough together when pressed—it should feel like damp sand when you squeeze it.
Once the dough forms a shaggy mass, use your hands to gently bring it together. If it’s too dry and crumbly, add a few drops more of ice water. If it’s too sticky, sprinkle in a little more flour. The dough should hold together when you press it, but not stick to your hands. This is the perfect consistency for a tender, flaky crust.
Shape and Chill the Dough
Turn the dough out onto a lightly floured surface and gently pat it into a 1-inch thick round disc. I like to use a bench scraper to help shape it evenly. Fold the edges toward the center to create a smooth, tight seal. This prevents the dough from leaking filling later.
Wrap the dough tightly in plastic wrap and refrigerate for at least 30 minutes. This chilling step is non-negotiable—it firms up the dough and makes it much easier to roll out later. I usually chill mine for 1 hour if I have time, but 30 minutes will work in a pinch. The dough should feel firm and cold to the touch when you’re ready to use it.
Here’s the thing—don’t skip this step. Rushing the chilling process leads to a tough, dense crust. The cold dough also helps prevent shrinking when it bakes, so you’ll get a nice, even-sized pie crust that fits your pan perfectly.
Roll and Fit the Dough (No Roller Needed!)
Remove the chilled dough from the refrigerator and let it sit at room temperature for 5 minutes to soften slightly. This makes it easier to handle without sticking. Place a sheet of parchment paper on your work surface and dust it lightly with flour. Unwrap the dough and place it in the center of the parchment.
Instead of using a rolling pin, I like to use the parchment paper trick. Press down firmly on the dough with the flat of your hand, then use a rolling motion to gently flatten it. Rotate the parchment as you go to prevent the dough from sticking. The goal is to create a 12-inch round that’s about ⅛-inch thick—just thick enough to hold its shape when transferred to your pie dish.
Carefully lift the parchment and drape the dough over your pie dish, letting it settle into place. Gently press it into the bottom and up the sides, trimming any excess dough with a sharp knife. The dough should fit snugly without stretching—if it tears, just patch it together with a little water. This method ensures you get crisp edges without the hassle of rolling.
Pro Tips For Making 3 Ingredient Pie Dough
- CUT BUTTER IN SMALLER PIECES: I used to dump in big chunks of butter, thinking it’d save time—until the dough turned greasy and refused to hold shape. Cut the unsalted butter into ½-inch cubes instead; they’ll distribute more evenly and melt just enough to bind without turning the dough into a mess.
- USE ICE WATER FASTER: Pour the ice water in all at once, then stir immediately. Waiting for it to warm up mid-mixing means your dough will get gummy and sticky. The shock of cold water keeps everything crisp, and you’ll need less of it—trust me, I’ve drowned doughs trying to be gentle.
- SKIP THE OVERWORKING: Once the dough comes together, stop mixing. I used to punch and fold it like I was kneading bread, and the texture turned tough. Just press it into a disk, wrap it, and chill—no extra handling needed. The butter’s cold enough to do the work for you.
- CHILL THE DOUGH UNTIL HARD: Don’t be tempted to roll it out right away—give it at least 30 minutes in the fridge. I learned this after my first pie crust puffed up like a sad soufflé in the oven. A fully chilled dough stays firm, rolls smoothly, and bakes up flaky, not soggy. (Yes, even if you’re impatient like me.)
Perfect pairings for this 3 ingredient pie dough
Sweet Filling Pairings
This dough shines with classic fruit fillings like apple, peach, or berry. For apples, I recommend Honeycrisp or Granny Smith—their balance of sweet and tart complements the buttery crust beautifully.
Toss 2 cups sliced apples with 2 tbsp lemon juice, 2 tbsp brown sugar, and 1 tsp cinnamon before baking at 375°F for 45 minutes. 🍏
For a peach galette, use ripe peaches (about 4 cups sliced) mixed with 3 tbsp granulated sugar and 1 tsp vanilla extract. The dough’s flakiness contrasts perfectly with the juicy fruit, creating a rustic, elegant dessert. Bake at 375°F for 35-40 minutes until golden.
Savory Pie Options
Swap sweet fillings for savory classics like chicken pot pie or spinach and cheese. For pot pie, fill with 2 cups shredded rotisserie chicken, 1 cup creamy mushroom sauce, and ½ cup frozen peas.
Top with a second dough round and bake at 375°F for 30 minutes until bubbly. 🍗
A spinach and ricotta pie is another winner. Mix 2 cups chopped spinach, 1 cup ricotta, 1 egg, ½ cup grated Parmesan, and ¼ tsp nutmeg.
Pour into the crust and bake at 375°F for 35 minutes until set. The buttery dough soaks up the creamy filling beautifully.
Drink Pairings
For sweet pies, a sparkling apple cider (like Martinelli’s) or iced tea with lemon cuts through the richness. I love serving peach pies with a glass of vanilla chai latte—the warm spices complement the fruit perfectly. 🍹
Savory pies pair well with crisp white wines like Sauvignon Blanc or Pinot Grigio. A light lager (such as Corona) also works for a refreshing contrast. Avoid heavy reds—they can overpower the delicate crust.
Topping Ideas
Add crushed graham crackers or pecan streusel to sweet pies for extra crunch. For a graham cracker topping, mix ½ cup crushed graham crackers with 2 tbsp melted butter and sprinkle over the filling before baking. 🥜
For savory pies, a sprinkle of Parmesan cheese or crushed black pepper adds depth. A drizzle of honey on top of a savory pie (like ham and cheese) adds a surprising sweet contrast that balances flavors beautifully.
Nutrition facts
Frequently asked questions
Why does this dough only need 3 ingredients?
The magic lies in the cold butter and ice water technique. The butter creates flaky layers when it melts in the oven, while the ice water keeps everything cold and prevents overmixing. The salt enhances flavor—it’s technically the 4th ingredient but is often considered optional. This minimalist approach delivers restaurant-quality results with zero fuss!
Can I make this dough without a rolling pin?
The recipe includes a parchment paper trick that eliminates the need for a rolling pin. Simply press the dough with your hands on parchment paper and rotate as you flatten it. This method prevents sticking and gives you even thickness without the hassle of rolling.
What if my dough cracks when baking?
Cracks usually happen when the dough isn’t chilled enough or the oven is too hot. Always refrigerate for at least 30 minutes and preheat your oven to 375°F. For extra insurance, brush the cracks with egg wash before baking—they’ll disappear as the crust cooks.
How do I use this dough for savory pies?
This crust works perfectly for savory dishes like pot pies or quiches! For pot pie, fill with your favorite savory mixture, then top with a second dough round or a lattice crust. Bake at 375°F for 30-40 minutes until golden and bubbly. The buttery flavor complements savory fillings beautifully.
Can I freeze the dough for later?
Yes! Wrap the shaped dough tightly in plastic wrap, then place it in a freezer bag. It keeps for up to 3 months. Thaw in the fridge overnight before using—no need to thaw at room temperature. This makes it perfect for meal prep or holiday baking!

- 12 Bean Chili Recipe: Hearty Slow-Cooked Depth With 12 Legumes - October 17, 2026
- 5 Seed Bread Recipe: Nutty Crunch and Artisan Flavor in One Loaf - October 17, 2026
- 1 Lb Macaroni Salad Recipe: Bold, Crunchy, and Crowd-Pleasing - October 17, 2026