
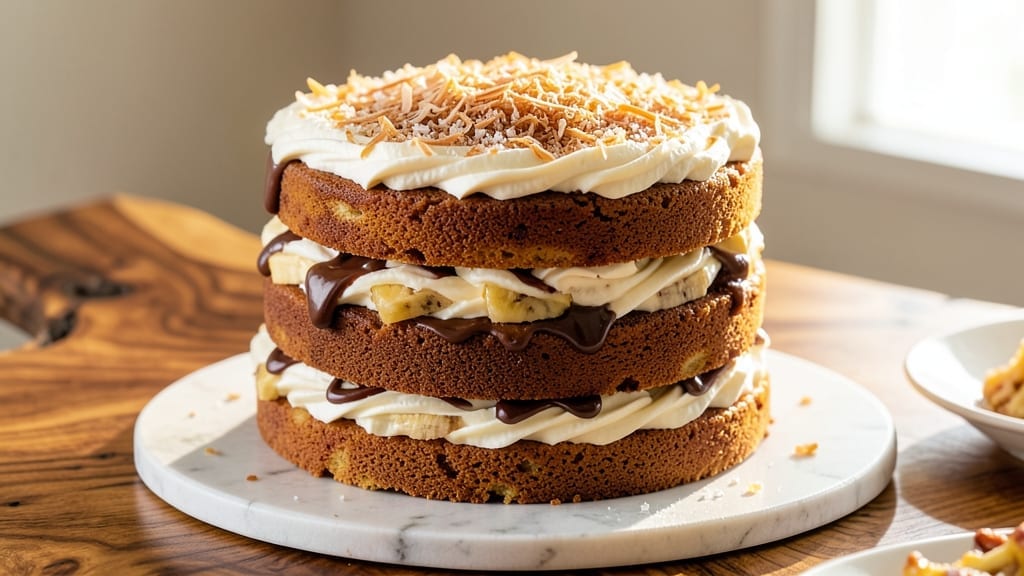
This 3-layer banana cake recipe delivers the perfect balance of moist banana layers, swirled vanilla bean cream, and tangy cream cheese frosting—every bite is a symphony of textures and flavors. 💛 The secret lies in perfectly ripe bananas and a foolproof baking technique that ensures each layer stays tender while developing that signature golden crust.
I’ve baked this cake for family gatherings and special occasions, and it never fails to impress. What sets this recipe apart is the vanilla bean swirl between layers, adding depth and a luxurious touch without overpowering the banana flavor.
The cream cheese frosting isn’t just sweet—it’s creamy, tangy, and just sweet enough to complement the cake’s natural richness. With precise measurements and clear instructions, even beginner bakers can achieve professional results.
By the time you’re done, you’ll have a showstopping dessert that’s light yet substantial, with layers that stay moist for days. The frosting isn’t just for decoration—it’s the star, binding everything together with its velvety texture and perfect balance of sweetness.
This cake tastes like a hug, especially when served warm with a scoop of vanilla ice cream. Whether you’re celebrating a birthday, holiday, or just craving a classic comfort dessert, this recipe delivers.
The layers are easy to assemble, and the baking process is straightforward—just follow the steps, and you’ll have a masterpiece ready to serve in under two hours.
Ingredients for 3 layer banana cake
Moist banana layers, velvety vanilla swirls, and tangy cream cheese frosting—just 14 ingredients for a showstopping dessert.
| Ingredient | Amount | Notes |
|---|---|---|
| Ripe Bananas 🍌 | 3 cups | Mashed, about 4-5 medium bananas |
| All-Purpose Flour 🌾 | 3 ½ cups | Sifted, spooned lightly |
| Granulated Sugar 🍚 | 2 ½ cups | Divided for layers and frosting |
| Brown Sugar 🍚 | ½ cup | Packed, for moisture |
| Unsalted Butter 🧈 | 1 ½ cups | Melted, full-fat preferred |
| Large Eggs 🥚 | 4 whole | Room temperature |
| Vanilla Extract 🌿 | 2 tbsp | Pure, high-quality |
| Baking Soda 🧂 | 1 ½ tsp | For lift and tenderness |
| Salt 🧂 | 1 tsp | Fine sea salt |
| Vanilla Bean Paste 🌿 | 1 tbsp | For swirls, seeds scraped |
| Heavy Cream 🥛 | 1 cup | Cold, for vanilla cream |
| Cream Cheese 🧀 | 16 oz | Room temperature, full-fat |
| Powdered Sugar 🍚 | 4 cups | For frosting, sifted |
| Lemon Juice 🍋 | 1 tbsp | Fresh, for tang |
The bananas are everything here. Spotty and squishy is perfect—those are the sweetest. I always grab Chiquita or Dole at the store, but any ripe ones work. The vanilla bean paste? Worth the splurge—it adds that pro-level depth. For the cream cheese, Philadelphia is my go-to, but any full-fat block works. Just make sure it’s room temperature or the frosting will seize up. The butter? Land O’Lakes or Plugrá—nothing fancy, but full-fat is non-negotiable for that rich texture.
No vanilla bean paste? Double the vanilla extract and add a pinch of vanilla sugar if you’ve got it. Out of heavy cream? Whipped coconut cream works for the swirl, though it’s slightly lighter. The frosting can be made with Greek yogurt instead of cream cheese if you prefer tangier, but it’ll be less rich. For the bananas, if they’re not ripe enough, pop them in a paper bag with an apple overnight. And if you’re worried about the cake being too sweet, reduce the sugar by 1/4 cup—trust me on this.
This cake keeps beautifully—3 days at room temperature covered loosely, or 5 days in the fridge once frosted. For make-ahead magic, bake the layers and frost 24 hours ahead—the flavors meld even better. I always freeze a single layer with frosting on top—just thaw at room temp before serving. The frosting can be made 2 days ahead and stored in the fridge, but bring it to room temp before whipping. And if you’ve got leftovers? Banana pudding is my go-to—layer cake cubes, vanilla ice cream, and a drizzle of caramel.
Why You’ll Love This Recipe
- No Mash Required: I swear by this trick—just slice those ripe bananas straight into the batter. No sticky mess, no peeling, and zero extra bowls to scrub. The slices soften perfectly while baking, soaking up that buttery brown sugar layer like a dream.
- Caramel-Kissed Layers: That brown sugar in the middle? It’s the star. The butter melts into a sticky, gooey center that tastes like a hug from a bakery, while the top stays tender but holds its shape. Honestly, I’ve made banana bread before, but this? This is next-level comfort.
- Lunchbox Legend: Between us, this cake is my go-to for school lunches or office snacks. Cut into squares, and it travels like a champ—no crumbs, no squish. Pack it the night before, and it’s still fresh by afternoon. My kid’s favorite? The chocolate frosting (yes, that’s optional, but trust me).
- Budget Magic: Ripe bananas are basically free if you check your fruit bowl weekly, and you’re using pantry staples. A single batch feeds six, and leftovers? They last days wrapped in foil. I’ve made this for birthdays, potlucks, and even just because—no guilt, all flavor.
Step-by-step instructions for 3 layer banana cake with vanilla swirls
Ready to bake the ultimate banana cake? This method delivers moist layers, perfect swirls, and that dreamy cream cheese frosting.
👨🍳 Step 1: Prep the Banana Mixture and Vanilla Cream
Start by mashing the 3 cups ripe bananas until completely smooth—no lumps allowed. I like to use a potato masher for that perfect texture. In a separate small bowl, whisk together the 1 cup heavy cream, 1 tbsp vanilla bean paste (scrape those seeds!), and 1 tbsp lemon juice. This creates our signature vanilla cream for the swirls.
Let both mixtures sit at room temperature while you preheat your oven to 350°F. This ensures everything blends smoothly later. The lemon juice brightens the vanilla flavor and balances the sweetness of the bananas—don’t skip it!
👨🍳 Step 2: Mix and Bake the Cake Layers
In a large mixing bowl, combine the mashed bananas with 1.5 cups granulated sugar, 0.5 cup brown sugar, and 1.5 cups melted butter. Mix until fully incorporated, then add the 4 whole large eggs one at a time, mixing well after each addition. The mixture should be smooth and slightly thick.
In another bowl, whisk together the 3.5 cups all-purpose flour, 1.5 tsp baking soda, and 1 tsp salt. Gradually fold this dry mixture into the banana mixture until just combined—overmixing develops gluten and makes the cake tough. Divide the batter evenly among three 8-inch round cake pans lined with parchment paper.
🥘 Step 3: Add Swirls and Bake to Perfection
Here’s where the magic happens: spread 1-2 tablespoons of the vanilla cream mixture over each cake layer, then swirl it gently with a knife. Bake for 25-30 minutes or until a toothpick inserted in the center comes out clean. The edges should be golden brown, but the centers should still look slightly moist.
Let the layers cool in the pans for 10 minutes, then transfer to a wire rack to cool completely. This resting period prevents the layers from becoming soggy when you add the frosting later. Patience here is key—don’t rush this step!
🍳 Step 4: Make the Cream Cheese Frosting
Beat the 16 oz cream cheese and the remaining 1 cup granulated sugar until smooth and fluffy. Add the 4 cups powdered sugar and mix until fully incorporated. The frosting should be thick but spreadable—if it’s too stiff, add 1-2 tablespoons of milk or cream to loosen it.
Once the cake layers are completely cool, spread a generous layer of frosting between each layer. Then, frost the entire cake, creating that classic tiered look. For extra flair, pipe decorative swirls on top using the remaining vanilla cream mixture.
⏰ Step 5: Chill and Serve
Refrigerate the cake for at least 1 hour before serving. This allows the frosting to set and the flavors to meld together. The cake will keep in the fridge for up to 5 days, but trust me, it won’t last that long!
Slice and serve with a dollop of whipped cream or a scoop of vanilla ice cream. Each bite should deliver moist banana cake, rich vanilla swirls, and that perfect tangy-sweet cream cheese frosting. Enjoy your masterpiece!
Pro Tips For Making 3 Layer Banana Cake
- Mash Bananas Thoroughly: I learned this the hard way—skip the food processor for ripe bananas in this cake. Use a fork or potato masher to break them into small chunks with minimal liquid. Too much banana purée makes the cake dense and gummy, while chunks add texture and prevent a soggy middle layer.
- Cream Butter and Sugars First: Don’t rush the butter-sugar mix. Beat it until it’s pale and fluffy—about 3-4 minutes—before adding eggs or bananas. This ensures the cake rises properly and stays moist, especially with the dense banana layers. (Yes, even if you’re impatient like me.)
- Skip Overmixing the Batter: Once you add flour, mix just until combined—no more. Overmixing develops gluten, which turns your cake into a tough, chewy brick. Fold gently with a spatula, and you’ll get a tender crumb that’s light enough to hold three layers without collapsing.
- Chill Layers Between Baking: Let each layer cool for 10 minutes in the pan, then transfer to a wire rack to cool completely before adding frosting or the next layer. Warm layers melt buttercream faster and make the cake sink. (Your frosting will thank you.)
Pro cooking tips for this dish
Banana Ripeness Matters
Your cake starts with the bananas—spotty and squishy is the gold standard. I always check for black specks and gentle give when squeezed.
If they’re too firm, pop them in a paper bag with an apple overnight to speed up ripening. Chiquita or Dole are my go-to brands, but any ripe bananas work. The riper, the sweeter—and that natural sweetness reduces how much sugar you’ll need. 🍌
Room Temperature Ingredients
Never skip letting your eggs, butter, and cream cheese come to room temperature first. Cold ingredients can cause the cake batter to curdle or the frosting to seize up. I place them in warm water for 10-15 minutes if I’m short on time.
For the butter, I melt it first for the batter, but keep the cream cheese block whole until ready to mix. This ensures a smooth, lump-free frosting every time.
Swirl Technique Secrets
The vanilla cream swirls are what elevate this cake from good to showstopping. Use a small offset spatula to spread 1-2 tablespoons of the vanilla cream over each layer, then drag the spatula through the batter in a zigzag motion to create marbled patterns.
Don’t overdo it—just enough to see the cream peek through. Pro tip: If the cream gets too thick, thin it with 1 teaspoon of milk before swirling.
Baking Time Precision
Your oven might run hot or cold, so always check for doneness at 25 minutes. Insert a toothpick into the center—it should come out with a few moist crumbs, not wet batter. The edges should be golden brown, but the center can still look slightly underdone.
Overbaking dries out the layers, so resist the urge to peek too early. Let them cool in the pans for 10 minutes before transferring to avoid collapsing.
Frosting Consistency Fixes
If your frosting turns out too stiff, add milk or cream 1 tablespoon at a time until it’s spreadable. For extra fluffiness, I beat the cream cheese and sugar on medium-high speed for 3-4 minutes until completely smooth.
Avoid overmixing—just until no streaks remain. For a smoother finish, chill the frosting for 15 minutes before spreading. This helps it set faster and prevents melting when you assemble the cake.
Layer Assembly Pro Tips
Always let the cake layers cool completely before frosting—room temperature layers prevent the frosting from melting. Use a serrated knife to level the tops if needed, and spread frosting evenly between layers. For the final top coat, I like to use a bench scraper to create clean edges.
Pipe decorative swirls with the leftover vanilla cream for that bakery-style touch. Chill for at least 1 hour before slicing to maintain clean layers. 💛
Nutrition facts
Frequently asked questions
Can I make this cake without vanilla bean paste?
Double the vanilla extract to 4 tablespoons and add 1 teaspoon vanilla sugar if available. For extra depth, mix in ½ teaspoon ground vanilla bean seeds (scraped from a pod). The flavor will be slightly different but still delicious. The lemon juice in the swirls helps balance any lack of vanilla intensity.
Why did my cake layers sink in the middle?
This usually happens from overmixing the batter or opening the oven door too early. Make sure to fold the dry ingredients just until combined, and never bake below 325°F. Let the layers cool in the pans for 10 minutes before transferring to prevent collapsing. Also, check your oven temperature with an oven thermometer—many run hot or cold.
How can I make this cake gluten-free?
Replace the all-purpose flour with a 1:1 gluten-free baking flour blend (like Bob’s Red Mill) plus ½ teaspoon xanthan gum. You may need to add 1-2 extra tablespoons of liquid (milk or water) to compensate for dryness. Test with one layer first, as gluten-free batters behave differently. The cream cheese frosting remains safe for gluten-free diets.
Can I substitute the cream cheese frosting?
Yes! For a lighter option, try Greek yogurt frosting (mix 2 cups Greek yogurt, 3 cups powdered sugar, and 1 teaspoon vanilla). For a richer alternative, use buttercream frosting (beat 1 cup softened butter, 4 cups powdered sugar, and 2 tablespoons milk). The tangy cream cheese flavor is key to balancing the sweetness, but these work well too.
How do I store leftovers without drying out the cake?
Wrap individual slices tightly in plastic wrap, then place them in an airtight container. Store at room temperature for up to 2 days or refrigerate for 4-5 days. For longer storage, freeze slices (without frosting) for up to 3 months10-15 seconds—just enough to soften the texture.

- 12 Bean Chili Recipe: Hearty Slow-Cooked Depth With 12 Legumes - October 17, 2026
- 5 Seed Bread Recipe: Nutty Crunch and Artisan Flavor in One Loaf - October 17, 2026
- 1 Lb Macaroni Salad Recipe: Bold, Crunchy, and Crowd-Pleasing - October 17, 2026