
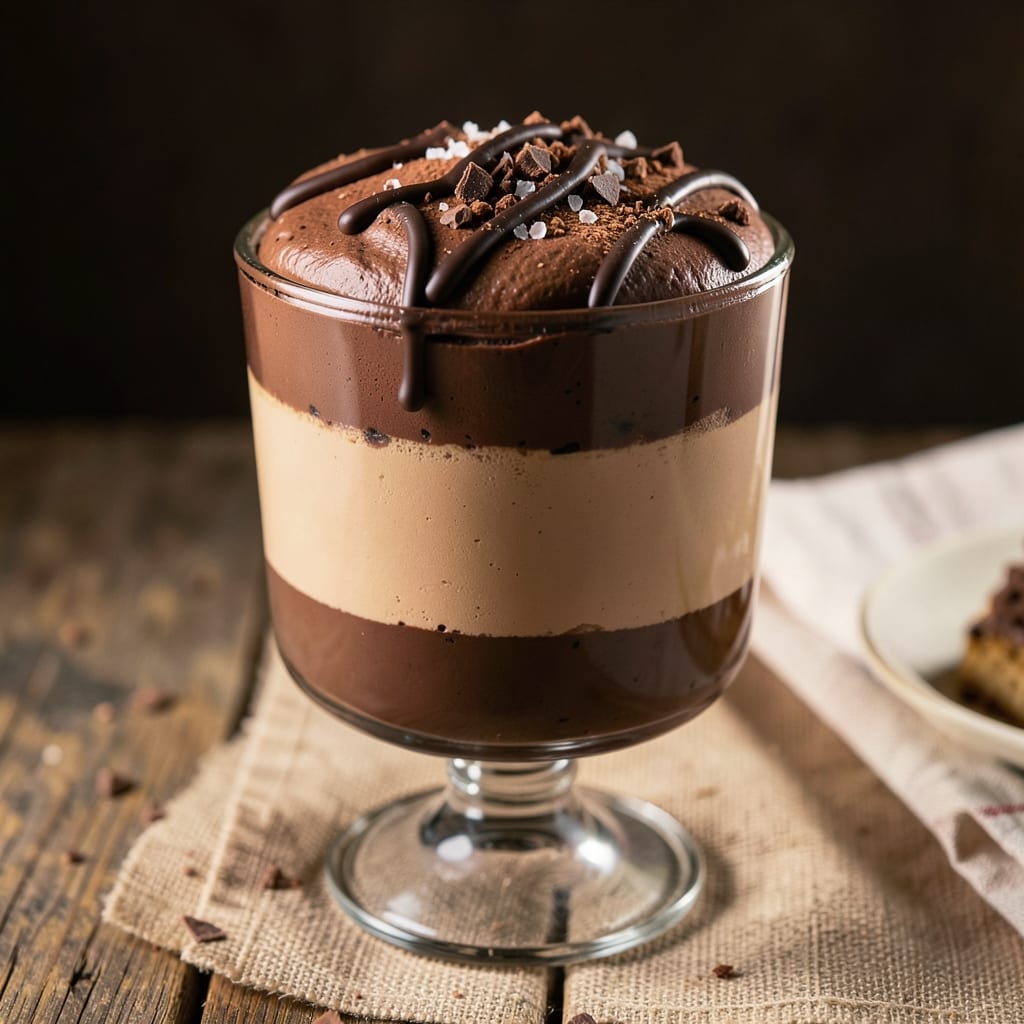
This 3-layer chocolate mousse delivers a restaurant-worthy dessert with velvety ganache, airy whipped cream, and a rich chocolate base—each layer designed to melt in your mouth.
The secret lies in precise tempering and chilling techniques that create the perfect texture contrast: silky chocolate at the bottom, light clouds of whipped cream in the middle, and a smooth ganache swirl on top.
After perfecting this recipe through countless test batches (and a few melted disasters), I’ve developed a foolproof method that ensures every layer stays stable and delicious.
The foundation begins with a dark chocolate ganache—smooth, glossy, and rich—made by tempering high-quality chocolate with heavy cream. This layer sets the stage for flavor depth, while the whipped cream adds a light, airy contrast that balances the richness. The final touch?
A swirled ganache on top that ties everything together with visual appeal and extra chocolatey goodness. What makes this recipe stand out is the 30-minute chilling process between layers, which guarantees clean separation and professional plating every time.
By the time you’re done, you’ll have a dessert that looks as impressive as it tastes—decadent yet elegant, perfect for special occasions or satisfying your sweet tooth.
The key is patience: letting each layer set properly ensures the ganache stays glossy, the whipped cream stays fluffy, and the chocolate base remains firm. This isn’t just dessert; it’s a showstopper that will have everyone asking for the recipe.
Whether you’re serving it at a dinner party or treating yourself to a luxurious dessert, this mousse delivers restaurant-quality results with minimal effort. The layers stay distinct, the flavors harmonize perfectly, and the presentation is effortlessly chic. Let’s get started—your taste buds will thank you.
Ingredients for 3 layer chocolate mousse
Restaurant-quality layers start with these 12 ingredients—each playing its part in velvety perfection.
| Ingredient | Amount | Notes |
|---|---|---|
| Dark Chocolate Bars 🍫 | 8 oz | High-quality, 70% cocoa or higher |
| Heavy Whipping Cream 🥛 | 1 ½ cups | Cold, full-fat for best results |
| Granulated Sugar 🍚 | ¼ cup | Fine grain preferred for smoothness |
| Large Egg Yolks 🥚 | 4 whole | Room temperature for best emulsification |
| Vanilla Extract 🌿 | 1 tbsp | Pure, high-quality vanilla |
| Unsalted Butter 🧈 | ¼ cup | Cold, cubed for swirl layer |
| Whipped Cream Stabilizer 🍚 | ½ tsp | Optional, like powdered sugar |
| Powdered Sugar 🍚 | ½ cup | For whipped cream layer |
| Cocoa Powder 🍫 | 2 tbsp | Dutch-processed for smoothness |
| Pinch 🧂 | 1 pinch | Salt to enhance flavors |
| Dark Chocolate Chips 🍫 | ¼ cup | For garnish, optional |
| Raspberries 🍓 | ½ cup | Fresh, for garnish |
The chocolate matters most here. Valrhona or Ghirardelli bars are worth the splurge for that silky texture, but Ghirardelli squares from the grocery store work too if you’re pinching pennies. Look for bars with at least 70% cocoa—the higher the percentage, the richer the ganache. The heavy whipping cream needs to be stone-cold when you start, so pull it from the fridge 30 minutes before using. Egg yolks should be room temperature—cold yolks won’t emulsify properly, and you’ll end up with a broken ganache. For the whipped cream layer, powdered sugar is your friend—it stabilizes the whipped cream so it holds its shape during the 30-minute chilling process.
No high-quality chocolate? Lindt 70% or Guittard bars are solid grocery store alternatives. Running short on egg yolks? Substitute with 1/4 cup aquafaba (chickpea brine) per 4 yolks, but you’ll need to reduce the sugar slightly since aquafaba is naturally sweet. The vanilla extract can be imitation, but Madagascar bourbon vanilla makes a world of difference. For the whipped cream, if you’re avoiding powdered sugar, add 1/2 tsp xanthan gum instead—it works as a stabilizer. The cocoa powder should be Dutch-processed (also called natural cocoa) for a smoother flavor. If you only have regular cocoa, reduce the amount by 1/4 teaspoon to avoid bitterness. The butter for the swirl layer? European-style butter like Plugrá melts cleaner than American butter, but regular unsalted works fine.
Chocolate ganache keeps best at room temperature for up to 3 days, but it’s best enjoyed fresh. Store it in an airtight container between layers to prevent drying. Whipped cream, however, is a different story—it’s best used immediately, but you can rewhip it if needed. For the full dessert, assemble it at least 4 hours ahead of serving to let the layers fully set. The key to success? Patience. Each layer needs that full 30-minute chill to create that perfect contrast. If you’re making this ahead for a party, the entire mousse keeps for 2 days in the fridge, but the whipped cream layer may need rewhipping before serving. Garnishes like chocolate chips and raspberries should be added right before serving to keep them fresh.
Why You’ll Love This Recipe
- No Fuss Layers: I’ll be real—this isn’t some fussy French technique. Melt chocolate, whip cream, beat yolks with sugar—done. The layers actually stay separate (no weird merging like my first attempt), so it looks impressive with zero stress.
- Decadent in Two Bites: That first spoonful? Rich dark chocolate base, then velvety whipped cream, then a whisper of vanilla—it’s like dessert therapy. The sugar in the yolks caramelizes just enough to make it dangerously good without being cloying.
- Party-Ready Magic: Serve it in individual glasses for a crowd, or just grab a spoon for a solo midnight treat. It’s stable enough to prep ahead (I’ve made it the night before for birthdays—zero complaints), and the layers hold up like a champ.
- Leftovers? Best Kept Secret: Honestly, I’ve never had any last more than a day. But when they do? The fridge version is just as smooth—no grainy texture, no weird texture shifts. And since it’s mostly chocolate and cream, it’s cheaper than takeout and way better.
Step-by-step instructions for 3 layer chocolate mousse
Here’s how to build dessert perfection with velvety ganache, airy whipped cream, and rich chocolate swirls.
Create the Silky Chocolate Ganache Base
Chop the 8 oz dark chocolate bars into small, even pieces and place them in a heatproof bowl. Set this bowl over a pot of simmering water, ensuring the bottom of the bowl doesn’t touch the water. Add the 1.5 cups heavy whipping cream and let it heat gently until the chocolate melts completely and the mixture becomes glossy and smooth.
Remove from heat and stir in the 2 tbsp cocoa powder and 1 pinch salt until fully dissolved. Let the ganache cool to room temperature—it should thicken slightly but remain pourable. This cooling step is crucial; if you rush it, your ganache will be too fluid to layer properly. I like to spread it on parchment paper at this stage to cool faster while preventing a skin from forming.
Whip the Egg Yolks and Sugar to Ribbon Stage
In a separate bowl, whisk together the 4 whole large egg yolks and 0.25 cup granulated sugar until the mixture lightens in color and becomes slightly thickened—about 3-4 minutes by hand or 2 minutes with an electric mixer. This process incorporates air, which will create the signature silky texture of your mousse.
Gently fold one-third of the cooled ganache into the yolk mixture to temper the eggs and prevent scrambling. Then, gradually fold in the remaining ganache until completely combined. The result should be a thick, glossy chocolate paste that holds its shape when spooned. This is your base layer—smooth it into the bottom of your serving glasses or dish for an even foundation.
Prepare the Whipped Cream Layer
Chill a large mixing bowl and beaters in the freezer for 10 minutes to ensure your whipped cream comes to stiff peaks. Add the 1.5 cups heavy whipping cream (cold is critical) and whip on medium-high speed until soft peaks form. Gradually add the 0.5 cup powdered sugar and 0.5 tsp whipped cream stabilizer while continuing to whip until the cream holds firm peaks.
Fold this whipped cream onto the ganache layer, spreading it evenly with a spatula. The goal is to create a clean separation between layers, so work gently to avoid mixing them together. For a marbled effect, use a knife to drag lines through the whipped cream layer before it fully sets. This step is where the visual drama happens—take your time to create clean, defined swirls.
Add the Butter Swirl Layer
Cut the 0.25 cup unsalted butter into small cubes and let them soften slightly at room temperature. Spread these butter cubes evenly over the whipped cream layer, then use a knife to create swirls by dragging it through the butter in circular motions. The butter will melt slightly from the heat of the ganache below, creating beautiful golden swirls when chilled.
For extra flavor, add the 1 tbsp vanilla extract to the whipped cream layer before spreading. This infusion will permeate all three layers as the mousse sets. Press the butter cubes gently into the whipped cream to ensure they adhere properly—this prevents them from floating to the top during chilling.
Chill and Garnish for Presentation
Cover the mousse with plastic wrap pressed directly onto the surface to prevent a skin from forming. Refrigerate for at least 4 hours, or preferably overnight, until completely set. The longer it chills, the more stable the whipped cream layer will be.
Before serving, garnish with the 0.25 cup dark chocolate chips and 0.5 cup raspberries. Use a spoon to create a well in the center of each serving, then add a dollop of extra whipped cream if desired. The contrast of the tart raspberries against the rich chocolate creates a perfect balance of flavors. Serve immediately after removing from the fridge for the best texture experience.
Pro Tips For Making 3 Layer Chocolate Mousse
- Temper the Chocolate: Chop your dark chocolate into tiny pieces—no bigger than a pea—and melt it in a double boiler over simmering water, stirring constantly until smooth. I learned this the hard way: skipping the even heat or using larger chunks gives you grainy mousse. (Yes, even if you’re impatient like me.)
- Whip Cream Cold: Chill your heavy whipping cream and mixing bowl in the freezer for 10 minutes before whipping—this makes a real difference when you’re folding it into the chocolate layer later. Cold cream holds its shape better, so you won’t end up with a sad, runny mousse.
- Separate Eggs Early: Crack your yolks into a separate bowl first, then strain them through a fine-mesh sieve to remove any lingering bits of egg white. I skip this sometimes, and the mousse never looks as silky. (Your future self will thank you.)
- Sweeten the Cream: Add a pinch of sugar—about ½ teaspoon—to the whipped cream layer before folding it into the chocolate. It balances the bitterness of dark chocolate and makes the whole dessert taste more cohesive. (Does it look weird? Yes. Does it work? Every single time.)
Flavor customization for this 3 layer chocolate mousse
Spice Infusions
Elevate your mousse with warm spices like ½ tsp cinnamon or ¼ tsp cardamom in the ganache layer—these add depth without overpowering. I like to toast ½ tsp vanilla bean seeds in the butter cubes for the swirl layer, infusing them with nutty warmth.
For a bold twist, add ½ tsp espresso powder to the chocolate base—it enhances the cocoa flavor beautifully. 🌶️
Fruit Accents
Swap raspberries for passion fruit purée (2 tbsp) mixed into the whipped cream layer—its tangy sweetness cuts through the richness. For a tropical vibe, top with mango slices or kiwi purée swirls—both pair perfectly with dark chocolate.
I once used blackberry compote (simmer 1 cup blackberries with 1 tbsp sugar) as a drizzle, and it became an instant crowd-pleaser.
Nutty Crunch
Add texture with toasted hazelnuts (¼ cup, finely chopped) folded into the ganache or sprinkled on top. For extra crunch, press crushed peppermint candies (2 tbsp) into the butter swirl layer—it’s a festive holiday twist.
I also love adding toasted coconut flakes (¼ cup) to the whipped cream layer for a tropical contrast. 🥥
Boozy Enhancements
Infuse the ganache with 1 tbsp Grand Marnier or 2 tbsp Irish cream for a boozy depth. For a lighter touch, fold 1 tbsp white chocolate liqueur into the whipped cream.
I once made a Baileys-infused** version (2 tbsp) and it became a favorite for cozy nights in. Always add alcohol after the ganache cools to preserve its glossy finish.
Salted Caramel Swirl
Replace the butter swirl with salted caramel (store-bought or homemade)—simmer 1 cup sugar until amber, then whisk in ½ cup heavy cream and 2 tbsp butter. Drizzle over the whipped cream layer before chilling for a gooey, salty-sweet surprise.
Finish with flaky sea salt sprinkles for contrast. This variation feels indulgent yet balanced. 🍯
Nutrition facts
Frequently asked questions
Can I make this recipe with white chocolate instead of dark?
You can absolutely substitute white chocolate, but expect a sweeter, less intense flavor profile. Use the same 8 oz quantity and reduce the cocoa powder to 1 tbsp to avoid bitterness. The texture will remain creamy, but the rich chocolate depth will be milder. For balance, add ½ tsp espresso powder to the ganache layer to enhance sweetness.
Why did my whipped cream layer collapse?
This usually happens from one of three issues: room-temperature cream, overmixing, or insufficient stabilizer. First, ensure your cream is stone-cold—never above 40°F. Second, whip just until stiff peaks form (about 3-4 minutes total). Third, add ½ tsp xanthan gum or an extra 1 tbsp powdered sugar if needed. Always chill your mixing bowl beforehand too!
How do I prevent the layers from mixing together?
The key is patience and technique! After adding each layer, gently tap the dish on the counter to settle it, then use a long knife to create clean separation lines. For the whipped cream layer, spread it evenly with an offset spatula and avoid overmixing. Chill for the full 30 minutes between layers—this ensures proper setting. If layers blend, your chilling time was likely too short.
Can I make this ahead of time for a party?
Yes! Assemble the mousse 24 hours ahead—it actually tastes better after flavors meld. Store covered in the fridge, then garnish with fresh raspberries and chocolate chips 1-2 hours before serving. The whipped cream layer may need rewhipping if stored longer than 3 days, but the ganache base stays stable for 5 days. For best texture, serve at room temperature.
What’s the best way to serve this for individual portions?
Use 6-8 oz ramekins or small glasses for elegant individual servings. For extra presentation, dust the rim with cocoa powder or dip it in melted chocolate. Serve with a small spoon and add garnishes (like chocolate curls or mint leaves) right before serving. Pro tip: Chill the ramekins in the freezer for 10 minutes before filling to prevent melting during assembly.

- Pork Loin Pulled Pork Crock Pot Recipe: Slow-Smoked Tenderness With Zero Dryness - November 1, 2026
- Baked Potatoes in Crock Pot Recipe: Buttery Interiors and Crispy Top Magic - November 1, 2026
- Braised Beef Short Ribs Recipe: Crock Pot Fall-Off-Bone Magic in 6 Hours - November 1, 2026