
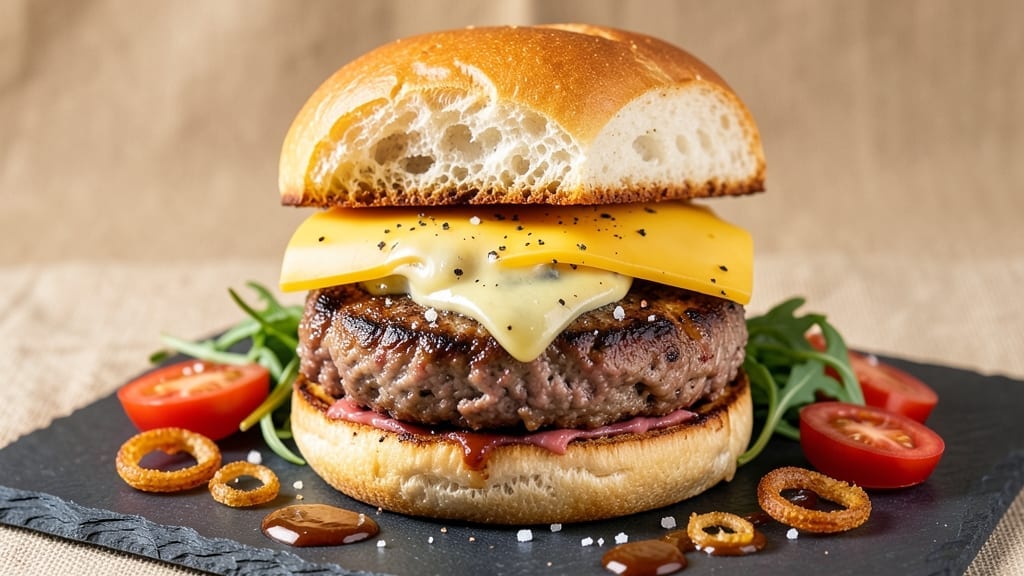
This 3 lb ground beef burger recipe delivers smash-style patties with juicy pink hearts that keep every bite tender and flavorful. The secret lies in proper seasoning, gentle handling, and precise cooking times—no overworking the meat or overcooking the patties. I’ve perfected this method over countless grilling sessions, ensuring each burger stays moist while developing a perfect crust. Whether you’re feeding a crowd or treating yourself to a juicy meal, these burgers are designed to impress without the guesswork.
The key to juicy burgers starts with high-quality ground beef (80/20 fat ratio for maximum flavor and moisture) and a simple yet effective seasoning blend. Smashing the patties thin creates a larger surface area for searing, which locks in juices while building a flavorful crust.
Resting the meat before cooking ensures even cooking, and flipping just once prevents drying. This method guarantees burgers that are crispy on the outside and tender on the inside—every time.
By the time you’re done, you’ll have smash-style burgers with a satisfying char and a melt-in-your-mouth center, ready to be topped with your favorite fixings. Serve them on toasted buns with crisp lettuce, tangy pickles, and a smear of mayo or special sauce.
The juices will flow freely, making every bite worth the effort. This recipe scales perfectly for 6–8 burgers, so you can feed a crowd without sacrificing quality.
For extra flavor, consider adding a sprinkle of smoked paprika or garlic powder to the seasoning mix, or top the burgers with melted cheese and caramelized onions. Pair them with a fresh side salad or crispy fries to round out the meal.
Here’s how to make them—simple, foolproof, and guaranteed to deliver restaurant-quality results at home.
Ingredients for 3 lb ground beef burger
Eight ingredients for the patties, plus a few staples to build perfect burgers.
| Ingredient | Amount | Notes |
|---|---|---|
| Ground Beef (80/20 fat ratio) 🥩 | 3 lb | Chilled for handling, no pre-forming |
| Kosher Salt 🧂 | 1 ½ tbsp | Diamond Crystal preferred |
| Freshly Ground Black Pepper 🌶️ | 1 tbsp | Coarse grind for texture |
| Garlic Powder 🧄 | 1 tsp | Freshly ground preferred |
| Onion Powder 🧅 | 1 tsp | For subtle depth |
| Smoked Paprika 🌶️ | ½ tsp | Optional for extra flavor |
| Hamburger Buns 🍞 | 8 whole | Toasted for texture |
| Unsalted Butter 🧈 | 2 tbsp | For toasting buns |
| Mayonnaise 🥫 | ½ cup | For special sauce |
| Yellow Mustard 🍯 | 2 tbsp | For special sauce |
| Ketchup 🍅 | 2 tbsp | For special sauce |
| Lettuce Leaves 🥬 | 8 whole | Iceberg or romaine |
| Dill Pickle Slices 🥒 | 8 pieces | Thinly sliced |
| Vegetable Oil 🫒 | 2 tbsp | For smashing pan |
The beef is everything—80/20 fat ratio is non-negotiable for juicy burgers. Grab it from the butcher counter if you can; pre-packaged ground beef often has lower fat content. Chill it for at least 30 minutes before handling so it stays firm when smashing. Look for bright red color and good marbling—Costco or Whole Foods usually carry the best quality. Smash-style burgers rely on thin, even patties, so avoid pre-formed patties unless you’re in a rush. The secret to keeping them juicy is minimal handling—just salt, pepper, and a light press.
No garlic powder? Fresh minced garlic at double the amount works too—just toss it in with the salt. Short on smoked paprika? Regular paprika at half the amount still adds flavor, though it won’t have that smoky depth. For the special sauce, Hellmann’s mayo is my go-to, but any good mayo will do. The buns should be soft but sturdy—brioche buns add extra richness if you want to splurge. Toast them in a dry pan with a little butter for that crispy texture. Lettuce and pickles can be store-bought, but fresh is always better if you’ve got it. If you’re missing any toppings, just skip them—burgers are versatile!
Keep the raw beef in the fridge until ready to use—no more than 2 hours before cooking. The seasoned meat can be shaped and chilled for up to 4 hours ahead of time, which is perfect if you’re prepping for a crowd. Once cooked, burgers reheat best in a skillet over medium heat for 1-2 minutes per side. Store leftovers in an airtight container for 3-4 days or freeze for 3 months. I always make extra patties—freeze them raw on a tray first, then transfer to a bag for easy reheating later.
Why You’ll Love This Recipe
- No-Fuss Mixing: I swear by this—just toss the beef, salt, and spices in a bowl. No kneading, no overworking, just gentle hands and a quick mix. The fat keeps it juicy, and the 80/20 ratio does all the heavy lifting.
- Umami Bomb: That garlic and onion powder? It’s like a flavor shortcut. The beef soaks it up instantly, giving every bite a savory punch without needing fancy toppings. Honestly, I’ve had people ask what secret seasoning I’m using.
- Leftover Goldmine: Cook once, eat twice (or three times). Freeze half for tacos or sloppy joes later—same great taste, zero extra effort. My freezer’s always stocked with these because they reheat like a dream.
- Budget Hero: Three pounds of beef stretches across meals without breaking the bank. The spices cost pennies, and the fat ratio means no dry, sad leftovers. Between us, this is how I feed a family of four for under $15.
Step-by-step instructions for smash-style burgers with juicy pink hearts
Here’s how to turn 3 lb of ground beef into eight perfectly juicy, smash-style burgers.
Prepare the Beef Mixture
In a large bowl, gently combine the 3 lb ground beef with the 1.5 tbsp kosher salt, 1 tbsp freshly ground black pepper, 1 tsp garlic powder, 1 tsp onion powder, and 0.5 tsp smoked paprika. Use your hands or a spoon to mix just until the seasonings are evenly distributed—don’t overwork the meat or you’ll compact the fat and end up with dense burgers. The mixture should look speckled with seasoning throughout.
Let the beef mixture sit at room temperature for 10-15 minutes while you prepare your cooking surface. This brief resting period ensures even cooking and helps maintain that juicy pink center we’re aiming for. If you’re working in a cold kitchen, this extra time also makes the beef easier to handle when forming patties.
Heat the Pan and Smash the Burgers
Heat a large skillet over medium-high heat until it’s thoroughly hot. Add the 2 tbsp vegetable oil and let it heat for 1-2 minutes until it shimmers. This high heat is crucial for creating that perfect crust while keeping the inside juicy.
Working in batches, take one portion of the beef mixture (about ½ cup) and place it in the center of the hot pan. Use a metal spatula to press down firmly and quickly smash the beef into a thin, even patty—about ½-inch thick. You’ll see the edges start to crisp almost immediately as the fat renders out. Repeat with the remaining beef mixture, keeping the cooked patties warm on a plate while you finish the batch.
Cook the Burgers to Juicy Perfection
Cook the smashed burgers for 2-3 minutes per side, or until they reach an internal temperature of 130°F. This lower temperature ensures that juicy pink center that makes these burgers special. I use a meat thermometer for accuracy, but you can also judge by the crust—it should be golden brown and crispy while the middle still looks slightly raw.
Here’s the thing—don’t press down on the burgers while they cook. I know it seems counterintuitive, but squeezing releases all those precious juices. Instead, let them cook undisturbed so the beef cooks evenly and stays moist. If you notice the bottom browning too quickly, you can carefully flip them using a thin spatula.
Toast the Buns and Assemble
While the burgers cook, melt the 2 tbsp unsalted butter in a separate skillet over medium heat. Toast each of the 8 hamburger buns for about 1 minute per side until golden brown. Keep them warm in a clean towel-lined basket to prevent them from getting soggy.
In a small bowl, mix together the 0.5 cup mayonnaise, 2 tbsp yellow mustard, and 2 tbsp ketchup to make the special sauce. Spread about 1 tbsp of this sauce on the bottom half of each toasted bun. Then layer each bun with a lettuce leaf, a burger, a pickle slice, and the top bun half. The pickles add that perfect tangy crunch that cuts through the richness of the beef.
Pro Tips For Making 3 Lb Ground Beef Burger
- CHILL THE MEAT FIRST: Take that 3 lb of beef out of the fridge 30 minutes before shaping—cold meat sticks like glue, and you’ll end up with sad, dense patties. Room temp also lets the seasoning stick better, so don’t skip this unless you’re in a rush (and even then, 15 minutes helps).
- SALT BEFORE SHAPING: Mix in the kosher salt before forming patties—this isn’t just for flavor, it’s for texture. The salt breaks down proteins on the surface, giving you that perfect crust later. (Yes, even if you’re impatient like me.)
- USE A MEAT THERMOMETER: Pull those patties off the heat at 155°F—waiting for 160°F or higher turns your juicy 80/20 into a dry, overcooked mess. The last 5 degrees happen fast, so trust the thermometer, not guesswork.
- PRESS WITH YOUR HANDS: Skip the spatula for shaping—press the beef into ¾-inch-thick patties with your fingers, then gently flatten with your palms. This keeps the fat distributed and prevents tearing when flipping. (No need for fancy tools, just muscle memory.)
Serving suggestions for this 3 lb ground beef burger
Classic Burger Toppings
Start with the basics: a crisp iceberg lettuce leaf and thin dill pickle slices on each burger for that essential crunch and tang.
I like to add sliced red onions (about 2 tbsp) for a sharp bite, especially if you’re serving these burgers with a sweet sugar-free BBQ sauce on the side.
For extra richness, top with melted cheddar cheese—just place it on the patty during the last 30 seconds of cooking so it melts perfectly. 🥬
Special Sauce Variations
While the classic mayo-mustard-ketchup combo works perfectly, try swapping in Greek yogurt for a lighter option (replace mayo with ½ cup plain Greek yogurt). For a smoky twist, mix in 1 tsp smoked paprika with the mayo.
If you love heat, add ½ tsp hot sauce or a dash of Worcestershire sauce for depth. I keep a small bowl of sauce on the table so everyone can customize their burgers. 🌶️
Side Dish Pairings
Crispy golden fries are a no-brainer, but for something lighter, serve with a cool cucumber-dill salad. Toss 2 cups diced cucumbers, ¼ cup chopped fresh dill, 2 tbsp red wine vinegar, and 3 tbsp olive oil with a pinch of salt.
For a heartier meal, add grilled portobello mushrooms or a crisp apple slaw with shredded carrots and a honey-mustard dressing. 🥔
Bun Alternatives
Swap the classic hamburger buns for brioche buns (toasted with 1 tbsp butter) for extra buttery richness. For a low-carb option, use lettuce wraps (butter lettuce leaves work best) or portobello mushroom caps grilled for 3-4 minutes per side.
If you’re feeling adventurous, try pretzel buns—brush them with garlic butter before toasting for a sweet-salty contrast. 🍞
Drink Pairings
A cold American lager like Bud Light or Coors Banquet cuts through the richness perfectly. For something craftier, try a hoppy IPA (like New Belgium Fat Tire) to balance the beefy flavors.
Non-alcoholic options? A lemon-lime soda with ice or sparkling water with a splash of grapefruit juice keeps things refreshing. I always serve drinks in frosted mugs for that classic burger joint vibe. 🍺
Garnish Like a Pro
Finish your burgers with freshly cracked black pepper and a sprinkle of flaky sea salt for a restaurant-quality touch. Add thinly sliced jalapeños for heat lovers or caramelized onions (sautéed in 1 tbsp butter for 10 minutes) for sweetness.
For a pop of color, scatter microgreens or chopped parsley on top. The key is to keep it simple—let the beef shine! 💫
Nutrition facts
Frequently asked questions
Why does this recipe use 80/20 ground beef instead of leaner cuts?
The 20% fat content in 80/20 ground beef is essential for juicy burgers. The fat melts during cooking, keeping the meat moist while adding incredible flavor. Lean cuts like 90/10 will produce dry, crumbly burgers—this ratio is the gold standard for restaurant-quality results.
How do I adjust this recipe for a grill instead of a pan?
Preheat your grill to medium-high heat (400-425°F) and oil the grates well. Shape the patties slightly thicker (¾-inch) since they won’t get as hot as a pan. Cook for 3-4 minutes per side for medium-rare (130°F internal temp). Use a grill thermometer for accuracy—charcoal grills run hotter than gas grills.
Can I make these burgers ahead of time?
Yes! Shape the patties and refrigerate them on a tray for up to 4 hours before cooking. For freezing, form patties and freeze them raw on a tray, then transfer to a bag for 3 months. Thaw overnight in the fridge before cooking. Never freeze cooked burgers—they become tough when reheated.
What’s the best way to keep my burgers warm while cooking?
Keep cooked patties on a wire rack set over a baking sheet in a 200°F oven while you finish cooking. This prevents them from steaming in their juices. For a large batch, use a slow cooker on warm setting—just don’t let them sit too long or they’ll dry out.
How do I fix dry burgers if I overcook them?
If your burgers turn out dry, try reviving them by placing them in a skillet with 1 tbsp butter and 2 tbsp beef broth over medium heat for 2-3 minutes. The moisture will help restore some juiciness. For future success, always cook to 130°F internal temp or less—medium-rare is key for juicy results.

- 12 Bean Chili Recipe: Hearty Slow-Cooked Depth With 12 Legumes - October 17, 2026
- 5 Seed Bread Recipe: Nutty Crunch and Artisan Flavor in One Loaf - October 17, 2026
- 1 Lb Macaroni Salad Recipe: Bold, Crunchy, and Crowd-Pleasing - October 17, 2026