
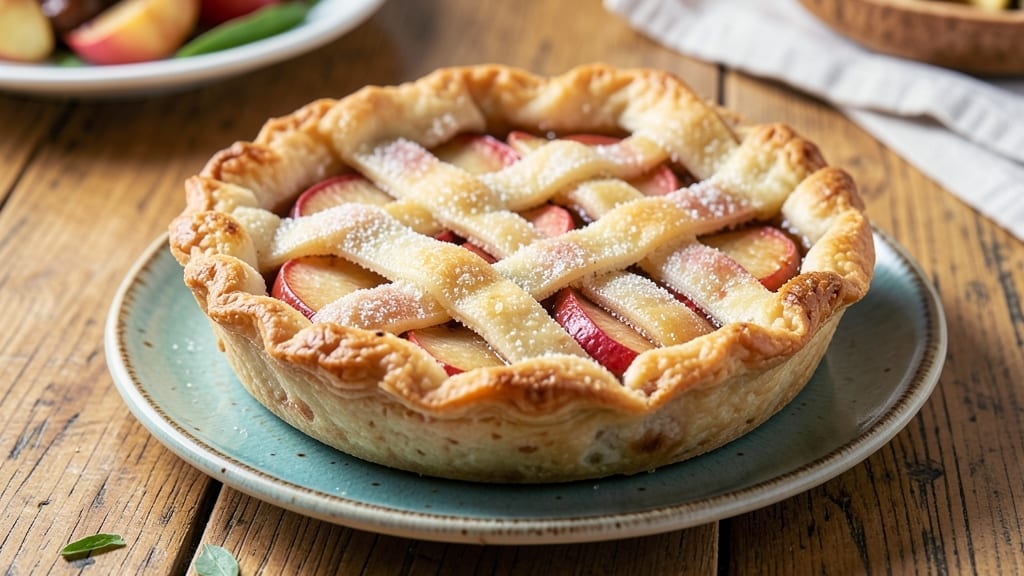
This 5-inch mini apple pie recipe delivers restaurant-quality dessert in a perfectly portable size—ideal for picnics, potlucks, or a single indulgent treat. 🍏 The secret lies in a buttery, flaky crust that holds its shape while baking, paired with a spiced apple filling that stays tender yet holds together beautifully.
I’ve perfected this recipe over years of holiday baking, ensuring every slice tastes like a homemade classic without the fuss of a full-sized pie.
The beauty of these mini pies is their versatility—use store-bought crust for convenience or roll out homemade dough for that extra touch of authenticity. The filling combines tart apples with cinnamon, brown sugar, and a touch of lemon juice for brightness, all baked until golden and fragrant.
With just 30–40 minutes in the oven at 375°F, you’ll have a batch of perfectly portioned desserts that disappear just as quickly as they’re made.
What makes these mini apple pies truly special is how they elevate any occasion. Serve them warm with vanilla ice cream for a cozy dessert, or let them cool slightly for a crisp, handheld treat.
The lattice crust option adds visual appeal, while a simple dusting of powdered sugar keeps things elegant. Whether you’re feeding a crowd or treating yourself, these pies are the ultimate dessert solution.
Ready to bake? The recipe includes step-by-step instructions for both crust and filling, plus tips for adjusting sweetness or texture. No special tools are needed—just a 5-inch pie dish, a rolling pin, and a little patience. Let’s get started on these foolproof, golden-brown mini masterpieces.
Ingredients for 5 inch mini apple pie
Six ingredients for the crust plus five for the filling—everything you need for golden mini apple pies.
| Ingredient | Amount | Notes |
|---|---|---|
| All-Purpose Flour 🌾 | 2 ½ cups | Spooned and leveled for accuracy |
| Unsalted Butter 🧈 | 1 cup | Cold, cubed for flaky crust |
| Granulated Sugar 🍚 | ½ cup | For crust sweetness |
| Ice Water 💧 | ½ cup | Chilled for dough handling |
| Granny Smith Apples 🍏 | 4 medium | Peeled, cored, sliced thin |
| Brown Sugar 🍚 | ¾ cup | Packed for filling |
| Ground Cinnamon 🌿 | 2 tbsp | Freshly ground preferred |
| Lemon Juice 🍋 | 1 tbsp | Freshly squeezed |
| Vanilla Extract 🌸 | ½ tsp | Pure vanilla preferred |
| Salt 🧂 | ½ tsp | Fine sea salt |
| Powdered Sugar 🍚 | ¼ cup | For dusting |
| Heavy Cream 🥛 | ½ cup | For serving option |
The butter matters most here—European-style or Plugrá brands keep their shape better when chilled. Whole Foods or Trader Joe’s carry good options, but any cold, cubed butter works in a pinch. Granny Smiths are ideal for their tartness, but Honeycrisp or Fuji add sweetness if you prefer. I always peel and slice them just before baking to prevent browning. For the flour, King Arthur or Bob’s Red Mill are reliable—avoid self-rising unless you adjust the recipe.
No Granny Smiths? McIntosh or Braeburn work well too. Short on vanilla? Almond extract at half the amount gives a different but nice flavor. The brown sugar can be swapped for white if you prefer less molasses flavor, but I find it adds depth. For the crust, store-bought pie crust saves time—just roll it out to fit your 5-inch dishes. Want extra flakiness? Add 1 tbsp ice water per crust to the dough. The lemon juice can be bottled, but fresh is brighter.
Prep the filling and crust separately, then assemble just before baking. The dough keeps 2 days wrapped in the fridge or 3 months frozen. Apples can be prepped ahead and stored in lemon water to prevent browning. Once baked, pies reheat beautifully—5 minutes at 350°F restores that fresh-from-oven warmth. Store cooled pies in an airtight container for 3 days at room temperature or freeze for 2 months.
Why You’ll Love This Recipe
- I swear by this trick: just mix cold butter into flour with ice water until it clumps. No chilling, no rolling—just press it into your mini pans and bake. The flaky layers still happen, even when I’m half-asleep.
- No-Roll Crust Shortcut: I swear by this trick: just mix cold butter into flour with ice water until it clumps. No chilling, no rolling—just press it into your mini pans and bake. The flaky layers still happen, even when I’m half-asleep.
- Tart-Sweet Magic: Granny Smiths cut through the sugar like a cool breeze on a summer day. That bright acidity balances the buttery crust so well, it’s the kind of bite that makes you reach for another slice without thinking.
- Party in a Pan: These are my go-to for potlucks, game days, or when I need dessert that won’t flop. Bake a batch ahead, store them in the fridge, and serve warm—no one will guess they’re not homemade from scratch.
Step-by-step instructions for 5-Inch mini apple pies
Here’s how to create flawless mini apple pies with crisp crusts and tender fruit filling.
👨🍳 Step 1: Make the Perfect Pie Crust
In a large bowl, combine the 2.5 cups all-purpose flour and 0.5 cup granulated sugar. Cut in the 1 cup cold cubed unsalted butter using a pastry cutter or your fingers until the mixture resembles coarse crumbs with pea-sized butter pieces remaining. This texture is crucial for flaky layers.
Add 0.5 cup ice water and 0.5 teaspoon salt to the bowl. Gently stir with a fork until the dough just comes together. Avoid overmixing—this develops gluten and makes the crust tough. Form the dough into a disk, wrap in plastic, and chill for at least 1 hour (or up to 2 days). The cold dough handles better and prevents shrinking during baking.
🍳 Step 2: Prepare the Apple Filling
Peel, core, and slice the 4 medium Granny Smith apples into ¼-inch thick slices. Toss them in a large bowl with 0.75 cup packed brown sugar, 2 tablespoons ground cinnamon, 1 tablespoon lemon juice, and 0.5 teaspoon vanilla extract. The lemon juice prevents browning while adding brightness, and the vanilla enhances the apple flavor.
Let the filling sit for 15 minutes while you roll out the dough. This resting time allows the juices to release slightly, making the filling more flavorful. You’ll notice the apples soften just enough to release their natural sweetness.
🥘 Step 3: Assemble the Mini Pies
Preheat your oven to 375°F. Roll out the chilled dough between two sheets of parchment paper to ⅛-inch thickness. Cut into 5-inch circles using a round cutter or plate. Press each circle into a 5-inch mini pie pan (or use a muffin tin for rustic pies). Trim any excess dough hanging over the edges.
Spoon about ¼ cup of apple filling into each crust, mounding it slightly in the center. Fold the overhanging dough edges up and over the filling, pinching them together to seal. Brush the crust with a little water and sprinkle with 0.25 cup powdered sugar for a decorative finish. Bake for 25-30 minutes until the crust is golden brown and the filling bubbles gently.
⏰ Step 4: Finish and Serve
Remove the mini pies from the oven and let them cool in the pans for 5 minutes. This brief resting period prevents the filling from spilling out when you transfer them. Serve warm with 0.5 cup heavy cream on the side for dipping, or dust with additional powdered sugar for an elegant presentation.
For best results, serve immediately while the crust is still crisp and the filling warm. If storing, keep at room temperature for up to 2 hours or refrigerate for up to 3 days. Reheat in a 350°F oven for 10 minutes to restore crispness.
Pro Tips For Making 5 Inch Mini Apple Pie
- Chill the Dough: Roll out your flour-butter crust and freeze it for 20 minutes before cutting circles—this stops shrinking and makes crisp edges. I learned this the hard way after my first batch of mini pies turned into sad, lumpy blobs.
- Dice Apples Small: Cut Granny Smiths into ¼-inch chunks (not slices) so they cook evenly without turning mushy. Big pieces stay undercooked; tiny ones caramelize perfectly. Use a sharp knife—this isn’t the time for a butter knife.
- Vent Those Pies: Poke 3-4 small holes in each crust top before baking to let steam escape—no soggy bottoms, no blown lids. Skip the lattice if you’re short on time, but don’t skip the vents.
- Brush Butter on Cold Crust: After baking, brush the tops with melted butter while still warm—it seals in flavor and gives that golden sheen. Cold butter? No. Room temp? Yes. (And yes, I’ve tried both ways.)
Common mistakes when making great 5 inch mini apple pie
Overfilling the Pies
One of the most common mistakes is overfilling your mini pies. When you pack too much apple filling into the crust, it can cause the dough to puff up unevenly or even burst during baking.
I’ve learned the hard way that ¼ cup of filling per pie is the perfect amount—any more risks a messy overflow. If you’re worried about losing filling, try mounding it slightly in the center rather than spreading it flat. This creates a natural barrier that keeps the apples contained. 🍏
Skipping the Chill Time
Rushing the dough’s 1-hour chill time is a recipe for disaster—literally. Cold dough prevents shrinking and makes rolling out much easier. When you skip this step, the butter melts too quickly, leading to a tough, dense crust instead of the flaky layers you want.
I always set a timer and make myself a cup of tea while waiting. Trust me, that extra time makes all the difference in the final texture. ⏰
Using Warm Dough
If your dough feels soft or sticky when you’re ready to roll it out, it’s a sign it’s too warm. Warm dough doesn’t hold its shape well and can cause the crust to spread unevenly in the oven.
To fix this, place the dough between two sheets of parchment paper and press it flat with a rolling pin. Then, pop it back in the fridge for 15-20 minutes to firm up.
I keep my workspace chilled by placing a damp towel on the counter—it helps the dough stay cool longer. 🧊
Ignoring the Lemon Juice
Lemon juice isn’t just for flavor—it’s a game-changer for preventing browning and adding brightness to the filling. Without it, your apples can turn grayish and lose their vibrant color. I always measure out the 1 tablespoon lemon juice first and toss it with the apples right after slicing.
If you’re short on time, bottled lemon juice works, but fresh is always better. The acidity also helps balance the sweetness of the brown sugar, creating a more complex flavor. 🍋
Baking Without a Parchment Liner
If you’re using mini pie pans without parchment liners, the crust can stick and lose its crispness. I recommend lining your pans with parchment circles cut to fit, or simply greasing them well with butter.
For even easier cleanup, I use 5-inch silicone pie molds—they release perfectly and don’t require any extra prep. If you’re baking in a muffin tin for a rustic look, make sure to grease each cup thoroughly to prevent sticking. 🧻
Overmixing the Dough
Overmixing the dough develops gluten, which makes the crust tough instead of tender. Once the dough comes together, stop stirring immediately—it should look shaggy, not smooth. I use a fork to gently combine the ingredients, just until the flour is moistened.
If your dough feels sticky, add a little more flour, but don’t overdo it. The key is to handle it as little as possible. This small detail makes a huge difference in the final texture. 💪
Nutrition facts
Frequently asked questions
Can I make these mini apple pies without a pie dish?
For a rustic look, use a muffin tin or ramekins instead. Grease them well to prevent sticking, and reduce baking time to 20-25 minutes since they conduct heat differently. The crust may be slightly softer but still delicious—just serve them warm for best results.
How do I adjust the recipe for fewer/more pies?
This recipe makes 6 mini pies. For fewer, halve the ingredients and make 3 pies. For more, double everything and bake in batches—your oven should comfortably handle 12 pies at once if spaced properly. The dough and filling scale perfectly, so no adjustments are needed beyond quantity.
Can I use frozen apples instead of fresh?
Yes, but thaw and drain them first! Frozen apples work well, but they release more moisture, so reduce the lemon juice to ½ tablespoon to prevent a soggy crust. Pat the apples dry with a paper towel before mixing with the filling to ensure a tender, not mushy, texture.
What’s the best way to store leftovers?
Cool completely, then store in an airtight container at room temperature for 2 days. For longer storage, freeze for up to 2 months. Reheat in a 350°F oven for 10 minutes to restore crispness. Avoid refrigerating—it makes the crust soggy.
Can I make the crust ahead of time?
Yes! The dough keeps for 2 days in the fridge or 3 months frozen. For convenience, roll and cut the crust circles in advance, then freeze them on a baking sheet before transferring to a bag. Thaw in the fridge overnight before filling and baking. Pre-cut crusts save time and make assembly a breeze.

- Pea Soup Instant Pot Recipe: Velvety Green Smoothness in 20 Minutes - November 1, 2026
- Pork Loin Pulled Pork Crock Pot Recipe: Slow-Smoked Tenderness With Zero Dryness - November 1, 2026
- Baked Potatoes in Crock Pot Recipe: Buttery Interiors and Crispy Top Magic - November 1, 2026