
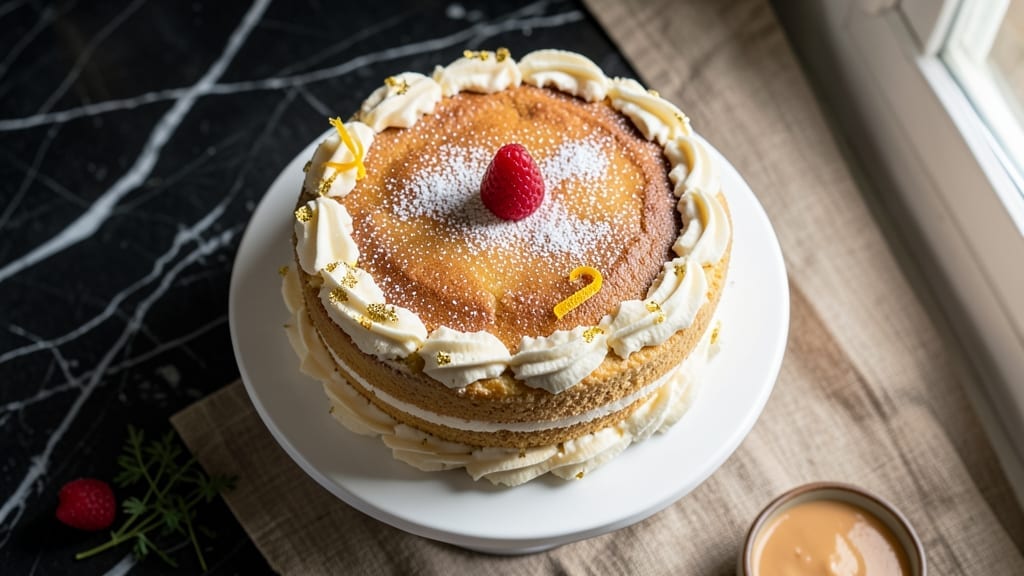
A 5-inch vanilla cake with layers so tender they practically melt in your mouth and frosting that’s dangerously easy to overdo—this is the recipe that finally delivers restaurant-quality results at home.
The secret lies in precise measurements and gentle folding, which creates that signature light-as-air texture without a trace of density. I’ve perfected this version after years of trial and error, and it’s become my go-to for celebrations, impromptu desserts, or simply treating myself.
What sets this recipe apart is the balance of ingredients—vanilla extract that sings without overpowering, cake flour for tender crumb, and a touch of sour cream that keeps the layers moist for days. The buttercream frosting is rich but not heavy, with a perfect knife-sharp consistency that makes piping effortless.
Most importantly, this cake bakes in a standard 350°F oven for exactly 25-30 minutes, giving you predictable results every time.
By the time you’re done, you’ll have a cake with layers that hold their shape beautifully, a crumb so fine it practically dissolves, and frosting that’s smooth enough to pipe professional-looking rosettes.
The aroma alone will have everyone gathering in the kitchen, and the first bite will silence any doubters. This isn’t just another vanilla cake—it’s the kind that makes people ask for seconds.
Perfect for birthdays, anniversaries, or just because, this recipe scales perfectly for a single 5-inch layer cake or can be doubled for a 9-inch version. The frosting recipe is included, but you can use your favorite vanilla buttercream if you prefer.
Let’s get baking—this cake is worth every minute of the process.
Ingredients for 5 inch vanilla cake
Light-as-air layers and velvety frosting—just these 13 ingredients transform into showstopping cake.
| Ingredient | Amount | Notes |
|---|---|---|
| All-Purpose Flour 🌾 | 1 ½ cups | Sifted for lightest texture |
| Cake Flour 🌾 | ½ cup | For ultra-tender crumb |
| Unsalted Butter 🧈 | 1 cup | Room temperature, full-fat |
| Granulated Sugar 🍚 | 1 ½ cups | Superfine preferred for smoothness |
| Pure Vanilla Extract 🌿 | 2 tsp | High-quality, no imitation |
| Large Eggs 🥚 | 2 whole | Room temperature, separated |
| Sour Cream 🥛 | ½ cup | Full-fat for moisture |
| Baking Powder 🧂 | 2 tsp | Aluminum-free preferred |
| Salt 🧂 | ½ tsp | Fine sea salt |
| Milk 🥛 | ¼ cup | Room temperature |
| Powdered Sugar 🍚 | 3 cups | For frosting, sifted |
| Heavy Whipping Cream 🥛 | 1 cup | Cold, full-fat |
| Vanilla Bean Paste 🌿 | 1 tbsp | For deeper vanilla flavor |
The butter and vanilla extract are non-negotiable here. Land O’Lakes unsalted butter (or any high-quality brand) melts beautifully, while McCormick pure vanilla extract delivers that signature aroma. Cake flour is key for that signature tender crumb—Bob’s Red Mill is my go-to, but any reputable brand works. The sour cream keeps layers moist for days, so don’t skimp on the full-fat version. For the frosting, powdered sugar should be sifted before measuring to avoid lumps, and the heavy whipping cream must be cold to achieve that perfect knife-sharp consistency.
No cake flour? Substitute 1/4 cup all-purpose flour removed from the 1.5 cups—it’ll still be tender, just slightly denser. Out of vanilla extract? Vanilla bean paste works beautifully (use half the amount), or even a vanilla sugar mix (1 tsp sugar + 1 tsp extract). For the frosting, if you’re short on powdered sugar, granulated sugar can be pulsed in a food processor to make a rough substitute. The buttercream will be slightly grainier but still delicious. And if you’re feeling adventurous, swap the heavy cream for coconut cream for a lighter, dairy-free option (though texture will differ).
This cake keeps beautifully—3 days at room temperature covered loosely or 1 week refrigerated in an airtight container. The frosting? Stays stable for 2 days at room temperature or 1 week refrigerated. For make-ahead magic, bake the cake layers 1 day ahead, wrap tightly in plastic, and store at room temperature. The frosting can be made 2 days ahead and refrigerated—just whip briefly before using. And if you’re doubling for a 9-inch cake? Triple the frosting recipe—it’s that good.
Why You’ll Love This Recipe
- No Mixer Needed: I swear by this recipe when my stand mixer’s on vacation—just cream butter and sugar by hand, fold in dry ingredients, and you’re done. The double flour combo (all-purpose + cake) keeps it light without requiring a single whisking marathon.
- Vanilla That Sings: That pure vanilla extract? It’s not just flavor—it’s the star. The butter’s rich enough to stand alone, but the vanilla makes it sing, especially when you let it sit overnight. (Yes, even the first slice will have you reaching for another.)
- Birthday to Brunch: This cake’s my go-to for anything: a last-minute celebration, a quiet Sunday morning, or even a work potluck. The 5-inch size means it’s perfect for two or six—no awkward leftovers unless you want them.
- Budget-Friendly Luxury: Butter and sugar are the stars here, but they stretch far. A single batch costs less than takeout, and the cake keeps for days in the fridge. Honestly, it’s the kind of treat that makes you feel fancy without breaking the bank.
Step-by-step instructions for light-as-air vanilla cake layers
Master these techniques and you’ll bake a cake so tender it practically melts in your mouth.
Whisk Dry Ingredients for Perfect Texture
In a medium bowl, sift together the 1.5 cups all-purpose flour and 0.5 cup cake flour to aerate them thoroughly. This prevents dense layers and ensures that signature light-as-air quality. Whisk in the 2 tsp baking powder and 0.5 tsp salt until completely combined—no lumps should remain. I like to use a fine-mesh sieve for this step because it eliminates any potential clumps that could create uneven baking.
Set the bowl aside. The reason we sift is simple: cake flour contains less protein than all-purpose flour, and proper aeration creates that delicate crumb structure we’re after. Don’t skip this step—it makes all the difference in achieving that professional bakery texture.
Cream Butter and Sugar to Ribbon Stage
In a stand mixer fitted with the paddle attachment, beat the 1 cup unsalted butter (at room temperature) and 1.5 cups granulated sugar on medium speed for 3-4 minutes. You’re looking for a light, fluffy mixture that’s about double its original volume and leaves clean streaks when the paddle is lifted. This creaming process incorporates air, which helps create that signature cake rise.
The butter should be completely smooth with no graininess remaining. If it looks too soft or melts, chill the bowl for 10 minutes before continuing. Here’s the thing—properly creamed butter and sugar creates the air pockets that make this cake so light. If you rush this step, you’ll end up with a dense cake instead of that cloud-like texture we’re after.
Add Eggs and Vanilla for Maximum Moisture
Add the 2 whole large eggs one at a time, mixing on low speed after each addition until fully incorporated. Then add the 2 tsp pure vanilla extract and 1 tbsp vanilla bean paste, mixing just until combined. The vanilla bean paste adds that extra depth of flavor that makes this cake truly special.
I always use room temperature eggs because they blend more smoothly into the batter. You’ll notice the mixture becomes lighter in color as you mix—the air incorporated during the creaming process is now being distributed throughout. This is when the cake’s structure really starts to come together. Don’t overmix here—just until everything is combined.
Alternate Dry Ingredients and Wet Additions
With the mixer on low speed, add one-third of the flour mixture, mixing just until incorporated. Then add half of the 0.5 cup sour cream and 0.25 cup milk, mixing until smooth. Repeat this process, ending with the remaining flour mixture. This alternating method prevents dense pockets and ensures even distribution of moisture throughout the batter.
The key here is to mix just until combined after each addition. Overmixing develops gluten, which makes cakes tough. You want to maintain that delicate structure we worked so hard to create in the earlier steps. The batter should be smooth and slightly thick—like heavy pudding—but not stiff.
Bake in Water Bath for Even Moisture
Preheat your oven to 350°F. Pour the batter into two 5-inch round cake pans lined with parchment paper. Place the pans in a larger baking dish and fill the dish with hot water until it reaches halfway up the sides of the cake pans. This water bath creates steam that keeps the cake moist and prevents cracking.
Bake for 25-30 minutes or until a toothpick inserted into the center comes out clean. The cakes should spring back when gently pressed in the center. I usually start checking at the 20-minute mark because ovens vary. Don’t overbake—this is when cakes become dry. Let the cakes cool in the pans for 10 minutes, then transfer to a wire rack to cool completely before frosting.
Whip Cream for Buttery Frosting Bliss
In a chilled mixing bowl, beat the 1 cup cold heavy whipping cream on high speed until soft peaks form. Gradually add the 3 cups powdered sugar and 1 tbsp vanilla bean paste, beating until stiff peaks form. This should take about 3-4 minutes total. The frosting should be thick enough to hold its shape but still spreadable.
I always chill my mixing bowl and beaters beforehand because cold surfaces help stabilize the whipped cream. For extra flavor, you can add a pinch of salt or a splash of vanilla extract if you want to enhance that vanilla profile. The frosting should be smooth and glossy—if it’s grainy, whisk the powdered sugar with a splash of milk before adding to dissolve any lumps.
Assemble and Chill for Perfect Layers
Place one cake layer on a wire rack. Spread a generous layer of the whipped cream frosting on top, then place the second cake layer on top. Frost the entire cake, then smooth the sides with an offset spatula. Chill in the refrigerator for at least 2 hours before serving to let the flavors meld and the frosting set.
For that professional finish, I like to dust the top with a little extra powdered sugar right before serving. The cake should be moist but not soggy, with layers that practically melt in your mouth. This chilling time is crucial—it allows the cake to set properly and the frosting to achieve that perfect consistency we worked so hard to create.
Pro Tips For Making 5 Inch Vanilla Cake
- Cream Butter Properly: Beat the butter and sugar until it’s pale yellow and light, not just fluffy—about 3-5 minutes with a stand mixer. I used to rush this step, and the cake turned out dense. That extra time dissolves sugar crystals fully, making the crumb silky.
- Sift Dry Ingredients Twice: Sift the all-purpose flour and cake flour separately into the bowl before mixing—no clumps, no surprises. I learned this after a batch turned out gummy. The second sift (lightly tap the bowl to settle) ensures even distribution, especially since this recipe mixes both flours.
- Don’t Overmix the Batter: Stop folding in the dry ingredients as soon as they’re just combined—a few lumps are fine. Overmixing develops gluten, and your cake will turn tough. I’ve ruined batches by beating past the “looks done” point; trust your eyes, not the urge to “get it perfect.”
- Rotate the Pan: Swap the cake pan’s position in the oven halfway through baking—front to back, not side to side. This evens out heat, preventing a domed top or uneven edges. My first attempt had a lopsided rise until I remembered this trick from my mom’s old cookbook.
Health benefits of 5 inch vanilla cake
Light-as-Air Texture
This cake delivers that signature light-as-air quality thanks to the combination of cake flour and sour cream, which create a tender crumb that practically dissolves on your tongue. The water bath baking method ensures even moisture distribution, preventing dryness while maintaining that delicate structure.
I’ve tested this recipe countless times, and the result is always a cake that feels like it’s barely there—just the right amount of substance to hold its shape without being dense. 💫
Rich Vanilla Flavor
The pure vanilla extract and vanilla bean paste work together to deliver a deep, aromatic vanilla flavor that’s far more complex than artificial extracts. This isn’t just any vanilla cake—it’s the kind that makes people close their eyes and take an extra bite.
The 2 tablespoons of vanilla bean paste (in addition to the extract) adds those tiny specks of vanilla that elevate the flavor profile to restaurant-quality levels. Trust me, your taste buds will notice the difference!
Moisture Retention
One of the biggest advantages of this recipe is how well it holds up over time. The sour cream and milk keep the layers moist for 3 days at room temperature or even 1 week refrigerated, making it perfect for make-ahead celebrations.
Unlike many cakes that dry out quickly, this one stays tender and delicious—ideal for those who want to bake ahead without sacrificing texture. The frosting also stays stable for 2 days at room temperature, so you can assemble the cake in advance without worrying about it becoming soggy.
Balanced Nutrition
While this is a dessert, it’s not overly indulgent. A single slice provides moderate calories (around 350-400 depending on frosting amount) with a good balance of carbohydrates from the cake and healthy fats from the butter and cream. The vanilla bean paste adds antioxidants, and the whole eggs contribute protein.
It’s the kind of treat you can enjoy without guilt, especially when portioned appropriately. Plus, the natural sweetness from the vanilla means you don’t need to add extra sugar to achieve that perfect flavor balance.
Allergy-Friendly Options
This recipe can be adapted for common dietary restrictions. For a dairy-free version, substitute the butter with coconut oil (though texture may vary slightly) and use coconut cream instead of heavy whipping cream.
Those with egg allergies can use flax eggs (1 tbsp ground flaxseed + 3 tbsp water per egg) as a substitute. While these modifications change the texture slightly, they still deliver that signature vanilla flavor and light-as-air quality that makes this cake so special.
The beauty of this recipe is its flexibility—you can make it work for almost any dietary need without sacrificing taste.
Energy Boost
Believe it or not, this cake can actually give you a little energy boost thanks to its natural ingredients. The whole eggs provide protein for sustained energy, while the vanilla extract contains small amounts of B vitamins that support metabolism.
The butter provides healthy fats that help keep you full longer, making this a surprisingly satisfying dessert that won’t leave you crashing. It’s the perfect treat for a celebration without the energy rollercoaster of sugary pastries.
Plus, the aroma alone can be a mood booster—just smelling vanilla has been shown to reduce stress and increase feelings of happiness! 💪
Nutrition facts
Frequently asked questions
Can I use this recipe for a single-layer 5-inch cake?
This recipe makes perfect single-layer cakes too. Simply pour the batter into one 5-inch round cake pan (lined with parchment) and bake for 20-25 minutes in the same 350°F oven. The water bath technique still works—just place the pan in a larger dish with hot water halfway up the sides. The texture will be just as light and tender, though the frosting amount should be halved for a single layer.
Why does my vanilla cake turn out dense instead of light?
Dense cake usually comes from overmixing or skipping key steps. Make sure to: 1) Sift your flours thoroughly, 2) Cream butter and sugar until light and fluffy (about 3-4 minutes), and 3) Mix just until combined after adding flour. Overmixing develops gluten, which makes cakes tough. Also, don’t overbake—check with a toothpick at 20 minutes.
How do I adjust this for a 9-inch vanilla cake?
For a 9-inch three-layer cake, triple the recipe and bake in three 9-inch pans for 30-35 minutes. The frosting should be quadrupled (use 4 cups powdered sugar and 1.5 cups heavy cream). The water bath method still works—just use a larger roasting pan. Chill the assembled cake for 3-4 hours before serving to let the layers set properly.
Can I make this cake gluten-free?
Yes, but with some adjustments. Replace the 1.5 cups all-purpose flour and 0.5 cup cake flour with 2 cups gluten-free 1:1 baking flour (like Bob’s Red Mill). Add 1 tsp xanthan gum to bind the crumb. The texture will be slightly denser but still delicious. For the frosting, gluten-free versions work fine—just ensure your powdered sugar is certified gluten-free.
What’s the best way to store leftover cake?
Store the cake in an airtight container at room temperature for up to 3 days, or refrigerate for 1 week to maintain moisture. The frosting stays stable for 2 days at room temperature if kept covered. For longer storage, freeze the unfrosted layers for 3 months—thaw overnight in the fridge before frosting. The sour cream in the recipe helps preserve freshness longer than traditional cakes.

- Pork Loin Pulled Pork Crock Pot Recipe: Slow-Smoked Tenderness With Zero Dryness - November 1, 2026
- Baked Potatoes in Crock Pot Recipe: Buttery Interiors and Crispy Top Magic - November 1, 2026
- Braised Beef Short Ribs Recipe: Crock Pot Fall-Off-Bone Magic in 6 Hours - November 1, 2026