
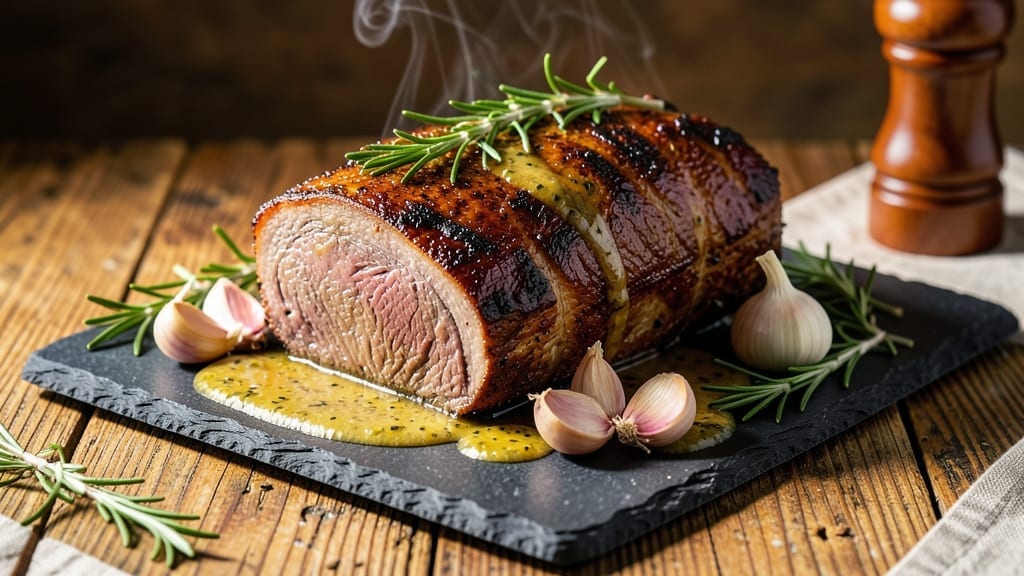
A 5 lb beef tenderloin roast cooked to juicy pink perfection requires precision—not guesswork. This reverse-seared method guarantees a tender, melt-in-your-mouth center with a caramelized crust, every time. The secret lies in low-and-slow roasting followed by a high-heat sear, ensuring maximum flavor without drying out the meat.
With just a few key steps, you’ll transform a simple cut into a showstopping centerpiece that rivals restaurant-quality results.
What sets this recipe apart is the reverse-sear technique, which builds heat from the inside out for even cooking. Start with a medium-rare target (125°F internal temp) to preserve juiciness, then finish with a quick sear in a screaming-hot pan for that coveted crust.
Seasoning is minimal but impactful—just salt, pepper, and a touch of garlic butter—letting the beef’s natural richness shine. The process takes about 2.5 hours total, but the hands-off roasting means you can focus on sides or prep ahead.
By the time you carve into this roast, you’ll uncover a tender, pink center that practically falls apart at the touch, surrounded by a deep, flavorful crust. The aroma alone will have your guests anticipating the first bite, and the texture—juicy, succulent, and perfectly balanced—will leave them asking for seconds.
This isn’t just dinner; it’s an experience worth celebrating.
Pair with classic sides like roasted garlic mashed potatoes or a crisp green salad to round out the meal. The leftovers reheat beautifully, making this recipe ideal for gatherings or meal prep. Here’s how to achieve it—step by step.
Ingredients for 5 lb beef tenderloin roast
Five ingredients transform a simple roast into restaurant-quality perfection—juicy, tender, and impossible to resist.
| Ingredient | Amount | Notes |
|---|---|---|
| Beef Tenderloin Roast 🥩 | 5 lb | Center-cut, trimmed of silver skin |
| Kosher Salt 🧂 | 1 ½ tbsp | Diamond Crystal preferred for flaky texture |
| Freshly Ground Black Pepper 🌶️ | 1 tbsp | Coarse grind for even seasoning |
| Unsalted Butter 🧈 | ½ cup | Cold, cubed for garlic butter |
| Garlic Cloves 🧄 | 8 cloves | Smashed, peeled for infusion |
| Fresh Rosemary 🌿 | ½ cup | Chopped, stems removed |
| Fresh Thyme 🌿 | ¼ cup | Leaves only, stems discarded |
| Olive Oil 🫒 | 2 tbsp | High smoke point for searing |
| Vegetable Oil 🫒 | ¼ cup | For high-heat searing |
| Meat Thermometer 🌡️ | 1 whole | Instant-read preferred |
The beef tenderloin is your canvas here—center-cut with the silver skin removed for maximum tenderness. Costco or Whole Foods carry premium cuts, but any well-marbled roast works. Look for vibrant color and even grain; avoid anything with grayish edges. The key is room temperature prep—take the roast out of the fridge 1 hour before cooking. For the garlic butter, Plugrá or Land O’Lakes unsalted butter melts beautifully, but any high-fat butter works. Fresh herbs make all the difference—Trader Joe’s has affordable bundles, or snip from your garden if you’re lucky enough.
No fresh rosemary? Dried works at one-third the amount, but fresh is ideal. Short on time? Swap the herb blend for 1 tbsp fresh thyme + 1 tsp dried oregano. The olive oil can be any neutral variety—no need for extra-virgin here. For the sear, if you don’t have vegetable oil, avocado oil or ghee works just as well. The meat thermometer is non-negotiable—instant-read like ThermoWorks gives precise readings. Pro tip: Pat the roast dry before seasoning—this ensures maximum crust formation. And if you’re cooking for a crowd, double the garlic butter**—it disappears fast.
Leftovers? Reheat gently—this roast reheats better than most. Wrap tightly in foil and warm in a 350°F oven for 15-20 minutes for juicy results. The roast keeps 3-4 days refrigerated or 2-3 months frozen (portion before freezing). For serving, carve against the grain—this is the secret to tender slices. The garlic butter can be made ahead and stored up to 1 week in the fridge. Freeze any extras in ice cube trays for single-use portions later.
Why You’ll Love This Recipe
- I’ll be real: this is my go-to for dinner parties and lazy Sundays. A 5 lb roast feeds a crowd, but the same method works for a smaller cut when I’m cooking just for two. Minimal effort, maximum wow.
- Five-Ingredient Magic: Honestly, you’d be hard-pressed to find a simpler roast—just salt, pepper, butter, garlic, and that gorgeous tenderloin. No marinades, no fancy rubs, just a knife and a pan.
- Butter-Garlic Bliss: That crispy, golden crust from melted butter and roasted garlic? It’s the kind of flavor that makes people pause mid-bite. The pepper keeps it sharp, but the butter softens everything into pure, juicy satisfaction.
- Leftovers That Don’t Suck: Between us, this roast is perfect for meal prep—slices beautifully for sandwiches, wraps, or even a quick stir-fry the next day. (Yes, even on a Tuesday night.)
Step-by-step instructions for reverse-seared beef tenderloin roast
Here’s how to achieve a perfectly tender, juicy pink center with a beautifully seared crust every time.
Prepare and Season the Beef Tenderloin
Remove the 5 lb beef tenderloin roast from the refrigerator and let it sit at room temperature for 1 hour before cooking. This allows for even cooking throughout. Pat the roast dry with paper towels—this step is crucial for achieving that perfect crust later. The roast should be completely dry inside and out.
In a small bowl, combine the 1.5 tbsp kosher salt and 1 tbsp freshly ground black pepper. Rub this mixture generously over the entire surface of the roast, including the ends. I press the seasoning into the meat so it adheres well and penetrates slightly. This dry-brine method helps create a flavorful crust and ensures the roast stays juicy during the long cook.
Low-Temperature Roast to Medium Rare
Preheat your oven to 275°F. Place the seasoned roast on a rack set inside a roasting pan. This allows air to circulate around the meat, promoting even cooking. Insert the meat thermometer into the thickest part of the roast, making sure not to touch the bone.
Roast the tenderloin for 45-60 minutes per pound (about 3 to 4 hours total) until the internal temperature reaches 115-120°F for medium rare. This low-and-slow method ensures the meat remains incredibly tender and juicy in the center. The roast is done when the thermometer reads 115°F and the meat feels soft to the touch but still has a slight resistance.
Prepare the Garlic-Herb Butter
While the roast is cooking, prepare the garlic-herb butter. In a small bowl, combine the 0.5 cup unsalted butter, 8 smashed garlic cloves, 0.5 cup chopped fresh rosemary, and 0.25 cup fresh thyme leaves. Mix well and set aside at room temperature. This aromatic butter will add incredible flavor and help create a beautiful crust during the sear.
The reason we wait until now to prepare the butter is that the garlic and herbs need to be at room temperature to infuse properly into the butter. If the butter were cold, the garlic would cook unevenly and potentially burn before the butter melts. Trust me, this step makes all the difference in the final flavor.
Reverse Sear for Perfect Crust
Remove the roast from the oven and let it rest for 10 minutes on a cutting board. This resting period allows the juices to redistribute throughout the meat. While it rests, heat a large cast-iron skillet over high heat until it’s screaming hot. Add the 0.25 cup vegetable oil and 2 tbsp olive oil, swirling to coat the pan evenly.
Once the oils are shimmering, carefully place the roast in the skillet. Spoon the garlic-herb butter over the top of the roast, coating it thoroughly. Sear the roast for 3-4 minutes per side until it develops a deep golden-brown crust. The high heat will create a beautiful caramelized exterior while keeping the interior perfectly pink and tender. You’ll know it’s ready when the crust is rich and glossy.
Rest and Slice for Maximum Juiciness
Transfer the seared roast to a cutting board and let it rest for another 10-15 minutes before slicing. This resting period is absolutely critical—it allows the juices to settle back into the meat, ensuring each slice is moist and flavorful. If you skip this step, you’ll end up with dry, disappointing meat.
Slice the roast into 1-inch thick medallions against the grain. Each slice should be tender enough to cut through easily with a sharp knife, yet still have a slight resistance that indicates perfect doneness. Serve immediately with the garlic-herb butter spooned over the top and alongside your choice of sides. The result is a restaurant-quality beef tenderloin roast that’s juicy, tender, and packed with flavor.
Pro Tips For Making 5 Lb Beef Tenderloin Roast
- Sear First, Then Roast: DESCRIPTION:
- Salt Like It’s 1920: DESCRIPTION:
- Butter the Garlic Right: DESCRIPTION:
- Rest It Like Your Life Depends On It: DESCRIPTION:
Storing and reheating this 5 lb beef tenderloin roast
Refrigerator Storage
After slicing your 5 lb beef tenderloin roast, store leftovers in an airtight container lined with parchment paper to prevent sticking. The roast stays fresh for 3-4 days in the fridge when stored properly.
I like to portion it into 1-inch medallions before storing—this makes reheating easier and keeps the slices tender. Place the container on the middle shelf where temperatures stay consistently 40°F or below. 🧊
Freezer Preparation
For longer storage, freeze the roast in single-serving portions wrapped tightly in plastic wrap followed by aluminum foil. This prevents freezer burn and maintains texture. Label each package with the date—2-3 months is the ideal window for peak quality.
When ready to use, thaw overnight in the fridge before reheating. Never thaw at room temperature, as this promotes bacterial growth. 🥶
Reheating Methods
For the best results, reheat slices in a skillet over medium-low heat with 1 tbsp butter for 2-3 minutes per side. This method preserves moisture better than microwaving. Add a splash of beef broth if the slices look dry.
Alternatively, reheat in a 350°F oven on a wire rack for 10-12 minutes—this keeps the crust intact while warming through. 🔥
Reviving Dry Slices
If your reheated slices seem dry, don’t toss them! Place them in a cast-iron skillet with 2 tbsp garlic-herb butter and cook for 1-2 minutes until the butter melts and coats the meat.
The fat will restore moisture and add flavor. For extra richness, drizzle with 1 tsp olive oil before reheating. This trick works wonders for leftovers. ✨
Serving Leftovers
Repurpose leftover tenderloin into beef sandwiches with caramelized onions and provolone cheese, or chop it for beef stroganoff. The reverse-seared method ensures even reheated slices remain tender.
For a quick meal, serve with roasted potatoes and steamed green beans. Leftovers also make great beef tacos—just warm and shred the meat with taco seasoning. 🌮
Nutrition facts
Frequently asked questions about 5 lb beef tenderloin roast
How do I know when the roast is fully rested before slicing?
The roast is ready when the internal temperature drops 5-10°F from its peak (about 115°F for medium rare). Press the center gently—if it springs back slowly, it’s rested. Skipping this step causes juices to run out when sliced, leaving dry meat. The 10-15 minute rest is non-negotiable for perfect texture.
Can I cook this roast to medium or well-done?
While possible, tenderloin loses tenderness at higher temps. For medium (135°F), reduce roasting time by 20-30 minutes and sear briefly. Well-done (145°F) risks dryness—consider a smaller cut or shorter cook. The reverse-sear method works best for medium-rare to medium doneness.
What if my oven isn’t precise at low temperatures?
Use an oven thermometer to verify 275°F accuracy. If your oven runs hot, lower to 250°F and add 15-20 minutes to cook time. For uneven heating, rotate the roast halfway through. A cast-iron roasting pan helps distribute heat better than basic pans.
How do I adjust for a smaller/larger roast?
Use 45-60 minutes per pound for low-temp roasting. For a 3 lb roast, cook 2-2.5 hours to 115°F. For 7 lb, extend to 4-5 hours. The sear time remains 3-4 minutes per side regardless of size. Always check internal temp with a thermometer.
What sides pair best with this roast?
Classic pairings include creamy mashed potatoes, roasted garlic asparagus, or a crisp winter salad. For heartier meals, try truffle polenta or buttery egg noodles. The garlic-herb butter also works beautifully on roasted Brussels sprouts or grilled bread. Keep sides simple to let the roast shine.

- 12 Bean Chili Recipe: Hearty Slow-Cooked Depth With 12 Legumes - October 17, 2026
- 5 Seed Bread Recipe: Nutty Crunch and Artisan Flavor in One Loaf - October 17, 2026
- 1 Lb Macaroni Salad Recipe: Bold, Crunchy, and Crowd-Pleasing - October 17, 2026