
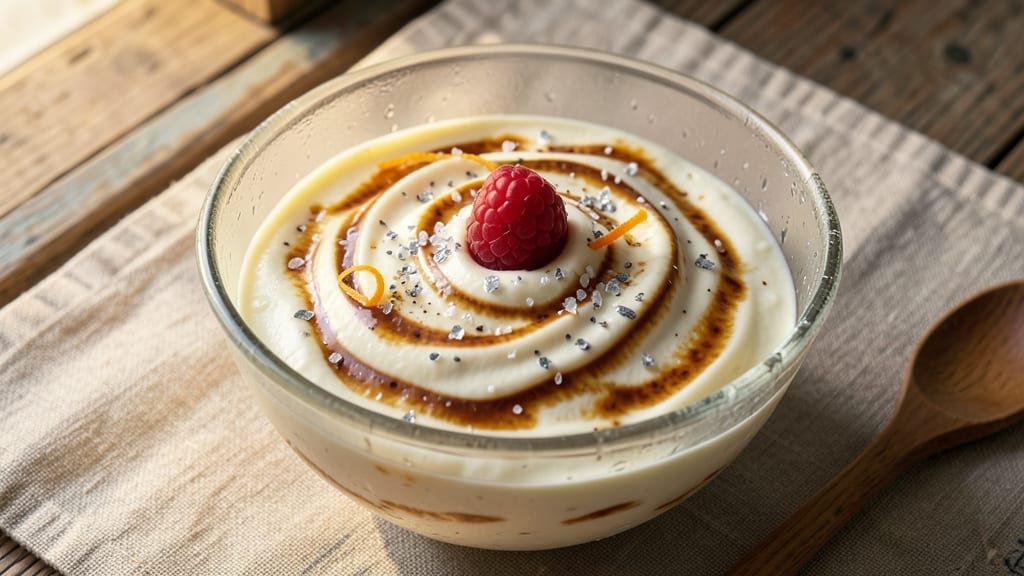
This 5-minute homemade ice cream recipe delivers restaurant-quality texture without a machine or freezing time. The secret lies in a simple no-churn method using a blender, ice, and salt—no special equipment required.
I developed this technique after craving ice cream but lacking the patience for traditional methods, and it never fails to impress.
The process is straightforward: blend heavy cream, sugar, and your choice of flavorings (vanilla, chocolate, or fruit puree) until smooth, then pour the mixture into a bowl surrounded by ice and salt.
Within minutes, the salt lowers the freezing point of the ice, rapidly chilling the cream into creamy, scoopable ice cream. This method preserves the natural sweetness and richness of the cream without developing ice crystals.
What you’ll achieve is ultra-smooth, velvety ice cream in just five minutes—no waiting, no machine, and no compromise on taste. The texture is lighter than traditional ice cream but still rich and satisfying, with a slight creaminess that makes every bite feel indulgent.
Perfect for last-minute cravings or when you want to impress guests with minimal effort.
Customize with mix-ins like crushed cookies, chocolate chips, or fresh fruit—just fold them in during the final blending step. The recipe scales easily for small batches or larger gatherings, making it versatile for any occasion. Ready to make ice cream faster than you can say “scoop”? Let’s get started.
Ingredients for 5 minute homemade ice cream
Pantry staples transform into velvety ice cream in minutes—no machine required.
| Ingredient | Amount | Notes |
|---|---|---|
| Heavy Whipping Cream 🥛 | 2 cups | Full-fat for optimal texture |
| Granulated Sugar 🍚 | ¾ cup | Adjust for sweetness preference |
| Vanilla Extract 🌿 | 1 tbsp | Pure vanilla for authentic flavor |
| Ice Cubes ❄️ | 6 cups | Standard grocery store ice |
| Kosher Salt 🧂 | ½ cup | Diamond Crystal preferred |
| Whole Milk 🥛 | ¼ cup | For creaminess if needed |
| Mix-Ins (optional) 🍪 | ½ cup | Crushed cookies or chocolate chips |
| Lemon Juice 🍋 | 1 tsp | Freshly squeezed for brightness |
| Ground Cinnamon 🌶️ | ½ tsp | For spiced variations |
| Cocoa Powder 🍫 | ¼ cup | For chocolate flavor option |
| Pure Maple Syrup 🍯 | 1 tbsp | Substitute for sugar if preferred |
The heavy whipping cream is non-negotiable here—full-fat only delivers that signature restaurant-quality texture. Trader Joe’s and Whole Foods carry the highest quality brands like Organic Valley or Horizon. For sugar, Domino or C&H granulated works perfectly, but if you prefer a natural sweetener, pure maple syrup at a 1:1 ratio is ideal. The vanilla extract should be pure, not imitation—Nielsen-Massey or McCormick are reliable choices. Ice matters too; standard grocery store cubes work fine, but crushed ice speeds up the chilling process if you’re in a rush.
No kosher salt? Diamond Crystal is essential—it dissolves completely, unlike table salt which can leave a grainy texture. Running short on vanilla? Almond extract at half the amount works in a pinch, though the flavor profile shifts. For chocolate lovers, unsweetened cocoa powder replaces sugar entirely—just use the same 0.25 cup measurement. The optional mix-ins can be anything from crushed Oreos to fresh berries; just fold them in during the final blending step. Need more creaminess? Whole milk at 0.25 cup blends seamlessly without altering the texture.
Store any unused mix-ins in airtight containers for up to 2 weeks—crushed cookies stay fresh longest. The ice cream itself is best enjoyed immediately, but any leftovers will keep for 1-2 days in an airtight container. For larger gatherings, double the recipe—this method scales perfectly. The salt and ice mixture can be reused for up to 3 batches before refreshing, making it an efficient process for multiple servings.
Why You’ll Love This Recipe
- No Mixing Required: I’ll admit, I was skeptical at first—how could something so simple taste good? But that pinch of salt and splash of vanilla in the cream? Chef’s kiss. The ice cubes do all the work while I sip my coffee.
- Rich Without Fuss: Between us, this is the closest I’ve gotten to gourmet ice cream without a machine. The sugar dissolves just enough to balance the cream’s richness, and the vanilla? It’s like a little flavor bomb waiting to happen—no overpowering aftertaste.
- Party in a Bowl: I’ve used this for everything from impromptu dessert nights to potlucks (yes, even on a Tuesday). Double the batch, add crushed cookies or cocoa powder, and suddenly you’ve got a crowd-pleaser that costs next to nothing.
- Zero Guilt Leftovers: Honestly, I make this so often I keep the cream and sugar pre-measured in a jar. If I don’t eat it all in one sitting, the leftovers stay creamy for days—no freezer burn, no ice crystals. Just smooth, dreamy ice cream whenever I crave it.
Step-by-step instructions for no-churn ice cream
Here’s how to make creamy, machine-free ice cream in just minutes using simple science and precise technique.
Whip the Cream Mixture to Soft Peaks
In a large mixing bowl, combine the 2 cups heavy whipping cream, 0.75 cup granulated sugar, 1 tbsp vanilla extract, 0.25 cup whole milk, and 1 tbsp pure maple syrup. Whisk together until the sugar dissolves completely—this prevents graininess in the final product. Transfer the mixture to a stand mixer fitted with the whisk attachment.
Whip on medium-high speed for 3-4 minutes until soft peaks form. You’ll know it’s ready when the mixture holds its shape briefly when the whisk is lifted, but still feels slightly fluid. Over-whipping leads to butter, so stop as soon as you see soft peaks. For chocolate variations, fold in 0.25 cup cocoa powder now using a silicone spatula until fully incorporated.
Prepare the Ice Bath
Fill a large bowl with 6 cups ice cubes and add the 0.5 cup kosher salt. Stir once to distribute the salt evenly—this creates a sub-zero brine bath that chills the mixture rapidly. Place your mixing bowl on top of this ice bath, making sure it sits securely without touching the bottom.
The salt lowers the freezing point of the ice, creating a temperature drop to 0°F—ideal for quick freezing. This method works faster than a standard ice bath because the salt accelerates heat transfer. Keep the ice bath stirred occasionally to maintain even temperature distribution throughout the process.
Freeze While Whipping Continuously
Return to your mixer and whip the cream mixture on high speed while it freezes in the ice bath. After 2-3 minutes, you’ll notice the mixture beginning to thicken. This is when you should fold in any optional mix-ins like crushed cookies or chocolate chips using a spatula—distribute them evenly throughout.
Continue whipping for a total of 5-6 minutes until the mixture reaches a thick, creamy consistency resembling soft-serve ice cream. You’ll know it’s ready when it holds its shape when dropped from a spoon but still feels slightly soft. For spiced variations, add 0.5 tsp ground cinnamon or 1 tsp lemon juice during the last minute of whipping.
Serve Immediately or Chill for Firmer Texture
Once the mixture reaches the desired consistency, transfer it to a serving bowl or individual portions. For immediate serving, scoop directly into bowls—this gives you that classic soft-serve texture. If you prefer firmer ice cream, cover the bowl and freeze for 1-2 hours before serving.
The key to success here is timing. If the mixture becomes too thick too quickly, simply add 1-2 tablespoons of cold milk to loosen it. For best results, serve immediately after whipping while the texture is at its peak. This method delivers creamy, restaurant-quality ice cream without any special equipment—just science and precise technique.
Pro Tips For Making 5 Minute Homemade Ice Cream
- Chill the Bowl First: Pop your mixing bowl in the freezer for 10 minutes before adding cream—this keeps the ice cream from melting while you whip. I learned this the hard way after watching my first batch turn into a sad, lukewarm puddle.
- Salt the Cream: Sprinkle that kosher salt directly into the cold heavy cream before whipping—it dissolves better and cuts through sweetness more evenly. Skip this, and your ice cream tastes like dessert syrup.
- Use Cold Ice Cubes: Grab ice cubes straight from the freezer, not the fridge—they’re colder and work faster to chill the bowl. Warm ice just slows everything down, and nobody wants to wait longer than five minutes.
- Whip Until Thick: Keep whipping the cream until it forms stiff peaks that hold their shape when you lift the whisk—this is the non-negotiable moment before adding sugar. Soft peaks = ice cream that melts like a snowman in July.
Dietary considerations for this 5 minute homemade ice cream
Dairy-Free Adaptations
Swap the heavy cream for full-fat coconut milk (chilled overnight) to create a creamy, dairy-free base. Use 1 can (13.5 oz) coconut milk and reduce sugar to ½ cup—the natural sweetness balances perfectly.
For extra richness, add 2 tbsp coconut cream at the end. This version works best with tropical flavors like mango or pineapple puree (½ cup blended). 🌴
Low-Sugar Options
Reduce sugar to ½ cup and sweeten with ¼ cup pure maple syrup or 2 tbsp honey for natural sweetness. For diabetic-friendly versions, use 1 tbsp erythritol or monk fruit sweetener (adjust to taste).
The texture remains creamy because sugar stabilizes fat molecules—just be prepared for a slightly softer result. I recommend adding 1 tsp xanthan gum to improve structure if using sugar substitutes.
Vegan Variations
Combine 1 can (13.5 oz) full-fat coconut milk with ½ cup cashew cream (blend soaked cashews with water) for a rich, plant-based base. Add 1 tbsp agar-agar powder to prevent iciness during freezing.
For chocolate lovers, mix in 2 tbsp cocoa powder and 1 tbsp vegan chocolate chips. This version requires 8-10 minutes total time due to the agar-agar setting process.
Gluten-Free Mix-Ins
Use certified gluten-free crushed cookies (like gluten-free chocolate chip or oatmeal raisin) or toasted nuts (pecans, almonds) for texture. For cookie dough swirls, blend ½ cup gluten-free flour with 2 tbsp melted butter and 1 tbsp brown sugar, then fold into the mixture before freezing.
Always check labels—some oats are cross-contaminated with gluten.
Nut-Free Safety
Skip nut-based mix-ins entirely and opt for sunflower seed butter (2 tbsp) for richness or freeze-dried strawberries (¼ cup) for fruitiness. For chocolate lovers, use vegan chocolate chunks made from cocoa butter and sugar.
The key is maintaining fat content—nut-free doesn’t mean flavorless! I like adding 1 tsp vanilla bean paste for extra depth in nut-free versions.
Protein Boost
Stir in 2 scoops vanilla protein powder (whey or plant-based) during the initial mixing phase. For Greek yogurt versions, blend ½ cup full-fat Greek yogurt with the cream mixture before freezing.
This adds 15-20g protein per serving while keeping the texture smooth. The protein powder works best when dissolved in 1-2 tbsp warm milk first to prevent clumping.
Nutrition facts
Frequently asked questions
Why does this ice cream set so quickly without a machine?
The salt in the ice bath creates a sub-zero temperature (0°F) that rapidly chills the cream mixture. This scientific trick—called a brine bath—freezes the cream in minutes by lowering the freezing point of water, allowing the cream to solidify faster than traditional methods. The continuous whipping while freezing prevents ice crystals from forming, keeping the texture smooth and creamy.
Can I make this with lighter cream or half-and-half?
No, this recipe requires full-fat heavy whipping cream for the best texture—lighter creams won’t whip properly and will result in icy, grainy ice cream. If you’re avoiding full-fat dairy, try the coconut milk adaptation mentioned in the dietary section, but expect a slightly different flavor profile. The fat content is key for that signature creamy mouthfeel!
What if my ice cream gets too thick or turns into butter?
If the mixture becomes too thick, simply add 1-2 tablespoons of cold milk and continue whipping for 30 seconds. Over-whipping happens when the cream separates into butter—this is normal if you whip too long, but you can still save it by adding a splash of milk and gently folding. For butter prevention, stop whipping as soon as you see soft peaks form during the initial stage.
How do I get rid of ice crystals in my homemade ice cream?
Ice crystals form when the ice cream melts and refreezes. To prevent them, always store your ice cream in an airtight container and avoid temperature fluctuations. If crystals appear, blend the ice cream briefly in a food processor or blender before serving—this redistributes the fat and smooths out the texture. For next time, try adding 1 tsp corn syrup or glycerin to the mixture to act as an anti-freeze agent.
Can I make this recipe ahead of time?
Yes, but with a twist! Prepare the cream mixture up to 24 hours ahead and store it in the fridge (unwhipped). When ready to make the ice cream, simply whip it as directed in the recipe. This gives you the same creamy texture without the need for last-minute prep. For best results, serve immediately after whipping for that soft-serve consistency.

- Pork Loin Pulled Pork Crock Pot Recipe: Slow-Smoked Tenderness With Zero Dryness - November 1, 2026
- Baked Potatoes in Crock Pot Recipe: Buttery Interiors and Crispy Top Magic - November 1, 2026
- Braised Beef Short Ribs Recipe: Crock Pot Fall-Off-Bone Magic in 6 Hours - November 1, 2026