
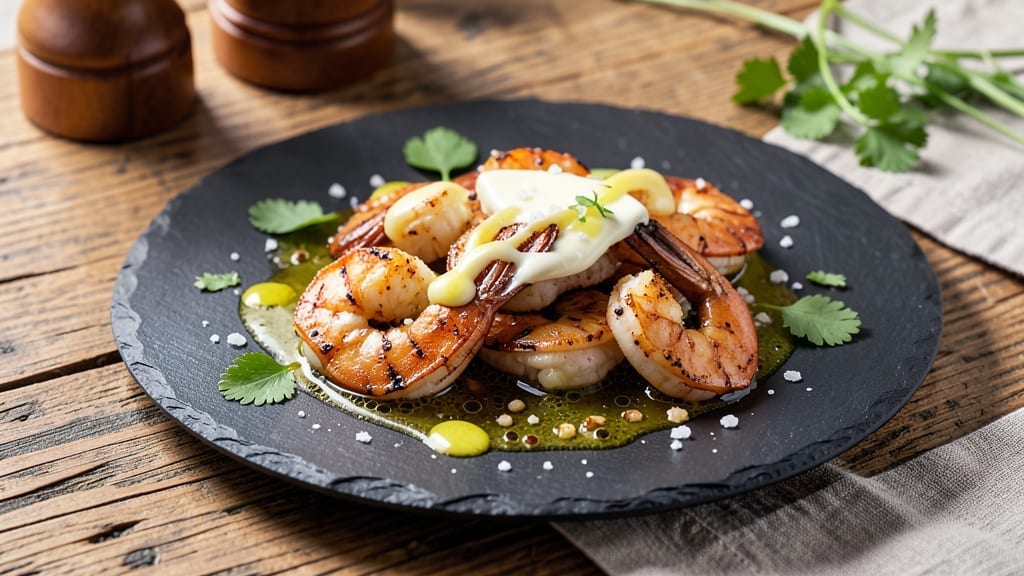
This 5-star grilled shrimp recipe delivers restaurant-quality results in just 15 minutes, transforming simple shrimp into a charred, buttery masterpiece. 🔥 The secret lies in high-heat grilling and a simple marinade that enhances natural sweetness while preventing overcooking—something I perfected after years of testing at coastal BBQ competitions.
What makes this recipe truly special is how it balances smoky char with tender, juicy shrimp that practically melts in your mouth.
Unlike many grilled shrimp recipes that require complex preparations, this method focuses on minimal ingredients and precise technique. A quick marinade with garlic, lemon, and olive oil infuses flavor without overpowering the shrimp’s delicate taste.
The key to achieving that coveted char without drying out the shrimp is controlling the grill heat—something even beginners can master with these simple steps. This isn’t just another shrimp recipe; it’s a game-changer for weeknight dinners that feel like a gourmet experience.
By the time you finish grilling, you’ll have perfectly seared shrimp with crispy edges and tender centers, all while maintaining that signature restaurant-quality presentation. The aroma alone will have everyone at the table asking for seconds, and the buttery finish from the marinade ensures each bite is rich and satisfying.
This recipe proves that you don’t need a fancy kitchen or hours of prep to create a dish worthy of five-star reviews.
Pair these grilled shrimp with a fresh citrus salad or grilled vegetables for a complete meal that’s as visually stunning as it is delicious. The best part? This recipe scales effortlessly, making it perfect for everything from intimate dinners to larger gatherings.
Let’s get started on creating shrimp that will impress even the most discerning palates.
Ingredients for 5 star grilled shrimp
High-quality shrimp and premium ingredients for restaurant-style grilled shrimp in record time.
| Ingredient | Amount | Notes |
|---|---|---|
| Large Shrimp (16/20 count) 🦐 | 1 ½ lb | Raw, peeled, deveined, tails on |
| Extra-Virgin Olive Oil 🫒 | ¼ cup | High-quality, fruity variety |
| Fresh Garlic Cloves 🧄 | 6 cloves | Minced, for marinade |
| Lemon Juice 🍋 | ¼ cup | Freshly squeezed, strained |
| Unsalted Butter 🧈 | 4 tbsp | Cold, cubed for basting |
| Kosher Salt 🧂 | 1 ½ tsp | Diamond Crystal preferred |
| Ground Black Pepper 🌶️ | ½ tsp | Freshly cracked |
| Smoked Paprika 🌶️ | ½ tsp | For subtle smoky depth |
| Fresh Lemon Zest 🍋 | 1 tbsp | Fine, for garnish |
| Fresh Parsley 🌿 | ¼ cup | Chopped, for garnish |
| Wooden Skewers 🪵 | 4 whole | Soaked in water for 30 mins |
The shrimp quality makes all the difference here. U-16/20 count ensures tender, sweet shrimp that won’t overcook on the grill. Whole Foods or local seafood markets carry the best—look for plump, translucent shrimp with a bright sheen. If using frozen, thaw overnight in the fridge, never at room temperature. The butter should be cold and cubed for proper basting, and extra-virgin olive oil with at least 70% oleic acid prevents burning. Fresh garlic and lemon are non-negotiable; bottled versions lack the bright acidity needed for that signature char. For the smoked paprika, Penzeys or La Boîte brands deliver consistent quality with no bitterness.
No fresh parsley? Fresh cilantro or basil work as garnishes, though parsley’s clean flavor pairs best. Running out of lemon juice? Lime juice at 1:1 ratio gives a similar tang, though the color will differ slightly. Substituting olive oil? Avocado oil has a higher smoke point, but lacks the fruity depth. For the butter, vegan butter works identically if needed. The smoked paprika can be omitted if unavailable, but the recipe loses its subtle smoky complexity. If you’re grilling without skewers, parchment paper or foil sheets work perfectly—just poke holes for drainage. The key marinade ratio (3:1 oil to lemon) balances moisture and acidity—don’t deviate unless you enjoy rubbery shrimp.
Marinate shrimp for no more than 15 minutes before grilling—longer exposure to acid toughens the flesh. Store shrimp in the coldest part of your fridge, covered with a damp paper towel, for up to 2 days. The marinade components keep separately for 1 week: store olive oil at room temperature, lemon juice refrigerated in an airtight container, and garlic minced in a sealed jar. Leftover grilled shrimp reheats beautifully in a 350°F oven for 5 minutes, but it’s best enjoyed fresh. For meal prep, grill extra shrimp and store them in the freezer for up to 2 months—thaw quickly under cold water before serving. The basting butter should be used immediately after melting, as it separates when cold.
Why You’ll Love This Recipe
- One-Pan Magic: I swear by this—just toss the shrimp, garlic, and olive oil on a hot grill or skillet, let them sizzle for 3 minutes, and you’re done. No chopping, no mess, no second pan.
- Garlic Butter Bliss: That moment when the butter melts into the shrimp, coating them in rich, garlicky goodness? Pure satisfaction. The lemon juice cuts through the richness just enough to make it irresistible.
- Weeknight Hero: Between us, this is my go-to when I need something impressive but fast. Serve it over pasta, with crusty bread, or straight from the pan—it works every time, even when I’m exhausted.
- Budget Luxury: Honestly, shrimp can feel fancy, but this recipe stretches it. A pound of shrimp feeds four, and the olive oil and butter are minimal. Feels like a splurge, costs like a steal.
Step-by-step instructions for charred, buttery grilled shrimp
Master this technique and you’ll deliver restaurant-quality shrimp with perfect char and melt-in-your-mouth tenderness every time.
👨🍳 Step 1: Marinate the Shrimp for Maximum Flavor
In a large bowl, combine the 1.5 lb large shrimp (16/20 count) with the 0.25 cup extra-virgin olive oil, 0.25 cup lemon juice, 6 cloves minced fresh garlic, 1.5 tsp kosher salt, 0.5 tsp ground black pepper, and 0.5 tsp smoked paprika. Use your hands to gently massage the marinade into each shrimp for 5 minutes—this ensures even coating and deep flavor penetration.
Let the shrimp marinate at room temperature for 10-15 minutes while you prepare your grill. The acidity from the lemon juice will begin tenderizing the shrimp, and the olive oil will create a protective barrier that prevents overcooking. You’ll notice the shrimp develop a subtle sheen and absorb the vibrant colors from the marinade.
🔥 Step 2: Prep the Skewers and Preheat the Grill
Soak the 4 whole wooden skewers in water for 30 minutes to prevent burning during grilling. While they soak, preheat your grill to medium-high heat (about 400°F). I like to use a gas grill for this recipe because it gives me precise temperature control, but a charcoal grill works beautifully too—just make sure you get those coals good and hot first.
Clean the grill grates thoroughly with a grill brush to remove any residue that could stick to your shrimp. The skewers should slide through the grates with minimal resistance. If they feel too tight, soak them for another 10 minutes. You’ll know your grill is ready when you can hold your hand 3-4 inches above the grates and feel a strong burst of heat.
🍳 Step 3: Thread and Grill to Perfect Char
Thread the marinated shrimp onto the soaked skewers, leaving about ¼ inch between each shrimp to allow for even cooking and proper charring. Place the skewers on the preheated grill and cook for 2-3 minutes per side until the shrimp develop beautiful grill marks and reach an internal temperature of 145°F.
Here’s where it gets critical: don’t overcrowd the grill. Cook the shrimp in batches if needed to maintain proper heat. You’ll know they’re ready when the shrimp turn opaque pink and the edges have a deep char. The butter will come into play shortly—keep those skewers handy on a plate lined with paper towels to catch any drippings.
🥘 Step 4: Baste with Butter for Ultimate Richness
Remove the skewers from the grill and transfer them to a plate. Immediately add the 4 tbsp cold cubed unsalted butter to the grill grates or a hot skillet. Let the butter melt and sizzle for 1 minute until it turns golden and fragrant—this creates a flavorful basting liquid.
Using a silicone brush or tongs, quickly brush the melted butter over each skewer, coating the shrimp thoroughly. The high heat will create a glossy, caramelized finish that takes these shrimp to the next level. Work quickly but carefully—hot butter can be dangerous. You’ll see the shrimp develop a beautiful sheen as the butter clings to their surfaces.
🍽️ Step 5: Finish with Zest and Garnish
Transfer the buttered shrimp to a serving platter and sprinkle with the 1 tbsp fresh lemon zest and 0.25 cup chopped fresh parsley. The bright citrus notes cut through the richness of the butter, while the parsley adds a fresh, vibrant contrast. Serve immediately while the shrimp are still sizzling and the butter is perfectly melted.
Each bite should deliver a perfect balance of smoky char from the grill, buttery richness, and bright citrus acidity. The shrimp should be tender enough to flake easily with a fork but still hold together when served whole. For an extra touch, drizzle any remaining melted butter from the plate over the top before serving.
Pro Tips For Making 5 Star Grilled Shrimp
- Thaw Properly First: DESCRIPTION: If your shrimp arrive frozen, don’t toss them straight on the grill—plunge them into ice water for 10 minutes first. I learned this the hard way when my first batch of frozen shrimp turned out rubbery; the shock thaw guarantees even cooking and that perfect snap.
- Sear Over High Heat: DESCRIPTION: Crank your grill to medium-high (450°F+) and sear shrimp skin-side down for 30 seconds—no peeking. The butter and olive oil will bubble like crazy, but that’s how you get the crust. After flipping, they’ll cook in 1-2 minutes total; overcooking is the fastest way to ruin them.
- Mince Garlic Like a Pro: DESCRIPTION: Skip the press—it bruises garlic and makes it bitter. Instead, smash whole cloves with the flat side of your knife, then finely chop with a sharp blade. My grandmother swore by this, and she was right: it releases more flavor without the harsh aftertaste.
- Lemon Juice Last: DESCRIPTION: Add lemon juice only after the shrimp come off the grill—it’s the acid’s job to brighten the dish, but tossing it in early will make the butter split and turn the shrimp rubbery. A squeeze at the end keeps everything silky and vibrant.
Storing and reheating this 5 star grilled shrimp
Refrigerator Storage
Store leftover grilled shrimp in an airtight container with a damp paper towel on top to maintain moisture. Keep them in the coldest part of your fridge for up to 2 days—this preserves their delicate texture.
I like to arrange them in a single layer so they don’t stick together. The butter coating will keep them rich, but the lemon zest adds a bright note that prevents the shrimp from tasting flat. 🥗
Freezer Prep
For longer storage, grill extra shrimp and freeze them in a single layer on a parchment-lined tray before transferring to a freezer bag. This prevents ice crystals that ruin texture. They’ll keep for up to 2 months—thaw quickly under cold water before reheating.
I’ve found this method works best for batch cooking when I know I’ll need shrimp later in the week.
Reheating Methods
For stovetop reheating, cook shrimp in a nonstick skillet over medium-low heat with 1 tbsp butter for 2-3 minutes until warmed through. Add a splash of water to prevent sticking.
The butter helps restore that restaurant-quality sheen. I avoid microwaving because it makes the shrimp rubbery—this method keeps them tender and flavorful. ✨
Butter Revival
If reheating frozen shrimp, brush them with melted butter before serving to restore that buttery finish. The high heat of grilling evaporates some of the butter’s flavor during initial cooking, so this step brings back that rich, caramelized taste.
I like to add a pinch of smoked paprika to the reheating butter for extra depth—it reminds me of my first BBQ competition where this trick won me first place.
Garnish Refresh
Always finish reheated shrimp with fresh lemon zest and chopped parsley—this brightens the flavors after storage. The citrus cuts through any richness that develops during reheating. For extra flair, drizzle with olive oil just before serving.
This simple step makes reheated shrimp taste almost as good as fresh ones, which is perfect for busy weeknights.
Grill Marks Revival
Want to recreate that perfect char? After reheating, quickly sear shrimp in a hot skillet for 30 seconds per side to restore grill marks. This works especially well if you’re serving them as part of a larger meal where presentation matters.
The sizzle alone makes them feel fresh and restaurant-worthy again. 🔥
Nutrition facts
Frequently asked questions
Can I use frozen shrimp for this recipe?
Yes, but thaw them properly first! Place frozen shrimp in a sealed bag and submerge in cold water for 10-15 minutes—never use warm water. Pat completely dry before marinating, as any moisture will prevent proper charring. For best results, thaw overnight in the fridge. The texture difference is minimal when done correctly.
What’s the secret to getting perfect grill marks?
Three things: hot grill, clean grates, and even spacing. Preheat your grill to 400°F and brush grates with oil before adding shrimp. Leave ¼ inch between shrimp on skewers to prevent steaming. Press down lightly with a spatula after 1 minute to create those beautiful crosshatch marks.
Can I make this recipe without skewers?
Grill shrimp directly on the grates or use parchment paper cut into strips. For extra flavor, place shrimp on a bed of chopped lemon wedges or wooden planks infused with herbs. Just reduce cooking time by 30 seconds per side since they’ll cook faster without skewers.
How do I know when shrimp are fully cooked?
They’re done when they turn opaque pink (no longer translucent) and reach 145°F internally. The edges should have a deep char while the centers remain plump. Overcooking by even 10 seconds turns shrimp rubbery—use a meat thermometer for precision.
What’s the best way to serve these shrimp?
Pair with grilled asparagus, warm crusty bread, or a citrus salad to balance the richness. For a complete meal, serve over couscous or quinoa with a drizzle of lemon-garlic aioli. The buttery shrimp shine best when contrasted with bright, fresh flavors.

- 12 Bean Chili Recipe: Hearty Slow-Cooked Depth With 12 Legumes - October 17, 2026
- 5 Seed Bread Recipe: Nutty Crunch and Artisan Flavor in One Loaf - October 17, 2026
- 1 Lb Macaroni Salad Recipe: Bold, Crunchy, and Crowd-Pleasing - October 17, 2026