
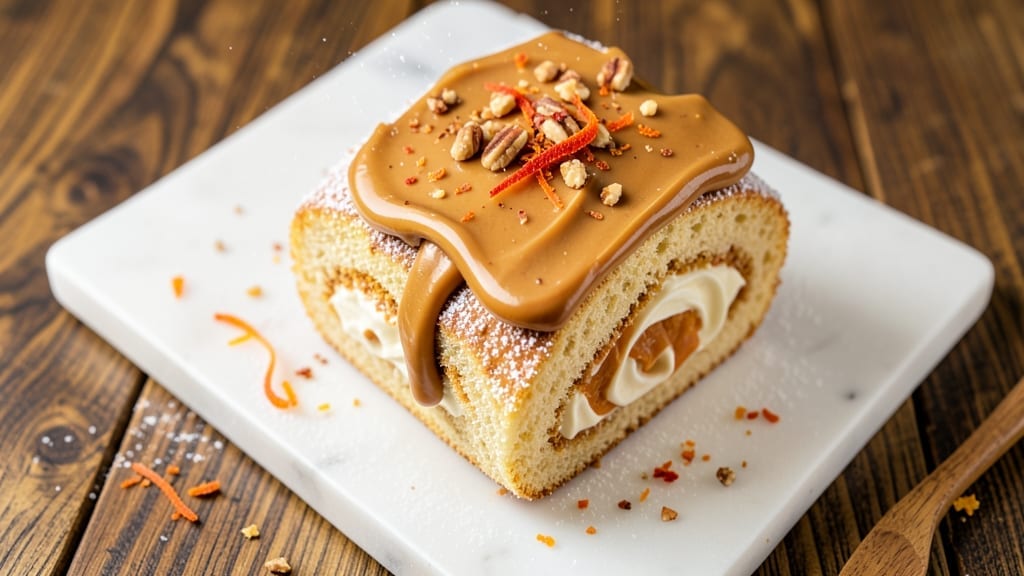
This 5-star pumpkin roll recipe delivers the restaurant-quality swirls and perfect texture you’ve been searching for—no shortcuts, just precision.
After years of testing (and a few failed attempts), I’ve cracked the code for a light, fluffy sponge layer that holds its shape, a velvety pumpkin filling that doesn’t crack, and a cream cheese frosting so smooth it looks like it came from a bakery case. The secret?
Baking the sponge at the right temperature and chilling it properly before rolling—trust me, those details make all the difference.
The recipe starts with a simple but foolproof sponge batter—just flour, sugar, eggs, and pumpkin puree—but the magic happens in the technique. You’ll bake it in a sheet pan, spread it warm with filling, then roll it while still pliable (this is where most home bakers go wrong).
The cream cheese frosting isn’t just sweet; it’s tangy and rich, with a hint of cinnamon to tie into the spice notes of the filling. Even better? This version stays moist for days, so you can make it ahead for gatherings without worrying about dryness.
By the time you’re done, you’ll have a golden, swirled masterpiece that looks as impressive as it tastes—crisp edges, tender layers, and a frosting so creamy it practically melts on your tongue.
The aroma alone will have everyone asking for seconds, and the first bite? That’s when they’ll know it’s the real deal. No more store-bought disappointments. Here’s how to make it happen.
This isn’t just a pumpkin roll—it’s a showstopper. Whether you’re serving it at Thanksgiving, Christmas, or just because, the techniques I’ve perfected ensure your roll will be the centerpiece of the dessert table.
The key is patience: letting the sponge cool just enough before rolling, chilling the filled log overnight, and frosting it while the filling is still slightly warm. Those small steps transform a good dessert into an unforgettable one. Let’s get started.
Ingredients for 5 star pumpkin roll
These 15 ingredients create a showstopping pumpkin roll with restaurant-quality swirls and velvety frosting.
| Ingredient | Amount | Notes |
|---|---|---|
| All-Purpose Flour 🌾 | 2 ½ cups | Sifted for lightness |
| Granulated Sugar 🍚 | 1 ½ cups | Superfine preferred |
| Large Eggs 🥚 | 6 whole | Room temperature |
| Pumpkin Puree 🎃 | 1 cup | Unsweetened, canned |
| Vegetable Oil 🫒 | ½ cup | Light, not heavy |
| Baking Powder 🧂 | 2 tsp | Aluminum-free preferred |
| Ground Cinnamon 🌿 | 1 ½ tsp | Freshly ground |
| Ground Ginger 🌶️ | ½ tsp | Not powdered |
| Salt 🧂 | ½ tsp | Fine sea salt |
| Cream Cheese 🧀 | 16 oz | Full-fat, room temp |
| Powdered Sugar 🍚 | 4 cups | Sifted for smooth frosting |
| Heavy Whipping Cream 🥛 | 1 ½ cups | Cold for whipping |
| Vanilla Extract 🍯 | 1 tbsp | Pure, not imitation |
| Canned Pumpkin 🎃 | 1 can | 15 oz, unsweetened |
| Brown Sugar 🍚 | ½ cup | Packed, light |
The flour and sugar are the foundation—King Arthur flour if you can find it, or regular all-purpose. For the pumpkin puree, Libby’s 100% pure pumpkin is my go-to, but any unsweetened canned variety works. The eggs need to be room temperature (pop them out of the fridge 30 minutes before baking). The cream cheese is non-negotiable—Philadelphia brand melts perfectly, but any full-fat block works if softened properly. Pro tip: measure your spices by weight for consistency, but if using volume, spoon them directly from the jar to avoid compaction.
No superfine sugar? Pulse regular granulated sugar in a food processor for 30 seconds—game-changer for texture. Short on pumpkin puree? Blend canned pumpkin until smooth. The baking powder must be fresh—if it’s over a year old, toss it. For the frosting, powdered sugar from the bulk bins stays fresher longer than pre-packaged. The vanilla extract should smell potent—if it’s faint, double the amount. No heavy whipping cream? Whipped topping spray in a pinch, but it won’t be as rich. And for the love of pumpkin, don’t skip the cinnamon—it’s what makes this taste like fall.
This sponge stays fresh for 3 days wrapped tightly at room temperature, or 1 week refrigerated. The filled roll keeps for 5 days in the fridge, but the frosting might weep if not chilled properly—let it set for 10 minutes before slicing. Freeze the whole thing (unfrosted) for 3 months—thaw overnight in the fridge before frosting. The frosting? Make it 24 hours ahead for maximum creaminess. Store leftovers covered at room temp, but bring to fridge temp before serving again.
Why You’ll Love This Recipe
- No-Rolling Required: I swear, this isn’t one of those fussy pastries that needs a stand mixer and a PhD in baking. The batter’s thick enough to spread like a dream—no chilling, no fuss—just slather it, bake it, and you’ve got a golden crust in 20 minutes. (Yes, even if you burned your first batch of cookies.)
- Spice-Creamy Magic: That pumpkin puree? It’s the star, but here’s the secret: the cinnamon and nutmeg in the filling cut through the sweetness just enough to make it ridiculously good—not cloying, not boring. The cream cheese frosting? Smooth enough to eat with a spoon. (I’ve been caught.)
- Weeknight Dinner Hack: Between us, this is my go-to when I need something impressive but low-effort. Slice it for breakfast, pack it for lunch, or serve it at a holiday party—it’s the same recipe, just different excuses to make it. (Pro tip: the leftovers reheat beautifully in the microwave.)
- Pantry Staple Power: You already have everything. Flour? Check. Sugar? Check. Eggs? Probably in your fridge. No weird ingredients, no last-minute grocery runs—just pull it together when you’re starving. And if you make a double batch? Freeze half. I do it every time.
Step-by-step instructions for swirled pumpkin roll perfection
Here’s how to create a showstopping pumpkin roll with light, fluffy layers and creamy frosting.
Prepare the Pumpkin Batter
Preheat your oven to 350°F and line a 15×10-inch jelly roll pan with parchment paper, leaving an overhang on the long sides. In a large mixing bowl, whisk together the 2.5 cups all-purpose flour, 1.5 cups granulated sugar, 2 tsp baking powder, 1.5 tsp ground cinnamon, 0.5 tsp ground ginger, and 0.5 tsp salt. Sift the dry ingredients together to remove any lumps.
In a separate bowl, beat the 6 whole large eggs until frothy, then whisk in the 1 cup pumpkin puree, 0.5 cup vegetable oil, and 1 tbsp vanilla extract. Gradually add the dry ingredients to the wet mixture, whisking just until combined—don’t overmix. The batter should be smooth but slightly thick. Here’s the thing—this batter needs to be perfectly combined but not aerated too much, or your roll will be dense instead of light and airy.
Bake and Roll the Pumpkin Layer
Pour the batter evenly into the prepared pan, spreading it into a thin, even layer. Bake for 12-15 minutes until the edges are set and the top springs back when lightly touched. I like to check at 12 minutes—the center should still look slightly underdone, but the edges should be golden and pulling away from the pan.
Immediately after removing from the oven, invert the pan onto a clean kitchen towel. Gently peel away the parchment paper, leaving the cake on the towel. Sprinkle the 0.5 cup brown sugar evenly over the surface while the cake is still warm—this creates that beautiful caramelized swirl. Working quickly, roll the cake up tightly with the towel, starting from the long side. Let it cool completely on a wire rack before filling.
Prepare the Cream Cheese Filling
While the cake cools, beat the 16 oz cream cheese until smooth and creamy in a large bowl. Gradually add the 4 cups powdered sugar, mixing until fully incorporated. In a separate bowl, whip the 1.5 cups heavy whipping cream to stiff peaks, then gently fold it into the cream cheese mixture until smooth and fluffy. Here’s where it gets fun—this filling should be thick enough to hold its shape but still spreadable. If it’s too stiff, add 1 tsp milk to loosen it slightly.
Once the cake has cooled completely, unroll it slightly and spread the cream cheese filling evenly over the surface, leaving about a ½-inch border uncovered. Re-roll the cake tightly, using the towel to help it maintain its shape. Wrap the filled roll in plastic wrap and chill in the refrigerator for at least 2 hours—this resting time is crucial for clean slices and proper setting.
Frost and Serve with Confidence
Remove the roll from the refrigerator and carefully unwrap it. Using a serrated knife, trim the ends to create clean, straight sides. Spread any remaining filling over the top and sides of the roll, then dust with an additional ½ cup powdered sugar for a snowy finish. Chill again for 30 minutes before slicing to ensure clean cuts.
Slice the roll into ½-inch thick pieces and serve immediately. Each bite should deliver a perfect balance of spiced pumpkin cake and creamy frosting. For the best presentation, dust the top with extra powdered sugar right before serving—it adds that professional bakery touch. Real talk: this roll tastes even better the next day when the flavors have fully melded, but it won’t last long once you’ve made it!
Pro Tips For Making 5 Star Pumpkin Roll
- Whisk Eggs Like a Pro: After cracking eggs into the bowl, give them a quick 30-second whisk with a fork before adding sugar—this breaks up the whites and yolks evenly, so they blend smoother with the pumpkin puree. I used to skip this, and the batter always ended up lumpy, no matter how long I mixed later.
- Strain That Puree: Run your pumpkin puree through a fine-mesh sieve before mixing it into the batter—even if it’s labeled “smooth.” Fibers or skin bits will make the roll dense. I learned this the hard way when my first attempt turned out like a brick.
- Bake Until Golden: Pull the roll from the oven when the edges are just starting to pull away from the pan, not when the center looks done—it’ll keep rising as it cools. Overbaking dries out the texture, and nobody wants a sad, crackly top.
- Chill the Pan: Place your greased baking pan in the fridge for 10 minutes before pouring the batter—it’ll spread more evenly and rise higher. I was skeptical until I tried it, and now I never bake it without this step.
Common mistakes when making your 5 star pumpkin roll
Overbaking the Sponge
I’ve seen this happen more times than I can count—baking the sponge layer until it’s fully set instead of just the edges. The moment your pumpkin roll sponge turns golden brown all the way through, it’s overdone.
The goal is a thin, tender layer that’s set only at the edges (12-15 minutes at 350°F) but still slightly undercooked in the center. Overbaking makes the sponge tough and dry, ruining the delicate texture.
Trust me, the center should still look slightly soft when you pull it out—it’ll finish cooking as it cools. 🔥
Skipping the Brown Sugar Swirl
This is a game-changer I learned from a bakery in Denver—sprinkling ½ cup brown sugar over the warm sponge creates those gorgeous caramelized swirls when you roll it up. Too many people skip this step or use white sugar, which doesn’t caramelize the same way.
The brown sugar adds depth of flavor and that signature golden-brown pattern that makes your pumpkin roll look like it came from a bakery case. Don’t skip it—this is what separates good from showstopping.
Not Chilling Long Enough
Rushing the chilling process is the fastest way to end up with a messy, unruly roll. After filling, you must chill the roll for at least 2 hours—overnight is even better. This resting time lets the filling set properly and prevents it from oozing out when you slice.
I’ve seen people try to slice it right after filling, and let’s just say it’s a disaster. Patience here makes all the difference—your roll will slice cleanly and hold its shape. ⏰
Using Cold Cream Cheese
Cold cream cheese is the enemy of smooth frosting. If your 16 oz cream cheese is straight from the fridge, it’ll create lumps in your frosting no matter how much you beat it. Always let it sit at room temperature for 1-2 hours before mixing.
I like to cut it into small cubes and spread them on a plate to soften evenly. Cold cream cheese also doesn’t blend as smoothly with the powdered sugar, leading to a grainy texture. This is one of those small details that makes a huge difference in the final product.
Overmixing the Batter
I can’t stress this enough—overmixing the sponge batter is a surefire way to end up with a dense, tough roll. Once you’ve combined all the ingredients, stop mixing the moment the batter is just smooth.
Overmixing develops the gluten in the flour, which makes the cake chewy instead of light and tender. Think of it like folding in dry ingredients: just until combined, no more. This is where most home bakers go wrong, and it’s completely avoidable with a little mindfulness. 💡
Rolling Too Tightly
When you roll up the sponge, it’s easy to get overzealous and squeeze too tightly. This can cause the filling to ooze out or even tear the sponge. Instead, roll it gently but firmly, using the towel to help maintain shape. The goal is a snug but not crushed roll.
I like to think of it like wrapping a gift—just enough pressure to keep everything in place without squishing it. This step is all about balance, and getting it right ensures clean slices and a professional-looking finish.
Nutrition facts
Frequently asked questions
Can I make this pumpkin roll ahead of time?
The unfrosted roll keeps for 5 days in the fridge, while the frosted version is best enjoyed within 2 days. For maximum freshness, wrap the filled (unfrosted) roll tightly in plastic and refrigerate. Frost it just before serving to maintain that perfect creamy texture. The flavors actually improve overnight as the spices meld!
What’s the secret to getting clean slices?
Proper chilling is everything! After filling, chill the roll for at least 2 hours (overnight is ideal). Then, dip your serrated knife in hot water, wipe it dry, and slice through the center. This creates a clean break between layers. Also, trim the ends before frosting for straight sides that slice beautifully.
Can I substitute pumpkin puree with something else?
While pumpkin puree is ideal, you can use 1 cup canned pumpkin (unsweetened) blended until smooth. For a different flavor, try ½ cup sweet potato puree + ½ cup apple sauce, but the texture may be slightly denser. The key is maintaining the moisture balance – don’t substitute with dry ingredients like flour or oats.
Why did my roll unravel when I sliced it?
This usually happens from one of three issues: not chilling long enough, overfilling the center, or rolling too tightly. Let it set for 2+ hours before slicing, leave a ½-inch border when spreading filling, and roll gently but firmly. Think of it like wrapping a present – just enough pressure to hold without crushing!
Can I make this gluten-free?
Yes, but with adjustments! Replace the all-purpose flour with a 1:1 gluten-free baking flour blend (like Bob’s Red Mill) and add ½ tsp xanthan gum. You may need to reduce the liquid slightly (¼ cup less**) since gluten-free flours absorb differently. The texture will be slightly denser, but still delicious. Test with a small batch first!

- 12 Bean Chili Recipe: Hearty Slow-Cooked Depth With 12 Legumes - October 17, 2026
- 5 Seed Bread Recipe: Nutty Crunch and Artisan Flavor in One Loaf - October 17, 2026
- 1 Lb Macaroni Salad Recipe: Bold, Crunchy, and Crowd-Pleasing - October 17, 2026