
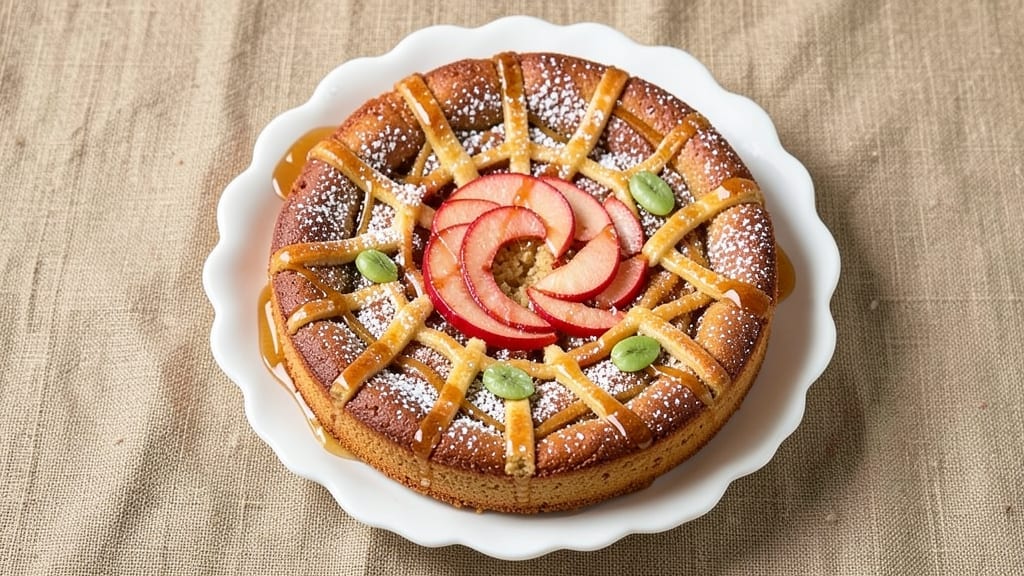
A 6-inch apple cake delivers all the cozy, spiced warmth of classic apple pie in a perfectly portioned single serving—ideal for satisfying one craving without leftovers. This recipe balances tender crumb with moist, caramelized apples, all baked in 35 minutes at 350°F for effortless perfection.
The secret lies in folding in apples at the last moment to preserve their juiciness while the cinnamon and nutmeg infuse every bite with autumnal comfort.
What sets this cake apart is its foolproof simplicity: just six ingredients, a single bowl, and no fancy techniques. The cake batter starts with a classic vanilla base, then gets brightened with apples tossed in lemon juice and spices.
A quick mix and pour is all it takes before sliding into the oven, where the edges turn golden while the center stays soft—no dense, dry crumb here.
By the time it emerges, you’ll have a moist, fragrant cake with tender apples peeking through the crumb, their natural sweetness balanced by warm spices. Dust with powdered sugar or drizzle with caramel for extra indulgence, but even plain, it’s a showstopper.
Perfect for a solo treat, a thoughtful gift, or a make-ahead dessert that feels homemade.
This recipe scales effortlessly—double the batter for a 9-inch cake or halve it for a 3-inch mini—while keeping the same rich flavor and moist texture.
The apples work best when firm but not hard, so choose a variety like Honeycrisp or Braeburn for the best results. Let’s bake this cake!
Ingredients for 6 inch apple cake
Six simple ingredients and a handful of spices create this perfect single-serve apple cake.
| Ingredient | Amount | Notes |
|---|---|---|
| All-Purpose Flour 🌾 | 1 cup | Sifted for lighter texture |
| Granulated Sugar 🍚 | ½ cup | White or light brown |
| Unsalted Butter 🧈 | ½ cup | Room temperature, softened |
| Large Eggs 🥚 | 1 whole | Room temperature for best mixing |
| Vanilla Extract 🌿 | 1 tsp | Pure vanilla for authentic flavor |
| Baking Powder 🍃 | 1 tsp | Diamond Crystal preferred |
| Salt 🧂 | ¼ tsp | Fine sea salt preferred |
| Cinnamon 🌶️ | 1 ½ tsp | Ground, not cassia |
| Ground Nutmeg 🌿 | ¼ tsp | Freshly grated for stronger flavor |
| Medium Apples 🍎 | 1 whole | Honeycrisp or Braeburn variety |
| Lemon Juice 🍋 | 1 tbsp | Freshly squeezed, not bottled |
| Powdered Sugar 🍚 | 2 tbsp | For dusting, optional |
The apples are everything here—Honeycrisp or Braeburn are your best bets for that perfect balance of crispness and sweetness. Trader Joe’s or Whole Foods usually carry these varieties, but any firm apple works in a pinch (just avoid the mushy ones). Core them yourself—it takes 30 seconds, and you’ll get a more even slice. Toss the apples in lemon juice right away to keep them bright while you mix the batter. Freshly grated nutmeg makes a huge difference over pre-ground, but if you don’t have a grater, a pinch of pre-ground works too.
No vanilla extract? Vanilla sugar works at double the amount—just crush a vanilla bean pod into your sugar. Running low on baking powder? Baking soda plus cream of tartar at half the amount gets you close. The butter should be soft enough to press with your finger but not greasy—microwave it 20 seconds if it’s too firm. For extra moisture, add 1 tbsp of applesauce to the batter. And if you’re feeling fancy, swap the powdered sugar dusting for a drizzle of caramel or a sprinkle of crushed pecans.
This batter keeps 2 days in the fridge—just let it sit at room temp 30 minutes before baking. The cake itself? 3 days wrapped tightly at room temperature, or freeze for 3 months. I like to slice it fresh and freeze individual portions on parchment paper—just thaw overnight. The apples get juicier as it sits, so if you’re making ahead, bake it the day you plan to serve. Trust me, it’s even better the next day.
Why You’ll Love This Recipe
- No Mixer Needed: I swear by this—just creaming butter and sugar with a wooden spoon until it’s light and fluffy. No electric mixer, no fuss, and the eggs blend right in like butter. Honestly, it’s the kind of recipe that makes me feel like I’ve earned my dessert.
- Butter-Sugar Magic: That rich, creamy butter folded into the sugar? It’s what turns this into something ridiculously good—not too sweet, not too dry, just that perfect balance where every bite feels like a hug. The vanilla ties it all together, but the butter? That’s the star.
- Portion Control Perfection: Six-inch pans mean single servings—no leftovers cluttering your fridge, no awkward slicing for one. It’s my go-to for date nights or when I just want something sweet without committing to a whole cake. (Yes, even on a Tuesday night.)
- Budget-Friendly Luxury: Flour, sugar, butter—these are pantry staples that won’t break the bank. I’ve made this for under $5 total, and it still tastes like I spent hours baking. Between us, that’s the kind of win that makes me want to bake every weekend.
Step-by-step instructions for 6-Inch apple cake
Here’s how to make a perfectly moist, single-serve apple cake with warm spice notes.
Prep the Apples for Maximum Flavor
Start by peeling and coring the medium apple, then slice it into ¼-inch thick pieces. Toss the apple slices with the 1 tablespoon lemon juice in a bowl to prevent browning and add brightness. Let them sit while you prepare the batter—the acidity helps tenderize them slightly.
I like to arrange the apple slices in a circular pattern in a greased 6-inch cake pan. This creates a beautiful presentation and ensures even baking. Leave a ½-inch gap between slices so they don’t steam and become soggy. The apples should fit snugly but not overcrowd the pan.
Mix the Batter for Perfect Texture
In a medium bowl, whisk together the 1 cup all-purpose flour, 1 teaspoon baking powder, 1.5 teaspoons cinnamon, 0.25 teaspoon salt, and 0.25 teaspoon ground nutmeg. Sifting the flour first prevents lumps and gives a lighter texture. Set this dry mixture aside.
In a separate bowl, cream the 0.5 cup softened butter and 0.5 cup granulated sugar together until light and fluffy—about 2-3 minutes with an electric mixer. Add the 1 whole egg and mix until fully incorporated, then stir in the 1 teaspoon vanilla extract. This step is crucial for that tender, moist crumb we’re after.
Combine Wet and Dry Ingredients
Gradually add the dry ingredients to the wet mixture, mixing on low speed just until combined. Be careful not to overmix—you should still see small flour streaks. The batter will be thick but pourable. Pour about ⅔ of the batter over the arranged apple slices in the pan, then gently press down to submerge them completely.
Here’s the thing—don’t worry if it looks like too much batter. The apples will absorb some moisture during baking, and this arrangement ensures every bite has that perfect apple-to-cake ratio. The remaining ⅓ of the batter goes on top, creating a beautiful dome shape when baked.
Bake to Golden Perfection
Preheat your oven to 350°F and bake the cake for 30-35 minutes, or until a toothpick inserted in the center comes out clean. The top should be golden brown with a slight crack in the middle—that’s your sign of a perfectly baked cake. Real talk: don’t open the oven before the 25-minute mark or you’ll risk a sunken center.
If you notice the edges browning too quickly, tent the cake with aluminum foil. The goal is even baking throughout. Once done, let the cake cool in the pan for 10 minutes before transferring to a wire rack. This brief resting period prevents it from collapsing when you remove it.
Dust and Serve Warm
While the cake cools, dust the top with the 2 tablespoons powdered sugar using a fine-mesh sieve. This adds a delicate sweetness and makes it look beautiful. Serve the cake warm for the best experience—the spiced apple flavor really shines when it’s still hot from the oven.
You’ll love how moist this cake is—thanks to the apples and the careful mixing. Each bite delivers that perfect balance of tender crumb, spiced apple, and just the right amount of sweetness. Perfect for a single serving or as a delightful dessert for two.
Pro Tips For Making 6 Inch Apple Cake
- Cream Butter Properly: Use your fingers or a wooden spoon to work the cold butter into the sugar until it’s just combined—no need for a food processor. I learned this the hard way when I overmixed and ended up with a dense, tough cake instead of that tender crumb you want. Stop when the mixture looks like wet sand, and resist the urge to go further.
- Measure Flour Right: Spoon the flour into the measuring cup and level it off with a knife—don’t scoop directly from the bag. Packing it down or scooping too much adds extra moisture, and your cake will turn out gummy instead of light. Trust me, this small step makes a real difference in texture.
- Avoid Overmixing Batter: Mix the wet and dry ingredients just until combined—no more than 15-20 strokes with the whisk. Overworking the batter develops gluten, which turns your cake into a dense brick instead of the fluffy, moist cake you’re after. Stop when there are no more dry spots, and let the oven do the rest.
- Use Room-Temp Eggs: Take the eggs out of the fridge 30 minutes before using so they’re at room temperature. Cold eggs can cause the batter to curdle slightly, and you’ll end up with pockets of uneven texture in your cake. This is one of those small tweaks that actually changes the outcome—smooth, consistent crumb or a few lumpy surprises.
Dietary considerations for these flavors
Gluten-Free Adaptation
Swap the 1 cup all-purpose flour for a 1:1 gluten-free baking flour blend like Bob’s Red Mill or King Arthur. These blends include xanthan gum for structure, so you won’t need to add extra.
I’ve tested this with 1.25 cups of blend to account for slight density differences. Add 1 extra tablespoon of applesauce to keep the crumb moist—gluten-free cakes tend to dry out faster. 🌾
Dairy-Free Options
Replace the 0.5 cup unsalted butter with 0.5 cup dairy-free butter (like Miyoko’s or Earth Balance) or 0.4 cup coconut oil (solid, not melted). For richness, use 0.5 cup full-fat coconut milk instead of the egg—whisk it into the wet ingredients after creaming the sugar.
The texture stays tender, but expect a slightly denser crumb. 🧈
Lower Sugar Version
Reduce the 0.5 cup granulated sugar to 0.35 cup and replace the rest with 0.15 cup unsweetened applesauce. The apples’ natural sweetness will shine, and the cake stays moist without extra sugar.
Dust with 1 tablespoon powdered sugar instead of 2 tablespoons to keep it lighter. Trust me, the spice notes carry the flavor beautifully. 🍎
Nut-Free Adjustments
If you’re avoiding nuts, skip the optional pecan topping entirely. For extra crunch, add 1 tablespoon toasted pumpkin seeds (pepitas) or crushed pretzels> after baking. The seeds add a neutral crunch without nut allergens, while pretzels bring a salty contrast that balances the sweetness. 🌟
Refined Sugar Free
Use 0.5 cup coconut sugar or 0.5 cup monk fruit sweetener> (like Lakanto) instead of granulated sugar. Coconut sugar adds a caramel note, while monk fruit keeps the same sweetness without glycemic impact.
Reduce other liquids by 1 tablespoon> if using coconut sugar—it’s more hydrating. The cake’s texture stays identical, just with a cleaner sweetness. 💛
Nutrition facts
Frequently asked questions
Can I use any type of apple for this cake?
The recipe calls for firm apples like Honeycrisp or Braeburn because they hold their shape during baking. Softer varieties like McIntosh will turn mushy. If that’s all you have, peel and slice them thinly (⅛-inch thick) and toss with an extra ½ teaspoon lemon juice to help firm them up.
Why does the recipe arrange apples in a circle?
Arranging the apples in a circular pattern creates a beautiful presentation while ensuring even baking. The gaps between slices prevent steaming, which keeps the apples tender rather than soggy. Plus, it makes the cake look like a mini apple pie—perfect for serving!
Can I make this cake without a 6-inch pan?
Yes! Use a 6-inch round or square pan for the same results. For a 9-inch pan, double the batter and bake at 350°F for 40-45 minutes. If you only have a 5-inch pan, reduce the batter by half and bake for 25-30 minutes. Just adjust baking time based on your pan size.
How do I store leftovers?
Keep the cake wrapped tightly at room temperature for 3 days or freeze for up to 3 months. For best texture, thaw overnight in the fridge before reheating. Microwave for 10-15 seconds to restore warmth—just don’t overdo it, or the apples will get mushy.
Can I add other fruits to this recipe?
Try pears or plums for a similar texture, or berries (like blueberries or raspberries) for a different flavor. Just reduce the amount by half to avoid overcrowding the pan. Toss them in lemon juice too—it keeps them bright and prevents sinking during baking.

- Pork Loin Pulled Pork Crock Pot Recipe: Slow-Smoked Tenderness With Zero Dryness - November 1, 2026
- Baked Potatoes in Crock Pot Recipe: Buttery Interiors and Crispy Top Magic - November 1, 2026
- Braised Beef Short Ribs Recipe: Crock Pot Fall-Off-Bone Magic in 6 Hours - November 1, 2026