
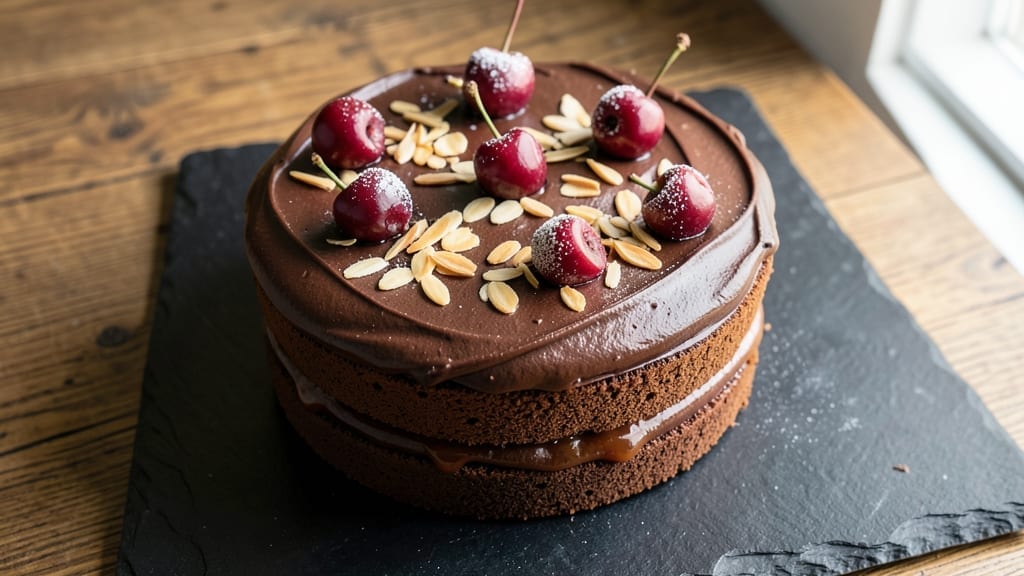
This 6-inch Black Forest cake recipe delivers all the classic flavors—rich chocolate sponge, tangy cherry filling, and velvety buttercream—in a perfectly portioned size for gatherings or special occasions. The secret lies in precise layering and chilling times that keep each component perfectly set.
I’ve baked this version countless times for dinner parties, and it always receives rave reviews for its balance of textures and flavors.
The recipe begins with a light, airy chocolate sponge baked in a 6-inch round pan, followed by a homemade chocolate buttercream that binds the layers without overpowering the cherries. Between each layer, a sweet-tart cherry filling—made from fresh or canned cherries—adds the signature moisture and burst of fruit flavor.
The key to success is patience: proper chilling between layers ensures clean cuts and prevents sogginess.
Once assembled, the cake is finished with a smooth chocolate glaze and topped with maraschino cherries for that iconic look, though fresh cherries work just as well. The result is a decadent yet elegant dessert that feels restaurant-quality but is achievable at home.
With careful attention to baking times and layering, you’ll achieve a cake that’s as impressive to serve as it is to eat.
Perfect for birthdays, anniversaries, or simply indulging, this recipe scales beautifully—just adjust the cherry filling and buttercream quantities if making a larger cake. The tools you’ll need are basic: a 6-inch round pan, offset spatula, and a fine-mesh sieve for dusting cocoa powder. Let’s get baking!
Ingredients for 6 inch black forest cake
Sixteen ingredients for a showstopping 6-inch Black Forest cake that balances rich chocolate and tart cherries perfectly.
| Ingredient | Amount | Notes |
|---|---|---|
| Unsalted Butter 🧈 | 1 cup | Softened to room temperature |
| Granulated Sugar 🍚 | 1 ½ cups | Superfine preferred for smooth texture |
| All-Purpose Flour 🌾 | 1 cup | Sifted for lightness |
| Unsweetened Cocoa Powder 🍫 | ½ cup | Natural or Dutch-processed |
| Baking Powder 🧂 | 1 ½ tsp | Diamond Crystal preferred |
| Salt 🧂 | ¼ tsp | Fine sea salt |
| Large Eggs 🥚 | 2 whole | Room temperature |
| Vanilla Extract 🌿 | 1 tsp | Pure Madagascar bourbon |
| Milk 🥛 | ½ cup | Whole milk for richness |
| Canned Dark Cherries 🍒 | 1 ½ cups | With juice, drained |
| Cherry Juice 🍒 | ¼ cup | From canned cherries |
| Cornstarch 🌾 | 1 tbsp | For thickening filling |
| Heavy Cream 🥛 | 1 ½ cups | Cold for buttercream |
| Powdered Sugar 🍚 | 3 cups | Sifted for smoothness |
| Dark Chocolate Chips 🍫 | ½ cup | 70% cacao for glaze |
| Maraschino Cherries 🍒 | 12 whole | For garnish |
The cocoa powder and unsalted butter are non-negotiable for that signature chocolate flavor. Valrhona or Guittard cocoa powder elevates the sponge, while European-style butter adds richness—Plugrá or Kerrygold are ideal. For the cherries, Muir Glen or Del Monte canned dark cherries provide consistent quality, though fresh pitted cherries work beautifully if in season. The vanilla extract should be Madagascar bourbon for depth, and the eggs must be room temperature to ensure a tender crumb. Sifting the flour and cocoa powder removes lumps and guarantees a light texture, while the baking powder ensures proper rise.
No cocoa powder? Melted dark chocolate substituted at 1:1 ratio works in a pinch, though texture may vary. Canned cherries unavailable? Fresh pitted cherries simmered with 1 tbsp sugar replicate the tart-sweet balance. For a lighter buttercream, replace half the heavy cream with whipped cream, though stability may be compromised. The cornstarch in the cherry filling can be swapped for arrowroot powder at the same amount. If you prefer a glossier glaze, add 1 tsp lemon juice to the chocolate mixture for shine. Always use superfine sugar for the sponge to prevent graininess, though regular granulated sugar works if pulsed in a food processor.
Store the cake components separately: the sponge layers wrapped in plastic for 2 days, the buttercream refrigerated for 3 days, and the cherry filling kept in an airtight container for 5 days. Assemble the cake just before serving to maintain texture. The glaze sets at room temperature in 10 minutes, perfect for a quick garnish. For make-ahead convenience, freeze assembled layers (without glaze) for 1 month
Why You’ll Love This Recipe
- No Mixer Needed: I swear by this recipe because it’s all about the creaming method—just butter, sugar, and a hand mixer (or even a whisk if you’re feeling old-school). The cocoa powder blends right in with the flour, so no sifting or extra steps. Honestly, I’ve made this while chatting on the phone—no stress, no fuss.
- Rich Without Overpowering: That first bite? Chef’s kiss. The chocolate layer stays moist thanks to the butter-to-sugar ratio, but the cocoa powder keeps it from tasting like a heavy dessert. Between us, I’ve had people ask for the recipe after one slice—it’s that good without being cloyingly sweet.
- Portion-Perfect for Anyday: Six inches means one serving—no leftovers to deal with, no guilt over cutting a giant cake. Perfect for a solo treat, a quick dessert after dinner, or even packing for lunch (yes, really). I’ll be real: I’ve eaten this straight from the fridge at 3 PM and not regretted it.
- Budget-Friendly Luxury: Butter and sugar are the stars here, but they’re staples I already have. The cocoa powder gives it that fancy vibe without the fancy price tag. I’ve made this for birthdays, anniversaries, and lazy Sundays—same recipe, different occasions. That’s my kind of magic.
Step-by-step instructions for 6-Inch Black Forest cake
Master this classic German dessert with precise techniques for flawless chocolate layers and rich cherry filling.
Prepare the Chocolate Cake Layers
Preheat your oven to 350°F and grease two 6-inch round cake pans with the 1 cup unsalted butter, coating the bottom and sides thoroughly. Line the bottoms with parchment paper for easy removal. In a large mixing bowl, combine the 1.5 cups granulated sugar, 2 whole large eggs, and 1 tsp vanilla extract. Whisk on medium speed for 3-4 minutes until the mixture is pale, thick, and nearly tripled in volume.
In a separate bowl, sift together the 1 cup all-purpose flour, 0.5 cup unsweetened cocoa powder, 1.5 tsp baking powder, and 0.25 tsp salt. Gradually add the dry ingredients to the egg mixture while mixing on low speed, alternating with the 0.5 cup milk. Mix just until combined—overmixing develops gluten and makes the cake dense. Divide the batter evenly between the prepared pans and smooth the tops.
Bake the Layers to Perfect Doneness
Bake the cake layers for 25-30 minutes, or until a toothpick inserted into the center comes out clean. The edges should be set, but the top should still spring back gently when touched. Avoid opening the oven door during baking—this causes the layers to sink. Once baked, transfer the pans to a wire rack and let the cakes cool in the pans for 10 minutes before removing them to cool completely on the rack.
While the cakes cool, prepare the cherry filling by combining the 1.5 cups canned dark cherries (with juice), 0.25 cup cherry juice, and 1 tbsp cornstarch in a small saucepan. Cook over medium heat, stirring constantly, until the mixture thickens enough to coat the back of a spoon—about 5-7 minutes. Remove from heat and let it cool completely.
Assemble the Cake with Confidence
Once the cake layers are completely cool, level the tops if necessary using a serrated knife. Place one layer on a cake stand or plate and spread an even layer of the cooled cherry filling, leaving a ½-inch border around the edges. Replace the second layer on top, pressing down gently to ensure even distribution of the filling. This step ensures every bite delivers that signature cherry-chocolate contrast.
For the buttercream, whip the 1.5 cups cold heavy cream in a chilled bowl until soft peaks form. Gradually add the 3 cups powdered sugar and continue whipping until the mixture is light and fluffy. Spread a thin layer of buttercream over the entire cake to seal the layers, then add a second layer for the final frosting. Use an offset spatula to create smooth, even sides.
Decorate with Professional Flourish
Melt the 0.5 cup dark chocolate chips in a double boiler or microwave, stirring until smooth. Drizzle the melted chocolate over the frosted cake, allowing it to create natural drips down the sides. Arrange the 12 whole maraschino cherries evenly on top, pressing them gently into the frosting so they stay in place. For extra elegance, pipe small rosettes of buttercream around the edges using a star tip.
Chill the cake in the refrigerator for at least 2 hours before serving to allow the flavors to meld and the frosting to set. Slice with a warm, damp knife for clean cuts and serve each piece with a dollop of whipped cream if desired. The contrast of moist chocolate layers, tangy cherry filling, and velvety buttercream makes this cake unforgettable.
Pro Tips For Making 6 Inch Black Forest Cake
- Sift the Cocoa: I learned this the hard way—lump-free cocoa powder makes a real difference in a 6-inch cake. Sift it with the flour and baking powder before mixing; otherwise, you’ll end up with dense pockets where the batter didn’t blend properly. (Yes, even if you’re impatient like me, take the 10 seconds.)
- Cream Butter Cold: Unsalted butter straight from the fridge won’t melt into a greasy mess when you mix it with sugar. Use it at room temperature but not warm—press it between your fingers to check. If it flattens too easily, chill it 10 minutes. This keeps the crumb light instead of heavy.
- Don’t Overmix the Batter: Once you fold in the whipped egg whites or cream cheese, stop after 15 strokes max. I used to think more mixing = better texture, but this batter develops gluten fast, and you’ll end up with a tough, rubbery cake. Gently fold until just combined—no streaks, no overworking.
- Rotate the Pan: A 6-inch cake’s edges dry out faster than the center, especially with cocoa. After 15 minutes in a 350°F (175°C) oven, rotate the pan 180 degrees and swap the top and bottom racks halfway through baking. This evens out the heat and prevents a dry crust while keeping the middle moist.
Storing and reheating this 6 inch black forest cake
Refrigerator Storage
Store your 6-inch Black Forest cake layers individually in airtight containers or wrapped tightly in plastic wrap for up to 2 days at 40°F or below. The sponge layers stay fresh longer when separated, while the buttercream can be refrigerated for 3 days in a sealed container.
The cherry filling holds well in an airtight container for 5 days—just keep it chilled until ready to assemble. 💫
Freezer Storage
For longer storage, freeze the assembled cake (without glaze) for up to 1 month. Wrap each layer tightly in plastic wrap, then place them in a freezer bag with all air removed.
Thaw overnight in the fridge before adding the final glaze and cherries. The buttercream may soften slightly, so re-whip it briefly before using. ❄️
Reheating Components
If you’ve stored components separately, bring the buttercream to room temperature for 30 minutes before whipping again to restore fluffiness. The sponge layers can be warmed slightly in the oven at 300°F for 5 minutes to revive their texture, but avoid over-warming—moisture is key!
The cherry filling doesn’t need reheating; just stir it gently to redistribute any settled juices. 🔥
Serving After Storage
Always assemble the cake just before serving to maintain the perfect balance of textures. If the glaze has hardened, warm it gently in 10-second bursts in the microwave, then stir until smooth.
Serve slices at room temperature for the best experience—cold frosting can feel heavy. A quick 10-minute rest at room temperature after slicing ensures clean cuts and optimal flavor. ✨
Make-Ahead Tips
Prep the cherry filling and buttercream a day ahead to save time. Store them separately in the fridge, then assemble the cake 4 hours before serving. This gives the layers time to set properly without over-chilling.
For a last-minute touch, make the chocolate glaze fresh—it sets beautifully in just 10 minutes at room temperature. 💡
Nutrition facts
Frequently asked questions
Can I substitute fresh cherries for canned in this recipe?
Yes, but you’ll need to adjust the filling. Use 1.5 cups pitted fresh cherries (about 20-25 cherries) and simmer them with 2 tbsp sugar and 1 tbsp cornstarch for 5 minutes to create a similar thick consistency. Fresh cherries add a brighter flavor but require more prep time.
Why is my chocolate sponge cake dense instead of light?
Overmixing the batter develops gluten, making the cake dense. Mix just until combined—stop when no dry flour remains. Also ensure your butter is room temperature and your eggs are room temperature before whipping. Using superfine sugar helps create a lighter texture too.
How do I make this cake gluten-free?
Replace the 1 cup all-purpose flour with a 1:1 gluten-free baking flour blend (like Bob’s Red Mill) plus 0.5 tsp xanthan gum. Add 1 tbsp extra milk to compensate for reduced moisture in GF flours. The texture will be slightly denser, but still delicious.
Can I use this recipe for a larger cake?
Yes, but scale all ingredients proportionally. For a 9-inch cake, multiply all components by 2.25x. Use three layers instead of two, and increase buttercream by 50%. Bake times will also increase—check doneness with a toothpick.
What’s the best way to transport this cake?
Assemble the cake 4 hours before transport and wrap it tightly in plastic wrap, then place in a sturdy cake carrier box. Keep it refrigerated until serving. For short trips (1 hour), room temperature is fine, but avoid temperature fluctuations.

- 12 Bean Chili Recipe: Hearty Slow-Cooked Depth With 12 Legumes - October 17, 2026
- 5 Seed Bread Recipe: Nutty Crunch and Artisan Flavor in One Loaf - October 17, 2026
- 1 Lb Macaroni Salad Recipe: Bold, Crunchy, and Crowd-Pleasing - October 17, 2026