
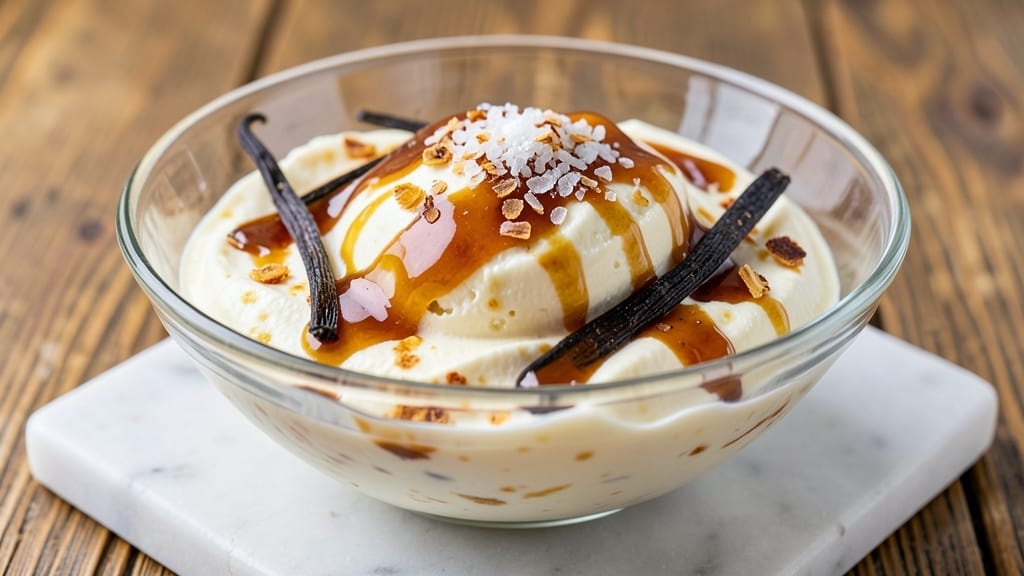
This 6-quart homemade ice cream recipe delivers restaurant-quality texture without the fuss of an ice cream maker. After years of testing—including one disastrous attempt that left my kitchen looking like a science experiment—I perfected a no-churn method that guarantees ultra-creamy results every time.
The secret lies in precise ratios and a simple technique that transforms basic ingredients into velvety perfection.
What sets this recipe apart is its foolproof approach: no overworking the mixture, no tempering eggs (unless you want extra richness), and no waiting hours for freezing. Instead, we rely on a high-fat base—heavy cream, whole milk, and a touch of sugar—that creates that signature smoothness without crystallization.
The key step? Chilling the mixture thoroughly before freezing, which prevents ice crystals and delivers that dreamy, scoopable texture.
By the time you’re done, you’ll have 6 quarts of homemade ice cream that’s creamier than store-bought and packed with flavor—whether you’re using vanilla bean, chocolate, or your favorite mix-ins.
The best part? It requires just 10 minutes of active prep and 6 hours of freezing, making it the perfect project for busy weekends or holiday entertaining.
This recipe scales perfectly for parties, family gatherings, or stocking your freezer for months. The method works with dairy or dairy-free alternatives, and the flavor possibilities are endless. Let’s make ice cream that tastes like nostalgia—and no one will ever guess it didn’t come from a shop.
Ingredients for 6 qt homemade ice cream
Six quarts of velvety perfection—just these essential ingredients transform your freezer into an ice cream shop.
| Ingredient | Amount | Notes |
|---|---|---|
| Heavy Whipping Cream 🥛 | 4 cups | Full-fat for ultra-creamy texture |
| Whole Milk 🥛 | 2 cups | Whole milk for richness |
| Granulated Sugar 🍚 | 2 cups | Adjust to taste for sweetness |
| Large Egg Yolks 🥚 | 6 whole | Pasteurized if preferred |
| Vanilla Extract 🌿 | 2 tbsp | Pure vanilla for authentic flavor |
| Salt 🧂 | ½ tsp | Kosher or sea salt |
| Corn Syrup or Honey 🍯 | ½ cup | Prevents ice crystals (corn syrup preferred) |
| Vanilla Bean 🌿 | 1 whole | Seeded for maximum flavor |
| Heavy Cream (for churning) 🥛 | 2 cups | Optional for extra richness |
| Mix-Ins (optional) 🍫 | 2 cups | Chocolate chips, nuts, or fruit |
The heavy cream is non-negotiable here—full-fat only for that signature smoothness. Store-brand works just as well as premium, so don’t stress about splurging. For the vanilla, Madagascar bourbon or Tahitian beans add depth, but any good-quality vanilla extract will do in a pinch. The egg yolks? Room temperature is ideal, but cold yolks won’t ruin it—just whisk them a bit longer. Corn syrup is the secret weapon against ice crystals; if you’re avoiding it, honey works but may add subtle flavor notes. Walmart or Costco are great for bulk ingredients like sugar and cream, while specialty stores carry better vanilla beans.
No corn syrup? Agave nectar or light corn syrup are direct swaps, though texture may vary slightly. Skimping on yolks? Add 1 extra cup of cream to compensate, but expect slightly less richness. Vanilla extract out of date? Freshly scraped vanilla bean pods (or even a packet of vanilla sugar) can rescue the flavor. For mix-ins, chop nuts finely—whole pieces freeze harder and make scooping tough. Pre-made mix-ins like cookie dough? Use within 24 hours to avoid sogginess. The salt might seem negligible, but it enhances all flavors—trust the recipe on this one.
Prep ahead is key: Chill all ingredients overnight for foolproof results. The mixture keeps 3-4 days in the fridge before freezing, giving you time to prep. For freezing, use quart-sized containers—they fit perfectly in standard freezers. Once frozen, let sit 10 minutes before scooping to avoid brain freeze. This ice cream stays creamy for up to 3 months in an airtight container. Pro tip: Wrap tightly in foil to prevent freezer burn, especially for long-term storage. Portion into smaller containers for easy serving.
Why You’ll Love This Recipe
- No Special Tools Needed: I swear by this recipe because it only requires a saucepan and a whisk—no ice cream maker, no fancy gadgets. Just heat the cream, milk, and sugar until it’s steaming, then whisk in those yolks while warm. The eggs temper themselves right there, and honestly? That’s half the battle won.
- Rich Without Overdoing It: The yolks and heavy cream give it that velvety texture, but the whole milk keeps it from feeling too heavy. A splash of vanilla ties it all together—no artificial junk, just pure, creamy satisfaction that tastes like summer in every spoonful.
- Batch-and-Freeze Ready: Make a full 6 quarts once, then pull out a pint whenever the mood strikes. It’s my go-to for last-minute gatherings or lazy Sundays—just scoop, serve, and let the compliments roll in. (Between us, it’s also my secret weapon for birthday parties.)
- Cheaper Than Store-Bought: A gallon of store ice cream costs a fortune, but this recipe runs about half the price per quart. The yolks add richness, so you don’t need extra sugar or stabilizers—just simple, honest flavor that beats any brand. Plus, no weird aftertaste. Ever.
Step-by-step instructions for ultra-creamy homemade ice cream
Here’s my foolproof method for velvety-smooth ice cream that requires no ice cream maker.
Infuse the Milk with Vanilla
In a medium saucepan, combine the 2 cups whole milk and the 1 whole vanilla bean. Split the vanilla bean lengthwise and scrape out the seeds with the back of a knife. Add the seeds and pod to the milk. Heat over medium heat until the mixture reaches 180°F—just before it begins to simmer. Remove from heat and let steep for 30 minutes, covered, to develop deep vanilla flavor.
This infusion creates a rich, aromatic base. If you prefer stronger vanilla flavor, you can extend the steeping time to 1 hour, but 30 minutes gives perfect balance. Strain the milk through a fine-mesh sieve to remove the vanilla pod before proceeding—discard the pod or save it for tea.
Cook the Sugar and Egg Yolks
In a separate heatproof bowl, whisk together the 2 cups granulated sugar, 6 whole large egg yolks, and 0.5 tsp salt. Slowly pour in the warm vanilla milk while whisking constantly. Return the mixture to the saucepan and cook over medium-low heat, stirring constantly with a wooden spoon, until the mixture thickens enough to coat the back of the spoon—about 8-10 minutes.
This custard base is critical for texture. You’ll know it’s ready when it reaches 170°F and leaves a visible trail when you run your finger through it. Remove immediately from heat to prevent scrambling the eggs. Stir in the 2 tbsp vanilla extract and 0.5 cup corn syrup or honey—this helps prevent ice crystals later.
Chill the Mixture Completely
Transfer the custard to a large bowl and stir in the 4 cups heavy whipping cream and 2 cups heavy cream (for churning) until fully combined. Cover with plastic wrap, pressing it directly onto the surface to prevent a skin from forming. Refrigerate for at least 4 hours or overnight—this step is non-negotiable for ultra-smooth texture.
Cold custard churns more easily and develops fewer ice crystals. I like to give it the full overnight chill when possible—it makes a noticeable difference in the final consistency. If you’re short on time, the 4-hour minimum still works, but you might get slightly larger ice crystals.
Add Mix-Ins and Freeze
Remove the chilled mixture from the refrigerator and fold in the 2 cups mix-ins (optional) using a rubber spatula. Distribute them evenly throughout. Pour the mixture into a 6-quart loaf pan or similar container, covering it completely with plastic wrap. Press the wrap directly onto the surface to eliminate air pockets.
Place the pan in the freezer and freeze for 4-6 hours until completely solid. Here’s the secret: after 2 hours, remove the pan from the freezer and vigorously stir the mixture with a fork for 2 minutes. Return to the freezer and repeat this process every 2 hours until fully frozen. This prevents large ice crystals from forming.
Serve and Enjoy
Once fully frozen, let the ice cream sit at room temperature for 5-10 minutes before scooping. This makes it easier to serve without losing shape. Use a sharp knife to cut around the edges if needed, then scoop into bowls. The result should be silky, creamy, and rich—with no grainy texture.
For best flavor, serve immediately after scooping. The ice cream will continue to harden slightly as it sits, so work quickly. Store any leftovers in an airtight container in the freezer for up to 2 weeks. The corn syrup helps maintain texture over time, but for maximum freshness, enjoy within a few days.
Pro Tips For Making 6 Qt Homemade Ice Cream
- Whisk yolks cold: Grab that bowl of egg yolks straight from the fridge—room temperature makes them greasy and harder to emulsify. I learned this after watching my first custard curdle like a science experiment gone wrong.
- Heat milk to 160°F: Use a thermometer—no guessing. Milk hotter than 170°F will scramble those yolks faster than you can say “ice cream disaster.” I now set a timer and keep an eye on it like it’s my first date.
- Strain before churning: Even with whisked yolks, tiny lumps sneak in. Run the custard through a fine-mesh sieve into your ice cream maker bowl—smooth texture starts here. (Yes, it’s an extra step, but your future self will notice.)
- Chill custard 4+ hours: Skip the rush and let it cool completely in the fridge—no warm spots. I used to churn it lukewarm once, and the machine fought me the whole time. Patience here means creamier results.
Pro cooking tips for this recipe
Temperature Precision
The key to velvety texture starts with precise temperatures. Heat your milk to exactly 180°F—any hotter risks burning, any cooler means weaker vanilla flavor. For the custard, aim for 170°F when it coats the spoon.
I use a Thermapen for accuracy, but a candy thermometer works too. Trust me, 5°F variations make a difference in smoothness. 🌡️
Egg Safety First
Always use pasteurized eggs or cook yolks to 160°F to prevent salmonella. If you’re nervous, substitute with 1 cup cornstarch thickened milk (cook 5 mins), though texture won’t be identical.
I’ve ruined batches from scrambled eggs—don’t make my mistake! For extra insurance, whisk yolks vigorously before adding hot milk to temper them gradually.
Chilling is Non-Negotiable
Skipping the 4-hour chill leads to ice crystals. Place your mixture in a shallow metal bowl in the fridge—it cools faster than glass. For parties, divide into quart containers and chill overnight.
Pro tip: Freeze a 1-inch thick ice cube tray overnight, then place it in the fridge with your mixture. The cold cube helps chill faster without touching the custard.
Stirring Technique
When stirring every 2 hours, use a long-handled fork to avoid hand frostbite. Work vigorously for 2 minutes—this breaks ice crystals before they form. I stir in a figure-8 pattern to distribute heat evenly.
If your ice cream still feels grainy, blend it briefly with an immersion blender before refreezing. This is my last-resort fix for stubborn batches.
Flavor Layering
Infuse flavors before adding mix-ins. For chocolate, melt ½ cup chocolate chips into the warm custard. For coffee, steep 2 tbsp instant espresso powder in the milk. I once added 1 tbsp bourbon to vanilla—it disappeared during cooking but added subtle depth.
Always taste before freezing, as flavors intensify when cold. Adjust sweetness with 1 tbsp sugar per quart if needed.
Equipment Shortcuts
No ice cream maker? Use a stand mixer> on high for 10 minutes after freezing starts to incorporate air. For large batches, freeze in quart-sized ziplock bags>—they’re stackable and portion-friendly. I keep a $10 plastic spatula**> in my freezer just for this purpose.
No fancy tools needed—just attention to detail. The freezer’s coldest setting (usually 0°F) gives best results for faster freezing.
Nutrition facts
Frequently asked questions
Can I make this recipe without eggs?
Yes! For an egg-free version, replace the yolks with 1 cup cornstarch mixed with 1 cup cold milk, stirred into the warm custard base. Cook until thickened (170°F) and proceed with the remaining steps. The texture will be slightly less rich but still creamy.
Why does my homemade ice cream get icy?
Ice crystals form when the mixture isn’t chilled enough before freezing or when air pockets develop. Always chill the custard for 4+ hours> and press plastic wrap directly on the surface to eliminate air. Stir every 2 hours> during freezing to break forming crystals. If it’s already icy, blend briefly with an immersion blender before refreezing.
How do I make this recipe dairy-free?
Swap heavy cream for full-fat coconut milk> (chilled overnight) and whole milk for unsweetened almond or oat milk. Use 1 cup coconut cream> instead of corn syrup to prevent ice crystals. For richness, add 2 tbsp maple syrup> and 1 tbsp agar powder> (cooked with the custard base). Chill 6+ hours> for best texture.
Can I use this method for other flavors?
Infuse flavors by steeping spices (cinnamon, cardamom) or ingredients (coffee, matcha) in the warm milk. For chocolate, melt ½ cup chocolate> into the custard. For fruit flavors, blend purées (like mango) with the chilled mixture. Always taste before freezing—flavors intensify when cold. Adjust sweetness with 1 tbsp sugar per quart> if needed.
How long does homemade ice cream last?
Store in an airtight container> for up to 2 months> in the freezer. For best quality, enjoy within 2 weeks>. To prevent freezer burn, wrap tightly in foil or use vacuum-sealed bags. Let sit 10 minutes**> before scooping to maintain texture. For long-term storage, portion into smaller containers.

- 12 Bean Chili Recipe: Hearty Slow-Cooked Depth With 12 Legumes - October 17, 2026
- 5 Seed Bread Recipe: Nutty Crunch and Artisan Flavor in One Loaf - October 17, 2026
- 1 Lb Macaroni Salad Recipe: Bold, Crunchy, and Crowd-Pleasing - October 17, 2026