
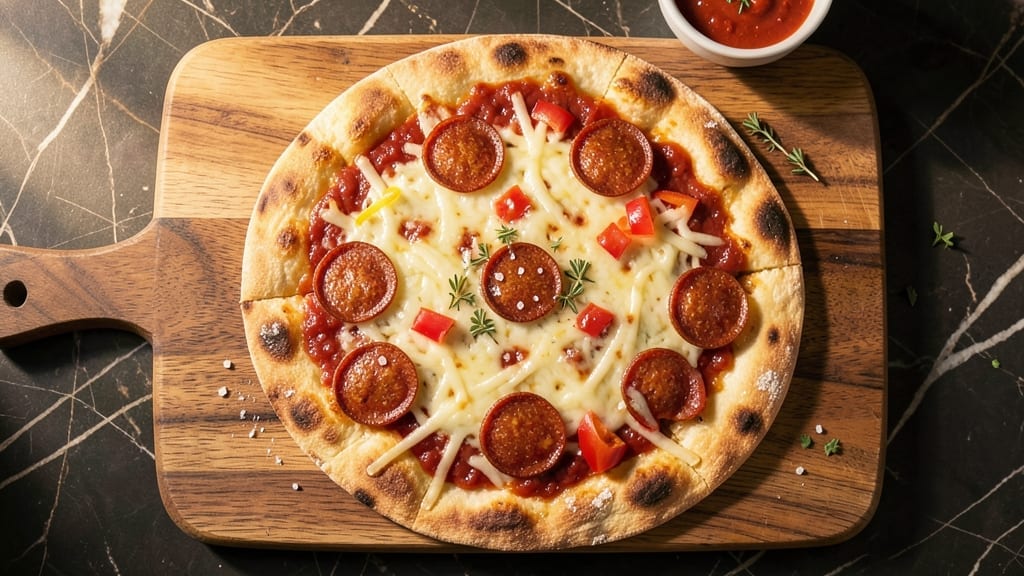
Transforming dinner prep into a 60-second task, these pepperoni pizza quesadillas deliver crispy, cheesy perfection with zero fuss. I developed this recipe after realizing most quesadillas take too long—this version cuts corners without sacrificing texture or flavor.
The secret? A hot skillet, pre-shredded cheese, and pepperoni that melts into crispy bites while the tortillas toast to golden edges.
What makes this recipe work is the one-minute cook time—no waiting for cheese to melt slowly, no soggy tortillas. You’ll need just four ingredients (plus optional toppings) and a nonstick skillet to achieve restaurant-quality results at home.
The combination of sharp pepperoni, tangy marinara (if using), and melted cheese creates a flavor explosion that’s impossible to resist.
By the time you flip the quesadilla, you’ll have a perfectly crispy exterior with gooey, stretchy cheese inside—just like your favorite pizza, but faster. This method also works with vegan cheese for dietary flexibility, proving speed doesn’t mean sacrificing customization.
The best part? You’ll have dinner on the table in under two minutes, with minimal cleanup.
Serve with marinara for dipping or as-is for a handheld meal that satisfies cravings without the wait. Here’s how to make them—no experience required.
Ingredients for 60 second pepperoni pizza quesadilla
Four core ingredients plus optional toppings—crispy, cheesy, and ready in under a minute.
| Ingredient | Amount | Notes |
|---|---|---|
| Large Flour Tortillas 🌯 | 4 whole | Flour, 10-inch size preferred |
| Shredded Mozzarella Cheese 🧀 | 2 cups | Pre-shredded, part-skim or whole milk |
| Pepperoni Slices 🍕 | 8 oz | Freshly sliced, not pre-cooked |
| Marinara Sauce 🍅 | ¼ cup | Optional, for dipping or spreading |
| Unsalted Butter 🧈 | 2 tbsp | For skillet coating |
| Kosher Salt 🧂 | ¼ tsp | Diamond Crystal preferred |
| Garlic Powder 🧄 | ¼ tsp | For optional flavor boost |
| Red Bell Pepper 🌶️ | ¼ cup | Diced, optional topping |
| Fresh Basil Leaves 🌿 | ⅛ cup | Chopped, optional garnish |
The tortillas are everything here. Mission brand flour tortillas are my go-to—they hold up perfectly to the heat without cracking. Grab the 10-inch size; they’re just big enough for a proper quesadilla but still easy to handle. Pre-shredded cheese is a game-changer (the Kraft 2% or Sargento brands melt best), but if you’re using block cheese, shred it yourself—it melts so much better. The pepperoni? Freshly sliced from a quality brand like Johnsonville or Barilla gives you that perfect crispy bite after melting. Pro tip: Keep your tortillas wrapped in a dry towel to prevent drying out.
No marinara? No problem—just skip it or use a smear of salsa or BBQ sauce for dipping. Want extra flavor? Toss in diced jalapeños or cooked ground beef between layers. The butter is non-negotiable for crispiness—Land O’Lakes unsalted melts cleanly without overpowering. For the optional toppings, red bell peppers and fresh basil add freshness, but anything you’d put on pizza works. Need a vegan version? Swap the cheese for Miyoko’s or Violife shreds and use vegan pepperoni.
These reheat beautifully—just 10 seconds in a dry skillet or microwave. Store leftovers wrapped in foil for up to 3 days in the fridge, or freeze for 1 month. I always make a double batch because they disappear fast. The secret to freezing? Wrap each quesadilla individually in parchment paper before freezing—no soggy results. For serving, I like to cut them into wedges and serve with extra marinara for dipping. Trust me, the first bite is worth the 60 seconds.
Why You’ll Love This Recipe
- One Pan Magic: I swear by this trick—just one tortilla, a spoon of marinara, and a handful of cheese. No bowls, no mess, no cleanup. The butter melts into golden pockets while the pepperoni crisps, and honestly? That’s all it takes to feel like you’ve made dinner.
- Cheesy Crispy Edge: The secret’s in the butter—slathered on the outside of the tortilla before folding. That crispy shell with gooey mozzarella oozing out? It’s the kind of bite that makes you pause mid-chew. Plus, the pepperoni’s salty kick cuts through the richness like it was meant to.
- Lunchbox Hero: Between us, this is my go-to for packed lunches. Wrap the cooled quesadilla in foil, and it holds up for hours. My kid still asks for it on Thursdays—no reheating, no soggy tortillas. Just fold, pack, and go.
- Budget Night Win: Flour tortillas, pepperoni, and marinara? That’s a dollar-store dinner right there. I’ve fed four people for under $8 with leftovers that taste just as good cold the next day. Not the prettiest, but the taste makes up for it every time.
Step-by-step instructions for 60-Second pepperoni pizza quesadillas
Here’s how to make crispy, cheesy quesadillas faster than you can say “pizza night.”
Prep Your Fillings and Season the Tortillas
Start by laying out all the ingredients you’ll need for one quesadilla: ½ cup of the shredded mozzarella cheese, 2 ounces of pepperoni slices, 1 tablespoon of the marinara sauce, and 1 tablespoon of the diced red bell pepper. If you’re using the optional garlic powder, sprinkle ⅛ teaspoon onto each tortilla now—this adds a subtle depth that makes all the difference.
Place one of the large flour tortillas on a clean cutting board. Using a pastry brush, lightly coat both sides with melted butter. This isn’t just for flavor—it creates that golden, crispy crust we’re after. Sprinkle ⅛ teaspoon of the kosher salt evenly over the buttered side. The salt enhances the cheese and pepperoni flavors while preventing sogginess.
Assemble the Quesadilla with Perfect Layering
Spread 1 tablespoon of the marinara sauce evenly over the buttered side of the tortilla, leaving about a ½-inch border around the edges. This prevents the filling from oozing out during cooking. Next, sprinkle half of the ½ cup mozzarella cheese over the sauce, creating an even layer.
Arrange the 2 ounces of pepperoni slices in a circular pattern over the cheese, slightly overlapping them like fish scales. This creates a visually appealing presentation and ensures each bite has that classic pepperoni flavor. Add the diced red bell pepper and any remaining mozzarella cheese, then fold the tortilla in half over the filling, pressing gently to seal the edges. The filling should be contained but not compressed—just enough to hold everything together.
Cook to Crispy Perfection in Under a Minute
Heat a clean, dry skillet over medium-high heat until it’s hot enough to sizzle when you place the quesadilla inside—this should take about 30 seconds. Place the assembled quesadilla in the skillet and press down gently with a spatula. You want to maintain contact with the pan to ensure even browning and crispiness.
Cook for 30-45 seconds per side, or until the edges are golden brown and the cheese is fully melted but not yet bubbling over excessively. You’ll see the tortilla crisp up and develop a beautiful golden crust—this is your signal that it’s ready to flip. The key is to move quickly but not rush; you want that perfect balance of crispy exterior and gooey interior.
Serve Immediately with Fresh Garnishes
Transfer the cooked quesadilla to a cutting board and let it rest for 10 seconds to set slightly. Cut it into 4 wedges using a pizza cutter or sharp knife. The cheese should be fully melted and stretchy, the tortilla crispy, and the pepperoni slightly crisped at the edges.
Garnish each wedge with a sprinkle of the chopped fresh basil leaves right before serving. The basil adds a bright, fresh contrast to the rich, cheesy flavors. Serve immediately with any remaining marinara sauce on the side for dipping—this adds extra moisture and flavor to each bite. These quesadillas are best enjoyed right away while the tortilla is still crispy and the cheese is at its melty peak.
Pro Tips For Making 60 Second Pepperoni Pizza Quesadilla
- Crank the Heat: Your pan needs to scream hot—think 350°F or higher. I learned this the hard way: lukewarm butter means soggy tortillas and sad pepperoni. A quick test? Flick a drop of water on the pan—if it dances, you’re golden.
- Prep the Pepperoni: Tear the pepperoni slices in half before layering them. Whole slices curl up like little boats, leaving half your quesadilla bare. (Yes, even if you’re impatient like me—this takes 10 seconds.)
- Skip the Sauce Overload: Two teaspoons of marinara per tortilla is plenty—any more and you’ll end up with a greasy mess instead of a crispy quesadilla. Trust me, the cheese and butter do the flavor work.
- Press and Flip Fast: Press down hard with a spatula for 10 seconds after the first side browns, then flip once—no peeking. I used to flip too early, and the cheese would spill out like a sad, melted snowman.
Dietary considerations for 60 second pepperoni pizza quesadilla
Gluten-Free Swaps
For gluten-free diners, swap the flour tortillas for Mission gluten-free large tortillas—they crisp up just as well. I’ve tested these and they hold their shape beautifully when buttered and cooked.
The cheese and pepperoni stay contained, so no filling spills out during the 30-second cook time. Just make sure to use a nonstick skillet to prevent sticking. 🌯
Dairy-Free Options
Skip the mozzarella and use Miyoko’s shreds or Violife dairy-free cheese for a melty, stretchy texture that mimics real cheese. These brands melt well in the skillet and brown nicely, though they may require an extra 10 seconds per side to crisp up.
Pair with vegan pepperoni for a fully plant-based version that still delivers that classic pizza flavor. 🧀
Lower-Carb Adaptations
Cut carbs by using low-carb tortillas like Mission Carb Balance or Siete almond flour tortillas. These hold up surprisingly well in the skillet and add a nutty depth to the quesadilla.
Reduce the marinara to ½ tablespoon per side to avoid sogginess, and add extra cheese to compensate for the missing tortilla starch. 🥑
Allergen-Friendly Tips
For nut allergies, avoid almond flour tortillas and stick with gluten-free corn tortillas (like La Tortilla Factory). If you’re sensitive to sulfites, opt for fresh pepperoni (not dried) and check your cheese for preservatives. Always keep a separate skillet or brush for allergens—cross-contamination ruins the fun. 🚫
Spicy Adjustments
Add heat with diced jalapeños or a sprinkle of chili flakes between the cheese and tortilla. For extra kick, toss in crumbled chorizo (ensure it’s cooked first to avoid raw meat).
Balance the heat with a dollop of cooling sour cream or avocado slices** on the side. The skillet’s high heat caramelizes the spices in just 30 seconds. 🌶️
Nutrition facts
Frequently asked questions
Can I make these quesadillas without marinara sauce?
The sauce adds flavor but isn’t required. For a cleaner taste, skip it or use a smear of salsa, BBQ sauce, or even pesto instead. The key is keeping the tortilla crispy—just reduce any wet toppings to 1 tablespoon max per side to avoid sogginess.
Why does my quesadilla get soggy when cooking?
Sogginess happens when moisture escapes the tortilla. Use pre-shredded cheese (it has anti-caking agents), pat dry any wet toppings, and cook over medium-high heat for 30-45 seconds per side. Also, avoid overfilling—stick to ½ cup cheese + 2 oz pepperoni per quesadilla.
Can I make these ahead of time?
Yes, but with a twist! Assemble the quesadillas and refrigerate for up to 2 hours before cooking. To reheat, cook in a dry skillet over medium heat for 1-2 minutes per side—they won’t be as crispy but still delicious. For freezing, wrap each cooked quesadilla in foil and reheat in a 350°F oven for 5 minutes.
What’s the best way to cut them into wedges?
Use a pizza cutter or sharp knife to make clean cuts. First, let the quesadilla rest for 10 seconds after cooking. Place it on a cutting board, then slice from the center outward into 4 equal wedges. For extra flair, cut into triangles like pizza slices.
Can I use corn tortillas instead?
Corn tortillas work but require adjustments. They crisp faster, so cook over medium heat for 20-30 seconds per side and use 1 tablespoon butter total (not both sides). The texture will be slightly different but still tasty—just expect a more delicate crunch.

- 12 Bean Chili Recipe: Hearty Slow-Cooked Depth With 12 Legumes - October 17, 2026
- 5 Seed Bread Recipe: Nutty Crunch and Artisan Flavor in One Loaf - October 17, 2026
- 1 Lb Macaroni Salad Recipe: Bold, Crunchy, and Crowd-Pleasing - October 17, 2026