
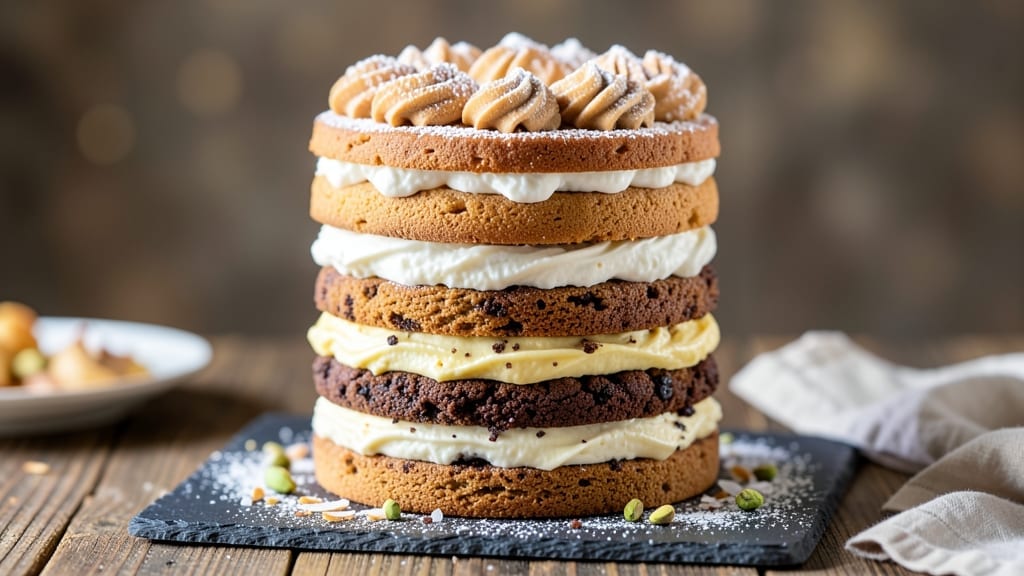
This 7-layer cookie cake recipe delivers the ultimate dessert experience—vanilla bean swirls, creamy pudding, and rich cream cheese frosting stacked to perfection. 💛 What sets this apart is the precise layering technique that ensures each component stays intact while creating a showstopping dessert that tastes as good as it looks.
The secret lies in baking the cookie layers just until set, then chilling them thoroughly before assembly to prevent crumbling.
What makes this recipe truly special is the balance of textures and flavors—crispy cookie layers, velvety pudding, and tangy-sweet frosting. Each layer is carefully measured and baked to hold together during the stacking process, while the cream cheese frosting adds the perfect finishing touch.
The vanilla bean swirls infuse every bite with aromatic warmth, making this cake irresistible.
By following the step-by-step assembly, you’ll achieve a foolproof cake that stays sturdy even after slicing. The chilling times are critical—don’t skip them!—to ensure clean layers and a professional finish. Whether serving at a party or treating yourself, this dessert delivers restaurant-quality results with minimal effort.
Optional decorations like sprinkles or chocolate shavings elevate the presentation, but the cake shines on its own. The key to success is patience—letting each layer set before adding the next. Here’s how to build this masterpiece layer by layer.
Ingredients for 7 layer cookie cake
These fifteen ingredients create a restaurant-quality 7-layer cookie cake with perfect balance.
| Ingredient | Amount | Notes |
|---|---|---|
| Vanilla Bean Swirl Cookie Dough 🍪 | 1 ½ cups | Freshly prepared, chilled 24 hours |
| Instant Vanilla Pudding Mix 🥄 | 1 box | Vanilla flavor, 3.4 oz size |
| Whole Milk 🥛 | 2 cups | Cold, full-fat preferred |
| Large Eggs 🥚 | 4 whole | Room temperature, separated |
| Unsalted Butter 🧈 | 1 cup | Cold, cubed for frosting |
| Cream Cheese 🧀 | 8 oz | Full-fat, room temperature |
| Granulated Sugar 🍚 | 1 ½ cups | Superfine preferred for frosting |
| Vanilla Extract 🌿 | 2 tsp | Pure, high-quality preferred |
| Vanilla Beans 🌸 | 2 whole | Scraped seeds for swirls |
| All-Purpose Flour 🌾 | 2 ½ cups | Sifted, for cookie layers |
| Baking Powder 🧂 | 1 tsp | Aluminum-free preferred |
| Salt 🧂 | ½ tsp | Fine sea salt |
| Powdered Sugar 🍚 | 3 cups | For dusting layers |
| White Chocolate Chips 🍫 | ½ cup | Optional garnish |
| Rainbow Sprinkles 🌈 | ¼ cup | For decoration |
The vanilla bean swirls are the heart of this cake, so high-quality vanilla beans are non-negotiable. Madagascar beans from specialty shops like Penzeys deliver the most aromatic flavor, but even budget brands work if scraped thoroughly. For the cookie layers, King Arthur flour yields the best texture—light and crisp without being dry. The cream cheese frosting requires full-fat cream cheese (Philadelphia is reliable) and superfine sugar for smoothness; regular granulated sugar can make the frosting grainy. Chill all components for at least 2 hours before assembly to prevent crumbling layers.
No vanilla beans? Double the vanilla extract and add a pinch of almond extract for depth. Running low on powdered sugar? Process granulated sugar in a food processor for 30 seconds—it won’t be as fine but works in a pinch. The cookie dough can be pre-made and stored in the fridge for up to 3 days or frozen for 3 months. For a lighter pudding layer, whisk the egg whites separately and fold them in at the end. The white chocolate chips and sprinkles are purely decorative, but they elevate the presentation—skip them if you prefer a classic look.
This cake requires patience—chill each layer for 15 minutes between assembly steps to ensure stability. The completed cake keeps in the fridge for 5 days (covered tightly) and freezes beautifully for 3 months (wrap each layer separately in plastic). For serving, let it sit at room temperature for 30 minutes to soften the frosting slightly. The cookie layers stay crisp best when stored in an airtight container with parchment between them to prevent sticking. Reheat individual slices in the oven for 10 seconds to restore crispness.
Why You’ll Love This Recipe
- No-Bake Magic: I swear by this recipe because it requires zero oven time. Just layer the cookie dough, mix up the pudding with warm milk and butter, let it set, and boom—you’ve got a showstopper dessert that looks like you slaved over it for hours.
- Pudding-Cookie Bliss: That vanilla bean swirl cookie dough meets the creamy, dreamy pudding layer? It’s like a hug for your taste buds. The contrast of chewy dough and silky pudding is ridiculously satisfying—no weird aftertaste, just pure comfort in every bite.
- Party in a Pan: Between us, this is my go-to for birthdays, potlucks, or even a “I just want cake” night. The layers hold up perfectly, so you can slice it ahead of time (yes, even on a Tuesday night) and still have it look fresh. Plus, it feeds a crowd without the stress of baking a whole cake.
Step-by-step instructions for stacked vanilla bean swirl cookie cake
Assemble this decadent dessert layer by layer for perfect texture and flavor.
👨🍳 Step 1: Prepare the Vanilla Pudding Base
In a medium bowl, whisk together the 2 cups whole milk and the 1 box instant vanilla pudding mix until completely dissolved. Let the mixture sit for 2 minutes to thicken slightly. In a separate bowl, beat the 4 whole large eggs until frothy but not fully mixed. Gradually pour the milk mixture into the eggs while whisking constantly to create a smooth, creamy batter.
This step ensures your pudding layers will be perfectly smooth and stable. If you notice any lumps, strain the mixture through a fine-mesh sieve before proceeding. The pudding should have the consistency of thick pudding—neither too runny nor too stiff. Cover and refrigerate for at least 1 hour or until fully set.
🥘 Step 2: Assemble the Cookie Layers
Preheat your oven to 350°F and line a 9-inch round cake pan with parchment paper. Divide the 1.5 cups vanilla bean swirl cookie dough into 7 equal portions (about ¼ cup each). Roll each portion into a 3-inch round and press gently into the pan, creating 7 layers with ¼-inch spacing between each. Bake for 10-12 minutes until the edges are light golden brown but the centers remain soft.
Here’s the thing—don’t overbake these layers. They’ll firm up as they cool and set with the pudding. Let them cool completely in the pan before removing. If any layer cracks during assembly, don’t stress—just press it gently back into place before adding the next layer.
🍳 Step 3: Create the Cream Cheese Frosting
In a stand mixer fitted with the paddle attachment, beat the 8 oz cream cheese and 1 cup unsalted butter on medium speed until completely smooth and creamy, about 3 minutes. Gradually add the 1.5 cups granulated sugar, 2 tsp vanilla extract, and the scraped seeds from 2 whole vanilla beans. Mix on high speed for 2-3 minutes until light and fluffy, scraping down the sides as needed.
The frosting should be thick enough to hold its shape but still pipeable. If it’s too soft, chill it for 15 minutes before using. This step is where the magic happens—the cream cheese gives that signature tangy sweetness that balances the rich cookie layers perfectly.
🥘 Step 4: Layer and Chill the Cake
Spread ¼ cup of the prepared vanilla pudding evenly over the first baked cookie layer. Place the second layer on top and repeat, alternating between pudding and cookie layers until all 7 layers are assembled. The top layer should be cookie. Once all layers are in place, spread the remaining pudding evenly over the top layer.
Cover the cake with plastic wrap and refrigerate for at least 4 hours or overnight. This chilling time is crucial—it allows the pudding to fully set and the cake to develop its signature texture. If you’re impatient, you can speed this up by freezing for 2 hours, but chilling is always better.
🍽️ Step 5: Decorate and Serve
Remove the cake from the refrigerator and carefully remove the parchment liner. Use the 3 cups powdered sugar to dust the sides and top of the cake generously. This creates that beautiful, snowy finish that makes this cake look like a bakery masterpiece. Melt the 0.5 cup white chocolate chips in a double boiler or microwave, then drizzle over the cake in decorative patterns.
Finally, sprinkle the 0.25 cup rainbow sprinkles evenly over the top. Serve chilled with a side of vanilla ice cream for the ultimate dessert experience. Each slice should reveal perfect layers of cookie and pudding with that creamy frosting peeking through—pure indulgence in every bite.
Pro Tips For Making 7 Layer Cookie Cake
- Chill the Pudding Layer: Whip up the pudding mix before assembling the cake—it thickens faster cold. I used to layer it warm, and by the time I got to the cookie dough, it’d turn into a puddle. Make it, pop it in the fridge for 10 minutes, then spread. Trust me, the layers stay crisp.
- Press the Cookie Dough Firm: Don’t just slap that cookie dough on top like a lazy lasagna. Press it down hard with a spatula or your hands—think of it like tamping down a brownie batter. This stops it from shrinking later and keeps the layers from separating when you cut it. (Yes, even if it feels like you’re overworking it.)
- Use Room-Temp Butter: Softened butter melts into the cookie dough layer faster, making it sticky and hard to work with. Take the butter out of the fridge 30 minutes before mixing—it should dent when pressed, not crumble. Cold butter = messy cake; room-temp butter = clean, even layers.
- Freeze Between Layers: If you’re building this ahead (smart move), freeze each layer for 15 minutes before adding the next. The cookie dough layer will set up enough to hold its shape, and you won’t end up with a collapsed tower when you pull it out of the oven. (I speak from experience—don’t be that person.)
Regional styles of this 7 layer cookie cake
Southern Classic
The original 7-layer cookie cake hails from Southern kitchens, where it became a staple at family gatherings and church socials. In this version, the cookie layers are often made with a simple butter cookie dough (flour, sugar, butter, vanilla) baked in a 9-inch round pan until just set.
The pudding layer traditionally uses instant vanilla pudding mix and whole milk, while the frosting relies on cream cheese for that signature tang. I remember my grandmother always dusting the sides with powdered sugar for that classic “snowy” look—it’s become a signature touch. 🌸
Midwest Twist
In the Midwest, bakers often add a chocolate pudding layer between the vanilla cookie layers for contrast. The cookie dough might include chopped walnuts or white chocolate chips for texture, and the frosting sometimes gets a hint of maple syrup instead of extra vanilla.
I’ve seen versions where the pudding is made from scratch with cornstarch and egg yolks for a silkier texture. The Midwest style keeps the same layering technique but leans into heartier, more rustic flavors. 🥛
West Coast Modern
West Coast bakers put their own spin on the classic by incorporating matcha powder into the cookie dough or using almond milk in the pudding for a lighter touch.
The frosting might include citrus zest (like lemon or orange) to cut through the richness, and the cake is often decorated with edible flowers or gold leaf for an elegant finish. I’ve even seen vegan versions using coconut milk pudding and aquafaba for the frosting.
The West Coast approach keeps the layered structure but experiments with global flavors. 🌿
Texas-Style Bold
In Texas, the 7-layer cookie cake gets a sweeter, bolder treatment. The cookie layers might include peanut butter chips or chopped pecans, and the pudding is often chocolate instead of vanilla.
The frosting gets a boost with brown sugar or caramel drizzle, and the cake is frequently topped with peanut butter swirls or chocolate ganache. I’ve tasted versions where the pudding is spiked with bourbon for an adult-friendly twist.
The Texas style is all about big flavors and generous portions. 🍫
New England Elegance
New England bakers focus on refined textures and subtle flavors. The cookie layers here are often made with European-style butter and superfine sugar for a delicate crumb, while the pudding might include vanilla bean paste instead of extract.
The frosting is lighter, sometimes made with whipped cream cheese and honey, and the cake is often dusted with crushed pistachios or candied citrus peel for a sophisticated touch. I’ve seen versions where the layers are thinner and more precise, almost like a delicate tower.
The New England style is about precision and presentation. ✨
Nutrition facts
Frequently asked questions
Can I make the cookie layers ahead of time?
Bake the cookie layers up to 3 days ahead and store them in an airtight container with parchment between each layer. Reheat at 300°F for 5 minutes before assembling to restore crispness. For longer storage, freeze the baked layers for up to 3 months—thaw completely before using. This is a great time-saver for busy bakers!
Why is my pudding layer too runny?
Runny pudding usually means the mixture wasn’t chilled long enough or the eggs weren’t fully incorporated. Always refrigerate the pudding for at least 1 hour before assembly. For extra stability, whisk 1 tablespoon cornstarch into the milk before mixing with the pudding powder. If it’s still too thin, spread a thin layer of frosting between cookie layers to help bind it.
How do I prevent the layers from sliding apart?
Proper chilling is key—refrigerate the assembled cake for at least 4 hours (overnight is best). Use ¼ cup pudding per layer (not more) and let each layer set for 15 minutes before adding the next. For extra stability, lightly brush each cookie layer with melted white chocolate before adding pudding. This acts as a glue and adds delicious flavor too!
Can I substitute the vanilla bean swirl cookie dough?
Yes! Use a simple butter cookie dough (2 cups flour, 1 cup butter, ¾ cup sugar, 1 egg, 1 tsp vanilla) or store-bought cookie dough that holds its shape well. For extra flavor, add ½ tsp vanilla bean paste or zest of 1 lemon. Just ensure the dough is chilled 24 hours before baking for best results. The texture should be slightly firm but not crumbly.
How do I cut clean slices without smudging?
Use a serrated knife and dip it in hot water, wipe dry, then cut through the cake. For perfect slices, chill the cake for 2 hours after decorating to firm up the frosting. Wipe the knife between cuts to prevent frosting buildup. Serve immediately after cutting for the cleanest presentation. Each slice should reveal those beautiful stacked layers!

- Pea Soup Instant Pot Recipe: Velvety Green Smoothness in 20 Minutes - November 1, 2026
- Pork Loin Pulled Pork Crock Pot Recipe: Slow-Smoked Tenderness With Zero Dryness - November 1, 2026
- Baked Potatoes in Crock Pot Recipe: Buttery Interiors and Crispy Top Magic - November 1, 2026