
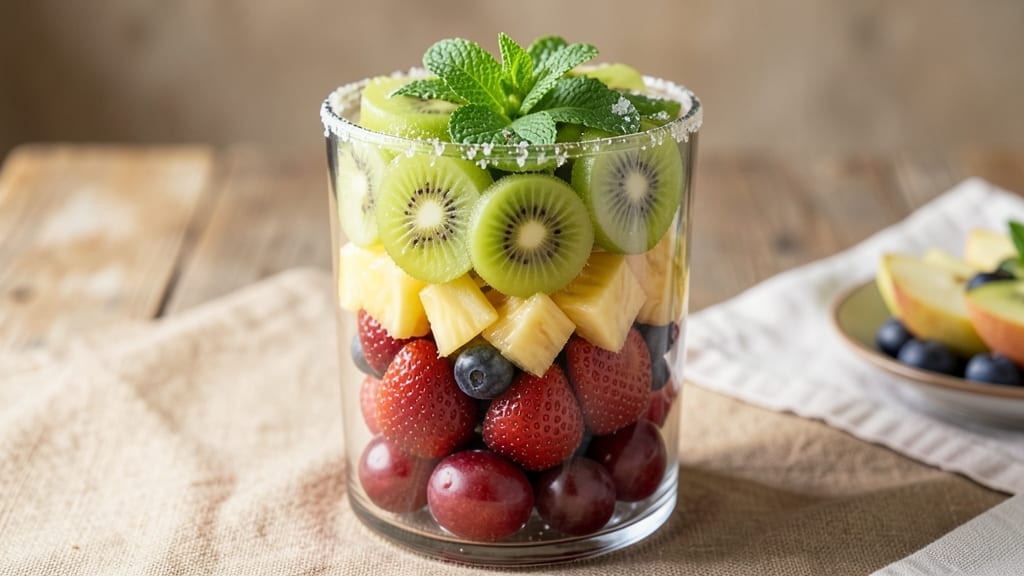
A 7-layer fruit salad transforms simple ingredients into a showstopping dessert or side dish that looks as impressive as it tastes. ✨ The secret lies in careful layering—each fruit brings a different texture and flavor, from crisp apples to creamy whipped topping, creating a visually stunning stack that’s perfect for celebrations or everyday treats.
This recipe balances sweet and tangy flavors with a perfect mix of juicy berries, citrus, and tropical fruits. The assembly process is straightforward, ensuring each layer stays distinct while coming together harmoniously.
Whether you’re serving it at a party or enjoying it as a light dessert, the vibrant colors and textures make every bite exciting.
What you’ll end up with is a visually stunning fruit salad that’s as beautiful as it is delicious—crisp, juicy, and perfectly balanced. The layers hold together beautifully, making it easy to serve without any mess. Plus, it’s customizable, so you can swap in seasonal fruits or add your favorite toppings.
Ready to impress with this foolproof fruit salad? It’s perfect for brunch, potlucks, or a refreshing afternoon snack. Let’s get started with the layering process—it’s easier than you think!
Ingredients for 7 layer fruit salad
Vibrant fruits and creamy layers create this stunning dessert that’s as delicious as it looks.
| Ingredient | Amount | Notes |
|---|---|---|
| Strawberries 🍓 | 1 ½ lb | Hull and slice lengthwise |
| Blueberries 🫐 | 1 ½ cups | Fresh, unwashed until ready |
| Green Apples 🍎 | 2 medium | Cored and thinly sliced |
| Pineapple 🍍 | 1 cup | Fresh, finely diced |
| Red Grapes 🍇 | 1 ½ cups | Seedless, halved |
| Kiwi 🥝 | 2 whole | Peeled and sliced into rounds |
| Whipped Cream 🧈 | 2 cups | Homemade or store-bought |
| Lemon Juice 🍋 | 2 tbsp | Freshly squeezed |
| Granulated Sugar 🍚 | 2 tbsp | Optional, for sweetness |
| Mint Leaves 🌿 | ¼ cup | Chopped, for garnish |
| Vanilla Extract 🥄 | 1 tsp | For whipped cream |
| Heavy Whipping Cream 🧈 | 1 ½ cups | Cold for fluffiness |
The apples and kiwi are your structure—firm and crisp—so grab the freshest you can find. Trader Joe’s often has the best selection of organic apples, and Whole Foods carries pre-sliced kiwi if you’re short on time. Strawberries should be bright red with a slight sheen, not dull or mushy. Grapes are a game-changer for texture—seedless green or red both work, but avoid those sad, shriveled ones. For pineapple, fresh is non-negotiable—canned won’t cut it here. Look for ripe but firm fruit with no browning at the base.
No kiwi? Mango or pear slices work beautifully—just adjust the color contrast in your layers. Blueberries can be swapped for raspberries, but they’ll stain more. Short on whipped cream? Whisk coconut cream until stiff and add a splash of vanilla. No mint? A sprinkle of toasted coconut flakes or crushed graham crackers adds a fun texture. For the lemon juice, fresh is ideal, but a splash of white wine vinegar in a pinch keeps things bright. Sweetness preference? Adjust the sugar or drizzle with honey after stacking.
Fruit layers keep best in the fridge for up to 3 days, but the whipped cream will deflate faster. Assemble just before serving for that restaurant-fresh look. Store components separately—fruits in one container, whipped cream in another—to keep everything fresh. Freeze extra whipped cream in a silicone mold for a quick topping later. Leftovers? Serve chilled over vanilla ice cream or in mini mason jars for individual portions—still stunning!
Why You’ll Love This Recipe
- No-Cut Shortcuts: I swear by the “handfuls” method—just eyeball the fruit, no measuring cups needed. Blueberries and grapes stay whole, strawberries get a quick hull, and the pineapple? Grab pre-cut chunks from a can. Ten minutes max, and zero knife wounds.
- Sweet-Tart Magic: That first bite of crisp green apple against juicy pineapple? It’s like summer in your mouth. The strawberries add brightness, while the blueberries tie it all together—no sugar needed. Honestly, it’s the kind of flavor combo that makes you want to eat it straight from the bowl.
- Party-Ready Always: Serve it at picnics, potlucks, or just because. The layers look impressive (even if it’s just tossed together), and it travels well. My kids grab it for school lunches, and I’ve even used it as a dessert base for yogurt parfaits. Versatile enough for any occasion.
- Zero-Waste Winner: Use what you have—overripe strawberries? Toss ‘em in. Extra grapes? No problem. The apples stay crisp for days in the fridge, and pineapple lasts even longer. Between us, this is my go-to recipe for using up fruit before it goes bad. Plus, it’s cheaper than buying pre-made salads.
Step-by-step instructions for building your 7 layer fruit salad
Here’s how to assemble this stunning, restaurant-worthy fruit salad with perfect layers and vibrant colors.
👨🍳 Step 1: Prepare and Arrange Each Fruit Layer
Start with the largest serving dish you have—glass bowls work beautifully for this presentation. Begin by arranging the 1.5 cups red grapes (halved) in a single layer at the bottom. Press them gently but firmly to create an even base—this prevents the layers from sliding during transport. The grapes’ firm texture provides the perfect foundation.
Next, spread the 1 cup finely diced pineapple evenly over the grapes. I like to use a small offset spatula to gently press the pineapple into the crevices between grape halves, creating a seamless transition. This layer should be about ½-inch thick—thicker layers make the salad harder to serve neatly. Pat down lightly with a paper towel to remove any excess moisture that could make the layers soggy.
🍳 Step 2: Build the Middle Layers with Delicate Fruits
Add the 1.5 lb strawberries (hull and slice lengthwise) as your third layer. Arrange them with the flat sides down to create a stable surface for the next layer. The strawberries should cover the entire surface completely—if you have gaps, add more slices or adjust the previous layers. I like to fan the strawberry slices slightly outward to create visual interest while maintaining structural integrity.
For the fourth layer, create a thin, even layer of 2 medium green apples (cored and thinly sliced). The apples should be arranged in a single layer with the slices placed vertically—this creates a pleasing striped pattern when viewed from the side. Lightly mist the apple layer with 1 tablespoon of the lemon juice to prevent browning and maintain freshness. This acidity also enhances the natural sweetness of the apples.
🥘 Step 3: Add the Juicy and Creamy Layers
Spread the 1.5 cups blueberries evenly as your fifth layer. Unlike the grapes, don’t press these down—their soft texture should remain intact. Instead, gently nestle them into the apple layer, filling any gaps while maintaining an even surface. The blueberries’ vibrant color will peek through the other layers, creating beautiful contrast when sliced.
For the sixth layer, create a thin blanket of 2 cups whipped cream. Use an offset spatula to spread it evenly, creating a smooth, creamy surface. This layer should be about ¼-inch thick—too much will make the salad too heavy, and too little won’t provide enough creaminess. Gently press the whipped cream into the blueberries to create adhesion between layers. This is the moment that matters: the whipped cream acts as both a structural stabilizer and flavor enhancer.
🍽️ Step 4: Top with Kiwi and Garnish Beautifully
Arrange the 2 whole kiwi (peeled and sliced into rounds) as your final fruit layer. Place them with the flat sides down, creating a perfect circular pattern at the top. The kiwi’s bright green color provides a stunning contrast to the other fruits. For an extra touch, sprinkle the remaining 1 tablespoon lemon juice over the top to enhance the fruit flavors and add a subtle tang.
Finally, create your garnish by combining the 0.25 cup chopped mint leaves with the 2 tbsp granulated sugar. Gently press this mixture into the center of the salad, creating a decorative pattern. For the whipped cream topping, whip the 1.5 cups cold heavy whipping cream with the 1 tsp vanilla extract until soft peaks form. Pipe or spoon this creamy topping around the edge of the salad for a professional finish that looks like it came from a bakery display.
Pro Tips For Making 7 Layer Fruit Salad
- Toss Apples Last: Green apples turn brown fast—like, embarrassingly fast. Toss them in lemon juice right before layering them on top, or they’ll look sad and dull by the time you serve it. (Yes, even if you’re impatient like me.)
- Rinse Pineapple Twice: Pineapple juice makes the other layers soggy, and nobody wants a watery fruit salad. Rinse the chunks twice in cold water to remove excess syrup, then pat them dry with a towel. Trust me, your blueberries will stay plump.
- Skip Whole Strawberries: Sliced strawberries release juice faster, keeping the layers from collapsing into a mushy mess. Halve or quarter them, and tuck them in the second or third layer where they won’t drip onto the grapes below.
- Chill Before Serving: This isn’t just about temperature—it’s about texture. Let the salad sit in the fridge for at least 30 minutes after assembling. The flavors meld, the juices distribute, and the apples firm up. Serve it cold, or you’ll miss the point.
Perfect pairings for this recipe
Whipped Cream Variations
For a lighter option, swap the whipped cream for coconut whipped cream—whip 1 can (13.5 oz) full-fat coconut milk chilled overnight until fluffy. Add ½ tsp vanilla extract and a pinch of cream of tartar for stability.
This tropical twist pairs beautifully with pineapple and kiwi layers, adding a subtle coconut aroma that complements the fruit perfectly. 🥥
Citrus Zest Garnishes
Brighten your salad with orange or lime zest instead of mint. Sprinkle 1 tsp orange zest mixed with 1 tbsp sugar over the top for a citrusy crunch. For extra flair, add thin orange slices arranged in a circular pattern around the edge.
The zest adds a refreshing aroma that cuts through the sweetness of the berries and apples.
Crunchy Toppings
Add texture with toasted coconut flakes or crushed graham crackers. Toast ½ cup unsweetened coconut flakes in a dry pan over medium heat for 2-3 minutes until golden, then sprinkle over the whipped cream layer.
For a cookie twist, pulse ½ cup graham crackers in a food processor until finely crumbled and mix with 1 tbsp melted butter before pressing into the center. 🥥
Drizzle Enhancements
Elevate your salad with a honey-lime drizzle. Combine 2 tbsp honey with 1 tbsp fresh lime juice and warm slightly until smooth. Drizzle lightly over the top layer before serving.
For a chocolate touch, melt 2 oz dark chocolate (70% cocoa) with 1 tbsp coconut milk, cool slightly, then drizzle in zigzags. This adds a sophisticated contrast to the fruity layers.
Cheese Pairings
For a savory-sweet balance, add crumbled goat cheese or mascarpone dollops. Press ½ cup goat cheese into the center of the salad, then top with 2 tbsp whipped cream. The tangy cheese pairs wonderfully with the sweet fruits, creating a gourmet twist.
For a richer option, dollop ¼ cup mascarpone mixed with 1 tsp honey around the edges before adding the final fruit layer.
Seasonal Fruit Swaps
Adjust your layers based on what’s in season. In summer, use peaches, nectarines, and blackberries for a juicier texture. In winter, swap in pomegranate seeds, persimmons, and blood oranges for deeper flavors. Each seasonal fruit brings unique colors and tastes, keeping your salad exciting year-round. 🍑
Nutrition facts
Frequently asked questions
Can I make this fruit salad ahead of time?
Prepare the fruit layers 1 day ahead, but assemble the salad just before serving. Store each fruit layer separately in the fridge, and keep the whipped cream in a sealed container. The layers will hold their shape better when assembled fresh, and the whipped cream stays fluffier. For the final presentation, build it 30-60 minutes before serving to prevent sogginess.
What’s the best way to keep the layers from sliding?
Press each fruit layer gently but firmly as you go—especially the grapes and pineapple. Use a small offset spatula to create a smooth, even surface between layers. For extra stability, chill the assembled salad in the fridge for 15-20 minutes before serving. The cold helps everything set slightly. A shallow bowl also works better than a deep one to prevent toppling.
Can I use canned pineapple instead of fresh?
Fresh pineapple is ideal for texture and flavor, but you can use canned in a pinch. Drain and rinse well, then pat completely dry with paper towels to remove excess moisture. For best results, dice it finely and mix with ½ tsp lemon juice to brighten the flavor. Canned pineapple won’t be as juicy, so it won’t add as much moisture to the salad.
How do I make the whipped cream layer extra stable?
Chill your mixing bowl and beaters before whipping the cream for 10 minutes to ensure proper volume. Add ½ tsp vanilla extract and 1 tbsp powdered sugar for stability. For a firmer layer, fold in 1 tbsp cornstarch before spreading it between fruit layers. This creates a subtle thickening effect that helps hold the salad together.
What’s the best way to serve this salad at a party?
Use a clear glass bowl for a stunning presentation that shows off all the layers. Serve with small spoons for easy scooping, and place the bowl on a decorative tray with a few extra fruit garnishes around it. For individual servings, use 6-ounce mason jars—layer the ingredients the same way and serve with a spoon. This makes it perfect for potlucks or buffet-style events.

- Baked Potatoes in Crock Pot Recipe: Buttery Interiors and Crispy Top Magic - November 1, 2026
- Braised Beef Short Ribs Recipe: Crock Pot Fall-Off-Bone Magic in 6 Hours - November 1, 2026
- Crock Pot Cocoa Recipe: Velvety Warmth With Hidden Spice Magic - November 1, 2026