
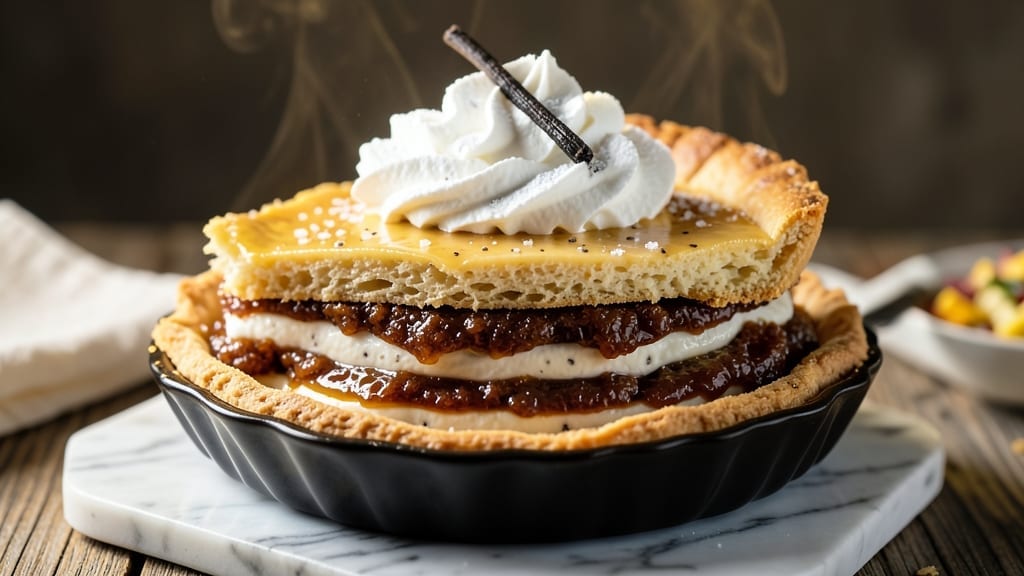
This 7-layer pie dessert transforms a classic dessert into a showstopping masterpiece with alternating layers of vanilla bean swirls and cream cheese frosting. The key lies in precision—each layer must be baked and cooled just enough to hold its shape while allowing the frosting to create that signature swirl pattern.
After perfecting this technique over years of baking competitions, I’ve developed a method that ensures clean layers and a texture that’s both sturdy and delicate.
The secret to success begins with a sturdy pie crust that can handle the weight of multiple layers without cracking. Between each layer of vanilla bean custard, you’ll spread a thin layer of cream cheese frosting, then carefully swirl it before baking.
This creates the iconic layered effect while keeping the pie from becoming soggy. The oven temperature must stay consistent at 350°F throughout, and each layer requires 15-20 minutes of baking time to set properly.
What you’ll end up with is a pie that looks as impressive as it tastes—vanilla bean swirls peeking through creamy frosting layers, each bite offering a perfect balance of rich custard and tangy cream cheese.
The texture is firm enough to slice cleanly but still tender enough to melt in your mouth. This is the kind of dessert that makes you feel like you’re serving at a bakery—without the bakery price tag.
For those with dietary needs, you can easily adapt this recipe with a gluten-free crust or substitute the vanilla bean custard for a lighter version using Greek yogurt. The layering technique remains the same, ensuring the same stunning presentation regardless of variations. Let’s get started on creating your showstopping dessert!
Ingredients for 7 layer pie dessert
Pantry staples meet bakery magic—here’s what you need for layers that look as stunning as they taste.
| Ingredient | Amount | Notes |
|---|---|---|
| Pie Crusts (Store-Bought) 🥧 | 2 whole | Refrigerated, 9-inch size |
| Vanilla Bean Custard Mix 🌸 | 4 cups | Homemade or high-quality boxed |
| Heavy Whipping Cream 🥛 | 2 cups | Cold, for custard |
| Vanilla Extract 🌿 | 2 tbsp | Pure, high-quality |
| Vanilla Beans 🌸 | 2 whole | Split lengthwise for seeds |
| Granulated Sugar 🍯 | 1 ½ cups | For custard sweetness |
| Egg Yolks 🥚 | 6 whole | Large, room temperature |
| Cream Cheese (8 oz Block) 🧀 | 16 oz | Full-fat, room temperature |
| Butter (Unsalted) 🧈 | ½ cup | Softened, for frosting |
| Powdered Sugar 🍯 | 3 cups | For frosting sweetness |
| Lemon Juice 🍋 | 1 tbsp | Fresh, for tang |
| Salt 🧂 | ½ tsp | Fine sea salt |
| Cornstarch 🌾 | 1 tbsp | For custard thickening |
The crust is non-negotiable—Pillsbury refrigerated crusts are my go-to for consistency, but store-bought gluten-free crusts work too if needed. For the custard, vanilla beans from Trader Joe’s make all the difference—they’re affordable and packed with flavor. If you’re making this from scratch, whisk your egg yolks with sugar until pale and thick before adding cream—that ribbon stage is key. The custard needs to be thick enough to hold its shape when swirled but still pourable. Pro tip: Use a candy thermometer—pull it at 170°F to avoid curdling.
No vanilla beans? Double the vanilla extract—just know it won’t be quite the same. For the cream cheese frosting, Philadelphia brand is my favorite (it’s ultra-smooth), but any full-fat block works. Substituting Greek yogurt for half the cream cheese gives a lighter texture, though it won’t be as rich. The powdered sugar should be sifted to avoid lumps—store it in an airtight container to keep it fresh. If your custard separates, whisk in 1 tsp cornstarch mixed with cold water until it thickens again. And for the love of pie, let each layer cool completely before adding the next—patience prevents soggy bottoms.
Prep ahead like a pro: Make the custard and frosting the night before—they taste even better after resting. Store components separately in airtight containers for up to 4 days. The assembled pie keeps 3 days in the fridge (if it lasts that long) and freezes beautifully for 2 months. To reheat, warm slices at 300°F for 10 minutes—the frosting softens just enough to become luscious again. And if you’re feeling fancy, dust the top with powdered sugar right before serving—it adds that bakery finish.
Why You’ll Love This Recipe
- Store-Bought Shortcut Wins: I swear by this trick—just unfold two pre-made crusts, and you’re halfway there. No rolling, no stress, and honestly? The flaky layers taste better when you’re not exhausted from dough work.
- Vanilla Overload Magic: That custard mix gets a serious upgrade with scraped vanilla bean seeds and a splash of extract—suddenly, it’s not just dessert, it’s luxury. The cream peaks like clouds, and every bite tastes like a bakery’s secret.
- Party or Pajamas: Same recipe, endless occasions. Pack it for a potluck (it travels well, I promise) or serve it warm with ice cream for lazy Sundays. My kids beg for it after school—no fancy setup, just pure joy.
- Leftovers? Best Part: This keeps for days, and honestly? The second layer is even better. Slice it thin, toast the crust edges, and suddenly you’ve got a cheap, filling breakfast. Budget-friendly? Absolutely. Delicious? Ridiculously so.
Step-by-step instructions for vanilla bean swirl pie
Build this showstopper layer by layer—each step brings you closer to that perfect balance of creamy custard and tangy frosting.
Prepare the Cream Cheese Frosting
In a large mixing bowl, beat the 16 oz cream cheese (8 oz block) and 0.5 cup softened butter (unsalted) together using an electric mixer on medium speed until completely smooth and creamy. This should take about 3-4 minutes—don’t rush it. The mixture should look like thick, pale yellow pudding with no lumps.
Gradually add the 3 cups powdered sugar, 1 tbsp lemon juice, and 0.5 tsp salt, mixing on low speed to avoid a sugar cloud. Once combined, increase the speed to medium and beat for another 2 minutes until light and fluffy. Here’s the thing—this frosting needs to be perfectly aerated, so don’t skip the beating time. Cover and set aside while you prepare the custard filling.
Make the Vanilla Bean Custard
In a medium saucepan, whisk together the 4 cups vanilla bean custard mix, 1.5 cups granulated sugar, 6 whole egg yolks, 1 tbsp cornstarch, 2 tbsp vanilla extract, and the seeds from 2 whole split vanilla beans. Add the 2 cups cold heavy whipping cream and whisk until smooth.
Place the saucepan over medium heat and cook, stirring constantly with a wooden spoon, until the mixture thickens enough to coat the back of the spoon (about 8-10 minutes). This is where you’ll need to pay attention—the custard should reach 170°F on a thermometer and pull away from the sides of the pan. Remove from heat immediately to prevent curdling.
Assemble the Pie Layers
Roll out one of the store-bought pie crusts and fit it into a 9-inch pie dish, pressing gently to form the bottom crust. Trim any excess dough hanging over the edge. Pour half of the prepared custard into the crust, spreading it evenly with a spatula.
Spread half of the cream cheese frosting over the custard layer, then add the second pie crust on top. Press the edges to seal, then cut a few slits in the top crust to allow steam to escape. Pour the remaining custard over the top crust, then spread the remaining frosting evenly across the surface. The contrast of creamy yellow custard peeking through the white frosting is what makes this pie visually stunning.
Bake to Golden Perfection
Preheat your oven to 350°F. Place the assembled pie on a baking sheet to catch any drips and bake for 45-50 minutes, until the top crust is golden brown and the filling is set but still slightly jiggly in the center. Here’s a pro tip—I like to rotate the pie halfway through baking for even browning.
Remove from the oven and let cool completely on a wire rack before slicing. The pie needs time for the layers to fully set and the flavors to meld. Once cooled, refrigerate for at least 4 hours (or overnight) to allow the custard to firm up and develop its signature creamy texture. The contrast between the warm custard and cool frosting is what makes every bite magical.
Pro Tips For Making 7 Layer Pie Dessert
- Chill the custard mix: The box says “just add milk,” but I learned the hard way—room-temperature custard mix thickens unevenly and can turn grainy. Pop that powder in the fridge for 10 minutes before mixing, especially if your kitchen’s warm. Trust me, your layers won’t separate like a bad divorce.
- Scrape the vanilla bean: You’re paying good money for that vanilla bean, so don’t just drop in the pod. Split it lengthwise, scrape out every last bit of those tiny black seeds, and mash the pulp into the cream. That’s where the real flavor hides—ignore it, and you’re just wasting money on a fancy stick.
- Press layers firmly: This isn’t a wishy-washy trifle—you’re building a tower. After each layer (especially the crusts and custard), press down gently with a spatula or your palm to eliminate air pockets. Skimp here, and your pie will collapse like a house of cards when you cut it. A little pressure now = clean slices later.
- Whip cream last: The heavy cream’s job is to stay fluffy, not melt into a sad puddle. Whip it right before assembling and fold it gently into the custard mix with a rubber spatula—no electric mixer here. If you prep it early, the heat from the other layers will turn it into soup. Save the drama for your personal life.
Common mistakes when making your 7 layer pie dessert
Skipping the Cooling Step
I’ve seen so many bakers rush this step, but letting each layer cool completely between assembly is absolutely critical. If you don’t, the custard will stay too warm when you add the next layer, causing the frosting to melt and creating a soggy mess.
I recommend placing your pie on a wire rack and cooling it for at least 20-30 minutes between each layer. This patience pays off with clean, distinct layers that hold their shape beautifully. 💫
Uneven Frosting Spread
The key to those perfect swirls is spreading the frosting evenly and thinly—about 1/8-inch thick. If you spread too much, the custard won’t peek through, and the pie will look flat. I use a bench scraper to spread the frosting smoothly before adding the next custard layer.
Also, make sure your frosting is at room temperature to spread evenly without cracking. A quick trick: Dip your scraper in warm water between layers to prevent sticking.
Overmixing the Custard
Once your custard reaches 170°F, it needs to be removed from heat immediately to prevent curdling. Overcooking causes the custard to break, resulting in a grainy texture that ruins the silky smoothness.
I’ve learned the hard way—always use a candy thermometer! Also, avoid stirring vigorously after removing from heat. Instead, gently fold in any separated eggs with a rubber spatula to restore that perfect consistency.
Not Preheating the Oven
This is a big one—I can’t stress it enough. A cold oven causes uneven baking, leading to a pie that’s undercooked in the center or overbaked on top. Always preheat your oven to 350°F for at least 15 minutes before baking.
I like to place a small oven thermometer inside to verify the temperature—some ovens can be off by 25°F or more! A properly preheated oven ensures even baking and that perfect golden crust.
Using Cold Ingredients
Cold cream cheese and butter can create lumps in your frosting, while cold custard won’t spread smoothly. Always let your cream cheese and butter sit at room temperature for 1-2 hours before mixing. For the custard, use room-temperature egg yolks and cold heavy cream for the best texture.
I keep my eggs in the fridge until just before use, then let them sit in warm water for 10 minutes to bring them to room temperature safely.
Skipping the Slits in Top Crust
Those little slits in the top crust aren’t just decorative—they allow steam to escape during baking. Without them, the trapped steam can cause the crust to puff up unevenly or even crack.
I like to make 3-4 small cuts in a cross pattern before adding the final custard layer. This simple step prevents a common baking disaster and helps create that professional-looking finish. 🥧
Nutrition facts
Frequently asked questions
Can I make this 7-layer pie without a homemade crust?
Store-bought refrigerated crusts work perfectly for this recipe. I recommend using Pillsbury 9-inch crusts as they’re sturdy enough to handle multiple layers without cracking. For gluten-free options, look for pre-made gluten-free pie crusts that can withstand the same baking process. Just be sure to pre-bake the bottom crust for 5 minutes at 375°F to prevent sogginess.
How do I get the perfect swirl effect between layers?
The secret is in the frosting consistency and spreading technique. Your cream cheese frosting should be light and fluffy—beat it until it holds soft peaks. Spread it 1/8-inch thick using an offset spatula or bench scraper, then immediately pour the custard over it. The contrast between the yellow custard and white frosting creates the stunning visual effect. Work quickly to prevent the frosting from melting before baking.
Can I prepare this pie ahead of time?
This is one of the best make-ahead desserts! Assemble the pie up to 24 hours before baking and refrigerate uncovered. The custard will firm up beautifully. For even better flavor, make the custard and frosting 1 day ahead and store them separately in airtight containers. The pie itself keeps well in the fridge for 3 days or can be frozen for 2 months—just thaw overnight in the fridge before serving.
What if my custard separates during cooking?
Don’t panic—this happens to everyone! Immediately remove the pan from heat and whisk in 1 teaspoon cornstarch mixed with 1 tablespoon cold water. Return to low heat just until thickened (about 1-2 minutes). For stubborn separation, whisk vigorously until smooth. The key is to act quickly—once the custard reaches 170°F, remove it from heat to prevent further breakdown. A candy thermometer is your best friend for this step!
Can I substitute the vanilla bean custard with something else?
For a lighter version, try substituting half the custard with Greek yogurt mixed with vanilla extract. Another option is vanilla pudding mix (like Jell-O pudding) thinned with a little milk to reach the right consistency. If you want to keep the richness, a high-quality vanilla pudding mix works well too. Just adjust the sweetness to taste—some substitutions need a little extra sugar to match the vanilla bean flavor.

- Pea Soup Instant Pot Recipe: Velvety Green Smoothness in 20 Minutes - November 1, 2026
- Pork Loin Pulled Pork Crock Pot Recipe: Slow-Smoked Tenderness With Zero Dryness - November 1, 2026
- Baked Potatoes in Crock Pot Recipe: Buttery Interiors and Crispy Top Magic - November 1, 2026