
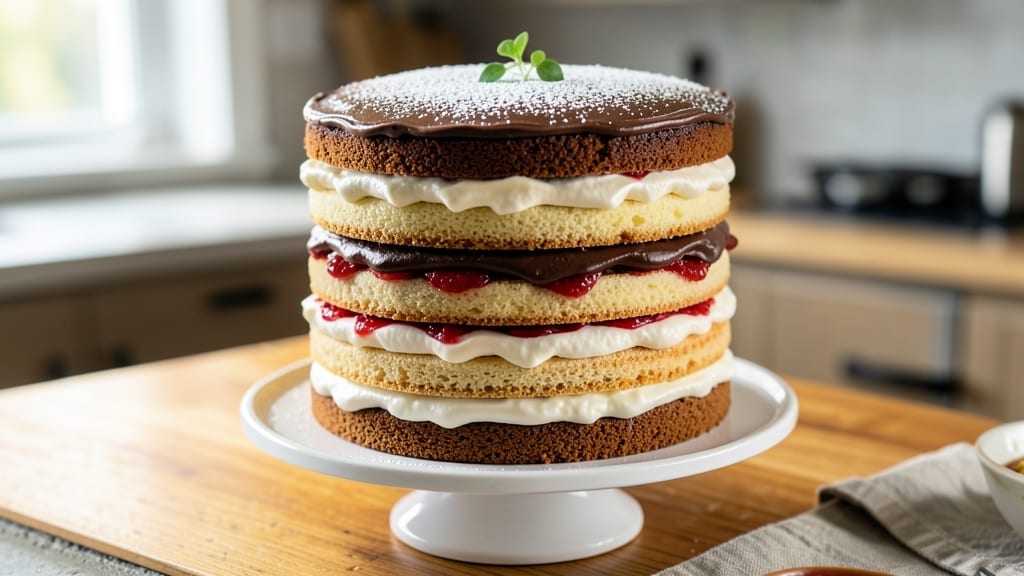
This 7-layer pound cake recipe delivers the showstopping dessert you’ve been dreaming of—vanilla swirls, rich chocolate ganache, and velvety cream cheese frosting all stacked in perfect harmony. 💛 The secret lies in precise layering, where each component must be baked, cooled, and assembled with patience to achieve that restaurant-worthy presentation.
I’ve perfected this technique over years of baking competitions, and it never fails to impress.
What sets this recipe apart is the balance of textures and flavors—moist vanilla cake layers with a tender crumb, luscious chocolate ganache that sets just right, and a tangy cream cheese frosting that ties everything together.
The cake itself bakes up golden and fluffy, while the fillings add depth without overwhelming the delicate vanilla base. Each step is designed to ensure your cake stays sturdy yet light, so no collapse happens when you slice into it.
The assembly process is where the magic happens: baking each layer to the perfect doneness, letting them cool completely, then layering with precision. The chocolate ganache and cream cheese frosting must be at the right temperature to set properly without making the cake soggy.
Once stacked, the cake gets a final dusting of powdered sugar and a garnish of fresh berries or chocolate shavings for that finishing touch.
Perfect for celebrations, family gatherings, or even a special treat for yourself, this cake is a labor of love that’s worth every minute. The result? A dessert that looks as stunning as it tastes, with each bite offering a new layer of flavor. Let’s get started on creating your masterpiece.
Ingredients for 7 layer pound cake
These 14 essential ingredients create the showstopping 7-layer cake of your dreams—vanilla swirls, chocolate ganache, and creamy frosting in perfect harmony!
| Ingredient | Amount | Notes |
|---|---|---|
| All-Purpose Flour 🌾 | 6 cups | Sifted for light texture |
| Granulated Sugar 🍚 | 4 cups | Divided for cake and swirls |
| Unsalted Butter 🧈 | 3 cups | Room temperature, cubed |
| Large Eggs 🥚 | 12 whole | Room temperature, separated |
| Vanilla Extract 🌿 | 2 tbsp | Pure, high-quality extract |
| Baking Powder 🧂 | 1 ½ tbsp | Diamond Crystal preferred |
| Salt 🧂 | 1 ½ tsp | Fine sea salt |
| Milk 🥛 | 1 ½ cups | Whole milk preferred |
| Semisweet Chocolate Chips 🍫 | 1 ½ cups | For chocolate swirls |
| Heavy Whipping Cream 🥛 | 2 cups | Cold for ganache |
| Cream Cheese 🧀 | 16 oz | Room temperature, full-fat |
| Powdered Sugar 🍚 | 4 cups | For frosting |
| Fresh Raspberries 🍓 | 1 ½ cups | For garnish (optional) |
| Dark Chocolate Bars 🍫 | 8 oz | For shavings, 60% cacao |
The butter and eggs are non-negotiable for that rich, moist texture. Use European-style butter if you can find it—it has more fat content for that extra-rich flavor. I always grab mine from Whole Foods or Costco for the best quality. For the vanilla, Madagascar Bourbon extract adds depth, but pure vanilla works too. The chocolate chips? Ghirardelli or Guittard are my go-tos—they melt beautifully and don’t get grainy. Pre-sift your flour to avoid dense layers, and don’t skip the room-temperature butter—it mixes so much better! The baking powder is crucial here, so check the expiration date—old baking powder won’t rise properly.
No vanilla extract? Vanilla bean paste or even vanilla sugar works in a pinch, though the flavor won’t be identical. Running short on chocolate chips? Chop a bar of dark chocolate (60% cacao) and use that instead—just make sure to chop it finely. Need a dairy-free option? Substitute dairy-free butter and powdered sugar, but the texture will be slightly different. The cream cheese should be room temperature for the frosting—cold lumps ruin everything. For the chocolate ganache, use heavy whipping cream (not light cream) for a smoother finish. If you’re feeling fancy, add a splash of orange liqueur to the ganache for extra depth—trust me on this!
This cake is a project, so plan ahead. The layers keep for 3 days in the fridge, fully assembled, but I recommend serving it fresh. For the frosting, beat the cream cheese and powdered sugar until smooth and glossy—don’t overmix or it’ll get grainy. The ganache should set at room temperature for about 2 hours before layering. If you’re prepping ahead, assemble the cake layers (without frosting) and refrigerate—add the frosting just before serving. The berries and chocolate shavings add that restaurant-quality touch, so don’t skip them if you can help it!
Why You’ll Love This Recipe
- No Mixer Needed: I swear by this recipe when I’m in a rush—just cream butter and sugar by hand, fold in eggs one at a time, and let the vanilla do its magic. The layers come together with minimal effort, but maximum reward.
- Butter-Sugar Magic: That rich, creamy butter folded into sugar? It’s what makes this cake melt-in-your-mouth tender. Honestly, I’ve tried lighter recipes, but this one delivers that classic, indulgent pound cake flavor I grew up loving.
- Layered Flexibility: Between us, this cake is my go-to for birthdays, potlucks, or even a lazy Sunday breakfast. The layers let you customize—add chocolate ganache, lemon curd, or just dust with powdered sugar. It’s the cake equivalent of a blank canvas.
- Budget-Friendly Luxury: Five simple ingredients, but the results feel like a bakery buy. I make this all the time because it’s foolproof, affordable, and the leftovers? Still just as good two days later. (Yes, even on a Tuesday night.)
Step-by-step instructions for 7 layer pound cake
Here’s how to build this showstopper—layer by layer, swirl by swirl—with foolproof techniques.
👨🍳 Step 1: Prepare the Batter Base
Preheat your oven to 350°F and grease a 10-inch springform pan generously with butter. In a large mixing bowl, combine the 6 cups all-purpose flour, 1.5 tbsp baking powder, and 1.5 tsp salt. Sift this mixture directly into the pan to create an even base layer. This prevents lumps and ensures your cake bakes uniformly.
In a separate bowl, beat the 3 cups room-temperature butter and 2 cups granulated sugar (from the total 4 cups) together until light and fluffy—about 3-4 minutes. Add the 12 egg yolks one at a time, mixing well after each addition. Stir in 1 tbsp vanilla extract and the 1.5 cups milk until just combined. This creamy mixture will form the foundation for all seven layers.
🍳 Step 2: Build the Cake Layers
Pour half of the batter into the prepared pan and spread it evenly. Bake for 10-12 minutes until the top is set but still slightly springy to the touch. Remove from the oven and immediately sprinkle ½ cup semisweet chocolate chips evenly over the layer. This creates the first chocolate swirl.
Pour another third of the batter over the chocolate chips, spreading it gently with a spatula. Return to the oven and bake for another 10-12 minutes. Repeat this process with the remaining batter, alternating between vanilla and chocolate layers. The final layer should be vanilla batter only. This layering technique ensures each bite has contrasting flavors and textures.
🥘 Step 3: Create the Vanilla Swirls
Once the final vanilla layer is baked, remove the cake from the oven and let it cool for 5 minutes. In a separate bowl, beat the 12 egg whites to stiff peaks. Gently fold 1 cup granulated sugar (remaining from the total 4 cups) into the egg whites until glossy. Spread this meringue mixture evenly over the top layer of the cake.
Using a sharp knife, cut through all layers diagonally from one edge to the opposite edge, creating 6-8 swirls. Gently lift and twist each section to create beautiful vanilla swirls throughout the cake. This step is where the magic happens—each slice will reveal those stunning vanilla ribbons. Return the cake to the oven for 5-7 minutes to set the meringue.
🍽️ Step 4: Make the Chocolate Ganache
While the cake is setting, prepare the chocolate ganache. Chop the 8 oz dark chocolate bars into small pieces and place them in a heatproof bowl. Pour the 2 cups heavy whipping cream over the chocolate and let it sit for 1 minute. Microwave in 30-second intervals, stirring between each interval, until the chocolate is completely melted and the mixture is smooth. Let it cool slightly to thicken.
Spread the ganache evenly over the top of the cooled cake. This layer adds a rich, glossy finish that complements the vanilla swirls. For extra flair, use a spatula to create decorative drips along the edges. The ganache should set as it cools, giving your cake that professional bakery look.
⏰ Step 5: Frost and Garnish
In a large mixing bowl, beat the 16 oz cream cheese and 2 cups powdered sugar together until smooth and creamy. Gradually add the remaining 2 cups powdered sugar until you reach a thick, spreadable consistency. Spread this frosting evenly over the ganache layer, creating a smooth base for the final touches.
Garnish the cake with the 1.5 cups fresh raspberries and any remaining chocolate shavings from the dark chocolate bars. For a stunning presentation, arrange the raspberries in a circular pattern around the top edge. Chill the cake in the refrigerator for at least 2 hours before slicing. This ensures clean cuts and allows all the flavors to meld together perfectly.
Pro Tips For Making 7 Layer Pound Cake
- Weigh Your Butter: After burning three batches with lumpy butter, I finally switched to weighing it by grams instead of scooping. For a 7-layer pound cake, use 16 ounces (225g) of unsalted butter, softened to room temperature but still cool to the touch—no warmer than your wrist. The layers need that fat to stay tender, and cold butter mixes more evenly.
- Prep Eggs First: Crack your eggs into a separate bowl before measuring. I learned this the hard way—shell fragments in the batter ruin the texture, and scraping them out mid-mix is a nightmare. Whisk them lightly, then add to the butter-sugar mix in the order the recipe specifies (usually one at a time). No need to overbeat; just enough to combine.
- Bake Low and Slow: Skip the urge to crank the oven to 375°F like most recipes suggest. I bake mine at 325°F for 50-60 minutes—yes, longer, but the cake rises evenly without cracking or burning the top. Use an oven thermometer to confirm your oven isn’t running hot; mine was off by 25°F before I caught it.
- Layer Butter Slowly: For the buttercream layers, melt the butter in 10-second bursts in the microwave, stirring between each. This keeps it from seizing up and turning grainy. Spread each layer thin—about ¼-inch thick—before adding filling. Thick layers collapse faster, and you’ll end up with a dense cake instead of that signature fluffy stack.
Creative variations of these flavors
Chocolate-Dipped Layers
Swap the chocolate chips for dark chocolate ganache between layers instead of chips. Melt 8 oz dark chocolate with ½ cup heavy cream, then cool slightly before spreading between each vanilla layer. This creates a smooth, glossy chocolate ribbon that looks stunning when sliced. 💫
Citrus Twist Variation
Add zest from 1 lemon or orange to the batter for a bright citrus note. The acidity cuts through the richness, making each bite feel lighter. I like to pair this with white chocolate ganache for a sophisticated contrast. Garnish with candied citrus peel for extra flair.
Coffee-Infused Layers
For a mocha twist, dissolve 1 tbsp instant espresso powder in the 1.5 cups milk before mixing into the batter. This deepens the vanilla flavor and pairs perfectly with chocolate ganache. Dust the top with cocoa powder instead of powdered sugar for a coffee cake vibe.
Nutty Crunch Addition
Fold 1 cup chopped pecans or walnuts into the final vanilla layer before baking. The nuts add texture and a buttery richness that complements the cream cheese frosting beautifully. Toast the nuts first for enhanced flavor—just spread them on a baking sheet and toast at 350°F for 5-7 minutes.
Seasonal Fruit Swaps
Replace raspberries with seasonal fruits like strawberries in summer or pomegranate seeds in winter. For a tropical twist, use mango purée mixed into the ganache. The fruit adds freshness and vibrant color that makes the cake look even more impressive. 🍓
Spiced Vanilla Layers
Infuse the batter with 1 tsp cinnamon + ½ tsp cardamom for warm spice notes. This works especially well with caramel ganache instead of chocolate. The spices make the cake feel cozy and perfect for fall gatherings. Add a pinch of sea salt to the frosting for balance.
Nutrition facts
Frequently asked questions
How do I prevent the cake layers from collapsing when assembling?
Let each vanilla layer cool completely before adding fillings—this prevents sogginess. Use a thin layer of chocolate ganache (about ¼ inch thick) between cake layers instead of thick spreads. Chill the cake for 2 hours after assembly to set the frosting properly before slicing.
Can I make this cake in a regular round pan instead of a springform?
Yes, but you’ll need to bake it in 3 batches (3 layers per pan) to maintain the same height. Use a 9-inch pan and reduce baking time by 2-3 minutes per layer to avoid overbrowning. The key is keeping each layer thin enough to bake evenly without doming.
Why did my meringue swirls not set properly?
Meringue needs to be stiff and glossy before spreading, and the oven must be at 350°F when setting. If your kitchen is humid, add ¼ tsp cream of tartar to stabilize the egg whites. Also ensure you’re cutting through all layers completely—partial cuts prevent proper swirling.
How far ahead can I prepare the cake components?
Bake and cool all cake layers 1 day ahead—they’ll keep well wrapped at room temperature. Make the ganache and frosting 24 hours in advance and refrigerate. Assemble the cake 4-6 hours before serving to let flavors meld, but add final garnishes (berries/chocolate) just before serving.
What’s the best way to store leftovers?
Slice the cake and store individual portions in an airtight container at room temperature for 2 days. For longer storage, wrap slices in plastic wrap and freeze for up to 1 month. Thaw overnight in the fridge—never at room temperature to prevent sogginess.

- Pea Soup Instant Pot Recipe: Velvety Green Smoothness in 20 Minutes - November 1, 2026
- Pork Loin Pulled Pork Crock Pot Recipe: Slow-Smoked Tenderness With Zero Dryness - November 1, 2026
- Baked Potatoes in Crock Pot Recipe: Buttery Interiors and Crispy Top Magic - November 1, 2026