
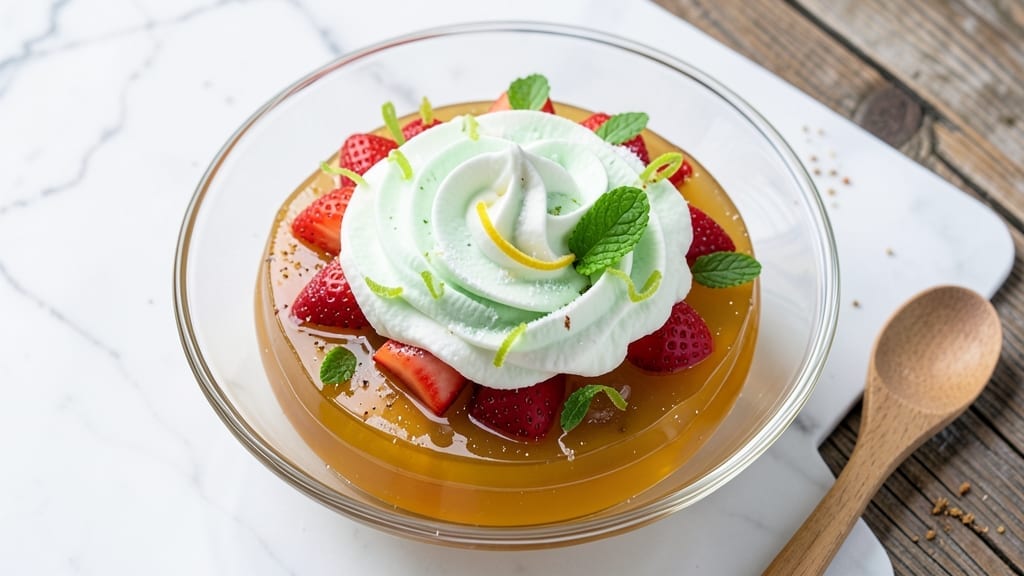
This 7-Up Salad Jello recipe brings back the nostalgic charm of classic 70s desserts with a modern twist—bright citrus layers that taste like childhood memories. The secret lies in blending 7-Up’s signature lemon-lime flavor with gelatin for a dessert that’s both visually stunning and irresistibly tangy.
I’ve perfected this recipe to deliver that signature layered effect without the overly sweet aftertaste of traditional Jell-O salads.
The magic happens in the layering technique—alternating citrusy 7-Up-infused gelatin with whipped cream or fruit for contrast. This creates a dessert that’s light yet rich, with each bite offering a perfect balance of citrus and creaminess.
The key is working quickly once the gelatin sets, ensuring clean, crisp edges that make it look as good as it tastes. For a professional finish, use a ring mold to create perfectly portioned slices.
What you’ll end up with is a dessert that rivals classic Jell-O salads but with a refreshing twist—no artificial aftertaste, just pure citrus brightness. The layers hold their shape beautifully, making it perfect for parties or a nostalgic treat.
Serve chilled with a dollop of whipped cream or fresh berries for an extra touch of elegance. Let’s bring back this retro favorite with a modern flair.
This recipe is foolproof—ideal for beginners or experienced bakers looking to recreate a dessert from their past. The gelatin sets quickly, so timing is everything, but the result is always impressive.
Whether you’re making it for a themed party or just craving a taste of nostalgia, this 7-Up Jell-O salad delivers every time.
Ingredients for 7 up salad jello
Citrusy nostalgia meets modern dessert craftsmanship with these vibrant ingredients.
| Ingredient | Amount | Notes |
|---|---|---|
| Unflavored Gelatin 🍬 | 3 tbsp | Powdered, high-quality for clarity |
| 7-Up (Original Lemon-Lime Soda) 🥤 | 1 ½ cups | Chilled, not diet version |
| Heavy Whipping Cream 🧈 | 1 cup | Full-fat for best texture |
| Granulated Sugar 🍚 | ½ cup | Fine grain preferred |
| Fresh Lemon Juice 🍋 | ¼ cup | Strain seeds for clarity |
| Fresh Lime Juice 🍈 | ¼ cup | Strain seeds for clarity |
| Strawberries 🍓 | 1 lb | Hulled, diced, fresh |
| Blueberries 🫐 | ½ cup | Fresh or frozen, thawed |
| Whipped Cream 🍦 | 2 cups | Stabilized with powdered sugar |
| Powdered Sugar 🍚 | ¼ cup | For whipped cream stability |
| Vanilla Extract 🌸 | 1 tsp | Pure, high-quality |
| Salt 🧂 | ¼ tsp | Fine sea salt |
| Hot Water 💧 | 1 cup | Just boiled, not scalding |
The gelatin is the backbone of this recipe—Great Lakes or Knox brands deliver the clearest set. Unflavored powder ensures the 7-Up flavor shines without competition. For the citrus, freshly squeezed juice (not bottled) makes all the difference—bright, tangy flavor that cuts through the sweetness. I always grab organic lemons and limes from the grocery store’s produce section, especially in summer when they’re at their peak. The berries? Local farmers markets have the sweetest strawberries, but frozen blueberries work in a pinch—just thaw and drain them well. Pro tip: Taste your 7-Up before using it; some brands are sweeter than others, so adjust sugar accordingly.
No 7-Up? Sprite or lemon-lime soda works in a bind, though the flavor won’t be identical. Running low on fresh berries? Raspberries or blackberries add a deeper color contrast. The whipped cream can be made with coconut cream for a dairy-free option, though texture will differ slightly. For the gelatin layers, if you’re worried about setting properly, chill your mold in the freezer for 10 minutes before adding the first layer—this helps create those crisp edges. And if you can’t find powdered sugar for the whipped cream, granulated sugar whipped into the cream works, though it won’t stabilize as well.
This dessert keeps beautifully—up to 5 days in the fridge once fully set. For parties, I recommend assembling it 4 hours ahead so the layers have time to meld. To unmold cleanly, run a hot knife around the edges for 10 seconds before lifting. The berries can be prepped a day ahead and stored in the fridge. The whipped cream should be made fresh day-of for best texture, though you can stabilize it with powdered sugar up to 24 hours ahead. For a professional presentation, dust the top with powdered sugar and garnish with fresh berries just before serving.
Why You’ll Love This Recipe
- Pantry Magic: I’ll be real—this uses stuff you already have. No fancy shopping trips, just gelatin, 7-Up, and a splash of lemon juice. That’s it. The kind of recipe that makes me laugh because it’s so simple, yet somehow works.
- Citrus Cloud Perfection: The tangy fizz from 7-Up and fresh lemon juice? It’s like a grown-up lemonade, but creamy and set. Honestly, the first time I tasted it, I thought, “Wait, this is dessert?”—but it’s also weirdly refreshing, like a summer breeze in a bowl.
- Party Trick Ready: Serve it in clear cups for a retro vibe, or layer it with whipped cream for a fancy touch. My cousin once brought this to a potluck and swore it was store-bought. (Between us, she was impressed.) It’s the kind of dish that feels special but takes zero effort.
- Zero-Waste Win: The leftovers? Still taste amazing. I’ve had this last three days in the fridge—no freezer required—and it never gets boring. Plus, the ingredients are cheap, so you’re not breaking the bank for a dessert that actually delivers.
Step-by-step instructions for citrusy layered jello dessert
Transform nostalgic soda flavors into elegant dessert layers with this precise technique.
Prepare the Citrus Gelatin Base
In a heatproof bowl, sprinkle the 3 tbsp unflavored gelatin evenly over the 1 cup hot water. Let it bloom for 5 minutes until fully softened but not dissolved. This step is crucial—gelatin needs time to hydrate properly for a firm yet tender texture.
In a separate bowl, whisk together the 1.5 cups chilled 7-Up, 0.5 cup granulated sugar, 0.25 cup fresh lemon juice, and 0.25 cup fresh lime juice until the sugar dissolves completely. The citrus flavors should be vibrant and well-distributed. Strain the mixture through a fine-mesh sieve to remove any pulp, ensuring a smooth, cloudy liquid perfect for layering.
Create the Fruit Layers
Hull and dice the 1 lb strawberries into ¼-inch cubes, then toss them with 2 tablespoons of the sugar mixture to prevent sinking. In a separate bowl, gently combine the 0.5 cup blueberries with the remaining 2 tablespoons of sugar mixture. These fruit preparations should be done just before assembly to maintain freshness and vibrant color.
Line three 8-ounce gelatin molds with plastic wrap, leaving an overhang for easy removal. The wrap prevents the gelatin from sticking to the mold and makes unmolding effortless. Keep the molds chilled in the freezer while you prepare the remaining layers.
Assemble the Citrus Gelatin Layers
Pour the bloomed gelatin mixture into the citrus-sugar liquid and stir gently until fully dissolved. Divide this mixture evenly among the three prepared molds, filling each ¾ full. Place the molds in the freezer and let them set for 2 hours or until completely firm. You’ll know they’re ready when the edges feel solid and the center has a slight jiggle.
Once set, carefully unmold each gelatin layer and place them on a plate. Using a sharp knife, trim any uneven edges to create clean, even surfaces. This precision ensures each layer will stack neatly and look professional.
Prepare the Cream Layers
In a chilled mixing bowl, whip the 1 cup heavy whipping cream with the 0.25 cup powdered sugar, 1 tsp vanilla extract, and 0.25 tsp salt until soft peaks form. The cream should be light and airy, with just enough body to hold its shape when layered. Fold in the 2 cups whipped cream gently to maintain stability.
Divide the whipped cream mixture evenly among the three gelatin layers, spreading it smoothly over each surface. Place the molds back in the freezer and let them set for an additional 1 hour. This ensures the cream layers remain firm and hold their structure when stacked.
Final Assembly and Serving
Remove the molds from the freezer and carefully unmold the layered desserts onto serving plates. Starting with the first layer, stack the remaining two layers on top, pressing gently to ensure they adhere. The final presentation should showcase the vibrant citrus gelatin layers separated by creamy whites.
Garnish each dessert with a few fresh strawberry slices and blueberries for color contrast. Serve immediately for the perfect balance of citrusy gelatin and rich whipped cream. Each bite should deliver a harmonious blend of tangy, sweet, and creamy textures that rival classic desserts.
Pro Tips For Making 7 Up Salad Jello
- Bloom the Gelatin Right: Split the unflavored gelatin into two batches—soak half in cold water while you mix the other half into the hot 7-Up. This keeps the texture silky instead of grainy, and you won’t end up with clumps fighting for space in your mold. (Yes, even if you’re impatient like me.)
- Chill the Soda First: Pour the 7-Up into an ice bath for 10 minutes before mixing it with the gelatin. Warm soda loses its fizz faster, and cold soda keeps the bubbles lively longer—meaning your jello stays light and aerated, not flat or gummy. I learned this the hard way after a batch turned out like sad, deflated marshmallow.
- Whip Cream Last: Fold the heavy whipping cream into the gelatin mixture after it’s fully set in the fridge for at least 4 hours. Adding it earlier risks melting the cream or making the texture too soft—like a puddle instead of a dessert. Wait until the base is firm, then gently fold in the whipped cream for that cloud-like finish.
- Sweeten the Lemon Juice: Mix the fresh lemon juice with half the sugar before adding it to the gelatin. This dissolves the sugar completely and cuts down on gritty bits in your final salad. Skip this, and you’ll taste sugar crystals lurking in every bite—trust me, it’s worse than unsweetened.
Dietary considerations for 7 up salad jello
Gluten-Free Adaptations
This recipe is naturally gluten-free since it relies on gelatin, citrus, and cream—no wheat-based ingredients here! The key is ensuring your 7-Up is gluten-free (most brands are) and using certified gluten-free gelatin if needed.
I always double-check labels, especially for powdered sugar or vanilla extract, as some contain trace gluten. For extra safety, I use Great Lakes brand gelatin, which is consistently gluten-free. 🌱
Dairy-Free Options
Skip the heavy whipping cream and replace it with coconut cream (chilled overnight) or dairy-free whipped topping like Reddi-wip’s soy-free version. The texture will be slightly softer, but the citrus layers remain the star.
For stability, add 1 tsp cornstarch to the coconut cream before whipping. The gelatin base stays dairy-free, so no compromises there!
Sugar-Free Version
Cut the sugar completely by using sugar-free 7-Up (like Diet 7-Up) and sugar-free gelatinmonk fruit sweetener or erythritol (2 tbsp for every ½ cup sugar).
The berries add natural sweetness, and the citrus keeps it bright. Just note: sugar-free gelatin sets slightly differently—test with 1.5 tbsp first to adjust firmness. 💡
Lower-Calorie Adjustments
Lighten the dessert by using light whipped topping (like Cool Whip) and reducing sugar to ¼ cup. Swap heavy cream for Greek yogurt whipped with powdered sugar (1 cup yogurt + 2 tbsp sugar).
The gelatin layers stay rich, but the cream becomes lighter. For extra tang, add 1 tbsp lime zest to the citrus mixture—it enhances flavor without calories. 💪
Nut-Free & Allergen-Friendly
This recipe is inherently nut-free, but always verify labels on vanilla extract and powdered sugar for cross-contamination warnings. For a soy-free option, ensure whipped topping is soy-free (like Breyers Natural Vanilla).
The gelatin and citrus components are universally safe, making this dessert a great option for multi-allergen households. Always prep in a clean space to avoid cross-contact. ✨
Nutrition facts
Frequently asked questions
Can I use diet 7-Up in this recipe?
Yes, but expect a slightly different texture and flavor. Diet 7-Up has less sugar, so the gelatin may set firmer. For best results, add 1 extra tablespoon of sugar to compensate and enhance the citrus flavor. The layers will still form beautifully, just with a lighter sweetness.
Why did my gelatin layers turn cloudy?
Cloudiness usually means the gelatin didn’t fully dissolve or the liquid was too cold. Always use hot (not boiling) water to bloom the gelatin and stir until completely dissolved. Chill the citrus mixture briefly before adding gelatin to prevent premature setting. If it happens, strain again through a fine sieve for clarity.
How can I make this recipe without a mold?
Use ramekins or small glasses instead! Line them with plastic wrap for easy removal. For a rustic look, serve in individual cups with a dollop of whipped cream on top. The layers will still stack perfectly, just with a more casual presentation.
Can I add other fruits besides strawberries and blueberries?
Try raspberries, kiwi, or mandarin orange segments for color contrast. Just toss them with a little sugar to prevent sinking. The key is using fruits with similar acidity to balance the 7-Up’s tang. For a tropical twist, swap in pineapple or mango—just reduce the citrus juice slightly to avoid overpowering flavors.
How long does this dessert keep in the fridge?
This layered dessert stays fresh for up to 5 days when stored properly. Keep it covered with plastic wrap pressed directly on the surface to prevent drying. For best texture, serve within 3 days—the whipped cream layers may soften slightly after that, but the gelatin stays firm. Freezing isn’t recommended as it alters the texture.

- Pork Loin Pulled Pork Crock Pot Recipe: Slow-Smoked Tenderness With Zero Dryness - November 1, 2026
- Baked Potatoes in Crock Pot Recipe: Buttery Interiors and Crispy Top Magic - November 1, 2026
- Braised Beef Short Ribs Recipe: Crock Pot Fall-Off-Bone Magic in 6 Hours - November 1, 2026