
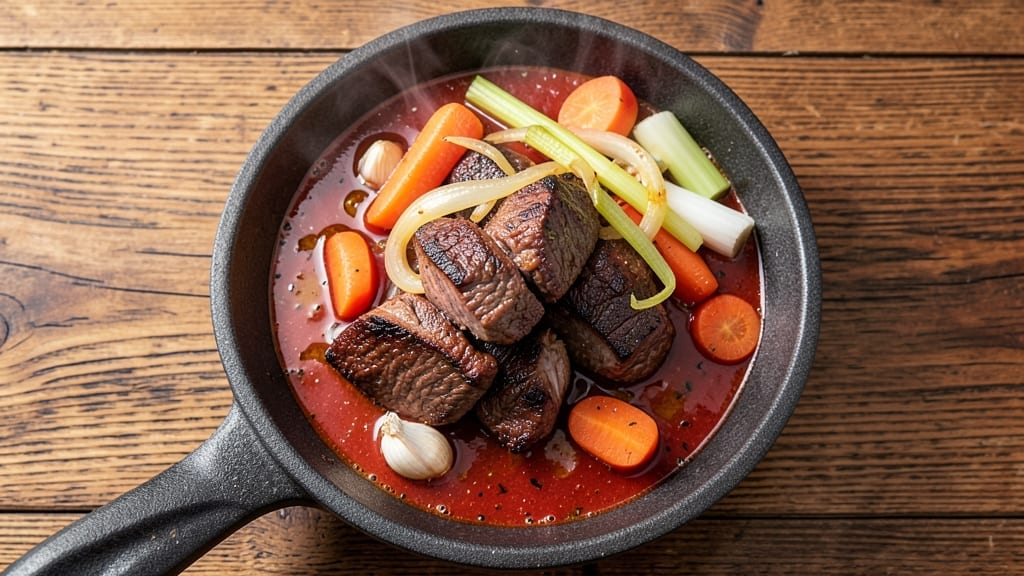
The 8-hour beef stew recipe transforms tough cuts into melt-in-your-mouth perfection through slow cooking—where time deepens flavors and turns simple ingredients into a hearty masterpiece. Professional chefs rely on this method to develop rich, caramelized undertones that home cooks can now recreate with precision.
The secret lies in browning the meat properly and letting the broth reduce slowly, creating layers of complexity that make every bite unforgettable.
This recipe delivers restaurant-quality results with minimal effort, thanks to a foolproof technique that balances tender beef, hearty vegetables, and a deeply flavorful broth.
You’ll start with a well-seared meat base, deglazed to capture every savory bit, then let the slow cooker work its magic over 8 hours—transforming tough cuts into fork-tender pieces.
The vegetables absorb the rich broth, becoming tender yet retaining their natural sweetness, while herbs and spices infuse the entire dish with aromatic depth.
By the time you serve this stew, you’ll have a deeply satisfying meal that smells as good as it tastes—warm, inviting, and packed with flavor.
The broth will have reduced to a velvety consistency, clinging to every bite of beef and vegetable, while the crust on the meat adds a satisfying contrast. This is comfort food at its finest, perfect for cold evenings or family gatherings where hearty, slow-cooked meals take center stage.
Whether you’re feeding a crowd or meal prepping for the week, this recipe scales beautifully while maintaining its rich, time-honored quality. The beauty of slow cooking lies in its ability to turn ordinary ingredients into something extraordinary—just give it the time it needs.
Let’s get started on creating a stew that will have everyone asking for seconds.
Ingredients for 8 hour beef stew
Sixteen ingredients transform into restaurant-quality beef stew through slow cooking mastery.
| Ingredient | Amount | Notes |
|---|---|---|
| Chuck Roast 🥩 | 3 lb | Trimmed of excess fat, cut into 1.5-inch cubes |
| Yellow Onions 🧅 | 2 whole | Medium size, sliced into 1/4-inch half-moons |
| Carrots 🥕 | 4 whole | Medium size, peeled and cut into 2-inch chunks |
| Celery Stalks 🌿 | 4 whole | Trimmed, cut into 1-inch pieces |
| Garlic Cloves 🧄 | 6 cloves | Peeled and lightly crushed |
| Tomato Paste 🍅 | ½ cup | High-quality, unsweetened |
| Dry Red Wine 🍷 | 1 cup | Bold variety like Cabernet Sauvignon |
| Beef Broth 🥫 | 4 cups | Homemade or high-quality store-bought |
| Fresh Thyme 🌿 | 2 tbsp | Leaves only, chopped (or 2 tsp dried) |
| Fresh Rosemary 🌿 | 1 tbsp | Chopped (or 1 tsp dried) |
| Bay Leaves 🍃 | 2 whole | Dried, standard size |
| All-Purpose Flour 🌾 | 2 tbsp | For thickening broth |
| Salt 🧂 | 1 ½ tsp | Diamond Crystal kosher salt |
| Black Peppercorns 🌶️ | 1 tsp | Freshly cracked |
| Olive Oil 🫒 | 2 tbsp | Extra-virgin for searing |
The chuck roast is non-negotiable here—its marbled fat renders during slow cooking, creating a rich, velvety broth. Look for cuts with good marbling at your butcher or grocery store’s meat counter, where staff can often identify the best pieces. If you’re buying pre-cut chuck roast, Costco or Whole Foods typically carry high-quality options. Trim excess fat before cubing, but leave some for flavor. For the vegetables, fresh carrots and celery with vibrant color yield the best results—avoid wilted or rubbery produce. The onions should be firm, not translucent at the stem end, and the garlic should have a pungent aroma without being musty.
No red wine on hand? Substitute with beef broth plus 1 tbsp balsamic vinegar for depth. Fresh herbs are ideal, but dried thyme and rosemary at half the amount work in a pinch. The tomato paste can be skipped if you prefer a lighter stew, though it adds natural sweetness and richness. For the broth, homemade is best, but quality store-bought brands like Kraft or Pacific Foods are reliable. The flour is strictly for thickening at the end—don’t add it prematurely, or it’ll create lumps. If you’re watching carbs, reduce to 1 tbsp and stir vigorously to dissolve.
This stew tastes even better the next day as flavors meld. Store in an airtight container in the fridge for up to 5 days, or freeze for 3 months in portion-sized containers. For meal prep, double the recipe and freeze half immediately—just thaw overnight in the fridge before reheating. The crust on the beef is best enjoyed fresh, but the stew reheats beautifully. If making ahead, skip the flour thickening until reheating to maintain optimal texture.
Why You’ll Love This Recipe
- Garlic Bomb Flavor: That first bite? Pure satisfaction. The garlic cloves, simmered low and slow, melt into the onions and carrots, creating this caramelized, savory base that makes the beef taste like it’s been aging for days. Not too sharp, not too mild—just right.
- Leftovers That Shine: Honestly, I make this on Sunday because the second batch is just as good. Reheat it, add a splash of broth, and it’s like eating restaurant-quality stew again. My kids actually ask for it—no jokes about “boring leftovers” this time.
- Budget-Friendly Feast: A whole chuck roast for under $10? Yes, please. The onions, carrots, and celery stretch into multiple servings, and the garlic adds that little luxury touch without breaking the bank. It’s the kind of meal that makes grocery day feel like a win.
Step-by-step instructions for deep-rich beef stew
This method transforms tough chuck roast into meltingly tender beef with layers of complex flavor.
Sear the Chuck Roast for Maximum Flavor
Heat the 2 tablespoons olive oil in a heavy Dutch oven over medium-high heat until shimmering. Working in batches, add the 3 lb chuck roast cut into 1.5-inch cubes, arranging them in a single layer. Let each piece sear undisturbed for 3-4 minutes until deeply browned on all sides.
This critical searing step develops the Maillard reaction, creating deep, caramelized flavors that form the foundation of your stew. Don’t rush this—crowding the pan will steam the meat instead of browning it. Transfer the browned beef to a plate as you work, keeping it warm.
Build the Aromatic Vegetable Base
In the same Dutch oven, add the sliced 2 whole yellow onions, 4 whole carrots cut into chunks, and 4 whole celery stalks chopped into pieces. Cook over medium heat for 8-10 minutes, stirring occasionally, until the vegetables begin to soften and release their natural juices.
Add the 6 cloves garlic cloves and cook for another 30 seconds until fragrant. The vegetables should be tender but not completely mushy—they’ll continue cooking throughout the long simmer. This step develops the stew’s foundational flavors through caramelization and sweating.
Deglaze and Develop the Sauce
Stir in the 0.5 cup tomato paste and cook for 2 minutes until it darkens slightly. Pour in the 1 cup dry red wine and scrape up all the browned bits from the bottom of the pot with a wooden spoon. This deglazing captures all the flavor you’ve built so far.
Allow the wine to simmer for 3-4 minutes until reduced by half, then add the 4 cups beef broth, 1.5 tsp salt, and 1 tsp freshly cracked black peppercorns. Bring to a gentle simmer, then return the beef to the pot along with the 2 whole bay leaves, 2 tbsp fresh thyme, and 1 tbsp fresh rosemary.
Simmer Low and Slow for Tender Perfection
Cover the Dutch oven and transfer to a preheated 300°F oven (or reduce heat to low on the stovetop). Let the stew cook for 7-8 hours, maintaining a gentle simmer. Check occasionally and add ½ cup water if the liquid reduces too much.
The key is patience—the long cooking time breaks down the connective tissue in the beef, transforming it into fork-tender morsels. You’ll know it’s ready when the beef easily pulls apart with a fork and the flavors have melded into a harmonious broth. The stew should have a rich, velvety consistency with vegetables that are tender but still hold their shape.
Finish and Thicken the Stew
Remove the stew from heat and discard the bay leaves. In a small bowl, whisk together the 2 tbsp all-purpose flour with 2 tablespoons cold water to make a slurry. Slowly stir this into the stew, simmering gently for 5-7 minutes until thickened to your desired consistency.
Taste and adjust seasoning with additional salt or pepper if needed. The stew should have a balanced flavor profile with the richness of the beef complemented by the acidity of the wine and the sweetness of the vegetables. Let it rest for 10 minutes before serving to allow the flavors to fully meld.
Pro Tips For Making 8 Hour Beef Stew
- SEAR THE ROAST FIRST: After trimming the chuck roast, pat it dry with paper towels—this isn’t just about looks. Hit it with a hot pan (no oil needed) until all sides are deep brown, about 3-4 minutes per side. That crust locks in flavor during the long cook, so don’t skip it unless you’re in a rush and willing to settle for bland beef.
- CUT VEGETABLES UNIFORM: Carrots and celery should be the same size as your onions—about ½-inch chunks. I used to chop them randomly, and some would turn mushy while others stayed crunchy. Uniform pieces cook evenly, so take the extra 2 minutes to make them consistent.
- DEGLAZE WITH BEER OR BROTH: After browning the meat, don’t just add water. Splash in ½ cup of beer (or beef broth) and scrape every bit of browned bits from the bottom—this is where the deep flavor hides. Ignore this, and your stew will taste like it’s missing something.
- SIMMER AT 300°F, NOT BOILING: The magic happens at a gentle simmer, not a rolling boil. If it’s bubbling hard, the meat will toughen instead of tenderize. Crank the heat down to the lowest setting that keeps tiny bubbles breaking the surface—patience here makes the difference between fork-tender beef and chewy disappointment.
Best sauces and condiments for this 8 hour beef stew
Classic Red Wine Reduction
Elevate your stew with a red wine reduction made from the leftover wine after deglazing. Simmer ½ cup red wine in a small saucepan until reduced by half (about 10 minutes).
Stir this into your finished stew just before serving—it adds depth and complexity that takes your dish to the next level. I like using Cabernet Sauvignon for its bold fruit notes that pair perfectly with beef. 🍷
Herb-Infused Olive Oil
Brighten the dish with herb-infused olive oil drizzled on top. Heat ¼ cup extra-virgin olive oil with 1 tbsp fresh rosemary and 1 tbsp fresh thyme until fragrant (about 2 minutes). Let it cool, then drizzle over the stew before serving.
This adds a fresh, aromatic finish that cuts through the richness. Store any leftover infused oil in an airtight container for up to 5 days.
Mustard Cream Sauce
Add a tangy contrast with a Dijon mustard cream sauce. Whisk together ¼ cup sour cream, 1 tbsp Dijon mustard, and 1 tbsp beef broth until smooth.
Stir this into individual portions just before serving—it adds a velvety texture and bright acidity that balances the stew’s richness. For extra flavor, add ½ tsp Worcestershire sauce. 🌟
Fresh Parsley Garnish
Finish with a sprinkle of fresh parsley for a pop of color and freshness. Chop 2 tbsp flat-leaf parsley finely and scatter over the stew right before serving. The bright, slightly peppery notes cleanse your palate between bites.
For a more intense flavor, lightly bruise the parsley by rubbing it between your palms before adding it to the stew.
Crusty Bread Topping
Serve with toasted bread croutons for texture and absorption. Cut ½ cup day-old crusty bread (like a baguette or sourdough) into ½-inch cubes, toss with 1 tbsp olive oil, and toast in a 350°F oven for 8-10 minutes until golden.
Sprinkle over the stew just before serving so they stay crisp. 🥖
Hot Pepper Flakes
Add a kick of heat with crushed red pepper flakes. Sprinkle ½ tsp over individual servings to taste—this lets everyone customize their spice level. For a smoky twist, substitute with ½ tsp smoked paprika mixed with the flakes.
Store pepper flakes in an airtight container away from light to preserve freshness.
Nutrition facts
Frequently asked questions
Can I use a slow cooker instead of oven for this 8-hour beef stew?
Transfer the stew to a slow cooker after Step 3 and cook on low heat for 8 hours or high heat for 4-5 hours. The texture and flavor will be nearly identical. Just ensure the liquid doesn’t reduce too much—add ½ cup water if needed during cooking. The slow cooker’s gentle heat works perfectly for tenderizing the beef.
What’s the best cut of beef for this recipe?
Chuck roast is ideal because its marbled fat renders beautifully during slow cooking, creating a rich broth. Other good options include stew beef or brisket. Avoid lean cuts like sirloin—they won’t develop the same tender texture. If you can’t find chuck, ask your butcher for a “stewing beef” cut specifically meant for long cooking.
Why does my stew taste bland after 8 hours?
Bland flavor usually means insufficient seasoning or insufficient browning. Double-check that you seared the beef deeply (it should be dark brown, not just pink) and deglazed thoroughly to capture fond. Taste before serving—add ½ tsp salt or ¼ tsp black pepper at the end if needed. For extra depth, stir in 1 tbsp soy sauce or ½ tsp smoked paprika during the final thickening.
Can I make this stew in a pressure cooker?
Yes, but reduce cooking time significantly! After Step 3, pressure cook on high pressure for 60 minutes (not including pre-heating time). The beef will be tender in 1 hour instead of 8. Just be careful not to overcook—check at 45 minutes if using a newer model. The flavor will be concentrated but slightly different from oven/slow cooker methods.
How do I store and reheat leftovers?
Store in an airtight container in the fridge for up to 5 days or freeze for 3 months. Reheat gently on the stovetop over medium-low heat, stirring occasionally, until bubbling. For best texture, add 1-2 tbsp water or broth if it seems too thick. Microwave reheating works but may make the vegetables mushy—use the 50% power setting for even heating.

- Baked Potatoes in Crock Pot Recipe: Buttery Interiors and Crispy Top Magic - November 1, 2026
- Braised Beef Short Ribs Recipe: Crock Pot Fall-Off-Bone Magic in 6 Hours - November 1, 2026
- Crock Pot Cocoa Recipe: Velvety Warmth With Hidden Spice Magic - November 1, 2026