
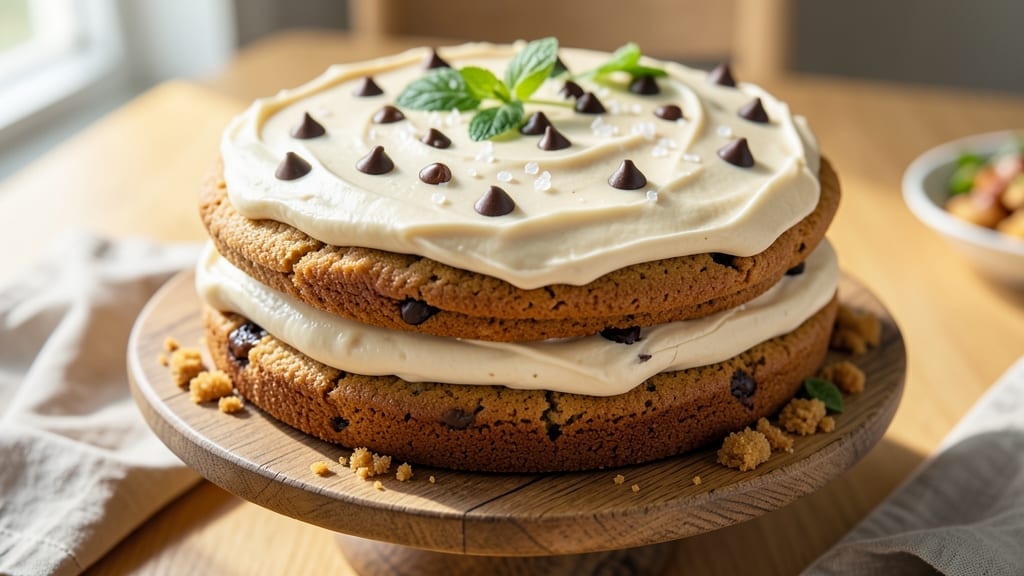
This 8-inch cookie cake recipe transforms a single pan into a showstopping dessert that looks like it belongs in a bakery display case. 💛 The secret lies in layering rich chocolate cookie dough with velvety buttercream, creating a cake that’s as impressive to serve as it is to eat.
Perfect for celebrations, this recipe delivers restaurant-quality results without the fuss of multiple layers or intricate decorating.
What sets this cookie cake apart is its foolproof technique—no special equipment needed beyond a standard 8-inch pan. The cookie dough bakes up with a tender crumb and subtle crackle on top, while the buttercream filling stays lusciously smooth.
The beauty of this recipe is that it’s customizable: swap chocolate for vanilla, add sprinkles, or keep it classic with a dusting of powdered sugar. Every bite delivers that perfect balance of cookie and frosting, making it a crowd-pleaser.
By the time you’re done, you’ll have a party-worthy dessert that’s easy to transport and serves 12-15 guests with minimal effort. The cake keeps well for 3 days in the fridge, allowing you to bake ahead and enjoy stress-free entertaining.
Whether you’re celebrating a birthday, holiday, or just treating yourself, this recipe delivers a dessert that feels special without the complexity.
The best part? This cookie cake is impossible to mess up—the instructions walk you through every step, from mixing the dough to achieving that perfect golden-brown finish.
With just a few simple ingredients and a little patience, you’ll create a dessert that looks like it took hours to make. Let’s get baking!
Ingredients for 8 inch cookie cake
Here’s everything you need to bake this stunning, single-pan dessert that’ll wow your guests!
| Ingredient | Amount | Notes |
|---|---|---|
| All-Purpose Flour 🌾 | 2 cups | Sifted for light texture |
| Unsalted Butter 🧈 | 1 cup | Cold, cubed for best mixing |
| Granulated Sugar 🍚 | 1 cup | White or light brown |
| Packed Brown Sugar 🍚 | ½ cup | For chewy texture |
| Large Eggs 🥚 | 2 whole | Room temperature |
| Vanilla Extract 🍯 | 2 tsp | Pure extract preferred |
| Baking Soda 🧪 | ½ tsp | Freshly measured |
| Salt 🧂 | ½ tsp | Fine sea salt |
| Unsweetened Cocoa Powder 🍫 | ½ cup | Natural or Dutch-processed |
| Hot Water 💧 | ½ cup | For blooming cocoa |
| Powdered Sugar 🍚 | 3 cups | For buttercream |
| Heavy Whipping Cream 🥛 | 1 cup | Cold for stiff peaks |
| Vanilla Extract 🍯 | 1 tbsp | Same as above |
| Mini Chocolate Chips 🍫 | 1 cup | Optional for extra flavor |
| Powdered Sugar 🍚 | 2 tbsp | For dusting top |
The butter and sugars are the foundation here—use high-quality unsalted butter (like Plugrá or Land O’Lakes) for the richest flavor. The cocoa powder makes all the difference: Ghirardelli or Hershey’s Special Dark are my go-tos, but any natural cocoa works. For the powdered sugar, Domino is my secret weapon—it’s ultra-fine and dissolves perfectly into the buttercream. Pro tip: measure your flour by scooping and leveling—don’t pack it down, or your cake will be dense. And trust me on the cold butter—it creates flaky layers that make this cookie cake look professional.
No cocoa powder? Swap for 1/2 cup melted dark chocolate (minus 1 tbsp cocoa) and let it cool before mixing. Running short on vanilla? Vanilla bean paste works too—just use 1 tbsp instead of 2 tsp. The chocolate chips are totally optional, but I always add them because they melt into little pockets of gooey goodness. For the buttercream, if you can’t find heavy whipping cream, substitute with 3/4 cup whipping cream plus 1/4 cup melted butter. And if you’re feeling fancy, swap the vanilla for a pinch of espresso powder—it deepens the chocolate flavor without anyone noticing.
This cake is a dream to make ahead—bake it 1 day in advance for even better flavor as the layers meld. Store it in an airtight container at room temperature for 2 days, or in the fridge for 3 days. The buttercream layer stays fresh for 4 days if kept covered. For serving, I love dusting the top with powdered sugar right before slicing—it gives that bakery-fresh look. And if you’re worried about transporting it, wrap the pan tightly in plastic wrap and it’ll stay perfect for your party.
Why You’ll Love This Recipe
- One-Bowl Wonder: I swear by this recipe—just toss everything into one bowl, mix until it’s almost crumbly, then bake. No food processor, no standing over a mixer, just you and your hands for two minutes. (Yes, even on a Tuesday night.)
- Butter-Sugar Magic: That creamy butter and the perfect mix of granulated and brown sugar? It’s what makes this cake ridiculously tender with just the right chew. Honestly, the first time I bit into it, I nearly dropped the whole pan.
- Party in a Pan: Slice it for a birthday, serve it whole for a cozy night in, or pack individual pieces for lunchboxes. Between us, I’ve even used it as a dessert base for ice cream—because why not? It’s that versatile.
- Budget-Friendly Stretch: A single 8-inch cake feeds four with generous slices, or six if you’re feeding kids (my daughter’s favorite). And with just five pantry staples, you’re not breaking the bank—just baking something that tastes like a treat.
Step-by-step instructions for 8-Inch cookie cake
This foolproof method delivers bakery-style layers with minimal effort—perfect for celebrations!
👨🍳 Step 1: Make the Chocolate Cake Layers
Preheat your oven to 350°F and grease an 8-inch round cake pan generously with butter. Line the bottom with parchment paper for easy removal. In a large mixing bowl, cream together the 1 cup unsalted butter, 1 cup granulated sugar, and ½ cup packed brown sugar on medium speed until light and fluffy—about 3-4 minutes. This step is crucial for that tender, cake-like texture.
Add the 2 whole large eggs one at a time, mixing well after each addition. Then stir in the 2 teaspoons vanilla extract. In a separate bowl, whisk together the 2 cups all-purpose flour, ½ teaspoon baking soda, and ½ teaspoon salt. Gradually add the dry ingredients to the wet mixture, mixing just until combined. Fold in the 1 cup mini chocolate chips (if using) by hand—don’t overmix or your layers will be dense.
🔥 Step 2: Bake the Layers to Perfection
Divide the batter evenly between two 4-inch round cake pans (or bake one layer at a time in your 8-inch pan). Bake for 18-20 minutes or until a toothpick inserted in the center comes out clean. The edges should be set but the tops still slightly springy to the touch. Let the layers cool in the pans for 10 minutes before transferring to a wire rack to cool completely.
Here’s the secret: Don’t overbake! You want moist layers that hold together beautifully. If the tops brown too quickly, tent them loosely with foil after 15 minutes to prevent over-browning while ensuring they’re fully cooked.
🍳 Step 3: Create the Chocolate Ganache
While the layers cool, prepare the ganache by combining the ½ cup unsweetened cocoa powder and ½ cup hot water in a heatproof bowl. Let it sit for 5 minutes to bloom the cocoa. Then whisk in the 1 cup unsalted butter, 1 cup granulated sugar, and 1 tablespoon vanilla extract until completely smooth. The mixture should be thick but pourable—if it’s too thick, warm it gently over a double boiler.
This ganache will serve double duty: as the filling between layers and as the frosting. The cocoa blooming step is key—it develops the rich chocolate flavor that makes this cake truly special. If you’re in a hurry, you can microwave the cocoa and water mixture for 30 seconds to speed up the process, but blooming naturally gives the best results.
🥘 Step 4: Assemble the Cookie Cake Layers
Once your layers are completely cool, place the first layer on a cake stand or plate. Spread about ⅓ cup of the ganache evenly over the top, leaving a ½-inch border uncovered. Press the second layer on top, then repeat with another ⅓ cup of ganache. For extra stability, you can secure the layers with toothpicks inserted vertically around the edges.
Here’s where the magic happens: The ganache should be cool enough to set but still warm enough to spread easily. If it’s too thick, warm it gently in the microwave for 10-15 seconds to make it more spreadable. The final layer should be smooth and level—use a small offset spatula to smooth any rough edges.
🍽️ Step 5: Frost and Decorate for Party Perfection
Transfer the assembled cake to a serving plate. In a large mixing bowl, beat the 1 cup heavy whipping cream to stiff peaks, then gradually add the 3 cups powdered sugar and 1 tablespoon vanilla extract, beating until smooth and glossy. Spread this buttercream evenly over the top and sides of the cake, creating a smooth, professional finish.
For that final touch, dust the top with the remaining 2 tablespoons powdered sugar using a fine-mesh sieve. Add decorative chocolate chips around the edges or sprinkle with colorful sprinkles for a festive look. Serve immediately for the best texture—this cake is designed to be enjoyed fresh from the oven!
Pro Tips For Making 8 Inch Cookie Cake
- Cream Butter Slowly: Beat the butter and sugars together until it’s light and fluffy—about 3-5 minutes. I used to rush this, and the cake turned out dense. Let the mixer do the work; this step guarantees a tender crumb.
- Measure Brown Sugar Right: Pack that brown sugar firmly into the measuring cup—no air gaps. I learned this the hard way when my cake came out too dry. A spoon press-down isn’t enough; tap the cup sharply to settle it.
- Avoid Overmixing the Dough: Mix the wet and dry ingredients just until combined—no need for a smooth batter. Overworking it develops gluten, and your cake will turn out tough instead of soft. Stop when there are still a few flour streaks.
- Bake Until Edge Pulls: Test doneness by gently tugging the edge of the cake—it should spring back, not stick. My first batch was underbaked because I trusted the timer over the visual cue. A toothpick test works too, but the edge pull is more reliable.
Perfect pairings for this recipe
Classic Coffee Pairing
Nothing complements this rich chocolate cookie cake like a hot cup of coffee brewed with medium-roast beans—think Starbucks Pike Place or Blue Bottle. The bitterness of the coffee cuts through the sweetness, creating a perfect balance.
I like to serve it with a dash of cinnamon on top for an extra layer of warmth. ☕
Creamy Vanilla Ice Cream
A scoop of homemade vanilla bean ice cream (or Ben & Jerry’s Phish Food) adds the ultimate contrast to the warm cookie cake. The cold, creamy texture melts beautifully against the cake’s edges, making every bite a decadent experience.
For a lighter option, try coconut milk ice cream—it pairs surprisingly well with the chocolate. 🍦
Warm Spiced Milk
For a cozy, comforting pairing, serve your cookie cake with warm spiced milk—heat 2 cups whole milk with 1 cinnamon stick, ½ tsp vanilla extract, and a pinch of nutmeg.
Strain and serve in small mugs. The spices enhance the cake’s chocolate flavor while adding a soothing warmth. Perfect for chilly evenings! 🌟
Fruity Accompaniments
Bright, tangy fruits like strawberries or raspberries add a refreshing contrast to the sweetness. Slice 1 cup fresh berries and arrange them on a platter alongside the cake. For an extra touch, drizzle with honey or raspberry jam. The acidity balances the richness beautifully. 🍓
Boozy Upgrades
For adults, a sip of bourbon (like Woodford Reserve) or espresso martini elevates the dessert experience. The caramel notes in bourbon complement the chocolate, while the bitterness of an espresso martini cuts through the sweetness. Serve in small glasses for a sophisticated touch. 🥃
Caramel Drizzle
Add a homemade caramel drizzle to the cake for an extra layer of indulgence. Heat ½ cup granulated sugar in a saucepan until melted, then whisk in ¼ cup heavy cream and 2 tbsp butter. Drizzle over the cake just before serving. The salty-sweet contrast is pure magic. 🍯
Nutrition facts
Frequently asked questions
Can I make this cookie cake in a different size pan?
Yes, you can adapt this recipe for other sizes! For a 6-inch pan, reduce all ingredients by 50% and bake at 350°F for 15-18 minutes per layer. For a 10-inch pan, increase ingredients by 25% and bake for 20-22 minutes. Always adjust baking time based on your pan material—glass takes slightly longer than metal.
How do I store and serve this cookie cake?
Keep your cookie cake fresh by storing it in an airtight container at room temperature for up to 2 days or in the fridge for 3 days. For the best texture, serve it at room temperature—let it sit for 30 minutes before slicing. To transport, wrap the pan tightly in plastic wrap and secure with a rubber band. For serving, use a serrated knife dipped in hot water for clean slices.
Can I substitute any ingredients to make this gluten-free?
Replace the all-purpose flour with a 1:1 gluten-free baking flour blend (like Bob’s Red Mill) and add ½ teaspoon xanthan gum if not included. For the buttercream, use a gluten-free powdered sugar. Keep all other ingredients the same. The texture will be slightly denser but still delicious. For extra moisture, add 1 tablespoon applesauce to the cake batter.
Why did my cookie cake crack or sink in the middle?
Cracking often happens when the cake cools too quickly or the oven temperature fluctuates. To prevent this, let the cake cool in the pan for 10 minutes before removing, and avoid opening the oven door frequently during baking. Sinking can occur if the layers aren’t fully baked or if too much filling is used. For a foolproof result, chill the assembled cake in the fridge for 30 minutes before serving to set the layers.
Can I make this cake ahead of time?
This recipe is perfect for making ahead! Bake the layers 1 day in advance and store them separately at room temperature in airtight containers. Assemble the cake up to 4 hours before serving. For even better flavor, let the assembled cake rest overnight in the fridge—this allows the flavors to meld beautifully. Reheat slices briefly in the microwave if you prefer warm cake.

- Pea Soup Instant Pot Recipe: Velvety Green Smoothness in 20 Minutes - November 1, 2026
- Pork Loin Pulled Pork Crock Pot Recipe: Slow-Smoked Tenderness With Zero Dryness - November 1, 2026
- Baked Potatoes in Crock Pot Recipe: Buttery Interiors and Crispy Top Magic - November 1, 2026