
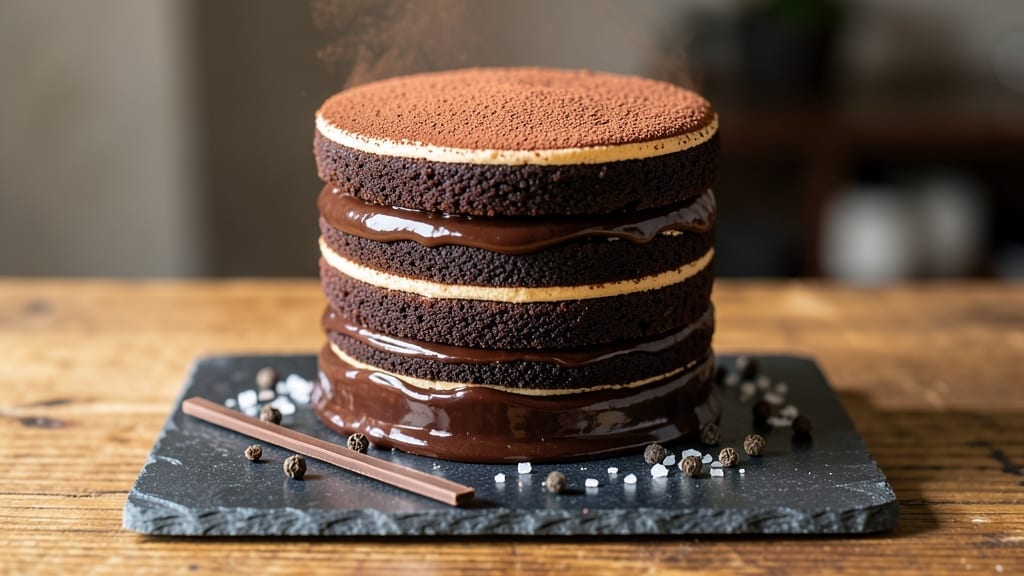
An 8-layer chocolate cake with velvety ganache and swirls of vanilla buttercream is the ultimate showstopper for celebrations—because nothing says “I went all out” like a towering dessert that looks as impressive as it tastes. 💛 The secret lies in precision: baking each layer perfectly flat, chilling them thoroughly, and alternating rich chocolate ganache with light buttercream for that signature marbled effect.
I’ve baked this cake for weddings, birthdays, and just-because moments, and every time, it becomes the centerpiece without stealing the spotlight from the occasion itself.
What sets this recipe apart is the balance of textures and flavors—dense, moist chocolate layers that stay tender despite their rich cocoa content, contrasted by smooth ganache that adds depth without overwhelming, and airy buttercream swirls that keep each bite light.
The key technique is patience: letting the cake cool completely between layers and chilling the entire assembly for at least 4 hours (or overnight) ensures clean slices and prevents the ganache from melting.
This isn’t just a cake; it’s a restaurant-quality dessert you can bake at home with the right approach.
By the time you’re done, you’ll have a stunning, multi-layered masterpiece that’s as beautiful as it is delicious—each forkful delivering layers of chocolate intensity, creamy ganache, and sweet buttercream. The ganache layers add a luxurious richness, while the buttercream swirls keep the texture elegant and balanced.
It’s the kind of dessert that makes guests pause mid-conversation to admire before taking their first bite.
Perfect for holiday feasts, anniversaries, or simply treating yourself to something extraordinary, this cake requires attention to detail but delivers results that feel like a professional bakery’s finest. Let’s get started on creating your own edible centerpiece—one layer at a time.
Ingredients for 8 layer chocolate cake
Precision ingredients for a restaurant-quality 8-layer chocolate masterpiece—each element matters for perfect layers, ganache, and buttercream.
| Ingredient | Amount | Notes |
|---|---|---|
| All-Purpose Flour 🌾 | 8 cups | Sifted for light texture |
| Unsalted Butter 🧈 | 4 cups | Room temperature, European-style preferred |
| Granulated Sugar 🍚 | 3 ½ cups | Superfine for smoother batter |
| Cocoa Powder 🍫 | 1 ½ cups | Dutch-processed for rich flavor |
| Large Eggs 🥚 | 12 whole | Room temperature, separated |
| Baking Powder 🧂 | 1 tbsp | Freshly opened for leavening |
| Salt 🧂 | 1 tsp | Fine sea salt preferred |
| Vanilla Extract 🌿 | 2 tbsp | Pure Madagascar bourbon |
| Whole Milk 🥛 | 2 cups | Room temperature |
| Dark Chocolate Chips 🍫 | 2 cups | 70% cacao minimum |
| Heavy Whipping Cream 🥛 | 4 cups | 36% fat for stability |
| Powdered Sugar 🍚 | 6 cups | For buttercream |
| Vanilla Bean Paste 🌿 | 2 tbsp | For deeper vanilla flavor |
| Chocolate Bars 🍫 | 1 ½ lb | 70% cacao for ganache |
| Heavy Cream 🥛 | 2 cups | 36% fat for ganache |
The cocoa and chocolate are non-negotiable. Valrhona or Callebaut cocoa powder delivers that velvety texture, and 70% cacao chocolate bars from Ghirardelli or Lindt create the richest ganache. I always buy my cocoa in bulk from Penzeys—it’s worth the investment. For the buttercream, European-style butter (like Plugrá) gives that silky finish. The eggs need to be room temperature—cold eggs cause dense layers. Pro tip: separate them the night before and let them sit uncovered in the fridge.
No Dutch-processed cocoa? Natural cocoa powder plus 1/4 tsp baking soda mimics the flavor. Short on vanilla? Vanilla sugar at double the amount works in a pinch. The buttercream can be made ahead—just whip it when ready to assemble. Ganache too thick? Warm the cream slightly before combining. For the chocolate bars, chocolate-covered espresso beans add a fun twist if you’re feeling adventurous. The key is temperature control—both chocolate and cream should be around 110°F when combined for perfect ganache.
Store cake layers wrapped in plastic at room temperature for 2 days before assembling. Buttercream keeps 5 days refrigerated or 3 months frozen. Ganache reheats beautifully—just warm gently in a double boiler. I always bake 4 layers at a time, cooling them on racks before chilling. The entire cake assembly needs 4-6 hours in the fridge to set properly. For serving, slice with a warm, wet knife for clean cuts—trust me, it makes all the difference.
Why You’ll Love This Recipe
- No-Fuss Layers: I swear, the layers are foolproof—just fold the cocoa into the butter-sugar mix, then alternate with whipped egg whites like you’re building a Jenga tower. No fancy piping, no stress.
- Rich Without Guilt: The cocoa powder and butter create this deep, velvety flavor that tastes indulgent but isn’t drowning in oil or weird additives. Honestly, my kids ask for seconds before I even finish slicing.
- Party-Proof Any Day: Birthday? Date night? Sunday brunch? This cake handles it all—just scale the layers for a crowd or keep it small for two. The frosting (if you add it) stays put, so no messy surprises.
- Leftovers That Last: Between us, this cake stays fresh for days if you wrap it right. I’ve sent slices to work with zero complaints, and the texture holds up better than store-bought. Budget win: uses pantry staples, no weird substitutions.
Step-by-step instructions for layering the ultimate chocolate cake
Here’s where the magic happens—building layers that balance rich chocolate with velvety buttercream.
👨🍳 Step 1: Prepare the Cake Batter for All 8 Layers
Preheat your oven to 350°F and grease eight 3-inch round cake pans with the 4 cups unsalted butter, reserving 1 cup for later. Sift together the 8 cups all-purpose flour, 1.5 cups cocoa powder, 1 tbsp baking powder, and 1 tsp salt into a large bowl. In a separate bowl, cream the remaining 3 cups butter with the 3.5 cups granulated sugar until light and fluffy—about 5-7 minutes.
Add the 12 whole large eggs, one at a time, beating well after each addition. Mix in the 2 tbsp vanilla extract and 2 tbsp vanilla bean paste for that signature depth. Gradually alternate adding the dry ingredients and 2 cups whole milk, beginning and ending with flour. Fold in the 2 cups dark chocolate chips just before dividing the batter evenly among the prepared pans.
🔥 Step 2: Bake Layers in Staggered Batches
Bake the first four pans for 18-20 minutes, rotating the pans halfway through, until a toothpick inserted in the center comes out clean. Let them cool in the pans for 10 minutes before transferring to a wire rack. Repeat with the remaining four pans, keeping the first batch warm while you bake the second.
Here’s the thing—don’t overbake. You want layers that are moist but firm enough to hold their shape when stacked. If the tops spring back slowly when touched, they’re perfect. Let all layers cool completely before assembling, or the buttercream will melt and create a soggy mess.
🥘 Step 3: Create the Vanilla Buttercream Swirls
In a stand mixer fitted with the whisk attachment, beat the 4 cups heavy whipping cream and 6 cups powdered sugar on medium speed until soft peaks form. Add the remaining 1 tbsp vanilla extract and 1 tbsp vanilla bean paste, mixing until fully incorporated. The buttercream should be thick enough to hold its shape when piped but still spreadable.
Divide the buttercream into four equal portions. For each portion, add ½ cup reserved butter and mix until smooth. Pipe each buttercream portion onto a separate parchment-lined baking sheet, spreading into a thin rectangle. Use an offset spatula to create swirl patterns before chilling for 30 minutes to firm up.
🍳 Step 4: Assemble the Ganache Layers
Chop the 1.5 lb chocolate bars into small pieces and place in a heatproof bowl. Pour the 2 cups heavy cream over the chocolate and let it sit for 2 minutes. Microwave in 30-second intervals, stirring between each, until the chocolate melts completely and the ganache reaches 110°F. Stir until smooth and glossy, then let it cool to 90°F—this ensures it sets properly between layers.
Place the first cake layer on a cake stand or plate. Spread a thin layer of ganache over the top, then place a chilled buttercream swirl on top. Add the second layer, repeating the ganache and buttercream process. Continue stacking all eight layers, finishing with a final layer of ganache on top. Chill the assembled cake in the refrigerator for at least 4 hours to allow the ganache to set completely.
⏰ Step 5: Final Touches and Serving
Once fully chilled, use a serrated knife to trim any uneven edges. Dust the top and sides with a light layer of powdered sugar using a fine-mesh sieve for an elegant finish. Let the cake sit at room temperature for 30 minutes before slicing to allow the ganache to soften slightly—this makes for the perfect first bite.
Slice into wedges and serve immediately. Each layer should reveal that beautiful contrast of moist chocolate cake, creamy buttercream swirls, and glossy ganache. The cake will keep in the refrigerator for up to 5 days, though I doubt it’ll last that long!
Pro Tips For Making 8 Layer Chocolate Cake
- Sift That Cocoa: DESCRIPTION: I learned this the hard way—lumpy cocoa powder ruins the whole cake. Use a fine-mesh sieve to sift it into the dry ingredients before mixing. This guarantees no gritty surprises in every layer, especially if you’re using natural cocoa (which clumps like crazy).
- Cream Butter Slowly: DESCRIPTION: Don’t rush the butter and sugar step. Let the butter soften to room temp first, then beat it on medium-high for 3-4 minutes until it’s pale yellow and fluffy—not just combined. This lightens the texture, and trust me, your layers will thank you.
- Weigh Your Flour: DESCRIPTION: Spooning flour from the bag into cups packs it too tightly, leading to dense layers. Use a kitchen scale for precision—8-layer cakes need consistent ratios, and packed flour throws everything off. (Yes, even if you’re impatient like me.)
- Chill Between Layers: DESCRIPTION: Skip the foil shortcut—let each layer cool completely on a wire rack before adding filling. Cold layers hold up better, and the filling won’t turn into a soggy mess halfway through. Patience here means no collapsing cake disaster.
Common mistakes when making great 8 layer chocolate cake
Overbaking Layers
I’ve ruined more cakes than I’ll admit by letting them bake too long—20 minutes max is your target for each layer. Overbaking dries out the cake, making it crumbly and unable to hold the ganache properly.
Test with a toothpick: it should come out with a few moist crumbs, not completely clean. If your oven runs hot, reduce temperature to 340°F and watch closely after 18 minutes. 🔥
Skipping Cooling Time
Rushing to assemble layers while they’re still warm is a recipe for disaster. Cool layers completely (at least 1 hour) before stacking, or the buttercream will melt into a soupy mess.
I’ve learned this the hard way—trust me, patience here prevents a sticky, collapsed cake. Place cooled layers in the fridge for 10 minutes before assembling to keep everything stable.
Uneven Layer Thickness
Consistency is key—each 3-inch layer should be 1.5 inches thick when baked. Use a leveling tool or serrated knife to trim domed tops after baking. I’ve seen cakes wobble because layers weren’t uniform.
Weigh your pans before baking to ensure even batter distribution. A digital kitchen scale helps here—aim for ~12 oz per layer for balance.
Ganache Temperature Issues
Ganache that’s too hot (above 110°F) will melt the cake layers, while too cool (below 90°F) won’t set properly. Use a candy thermometer to monitor temperature—this is non-negotiable. If your ganache seizes up, add 1 tsp warm cream and stir gently.
I’ve also had ganache turn grainy—this happens when chocolate isn’t chopped finely enough. Chop chocolate into ¼-inch pieces before melting for silky results.
Not Chilling Enough
Even if your cake looks perfect, 4 hours in the fridge is the minimum for the ganache to fully set. I’ve sliced cakes too soon and ended up with a runny, messy disaster.
Cover the cake with plastic wrap to prevent drying. For extra insurance, freeze it for 1 hour before serving—this firms up the ganache beautifully. 💪
Using Low-Quality Chocolate
Cheap chocolate (below 70% cacao) won’t melt smoothly, leading to streaky ganache. Stick with Valrhona or Lindt bars—they’re worth the splurge. Natural cocoa powder lacks the richness of Dutch-processed, so if you must substitute, add ¼ tsp baking soda to mimic the flavor.
I’ve also seen ganache separate when cream is too cold—always use room-temperature cream for a flawless finish.
Nutrition facts
Frequently asked questions
Can I make this cake with fewer layers?
The magic of an 8-layer cake is in its dramatic presentation, but you can absolutely adapt this recipe for 4 or 6 layers! Simply halve or reduce the batter by 25% while keeping the same proportions for buttercream and ganache. For a 4-layer version, use 4-inch pans instead of 3-inch—they’ll be thicker and more substantial. The key is maintaining the ganache-to-buttercream ratio (1:1) for that signature contrast.
How do I prevent the cake from collapsing between layers?
Collapse happens when layers aren’t fully cooled or when ganache is too warm. Always let layers cool completely (at least 1 hour) before stacking, and chill the assembled cake for 4+ hours. Use a candy thermometer to keep ganache between 90-110°F—this ensures proper setting. For extra stability, brush each layer with 1 tbsp apricot jam before adding ganache (this acts as a glue).
Can I make the buttercream ahead of time?
The buttercream can be made 3 days ahead and stored in an airtight container in the fridge. Bring it to room temperature before whipping again to restore fluffiness. For the ganache, prepare it up to 2 days ahead and reheat gently in a double boiler until smooth. The cake layers themselves can be baked and stored wrapped at room temperature for 2 days before assembly.
What’s the best way to transport this cake?
For short trips (1 hour or less), transport the assembled cake at room temperature on a sturdy cake board. For longer trips, keep it refrigerated in a cake carrier with a lid. If you’re worried about shifting, wrap the cake board with plastic wrap and secure it with a sturdy box. Never transport a cake that hasn’t been chilled for at least 4 hours—the ganache needs to be set to prevent mess.
Can I substitute buttercream for cream cheese frosting?
While possible, I don’t recommend it for this recipe. The light, airy texture of buttercream is essential for balancing the dense chocolate layers and rich ganache. Cream cheese frosting is heavier and would overwhelm the delicate structure. If you must substitute, use a lightened version (whipped cream + powdered sugar) and reduce the ganache by 20% to maintain balance.

- 12 Bean Chili Recipe: Hearty Slow-Cooked Depth With 12 Legumes - October 17, 2026
- 5 Seed Bread Recipe: Nutty Crunch and Artisan Flavor in One Loaf - October 17, 2026
- 1 Lb Macaroni Salad Recipe: Bold, Crunchy, and Crowd-Pleasing - October 17, 2026