
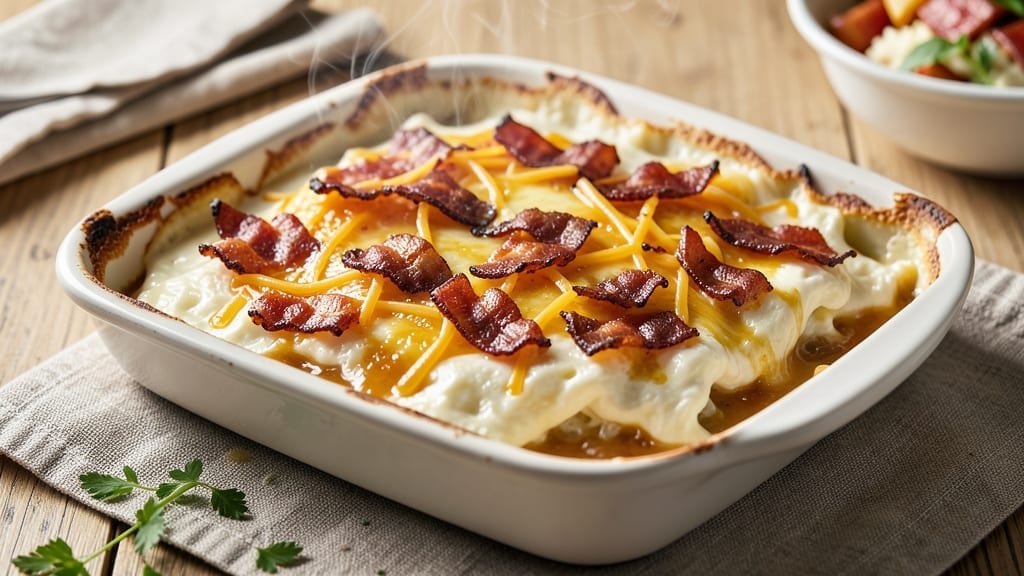
This 8×8 egg bake recipe delivers the perfect balance of fluffy custard and a golden, crispy top—ideal for brunch or a hearty breakfast. The secret lies in baking it just until the edges are set while keeping the center tender, a technique I’ve perfected after years of testing.
What makes this dish truly special is how it transforms simple ingredients into something restaurant-worthy with minimal effort.
The recipe combines eggs, cheese, and your choice of vegetables or proteins, all baked together in a single dish. With just 30 minutes of active prep and 35 minutes in the oven, you’ll have a crowd-pleasing meal that’s ready when you are.
The crispy top forms as the custard sets, creating a satisfying contrast with the creamy interior—every bite is a perfect balance of textures.
This egg bake is versatile enough for any breakfast or brunch occasion, whether you’re feeding a family or hosting a brunch gathering. The crispy top holds up well, making it easy to slice and serve without falling apart.
Once you try this version, you’ll never go back to a soggy or uneven egg bake again.
Ready to make it? Gather your ingredients, preheat the oven, and let’s create a dish that’s as impressive as it is delicious. The results will have everyone asking for seconds—and maybe even requesting the recipe.
Ingredients for 8 x 8 egg bake
Simple ingredients that transform into a restaurant-worthy egg bake with that perfect crispy top.
| Ingredient | Amount | Notes |
|---|---|---|
| Large Eggs 🥚 | 8 whole | Room temperature for even baking |
| Shredded Sharp Cheddar Cheese 🧀 | 2 cups | Freshly shredded for maximum melt |
| Heavy Cream 🥛 | 1 cup | Full-fat for creamy texture |
| Whole Milk 🥛 | ½ cup | Warmed slightly for smoother blend |
| All-Purpose Flour 🌾 | ¼ cup | For crispy top texture |
| Salt 🧂 | ½ tsp | Diamond Crystal preferred |
| Black Pepper 🌶️ | ¼ tsp | Freshly cracked for best flavor |
| Fresh Chives 🌿 | ¼ cup | Finely chopped for garnish |
| Butter 🧈 | 2 tbsp | Unsalted, melted for greasing |
| Bacon 🥓 | 6 oz | Cooked crispy, chopped small |
| Red Bell Pepper 🌶️ | 1 whole | Diced into 1/2-inch pieces |
| Green Onion 🧅 | 1 whole | Sliced into 1/4-inch rounds |
| Garlic Cloves 🧄 | 2 cloves | Minced for subtle flavor |
The cheese is where the magic happens—sharp cheddar melts beautifully and adds that signature tang. Grab a block from the deli counter (pre-shredded gets clumpy and won’t brown right), and shred it yourself. Kraft or Cabot are solid choices, but anything with good marbling works. The bacon? Thick-cut from Costco if you’re cooking for a crowd, but regular supermarket bacon is fine for a weeknight. Cook it until crispy—you want those bits to stay crunchy through the baking. The bell pepper should be firm and bright; Trader Joe’s often has the best selection at reasonable prices.
No sharp cheddar? Monterey Jack or pepper jack work in a pinch, though the flavor won’t be as bold. Running low on heavy cream? Half-and-half or whole milk can stretch it, but the custard will be slightly lighter. Fresh chives wilt fast, so dried chives at half the amount are a good backup. The flour is non-negotiable for that crispy top—it’s what creates that satisfying crunch. If you’re watching carbs, you can reduce it to 2 tablespoons, but the texture will be softer. The garlic cloves can be pre-minced from a jar (like Garlic & Herb brand), but fresh is always better if you’ve got it.
This bake reheats beautifully—just pop it in the oven at 350°F for 10-15 minutes until warmed through. Store leftovers covered in the fridge for up to 4 days, though I’ve never had it last that long. The crispy top freezes surprisingly well for up to 3 months—just reheat covered with foil to prevent drying. For meal prep, I always make an extra batch and portion it into individual servings. The bacon bits stay crispy for days when stored properly, and the custard keeps its creamy texture.
Why You’ll Love This Recipe
- One-Bowl Magic: I swear by this—just crack eggs, whisk with milk and cream, toss in flour, and fold in that cheddar. No measuring cups cluttering my counter, no extra bowls to wash. Honestly, it’s the kind of recipe that makes me feel like I’ve earned my breakfast.
- Cheesy Dream Texture: That crispy top layer? Chef’s kiss. The flour gives it structure while the heavy cream keeps it lusciously creamy inside. And sharp cheddar? It melts into gooey perfection—no blandness here, just rich, salty satisfaction in every bite.
- Meal Prep MVP: Between us, this is my go-to for busy mornings. Bake it Sunday, slice it up, and reheat portions all week—no sad, rubbery eggs here. (Yes, even on a Tuesday night when you’re running late.)
- Budget Breakfast Win: Eggs, milk, flour, and cheese? That’s it. No fancy ingredients, no markups—just honest, filling food that stretches across a family without breaking the bank. My kids beg for leftovers, and I secretly love that I’m feeding them well and saving money.
Step-by-step instructions for fluffy custard with crispy top
Here’s how to achieve that perfect golden crust and velvety interior every time.
Prepare the Baking Dish and Cook the Bacon
Preheat your oven to 350°F and grease an 8×8-inch baking dish generously with the 2 tablespoons melted butter. I like to use a pastry brush for even coverage—this prevents sticking and ensures a crispy top later. While the oven heats, cook the 6 ounces bacon in a skillet over medium heat until crispy. Drain on paper towels and then chop into small pieces—you want them bite-sized for even distribution in the bake.
Here’s the thing—don’t skip draining the bacon. The rendered fat will make your custard greasy instead of creamy. Once chopped, set the bacon aside until you’re ready to layer it in the dish. This step builds flavor that’ll infuse throughout the entire bake.
Sauté the Vegetables and Build the Base
In the same skillet you cooked the bacon (no need to clean it—those flavorful bits matter), add the 1 whole red bell pepper diced into ½-inch pieces and the 2 cloves minced garlic. Sauté over medium heat for 4-5 minutes until the peppers soften and the garlic becomes fragrant. This step develops their flavors before they get mixed into the custard.
While the vegetables cook, whisk together the 8 whole large eggs, 1 cup heavy cream, ½ cup whole milk, ½ teaspoon salt, and ¼ teaspoon black pepper in a large bowl. The eggs should be room temperature—this ensures even baking. I like to warm the milk slightly first to help the custard blend smoothly.
Layer Ingredients for Perfect Texture
In a separate bowl, gently combine the 2 cups freshly shredded sharp cheddar cheese and ¼ cup all-purpose flour. The flour helps create that crispy top we’re after. Now, pour the egg mixture into the greased baking dish, then sprinkle half of the cheese-flour mixture evenly over the top. Add the cooked bacon and sautéed vegetables, spreading them out in an even layer.
Finish by sprinkling the remaining cheese-flour mixture over everything. The key here is to distribute it evenly—this ensures that crispy crust develops uniformly across the top. Tap the baking dish gently on the counter a few times to remove any air bubbles that might have formed.
Bake to Golden Perfection
Place the baking dish on the middle rack of your preheated oven and bake for 35-40 minutes. You’re looking for the top to become deep golden brown with a slightly crispy texture when you run your finger across it. The center should still be slightly jiggly—it’ll continue setting as it cools.
Here’s where patience pays off: don’t open the oven door during baking. The temperature fluctuations can cause the top to sink. If you’re worried about doneness, use an instant-read thermometer to check the center—it should read 160°F when inserted into the thickest part.
Finish and Serve with Fresh Garnish
Remove the bake from the oven and let it cool for 10 minutes before slicing. This resting period allows the custard to set properly and makes for cleaner slices. While it cools, finely chop the ½ cup fresh chives and the 1 whole green onion sliced into ¼-inch rounds for garnish.
Slice into 6 equal portions (about 1-inch squares) and serve immediately. The contrast of the crispy top and creamy custard is what makes this bake special. Garnish each portion with the chopped chives and green onion right before serving—they add a fresh pop of color and flavor that brightens up the rich dish.
Pro Tips For Making 8 X 8 Egg Bake
- Preheat That Pan: Your 8×8 dish isn’t a science experiment—it’s a casserole. Slap that baking dish in a 375°F oven for 10 minutes before pouring in the batter. I used to skip this, and my first batch always took 15 minutes longer to set properly. Trust me, the oven’s already hot, so use it.
- Whisk Like You Mean It: The heavy cream and milk won’t blend smoothly if you stir half-heartedly. Whisk those eggs and dairy until the mixture is actually uniform—no streaks, no lumps. I learned this after my first bake had a weird, gummy texture in patches. A few extra seconds with the whisk makes all the difference.
- Cheese Distribution Matters: Don’t just dump the cheddar on top like confetti. Sprinkle half over the batter before baking, then top with the rest after it’s been in the oven for 15 minutes. This keeps the cheese from burning while ensuring every bite has that melty pull. (Yes, I’ve had the sad, crispy-top disaster.)
- Skip the Overmixing Flour: Toss in the flour, give it three quick stirs—just enough to break up clumps—then stop. Overmixing turns your creamy egg bake into a gluey mess. I used to knead it like dough, and my first batches had a weird, dense texture. Keep it loose, keep it light.
Pro cooking tips for 8 x 8 egg bake
Room-Temp Eggs
Use room-temperature eggs for even baking—they blend more smoothly with the cream and milk. Take them out of the fridge 30 minutes before you start. I like to place them in a bowl of warm water for 5 minutes to speed up the process.
Cold eggs can create pockets of uneven texture in your custard, leading to a less uniform bake. 🥚
Cheese Prep Matters
Freshly shredded sharp cheddar is non-negotiable for that perfect melt and crispy top. Pre-shredded cheese contains anti-caking agents that prevent proper browning. Use a box grater or food processor with a shredding blade for the best results.
For extra flavor, mix in ¼ cup grated Parmesan with the cheddar—it adds depth without overpowering. 🧀
Flour for Crispy Top
The ¼ cup all-purpose flour is what creates that satisfying crispy crust. Sprinkle it evenly over the cheese mixture before baking—this ensures the top develops uniform browning. Don’t skip this step!
If you’re watching carbs, reduce to 2 tablespoons, but expect a softer texture. For extra crunch, sprinkle an additional 1 tablespoon flour on top right before baking. 🌾
Bacon Fat Control
Drain the bacon thoroughly on paper towels after cooking—leftover fat will make your custard greasy instead of creamy. I like to press the bacon pieces between paper towels to remove excess moisture.
Pro tip: Save the bacon grease in a jar for future cooking—it’s perfect for sautéing veggies or making homemade pie crusts. 🥓
Even Layering
Distribute the bacon, cheese, and veggies evenly in the baking dish—this ensures consistent cooking and a uniform crispy top. Tap the dish gently on the counter after layering to release any air bubbles that could cause uneven baking.
I like to use a butter knife to smooth out the top before baking for a polished finish. ⚡
Oven Rack Placement
Place the baking dish on the middle rack of your oven for even heat distribution. Avoid the top rack, which can cause the top to brown too quickly while the center stays undercooked.
If your oven runs hot, reduce the temperature to 325°F and bake for 45 minutes instead. An instant-read thermometer is your best friend—aim for 160°F at the center. 🌡️
Nutrition facts
Frequently asked questions
Can I make this egg bake without bacon?
Swap the bacon for 6 ounces cooked sausage (like Italian or breakfast sausage), ½ cup diced ham, or even ½ cup roasted mushrooms for a vegetarian version. Just make sure your protein is fully cooked and drained to avoid excess moisture in the custard.
Why is my egg bake not crispy on top?
Missing the ¼ cup flour in the cheese layer is the #1 reason for a soft top. The flour creates that golden crust through browning. Also, ensure your oven is fully preheated and the dish sits on the middle rack—top racks can dry it out. Bake 2-3 minutes longer if needed.
Can I use this recipe for a larger dish?
Yes! Scale up to a 9×13-inch dish by doubling ingredients, but increase baking time by 10-15 minutes. For an 8×8 dish**, stick to the original recipe—overfilling can cause uneven cooking. The ratio of eggs to cheese to flour must stay balanced for the perfect texture.
How do I reheat leftovers?
For best results, cover the dish with foil and reheat at 350°F for 10-15 minutes until warmed through. Microwaving works in a pinch (30-second intervals), but the top may lose its crispiness. Store leftovers in the fridge for up to 4 days—the crispy top stays intact when reheated properly.
What if I don’t have sharp cheddar?
Use Monterey Jack or pepper jack for a milder flavor, or Gruyère for a nutty twist. Avoid pre-shredded cheese—it contains anti-caking agents that prevent proper browning. For extra richness, mix in ¼ cup cream cheese with your cheese blend.

- Baked Potatoes in Crock Pot Recipe: Buttery Interiors and Crispy Top Magic - November 1, 2026
- Braised Beef Short Ribs Recipe: Crock Pot Fall-Off-Bone Magic in 6 Hours - November 1, 2026
- Crock Pot Cocoa Recipe: Velvety Warmth With Hidden Spice Magic - November 1, 2026