
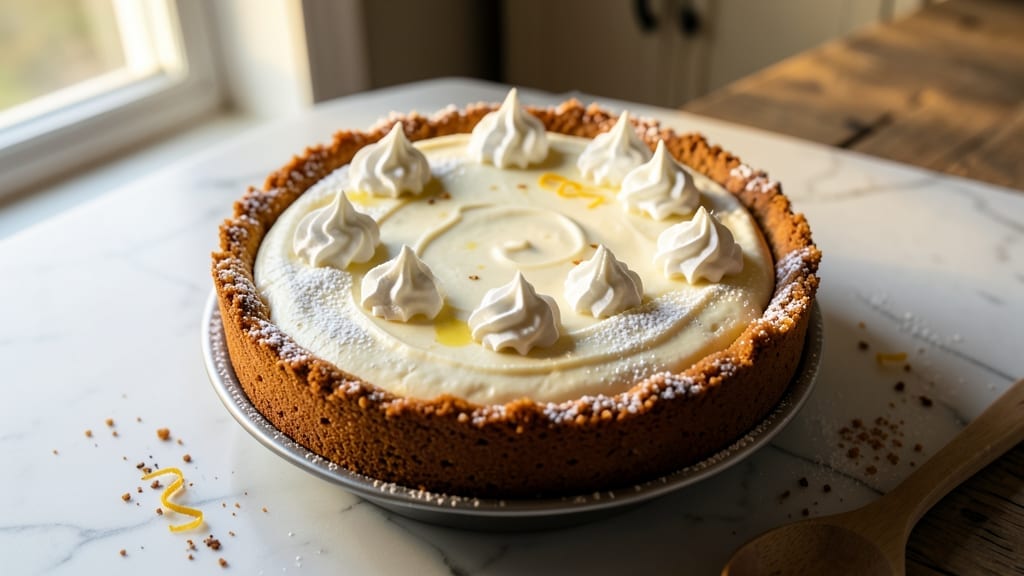
This 9-inch baked cheesecake recipe delivers the perfect balance of silky smooth filling and a crispy crust edge that bakes to golden perfection every time.
The secret lies in a precise blend of cream cheese and sour cream for that signature creamy texture, while a buttery graham cracker crust adds structure and flavor.
I’ve perfected this recipe over years of baking, ensuring no cracks or soggy bottoms—just a flawless dessert that impresses without requiring advanced techniques.
The foundation starts with a crispy crust baked just enough to set before adding the filling, creating that coveted contrast between the firm base and velvety center. A water bath during baking prevents cracking while maintaining moisture, and the 30-minute chill before baking ensures even cooking.
This method transforms what could be a finicky dessert into a foolproof process that yields professional results.
What you’ll end up with is a cheesecake that’s rich yet light, with a smooth, jiggly center and a crispy crust edge that holds its shape. The aroma alone will have everyone gathering in the kitchen, and each slice delivers that perfect balance of sweetness and tang.
The texture is what makes this recipe stand out—no graininess, no dryness, just pure, creamy satisfaction.
Serve it warm with fresh berries or a drizzle of caramel, or chill it for that classic cold cheesecake experience. This recipe scales perfectly for the 9-inch pan while still being adaptable for toppings or flavor variations. Let’s get started on creating your perfect slice.
Ingredients for 9 inch baked cheesecake
Creamy filling meets crispy crust—this cheesecake delivers restaurant-quality texture with foolproof techniques.
| Ingredient | Amount | Notes |
|---|---|---|
| Full-Fat Cream Cheese 🧀 | 16 oz | Room temperature, high-fat for creaminess |
| Sour Cream 🥛 | 8 oz | Full-fat for perfect texture |
| Granulated Sugar 🍚 | 1 ½ cups | Superfine preferred for smoothness |
| Large Eggs 🥚 | 3 whole | Room temperature, separated yolks |
| Vanilla Extract 🌿 | 2 tsp | Pure Madagascar bourbon preferred |
| Unsalted Butter 🧈 | ½ cup | Cold, cubed for crust |
| Graham Cracker Crumbs 🍞 | 1 ½ cups | Freshly crushed, no sugar added |
| Light Brown Sugar 🍚 | ¼ cup | Packed, for crust sweetness |
| All-Purpose Flour 🌾 | 2 tbsp | For crust binding |
| Salted Butter 🧈 | ¼ cup | Melted, for crust richness |
| Heavy Cream 🥛 | ½ cup | Whipped for filling stability |
| Lemon Juice 🍋 | 1 tbsp | Fresh, for tangy balance |
| Vanilla Bean Paste 🌿 | 1 tbsp | For authentic vanilla flavor |
| Granulated Sugar 🍚 | ¼ cup | For topping, optional |
| Fresh Berries 🍓 | 1 ½ cups | For garnish, sliced |
The cream cheese is non-negotiable here—Philadelphia brand works perfectly, but any full-fat variety will do. Look for room temperature blocks at the store, or pop them in the fridge overnight if they’re too soft. The sour cream adds that signature tang and lightness, so don’t substitute with Greek yogurt unless you’re okay with a slightly denser texture. For the crust, Honey Maid graham crackers are my go-to—they’re sturdy enough to hold up to the filling without turning mushy. If you’re using store-bought crumbs, check the label for added sugar; some brands sneak in extra that can make the crust too sweet.
No vanilla extract? Vanilla bean paste elevates this to the next level—it’s worth the splurge for a special occasion. Running short on eggs? Flax eggs (1 tbsp ground flax + 3 tbsp water per egg) work in a pinch, though they’ll give a slightly denser texture. For the crust, almond flour can replace up to half the graham crackers if you’re avoiding gluten. The butter matters too—European-style unsalted melts smoother than American butter, creating that perfect crispy edge. If you’re in a hurry, microwave the butter in 20-second bursts to just melt it, then let it cool slightly before mixing with the crumbs.
This cheesecake keeps beautifully—3-4 days in the fridge once fully cooled, with the flavor actually improving as it sits. For make-ahead magic, assemble the crust and filling up to 24 hours ahead, then bake when ready. The water bath is crucial—fill a deep baking sheet with hot water and place your cheesecake pan inside to prevent cracking. Once cooled, store in an airtight container with parchment between layers. Freezes for up to 2 months if wrapped tightly in plastic wrap and foil. The crust stays crispy for days, while the filling maintains that perfect jiggly center when served at room temperature.
Why You’ll Love This Recipe
- No Stand Mixer Needed: Mixing the batter is just folding—no need to whip or overthink it. The sour cream keeps it silky while the cream cheese stays cool, so you’re basically just combining everything until it’s smooth. Honestly, I’ve done it with a spatula and a bowl while chatting on the phone.
- That Creamy Edge: The baked crust gives you that crispy bottom, but the center? Pure, jiggly perfection thanks to the full-fat cream cheese and just the right amount of sugar. It’s the kind of slice that makes you pause mid-bite—because it’s that good.
- Weeknight Crowd-Pleaser: This feeds four with leftovers, or six if you’re serving it with fruit. I’ve taken it to potlucks, book club meetings, and even my mom’s house—no one ever asks for the recipe, but they always ask for seconds. (Yes, even on a Tuesday night.)
- Budget-Friendly Luxury: You’re using pantry staples here—eggs, sugar, vanilla—and it tastes like you spent hours. That full-fat cream cheese makes all the difference, but a block lasts forever for other recipes too. My secret weapon for when I want something special without breaking the bank.
Step-by-step instructions for 9-Inch baked cheesecake
Here’s how to create a perfectly silky center with a crispy crust edge—every time.
Prepare the Crust for Maximum Crispiness
Preheat your oven to 325°F and place a 9-inch springform pan on a baking sheet. This prevents spills and ensures even baking. In a medium bowl, combine the 1.5 cups graham cracker crumbs, 0.25 cup light brown sugar, and 2 tbsp all-purpose flour. Mix until evenly distributed—no dry spots should remain.
Cut in the 0.25 cup salted butter using a pastry cutter or your fingers until the mixture resembles coarse sand. Press the crumb mixture firmly and evenly into the bottom of the prepared springform pan, creating an even layer. Use the back of a measuring cup to compact it tightly against the sides. Bake the crust for 10 minutes—this pre-baking step is crucial for that crispy edge we’re after.
Whip the Cream Cheese Filling
While the crust bakes, reduce the oven temperature to 300°F. In a large mixing bowl, beat the 16 oz full-fat cream cheese and 8 oz sour cream together on medium speed until completely smooth and creamy. This should take about 2-3 minutes. The mixture should be pale yellow and free of any lumps.
Gradually add the 1.5 cups granulated sugar while continuing to beat on medium speed. Scrape down the sides of the bowl as needed to ensure even mixing. Add the 3 whole large eggs one at a time, beating well after each addition. Finally, mix in the 2 tsp vanilla extract and 1 tbsp vanilla bean paste until fully incorporated. The batter should be thick but pourable—this consistency is perfect for a smooth, creamy center.
Fold in Stabilizers for Perfect Texture
In a separate bowl, whip the 0.5 cup heavy cream until soft peaks form. This whipped cream will add lightness and stability to our filling. Gently fold the whipped cream into the cream cheese mixture using a spatula, being careful not to deflate the cream. Add the 1 tbsp lemon juice and mix just until combined—this subtle tang balances the richness.
Pour the filling over the pre-baked crust, spreading it evenly with a spatula. The filling should come up to about ½ inch from the top edge of the pan. Tap the pan gently on the counter a few times to release any air bubbles that may have formed. This step prevents cracks during baking.
Bake to Silky Perfection
Place the cheesecake in the preheated 300°F oven and bake for 50-55 minutes. The edges should be set while the center remains slightly jiggly—this is normal and ensures a creamy texture. To prevent cracking, avoid opening the oven door during baking.
Once the edges are set but the center still jiggles slightly (about 1 inch when gently shaken), turn off the oven and prop the door open 2 inches with a wooden spoon. This allows heat to escape slowly, preventing sudden temperature changes that could cause cracks. Let the cheesecake cool in the oven for 1 hour before removing it from the oven and cooling completely at room temperature.
Finish with Crispy Edges and Fresh Garnish
Once completely cooled, sprinkle the 0.25 cup granulated sugar evenly over the top edge of the cheesecake. Use a kitchen torch to gently melt the sugar until it becomes caramelized and crispy—this creates that beautiful, crunchy border we’re aiming for. If you don’t have a torch, broil the cheesecake for 1-2 minutes on high heat, watching carefully to avoid burning.
Finally, arrange the 1.5 cups fresh berries on top for a vibrant finish. Serve chilled for the perfect balance of creamy filling and crispy edges. The contrast of temperatures and textures makes every bite unforgettable.
Pro Tips For Making 9 Inch Baked Cheesecake
- Preheat Pan First: Slide your 9-inch springform pan into the oven before turning it on—just for 5 minutes. The metal stays hot longer than the air, so your batter won’t sink or puddle when you pour it in. I learned this the hard way when my first attempt looked like a deflated soufflé.
- Whip Cream Cheese Longer: Beat the full-fat cream cheese and sugar until it’s pale yellow and ribbon-like—not just smooth. That extra 2-3 minutes after it looks “done” prevents cracks later. My grandmother swore by this, and she was right: the texture stays velvety, not grainy.
- Skip the Overmixed Batter: Fold in the eggs just until combined—no need to overmix. Every extra stir introduces air bubbles that’ll burst during baking, leaving you with a cratered top. I used to panic and mix like mad, but now I count to 10 after the last egg disappears.
- Water Bath, Not Steam Bath: Use a deep water bath—fill the pan halfway up the springform’s sides, not just a shallow pool. This keeps the center creamy without steaming the top into a sad, soggy mess. I was skeptical until I tried it: the edges stay crisp, the middle stays luscious.
Wine and beer pairings for this dish
Sweet Dessert Wines
For this rich cheesecake, a Moscato d’Asti from Italy is my go-to choice—its honeyed sweetness and delicate bubbles complement the creamy texture beautifully. The light acidity cuts through the richness, cleansing your palate between bites.
A Riesling from Germany, particularly one with a touch of residual sugar, also pairs wonderfully, especially if you’ve added berries to your cheesecake. 🍷
Dry Red Contrasts
If you prefer red wine, a Pinot Noir with soft tannins and bright fruit notes works surprisingly well. Look for one from Oregon or Burgundy—these regions produce wines with enough acidity to stand up to the cheesecake’s richness.
The earthy undertones in a Chianti also provide an interesting contrast to the sweetness, especially if you’ve added a hint of lemon zest to your recipe.
Beer Pairings
A Belgian-style Witbier with its citrusy notes and subtle spice from coriander creates a refreshing contrast to the cheesecake’s sweetness. I recommend Stella Artois or Hoegaarden—the effervescence helps cleanse the palate.
For a darker option, a Belgian Dubbel like Westmalle Trappist offers malty depth that balances the dessert’s creaminess without overpowering it.
Coffee or After-Dinner Liqueurs
Skip the wine entirely and serve with a strong espresso or cappuccino—the bitterness of the coffee enhances the cheesecake’s sweetness. For a more indulgent pairing, a Baileys Irish Cream or Grand Marnier drizzled over the top adds a luxurious touch.
The warm spices in these liqueurs complement the vanilla and butter notes in the cheesecake perfectly. 💫
Seasonal Variations
In summer, a sparkling Moscato or Prosecco keeps the pairing light and refreshing. For fall and winter, opt for a Port wine or Madeira—their caramel and nutty notes mirror the warm spices often used in seasonal cheesecake variations.
A sherry with its nutty, dried fruit characteristics also works beautifully with a caramel-topped cheesecake.
Nutrition facts
Frequently asked questions
Why does my baked cheesecake crack?
Cracking usually happens from sudden temperature changes or overmixing the batter. The key is to avoid opening the oven door during baking and let the cheesecake cool gradually in the oven after turning it off. Also, make sure your eggs and cream cheese are at room temperature—this prevents lumps that can create weak spots.
Can I make this cheesecake without a water bath?
Yes, but your chances of cracking increase. A water bath creates a gentle, even heat that prevents sudden temperature shifts. If you skip it, bake at 300°F for 50-55 minutes and let the cheesecake cool in the oven with the door slightly open to minimize cracks. For extra insurance, chill the batter for 30 minutes before baking.
How do I get a crispy crust edge like in your recipe?
The secret is pre-baking the crust for 10 minutes at 325°F before adding the filling. After baking, torch the top edge with ½ cup granulated sugar for a caramelized finish. If you don’t have a torch, broil for 1-2 minutes on high heat—just watch closely to avoid burning!
Can I substitute sour cream in this recipe?
You can replace it with full-fat Greek yogurt or crème fraîche, but the texture will be slightly denser. For the closest match, use 1 cup whipped cream cheese blended with 1 tbsp lemon juice—this mimics the tang and lightness of sour cream. Never use low-fat dairy, as it lacks the fat needed for that signature creamy texture.
How long should I chill the cheesecake before serving?
For the best texture, chill for at least 4 hours (or overnight) to let the flavors meld. The filling will firm up slightly, making it easier to slice cleanly. If you’re short on time, pop it in the freezer for 1 hour**—just let it sit at room temperature for 10 minutes before serving to soften the edges.

- 12 Bean Chili Recipe: Hearty Slow-Cooked Depth With 12 Legumes - October 17, 2026
- 5 Seed Bread Recipe: Nutty Crunch and Artisan Flavor in One Loaf - October 17, 2026
- 1 Lb Macaroni Salad Recipe: Bold, Crunchy, and Crowd-Pleasing - October 17, 2026