
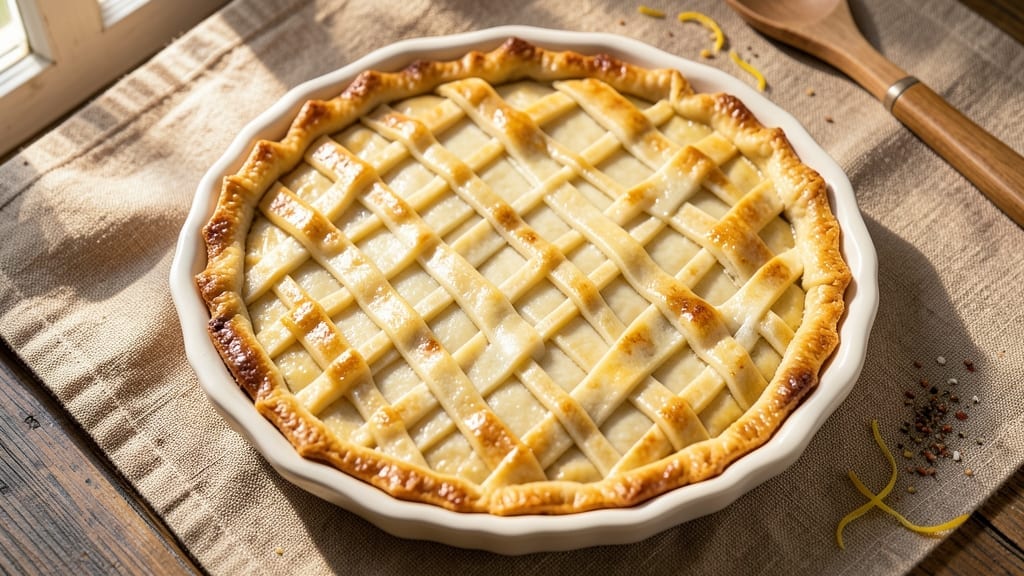
A 9-inch butter pie crust with layers so flaky they practically melt in your mouth is the foundation every great pie deserves. This recipe delivers the perfect balance of crispness and tenderness, ensuring your crust shines through even the richest fillings.
The secret lies in cold butter and gentle handling—no overworking, no shortcuts, just pure, buttery perfection that takes just 20 minutes of active time.
Professional bakers swear by this method because it works every time: chilled butter cut into flour creates pockets of steam that puff the crust into delicate, feather-light layers.
We’ll guide you through rolling the dough to the right thickness, fitting it seamlessly into your pie dish, and baking it until golden—without shrinking or cracking. The result? A crust so impressive, no one will guess it’s homemade.
Once baked, this crust becomes a blank canvas for your favorite fillings—whether it’s a classic apple lattice, velvety chocolate ganache, or even savory options like spinach and cheese. The flaky layers stay crisp at the edges while remaining tender enough to cut through with a fork.
No more soggy bottoms or tough crusts—just restaurant-quality results you can achieve at home.
Ready to elevate your pies? This recipe includes troubleshooting tips for common issues like cracking or shrinking, plus variations for extra-buttery or gluten-free crusts. Let’s get started on the foundation that makes every pie unforgettable.
Ingredients for 9 inch butter pie crust
Five ingredients transform into the perfect flaky pie crust foundation for any filling.
| Ingredient | Amount | Notes |
|---|---|---|
| All-Purpose Flour 🌾 | 2 ½ cups | Sifted for light texture |
| Unsalted Butter 🧈 | 1 cup | Cold, cubed into 1/2-inch pieces |
| Ice Water 💧 | ⅓ cup | Chilled for dough cohesion |
| Diamond Crystal Kosher Salt 🧂 | ½ tsp | Fine grain preferred |
| Granulated Sugar 🍚 | 2 tbsp | For subtle sweetness |
The butter is non-negotiable here—European-style unsalted butter like Plugrá or Land O’Lakes has higher fat content, which translates to extra flakiness. Buy it when it’s on sale at Costco or Whole Foods—just make sure the package says ‘82% fat’ or higher. Keep those butter cubes frozen until you’re ready to mix, then let them thaw just enough to hold their shape. Flour matters too: King Arthur or Gold Medal brands are my go-to for consistent results. The ice water is your secret weapon—it keeps the dough from sticking and helps create those signature flaky layers.
No ice water? Freeze a small ice cube tray for 10 minutes before using. Running short on butter? Lard or coconut oil can work in a pinch, but the flavor won’t be quite the same. The sugar is optional but worth it—it caramelizes slightly during baking, adding just enough sweetness to balance savory fillings. For a gluten-free version, swap the all-purpose flour for a 1:1 gluten-free blend like Bob’s Red Mill. If you’re baking in a humid climate, chill your dough for an extra 30 minutes before rolling—it prevents shrinking when it hits the oven.
Wrapped in plastic wrap, this dough keeps in the fridge for up to 4 days—perfect for meal prep. For longer storage, freeze the dough ball for up to 3 months. Thaw overnight in the fridge before using. Pro tip: Roll the dough between two sheets of parchment paper to prevent sticking, and always keep your rolling pin chilled. The crust bakes best at 375°F for 18-22 minutes—just until it’s golden. Let it cool for 10 minutes before filling to prevent sogginess.
Why You’ll Love This Recipe
- Foolproof First Try: I’ve made pie crusts fail spectacularly—this one actually works the first time. Cold butter cut into flour with ice water? That’s the magic. No overworking, no stress, just a buttery lattice or pie shell that holds together like it’s been baked by a pro.
- Buttery Bliss: That moment when you pull a golden crust from the oven? The flaky layers, the sugar-kissed edges—it’s the kind of taste that makes you forget about store-bought shortcuts. The butter-to-flour ratio here is spot-on for that perfect melt-in-your-mouth texture.
- Party-Ready Base: Need a last-minute dessert for guests? This crust is your secret weapon. It’s the foundation for pies, tarts, or even savory galettes. Honestly, I’ve used it for everything from classic apple pie to a sweet potato galette, and it never lets me down.
- Budget-Friendly Staple: Five ingredients, zero waste. You’re already using flour and butter for other recipes—this just repurposes them into something extraordinary. Plus, leftovers? Freeze them for months. It’s the kind of recipe that saves money and time without sacrificing quality.
Step-by-step instructions for a perfect 9-Inch butter pie crust
This method delivers restaurant-quality flakiness every time—no shortcuts, just science-backed technique.
Combine Dry Ingredients for Optimal Texture
In a large mixing bowl, whisk together the 2.5 cups all-purpose flour, 0.5 teaspoon diamond crystal kosher salt, and 2 tablespoons granulated sugar. This dry blend is your foundation, and sifting isn’t strictly necessary here, but I like to give it a quick pulse with a fork to break up any flour clumps. The sugar adds just enough sweetness to complement fruit fillings while helping develop those delicate layers.
Here’s the thing—those ½ teaspoon salt and 2 tablespoons sugar might seem small, but they play crucial roles. The salt enhances flavor, while the sugar creates a subtle caramelization during baking that adds depth to the crust’s character. Don’t skip either, even if your filling is sweet.
Cut in the Cold Butter for Maximum Flakiness
Add the 1 cup unsalted butter, cut into ½-inch cubes, to the flour mixture. Using a pastry cutter or your fingers, work the butter into the flour until you achieve pea-sized crumbs with some flour-coated butter pieces remaining. This is critical—those remaining butter pieces create steam pockets during baking, which is what gives you that signature flakiness.
I press down gently on the butter pieces during the first minute—this prevents them from melting into the flour too quickly. You’re aiming for a texture that resembles coarse cornmeal with visible butter chunks. If the mixture starts to look like wet sand, you’ve overworked it. The butter should still be cold to the touch when you’re done.
Add Ice Water Gradually for Perfect Dough Cohesion
With a fork or small spoon, begin adding the ⅓ cup ice water, 1 tablespoon at a time, mixing gently after each addition. The water should be ice cold—this prevents the butter from melting too quickly. You’re looking for the dough to just come together when pressed, but not so much that it becomes sticky. It should hold when you press it lightly with your fingers but still feel slightly crumbly.
This is where patience pays off. If you add the water too quickly, you’ll end up with a tough crust. If it’s too dry, the crust will crack during baking. The dough should gather into a shaggy mass that can be pressed into a disk. Don’t be tempted to add extra water—this dough needs to be just barely together, not fully cohesive like pie dough should be.
Chill the Dough for Easier Handling
Wrap the dough tightly in plastic wrap and refrigerate for at least 1 hour (up to 2 days). This chilling period is non-negotiable—it firms up the butter, prevents the crust from shrinking during baking, and makes rolling out much easier. I like to flatten it into a disk about ½-inch thick before wrapping to maintain a consistent shape.
Real talk: Skipping this step is how most home bakers end up with tough, dense crusts. The cold butter creates those beautiful, airy layers when it melts during baking. If you’re in a hurry, you can chill it for 30 minutes in the freezer, but I find the refrigerator gives more even chilling.
Roll and Fit the Crust with Precision
On a lightly floured surface, roll the chilled dough into a 9-inch circle, about ⅛-inch thick. I use a 9-inch pie plate as my guide, rolling the dough slightly larger than the plate’s diameter so it has enough to hang over the edges. Keep rotating the dough as you roll to prevent it from becoming uneven or sticking.
Gently transfer the rolled crust to your prepared pie dish. Here’s a pro tip: I like to use a rolling pin to help guide it in, then carefully tuck the overhang under itself to create a neat edge. Press the bottom crust firmly into the dish, especially the edges, to prevent shrinking during baking. The crust should fit snugly but not be forced—if it tears, patch it with extra dough.
Pro Tips For Making 9 Inch Butter Pie Crust
- Cut Butter Cold: DESCRIPTION: Take the butter straight from the fridge—no thawing, no softening—because cold butter creates flaky layers that warm butter just can’t match. I used to rush this step and wondered why my crust never held together like the ones in baking magazines. Trust me, the fridge is your friend here.
- Pulse, Don’t Overmix: DESCRIPTION: Work the dough just until it comes together—no more. Overmixing develops gluten, and that’s the fast track to a tough, chewy crust. I learned this the hard way after making a batch that tasted more like bread than pastry. Stop when the dough clumps when pressed, even if it looks uneven.
- Roll Evenly, Not Perfectly: DESCRIPTION: Use a rolling pin to press the dough into the pie dish, then lift and re-roll the edges to smooth them out. It won’t be Instagram-worthy, but an even thickness cooks uniformly and prevents soggy spots. My grandmother swore by this, and she was right: consistency matters more than looks.
- Blind-Bake for 15 Minutes: DESCRIPTION: Cover the crust with parchment, fill it with pie weights or dried beans, and bake for 15 minutes before adding your filling. This pre-baking step prevents a gummy crust—something I skipped for years until I finally got tired of my fillings swimming in butter. Yes, it’s an extra step, but it’s worth it.
Serving suggestions for this dish
Classic Dessert Pairings
This buttery crust shines with apple pie—sliced Granny Smith apples tossed with cinnamon and sugar create the perfect contrast to the flaky layers. For a richer option, try chocolate cream pie with a velvety ganache filling.
I also love pecan pie where the crust’s crispness balances the gooey pecan filling. 🍏
Savory Options
Don’t limit this crust to sweets! A spinach and cheese pot pie with a creamy filling becomes a showstopper. For something heartier, try a sausage and mushroom galette—the crust holds up beautifully to savory ingredients. The flaky texture works perfectly with quiche Lorraine too. 🧀
Garnishes That Elevate
Before baking, brush the crust with egg wash for a golden finish. After baking, sprinkle with flaky sea salt or coarse sugar for texture. A dusting of powdered sugar adds elegance to fruit pies, while toasted nuts (like pecans or walnuts) bring crunch to custard pies. 🌟
Serving Style Tips
For a rustic look, serve pies straight from the oven with a dollop of vanilla ice cream or whipped cream. For a more formal presentation, chill the pie for 2 hours before slicing—this makes clean cuts and prevents crumbling.
Use a sharp serrated knife and dip it in hot water between slices. ✨
Make-Ahead Serving
Bake the crust ahead of time and store it in an airtight container at room temperature for 2 days or freeze for 3 months. Reheat blind-baked crusts at 350°F for 10 minutes before adding fillings. For pies, assemble and refrigerate overnight—this lets flavors meld beautifully. 📅
Nutrition facts
Frequently asked questions
Why does my butter pie crust turn out tough instead of flaky?
The most common cause is overworking the dough or using warm butter. Keep your butter cold and work it into the flour just until pea-sized crumbs remain—no more! Also, avoid adding extra water, as this develops gluten and creates a tough texture. If your kitchen is warm, chill the dough longer (up to 2 hours) before rolling.
Can I make this crust without a food processor?
Use your fingers or a pastry cutter to cut the butter into the flour until you get pea-sized crumbs. Work quickly and keep everything cold—this prevents the butter from melting and losing its flakiness. The manual method just requires a little more elbow grease and patience, but the results are just as delicious.
How do I prevent my crust from shrinking in the oven?
Chilling the dough thoroughly is key, but also ensure your pie dish is properly prepared. Place the crust in a 375°F oven for 10 minutes before adding filling (blind-bake). This sets the shape. For extra insurance, press the edges firmly against the dish and tuck the overhang under itself before baking. Avoid overfilling—leave at least ½-inch headspace.
What’s the best way to store leftover crust?
Wrap baked crust tightly in plastic wrap or aluminum foil and store at room temperature for 2 days. For longer storage, freeze it for up to 3 months. To reheat, place in a 350°F oven for 10-15 minutes until warmed through. Thaw frozen unbaked dough in the fridge overnight before using—never at room temperature.
Can I use this crust for a double-crust pie?
Yes, but make two dough balls instead of one. Roll the first crust as directed, then chill the second dough ball separately. After adding your filling, roll the top crust and place it on the pie. Trim and crimp the edges, then cut slits for steam to escape. Brush with egg wash before baking for a beautiful golden finish.

- Baked Potatoes in Crock Pot Recipe: Buttery Interiors and Crispy Top Magic - November 1, 2026
- Braised Beef Short Ribs Recipe: Crock Pot Fall-Off-Bone Magic in 6 Hours - November 1, 2026
- Crock Pot Cocoa Recipe: Velvety Warmth With Hidden Spice Magic - November 1, 2026