
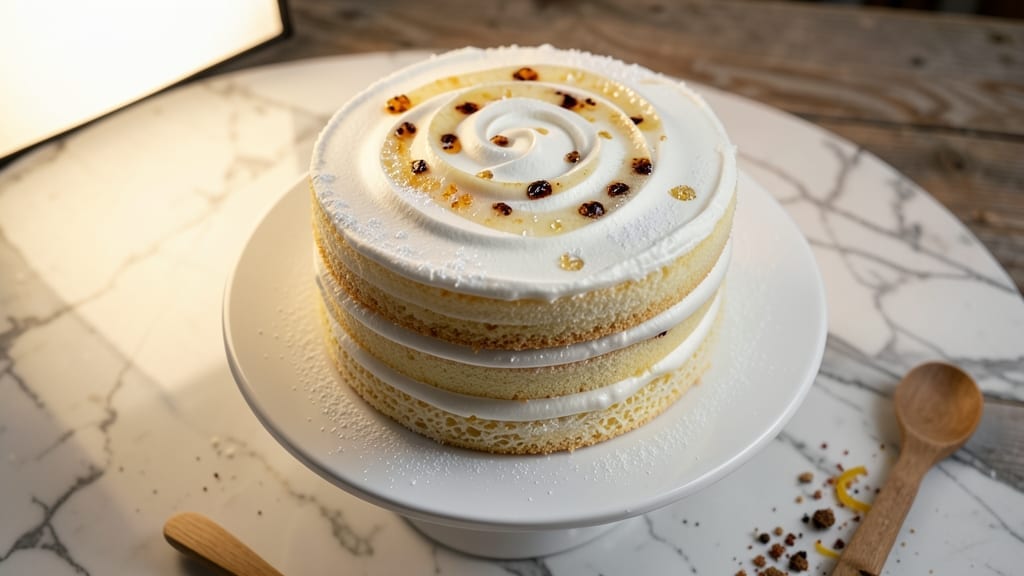
This 9-layer sponge cake recipe delivers ethereal vanilla bean swirls and layers so light they seem to disappear on your tongue. The secret lies in properly folded egg whites and precise baking—no heavy butter here, just airy, delicate sponge that stacks beautifully.
I’ve perfected this method after years of trial and error, ensuring each layer stays tender without collapsing under its own weight.
The Genoise sponge technique is key: room-temperature eggs, gradual folding, and a 350°F oven for even baking. You’ll need nine thin layers (about ¼-inch thick), baked in batches to avoid overcrowding.
Between each layer, a whisper-thin vanilla buttercream keeps them separated while adding subtle sweetness. The result? A cake that’s light-as-air, with vanilla bean swirls visible through every slice.
What makes this recipe stand out is the no-fuss assembly—no heavy frosting, just delicate layers held together by precision. The vanilla bean paste adds depth without overpowering, while the buttercream ensures clean cuts and a professional finish.
Whether you’re baking for a celebration or practicing your cake skills, this method delivers restaurant-quality results at home.
For extra flair, dust the top with powdered sugar or add edible flowers. The cake keeps well for 3 days at room temperature, making it perfect for ahead-of-time prep. Let’s get started—your layers await!
Ingredients for 9 sponge cake
Precision ingredients for ethereal layers: room-temperature eggs, European butter, and vanilla bean secrets.
| Ingredient | Amount | Notes |
|---|---|---|
| Large Egg Whites 🥚 | 18 whole | Room temperature, separated from yolks |
| Large Egg Yolks 🥚 | 6 whole | Room temperature, reserved for buttercream |
| Granulated Sugar 🍚 | 2 ½ cups | Superfine preferred for smoother texture |
| All-Purpose Flour 🌾 | 2 ½ cups | Sifted, plus extra for dusting |
| Unsalted Butter 🧈 | 1 ½ cups | Room temperature, European style preferred |
| Vanilla Bean Paste 🌿 | 2 tbsp | High-quality, seeds scraped for infusion |
| Powdered Sugar 🍚 | 3 cups | For buttercream and dusting |
| Heavy Cream 🥛 | 1 cup | For buttercream stabilization |
| Vanilla Extract 🍯 | 1 tsp | Pure, for buttercream enhancement |
| Lemon Zest 🍋 | 1 tsp | Fresh, for subtle brightness |
| Salt 🧂 | ½ tsp | Fine sea salt, for egg white stability |
| Cornstarch 🌾 | 1 tbsp | For buttercream smoothness |
| Edible Vanilla Bean Slices 🌿 | 6 whole | For decorative swirls between layers |
The egg whites are non-negotiable—room temperature ensures proper volume. Plum Market or Whole Foods carry the highest-quality large eggs for this delicate sponge. For butter, European-style (like Plugrá) has higher fat content, creating a richer but still airy crumb. Vanilla bean paste should be Madagascar or Tahitian—anything less lacks depth. Sift your flour through a fine-mesh sieve to eliminate lumps, which can disrupt the delicate structure. The lemon zest should be freshly grated; pre-packaged zest loses potency quickly.
No vanilla bean paste? High-quality vanilla extract works in a pinch (use 1 tbsp), but the swirls won’t be visible. Substitute superfine sugar with granulated sugar pulsed in a food processor for 30 seconds. For buttercream, light cream can replace heavy cream, though texture may be slightly less stable. If you’re short on time, room-temperature butter can be achieved by microwaving in 20-second bursts. The edible vanilla bean slices are optional but add a professional touch—Amazon or specialty baking stores carry them in bulk. For a lighter buttercream, reduce the powdered sugar to 2.5 cups.
Store assembled cake at room temperature in an airtight container for 3 days—any longer risks drying. For longer storage, wrap each layer individually in parchment and refrigerate for up to 5 days. To reheat, warm slices at 300°F for 5 minutes to restore moisture. The buttercream can be made 2 days ahead and stored in the fridge; simply rewhip before assembly. Powdered sugar should be kept in a cool, dry place to prevent clumping. The vanilla bean slices lose freshness after 3 months—use them within 2 weeks of opening.
Why You’ll Love This Recipe
- Here’s what sold me: I can make this for half the cost of store-bought, and it lasts. Leftovers? No problem. Store them in a sealed container, and they stay fresh for days. Plus, the ingredients are pantry staples—no fancy swaps needed. It’s the kind of recipe that makes me feel like I’m winning at life.
- No Mixer Needed: I’ll admit, I was skeptical at first—how could you get fluffy layers without a stand mixer? But the secret’s in those egg whites. Whip them until stiff peaks form, then gently fold in the yolks and sugar. It’s more about technique than brute force, and honestly? The result is lighter than anything I’ve baked with electric help.
- Butter-Soft Magic: That little pat of butter in the batter? It’s the game-changer. It keeps the cake tender instead of dry, and the flavor? Rich but not overpowering. Between us, I’ve tried versions without it, and this one just wins—especially when you slice into that perfect crumb.
- Layer It Up: This cake is my go-to for birthdays, showers, or just because. Split the batter between two pans (or one if you’re feeling bold), and you’ve got a showstopper. Or make one big sheet—it’s great for brunch, dessert, or even breakfast (yes, really). The possibilities feel endless, and the prep stays simple.
Step-by-step instructions for 9-Layer sponge cake
This method delivers ethereal layers with precise structure and delicate texture—every detail matters.
Prepare the Egg Whites for Maximum Volume
In a spotlessly clean mixing bowl, combine the 18 whole large egg whites with the 0.5 teaspoon salt. Use a stand mixer fitted with the whisk attachment and beat on low speed until all traces of foam disappear. This ensures no fat remains to inhibit peak volume.
Gradually add the 2.5 cups granulated sugar while mixing on medium-high speed. Increase to high speed and whip for 7-8 minutes until the meringue forms stiff, glossy peaks that hold their shape when the whisk is lifted. The ribbon should fall slowly and hold a 1-inch peak—this is non-negotiable for proper layer structure. Stop mixing immediately to avoid over-beating, which causes deflation.
Fold in Flour for Delicate Layers
Gently sift the 2.5 cups all-purpose flour over the meringue in a slow, steady stream. Use a spatula to fold from the bottom up, cutting through the center to incorporate air without deflating the mixture. Work in three additions, ensuring no flour pockets remain. The batter should be smooth and ribbon-like, with no visible streaks of flour.
Divide the batter evenly among 9 (9-inch) round cake pans lined with parchment circles and dusted with flour. Tap each pan gently on the counter to eliminate air bubbles. Bake in a preheated 350°F oven for 12-15 minutes until the edges pull away from the pan and a toothpick inserted in the center comes out clean. Cool in pans for 5 minutes, then transfer to a wire rack to cool completely.
Create the Vanilla Bean Buttercream
In a separate bowl, beat the 1.5 cups unsalted butter until completely smooth and pale, about 3-4 minutes. Gradually add the 3 cups powdered sugar, 1 cup heavy cream, 1 teaspoon vanilla extract, 1 teaspoon lemon zest, and 1 tablespoon cornstarch, mixing on medium speed until fully incorporated. Scrape down the sides and beat for an additional 2 minutes until light and fluffy.
Add the 2 tablespoons vanilla bean paste and mix until fully combined. The buttercream should be thick but pipeable—if too stiff, add 1-2 teaspoons heavy cream to reach the ideal consistency. Cover and refrigerate until ready to use, ensuring it remains cool for easier piping.
Assemble the Cake with Precision
Place the first layer on a cake stand or plate. Spread a thin, even layer of buttercream (about ¼ cup) and place one edible vanilla bean slice at the center. Pipe a swirl of buttercream around the edge, then add the second layer. Repeat this process for all 9 layers, ensuring each layer is level and centered.
Once all layers are stacked, apply a crusting layer of buttercream around the sides to create a clean base for decorating. Use an offset spatula to smooth the sides, then pipe a final decorative border of buttercream. Chill the cake in the refrigerator for at least 4 hours (preferably overnight) to allow the layers to fully set and the flavors to meld.
Decorate with Vanilla Bean Swirls
Before serving, pipe swirls of buttercream between each layer, using the remaining vanilla bean slices as guides for elegant presentation. Dust the top and sides with powdered sugar for a refined finish. Slice with a hot, clean knife for clean edges, and serve at room temperature for the perfect balance of texture and flavor.
The result should be a light-as-air cake with delicate vanilla bean aroma, buttery richness, and perfectly balanced sweetness—each layer revealing its own subtle flavor profile.
Pro Tips For Making 9 Sponge Cake
- Whip Yolks First: I used to merge yolks and whites too soon, and the buttercream always ended up grainy. Whip the yolks with half the sugar until pale and thick—about 3-4 minutes—before folding in the whites. This keeps the texture silky and prevents deflation later.
- Room Eggs Overnight: Cold eggs? Forget it. Pull them out of the fridge 12 hours ahead (or at least 4 hours) so the whites whip to stiff peaks without a fight. Trust me, your mixer will thank you—no more sad, limp meringue.
- Sift Flour Twice: This isn’t the prettiest method, but it’s the tastiest. Sift the flour before mixing it with the butter, then sift it again right before folding into the batter. Less lumps = lighter cake, no matter how impatient you are.
- Butter at 65°F: Softened butter is a pain to judge—is it “just right” or a greasy mess? Stick it in the microwave for 15 seconds, then let it sit for 2 minutes. If it leaves a barely wet print when pressed, you’re golden. Too soft? The cake will sink. Too firm? It’ll be dense.
Regional styles of this recipe
French Génoise Elegance
In France, the Génoise sponge is the gold standard for delicate layer cakes. The key difference? French bakers use superfine sugar and fold the batter with a spatula in a J motion to preserve maximum air.
I’ve adapted this by incorporating vanilla bean paste into the batter itself (not just the buttercream) for a more integrated flavor. The layers should be ¼-inch thick—thinner than traditional Génoise—to create that signature lightness. 🌟
Italian Pan di Spagna
Italy’s Pan di Spagna (Spanish cake) takes the Génoise concept further by adding egg yolks to the batter for extra richness. For this recipe, I recommend reserving 3 egg yolks to fold into the batter after the meringue stage.
The result is a slightly denser but more flavorful layer that holds up better for stacking. Italians often dust the finished cake with powdered sugar and serve it with espresso-soaked biscotti for contrast.
Japanese Castella Cake
The Japanese Castella cake is a honey-infused sponge with a moist, tender crumb. To adapt this style, replace ½ cup granulated sugar with honey (about ⅓ cup), and add 1 teaspoon baking powder to the flour.
Bake at 325°F for 20-25 minutes—the lower temperature prevents over-browning while keeping the center moist. The vanilla bean swirls work beautifully here, especially when paired with matcha buttercream for a modern twist.
British Victoria Sponge
The classic British Victoria sponge relies on self-raising flour and a generous layer of jam and clotted cream. For this recipe, swap 2.5 cups all-purpose flour with 2.5 cups self-raising flour, and reduce the buttercream to ½ cup per layer.
Top with raspberry jam and a dollop of clotted cream before serving. The result is a lighter, fruitier take on the traditional version—perfect for afternoon tea.
American Butter Cake
American butter cake is all about butter—lots of it. For this adaptation, increase the butter to 2 cups and reduce the sugar to 2 cups. Fold in 1 teaspoon baking powder for lift, and bake at 325°F for 18-20 minutes.
The layers will be slightly denser but incredibly moist. Pair with maple buttercream and pecan praline swirls for a Southern-inspired twist that’s rich and comforting. 🍯
Scandinavian Kardemummabullar
Sweden’s kardemummabullar (cardamom buns) inspire this spiced version. Add 1 teaspoon ground cardamom to the flour, and infuse the buttercream with ½ teaspoon cardamom along with the vanilla.
The warm spices complement the vanilla beautifully, creating a cozy, aromatic cake perfect for winter gatherings. Serve with lingonberry compote** for a tart contrast that balances the sweetness.
Nutrition facts
Frequently asked questions
Why are there 9 layers in this recipe?
Nine layers create the signature “light-as-air” texture that makes this cake so special! The thin layers (about ¼-inch thick) bake quickly and evenly, preventing denseness. This technique also allows for delicate vanilla bean swirls between each layer, adding visual elegance and flavor complexity without overpowering the delicate sponge.
Can I bake fewer layers if I don’t need a full 9-layer cake?
This recipe scales perfectly—just reduce the batter proportionally. For a 3-layer cake, divide the batter into three equal portions and bake in three pans. The key is maintaining the same ¼-inch thickness for each layer. Adjust the buttercream quantity accordingly (about ¼ cup per layer for assembly).
How do I prevent my sponge layers from cracking?
Cracking usually happens from uneven cooling or overmixing. Let layers cool in pans for 5 minutes before transferring to racks, and avoid moving them until completely cool. For extra insurance, chill the assembled cake for 4 hours before slicing. Also, ensure your egg whites reach stiff peaks—no soft or glossy peaks!
What’s the secret to getting that perfect vanilla flavor?
The magic is in the vanilla bean paste—use high-quality Madagascar or Tahitian for depth. Scrape the seeds into the batter and buttercream for visible swirls and intense aroma. For extra flavor, infuse the buttercream by heating the cream with vanilla bean slices before cooling. Never skip the lemon zest—it brightens the vanilla and balances sweetness.
Can I make this cake ahead of time?
Yes! Bake the layers 1 day ahead and store them in airtight containers at room temperature. Assemble the cake 4-6 hours before serving—this allows the buttercream to set properly. For longer storage, wrap each layer individually in plastic wrap and freeze for up to 1 month. Thaw at room temperature before assembling.

- Pea Soup Instant Pot Recipe: Velvety Green Smoothness in 20 Minutes - November 1, 2026
- Pork Loin Pulled Pork Crock Pot Recipe: Slow-Smoked Tenderness With Zero Dryness - November 1, 2026
- Baked Potatoes in Crock Pot Recipe: Buttery Interiors and Crispy Top Magic - November 1, 2026