
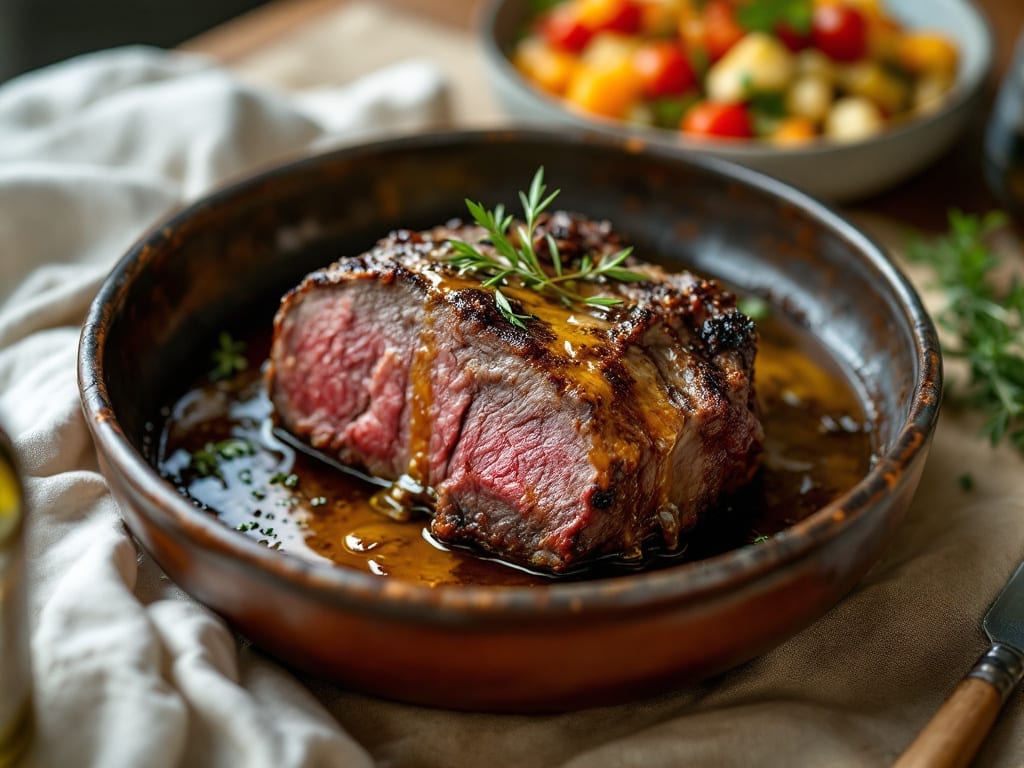
Transforming a tough cut of beef into melt-in-your-mouth perfection requires patience, and this crock pot beef chuck shoulder cross rib roast delivers exactly that. The slow-cooking process breaks down tough fibers while building deep, savory flavors that infuse every bite.
I’ve perfected this method over years of testing, ensuring the result is tender enough to fall apart with minimal effort.
The secret lies in the preparation: searing the roast first creates a flavorful crust that locks in juices during cooking. A simple blend of salt, pepper, and garlic powder enhances the beef’s natural richness without overpowering it.
Once in the crock pot, the low-and-slow method—typically 6-8 hours on low heat—transforms the meat into succulent slices that practically dissolve on the tongue.
What you’ll achieve is a dish that’s restaurant-quality yet effortless, with a rich, caramelized surface and moist, tender meat throughout. The crock pot method ensures even cooking and minimal cleanup, making this ideal for weeknight dinners or meal prep.
Serve with roasted vegetables or crusty bread to soak up every last bit of that flavorful cooking liquid.
This recipe works equally well in a standard oven if you prefer, though the crock pot maintains consistent moisture. The internal temperature should reach 145°F for medium-rare—use a meat thermometer for precision.
Whether you’re feeding a family or planning leftovers, this method guarantees a dish that’s both impressive and foolproof.
Ingredients for beef chuck shoulder cross rib roast crock pot
Six core ingredients transform tough beef into restaurant-quality tenderness through slow-cooked alchemy.
| Ingredient | Amount | Notes |
|---|---|---|
| Beef Chuck Shoulder Cross Rib Roast 🥩 | 4 lb | Bone-in preferred, trimmed of excess fat |
| Kosher Salt 🧂 | 2 tbsp | Diamond Crystal preferred for texture |
| Freshly Ground Black Pepper 🌶️ | 1 ½ tsp | Coarsely cracked for even distribution |
| Garlic Powder 🧄 | 2 tsp | Freshly toasted for deeper flavor |
| Extra-Virgin Olive Oil 🫒 | 2 tbsp | For high-heat searing |
| Yellow Onion 🧅 | 1 whole | Quartered, skin on for aroma |
| Carrots 🥕 | 4 whole | Whole, unpeeled for texture |
| Celery Stalks 🥬 | 3 whole | Trimmed, cut into 2-inch pieces |
| Beef Broth 💧 | 2 cups | Low-sodium, homemade preferred |
| Dry Red Wine 🍷 | 1 cup | Cabernet Sauvignon or Merlot |
| Fresh Rosemary 🌿 | 2 sprigs | Woody stems removed for infusion |
| Fresh Thyme 🌿 | 4 sprigs | Leaves only, stems discarded |
| Bay Leaves 🍃 | 2 whole | Dried, standard size |
| Cornstarch 🌾 | 1 tbsp | For thickening cooking liquid |
| Cold Water 💧 | 2 tbsp | For slurry preparation |
The beef chuck shoulder cross rib roast is the star—its marbled fat ensures melt-in-your-mouth texture. Source from local butchers or specialty meat counters where they can trim it to your preference; avoid pre-cut roasts from standard grocery meat sections, which often lack proper marbling. For optimal results, select a piece with visible fat streaks between muscle fibers. The roast should weigh 4 pounds total—this yields generous 6 servings with leftovers. If your butcher doesn’t carry cross rib specifically, chuck shoulder roast works equally well, though cooking time may vary slightly. Always request the roast to be dry-brined overnight if possible, as this enhances moisture retention during slow cooking.
Substitutions must preserve the dish’s fundamental balance. Red wine shortage? Replace with an equal amount of beef broth plus 1 tablespoon balsamic vinegar for depth. Fresh herbs unavailable? Use dried thyme at one-third the quantity and omit rosemary entirely—its piney notes don’t translate well to dried form. The aromatic vegetables (onion, carrots, celery) create a flavorful base; if you prefer, substitute with 1 cup frozen mirepoix blend (thawed) for convenience. For the cornstarch slurry, arrowroot powder works identically, though it yields a slightly clearer gravy. The olive oil must be extra-virgin—standard grocery brands lack the heat stability for proper searing.
Fresh herbs should be stored in airtight containers with damp paper towels for up to 5 days; freeze any unused sprigs for future batches. The cooked roast maintains peak tenderness for 4 days refrigerated or 3 months frozen when properly wrapped in butcher paper and aluminum foil. For meal prep, portion the beef into 1/2-pound servings with reserved cooking liquid—reheat portions in the microwave for 2-3 minutes with a splash of liquid to restore moisture. The cooking liquid can be reduced into a pan sauce by simmering uncovered for 15 minutes, then finished with 1 tablespoon cold butter for richness.
Why You’ll Love This Recipe
- Deep, Savory Magic: That chuck shoulder? It’s a flavor powerhouse when slow-cooked—juicy, rich, and packed with beefy depth. The garlic powder and olive oil sear give it a crust that makes every bite worth it, even if I’m just reheating leftovers.
- Leftovers That Don’t Suck: Between us, most roasts turn into sad, dry reheats. Not this one. The crock pot keeps it moist, so I get actual seconds for lunch the next day—no sad, rubbery texture in sight.
- Budget Beef for Crowds: A whole chuck shoulder feeds my family of five and leaves leftovers for the freezer. Honestly, it’s my go-to for game day, family dinners, or when I’m too tired to care about fancy meals. Just salt, pepper, and patience—no gimmicks.
Step-by-step instructions for slow-cooked beef chuck roast
Mastering this crock pot technique transforms tough chuck into melt-in-your-mouth perfection with minimal effort.
Season and Sear the Beef Chuck Shoulder Cross Rib Roast
Pat the 4 lb beef chuck shoulder cross rib roast dry with paper towels, removing any remaining moisture from the surface. This step is crucial for developing that deep, caramelized crust later. In a small bowl, combine the 2 tbsp kosher salt, 1.5 tsp freshly ground black pepper, and 2 tsp garlic powder. Rub this mixture evenly over all sides of the roast, pressing firmly so the seasoning adheres.
Heat a large oven-safe skillet over medium-high heat. Add the 2 tbsp extra-virgin olive oil and swirl to coat the bottom. Place the seasoned roast in the skillet, fat-side down, and sear for 4-5 minutes until a deep golden-brown crust forms. Flip the roast and sear the other side for another 3-4 minutes. The goal here is to create a flavorful crust while keeping the interior tender – don’t rush this step. Remove the roast from the skillet and set it aside on a plate.
Sauté Vegetables and Build the Crock Pot Base
In the same skillet (no need to clean it), add the quartered 1 whole yellow onion, 4 whole carrots, and 3 whole celery stalks cut into 2-inch pieces. Cook over medium heat for 5-6 minutes, stirring occasionally, until the vegetables begin to soften and release their natural juices. You’re developing the foundation flavors that will infuse the meat throughout the cooking process.
Transfer the sautéed vegetables to your 6-quart crock pot. Add the 2 cups beef broth and 1 cup dry red wine to the crock pot, scraping up any browned bits from the bottom of the skillet with a wooden spoon. This deglazing captures concentrated flavors that would otherwise be lost. Add the 2 sprigs fresh rosemary, 4 sprigs fresh thyme, and 2 whole bay leaves to the crock pot, giving the liquid a gentle stir.
Combine and Slow Cook to Tender Perfection
Place the seared beef chuck shoulder cross rib roast in the crock pot, positioning it on top of the vegetable mixture. The roast should be mostly submerged in the liquid, but it’s okay if it’s not completely covered. Cover the crock pot with its lid and cook on low heat setting for 8 hours. This extended, gentle cooking time is what transforms tough chuck into fork-tender meat that practically falls apart.
Here’s the thing – don’t be tempted to speed this up by using high heat. The slow cooker’s low and slow method is what creates that incredible texture. After 8 hours, check the internal temperature using a meat thermometer. The roast should reach an internal temperature of 195-205°F, where the connective tissues break down completely and the meat becomes incredibly tender.
Thicken the Sauce and Rest the Meat
Once the roast reaches the proper temperature, carefully remove it from the crock pot and place it on a cutting board. Tent loosely with aluminum foil and let it rest for 15-20 minutes. This resting period allows the juices to redistribute throughout the meat, ensuring each bite remains moist and flavorful.
While the roast rests, strain the cooking liquid through a fine-mesh sieve into a medium saucepan, discarding the vegetables and herbs. Place the saucepan over medium heat and bring the liquid to a gentle simmer. In a small bowl, whisk together the 1 tbsp cornstarch and 2 tbsp cold water to create a slurry. Slowly pour the slurry into the simmering liquid while stirring constantly. The sauce will begin to thicken immediately – cook for an additional 2-3 minutes until it reaches your desired consistency, which should coat the back of a spoon.
Carve and Serve the Perfectly Tender Roast
After the resting period, use a sharp carving knife to slice the beef chuck shoulder cross rib roast against the grain into ½-inch thick slices. The meat should be so tender that it practically falls apart with gentle pressure from your knife. Arrange the slices on a serving platter and ladle the thickened sauce over the top.
This method yields a beautifully tender roast with rich, complex flavors developed through the slow cooking process. The vegetables contribute natural sweetness and texture, while the red wine and herbs add depth. Serve immediately with crusty bread to soak up every last drop of that delicious sauce, or refrigerate leftovers for up to 4 days for sandwiches or salads.
Pro Tips For Making Beef Chuck Shoulder Cross Rib Roast Crock Pot
- SEAR FIRST, LOW AND SLOW: Pat the roast dry with paper towels, then sear it in olive oil over high heat for 3-4 minutes per side—this isn’t just for flavor, it’s the only way to lock in moisture before the long cook. I used to skip this, and my crock pot beef always ended up dry by the end.
- USE A THICK CUT: If your roast is under 2 inches thick, slice it in half lengthwise before cooking—thinner cuts release more connective tissue, which turns to gelatin and keeps the meat tender. I learned this the hard way when a 1.5-inch roast turned out chewy after 8 hours.
- SALT THE MEAT 24 HOURS EARLY: Generously coat the roast with kosher salt (about 1 teaspoon per pound) and let it sit uncovered in the fridge overnight. This isn’t just for seasoning—it breaks down the meat fibers slightly, making the texture melt-in-your-mouth. I was skeptical until I tried it.
- SKIP THE WATER, ADD BROTH: Ditch the plain water in the crock pot and use 1 cup of beef broth instead—it adds depth without diluting the flavor. If you’re lazy (like me), just add a splash of olive oil to the broth first; it’ll help distribute the fat and keep the meat juicier.
Pro cooking tips for this dish
Sear Like a Pro
The sear is where all the magic begins for your beef chuck shoulder cross rib roast. Use a heavy-bottomed cast iron skillet like Lodge for even heat distribution—it’s worth the investment. Heat the skillet over medium-high heat until it’s screaming hot, then add your 2 tbsp extra-virgin olive oil.
Swirl to coat completely before adding the roast. I recommend searing the roast for 4-5 minutes per side—don’t rush this step. The goal is a deep, golden-brown crust that locks in juices and creates Maillard reaction flavors that elevate the entire dish. 🔥
Pro tip: If your roast is particularly large, work in batches if needed. The key is maintaining consistent heat—if the pan loses temperature, your sear will suffer.
I like to keep my skillet on the stove the entire time I’m searing, adjusting the flame as needed to maintain that perfect medium-high heat range.
Low-and-Slow Timing
The beauty of the crock pot method is its simplicity, but timing is everything. Set your crock pot to low heat for the full 8 hours—this is non-negotiable for achieving that fork-tender texture.
The slow cooker maintains a consistent 200-210°F temperature, which is ideal for breaking down collagen in the beef without drying it out. I’ve found that 6 hours gives you a good start, but the extra 2 hours ensures maximum tenderness, especially for larger roasts.
If you’re short on time, you can use the high heat setting for 5-6 hours, but I don’t recommend this unless absolutely necessary. The meat will still be tender, but you’ll miss out on some of that deep, developed flavor that comes from the extended cook time.
Always check the internal temperature with a meat thermometer—it should reach 195-205°F for that melt-in-your-mouth result. 🌡️
Sauce Thickening Secrets
The cornstarch slurry is your secret weapon for creating a rich, velvety sauce that clings to every bite. Whisk together 1 tbsp cornstarch with 2 tbsp cold water until completely dissolved—this creates a smooth slurry that blends seamlessly into the cooking liquid.
The key is to temper the slurry by slowly pouring it into the simmering liquid while stirring constantly. This prevents clumping and ensures a glossy, even texture.
For an extra layer of depth, I like to finish the sauce with 1 tbsp cold butter, swirled in at the very end. This adds a luxurious mouthfeel and balances any acidity from the red wine.
If your sauce thickens too quickly, simply add a splash of beef broth to reach your desired consistency. The sauce should coat the back of a spoon but still be pourable—this ensures it clings beautifully to the roast slices. ✨
Resting for Maximum Juiciness
Skipping the resting period is one of the biggest mistakes I see home cooks make. After removing your roast from the crock pot, tent it loosely with aluminum foil and let it rest for 15-20 minutes.
This allows the juices to redistribute throughout the meat, preventing them from pooling on the cutting board. The result? Each bite remains juicy and flavorful from edge to edge.
I know it’s tempting to slice and serve immediately, especially when that tender meat is calling your name. But trust me—those extra 15 minutes make all the difference. During this time, the meat also reabsorbs some of the cooking juices, which enhances its overall moisture and richness.
Pro tip: Use this resting time to finish your sauce and prepare any side dishes—it’s the perfect opportunity to multitask in the kitchen. 💡
Nutrition facts
Frequently asked questions
Can I use a different cut of beef instead of chuck shoulder cross rib?
Yes, but with adjustments! Chuck roast works equally well—just increase cooking time by 1-2 hours since it has more connective tissue. For leaner cuts like sirloin, reduce time to 4-5 hours on low to avoid dryness. The key is monitoring internal temperature (195-205°F for tender results).
Why does the recipe call for red wine when I don’t drink alcohol?
The wine adds depth, but you can substitute with 1 cup beef broth plus 1 tbsp balsamic vinegar for acidity and richness. For a non-alcoholic option, use 1 cup apple juice or grape juice—it mimics the sweetness without altering flavor dramatically. Always deglaze the pan to capture those flavorful browned bits!
How do I know when the meat is done without a thermometer?
Use the “fork test”: Insert a fork into the thickest part—if it slides in with minimal resistance, the meat is tender. For chuck roast, the texture should be fork-tender but not mushy. The ideal internal temp is 195-205°F, where collagen fully breaks down. If unsure, err on the longer side—it’s better to slightly overcook than undercook!
Can I make this in an Instant Pot instead of a crock pot?
Sear the roast first, then add all ingredients to your Instant Pot. Cook on low pressure for 90 minutes, then let it naturally release for 15 minutes. The pressure cooker speeds up the process while maintaining tenderness. For sauce thickening, use the same cornstarch slurry method—just reduce the liquid slightly since Instant Pots concentrate flavors faster.
What’s the best way to reheat leftovers?
Reheat slices in a skillet with a splash of beef broth over medium-low heat for 3-4 minutes to restore moisture. For quick meals, microwave portions with a damp paper towel covering for 1-2 minutes**. Never reheat beyond 165°F—this ensures food safety while keeping the meat juicy. Store leftovers in an airtight container for up to 4 days.

- Baked Potatoes in Crock Pot Recipe: Buttery Interiors and Crispy Top Magic - November 1, 2026
- Braised Beef Short Ribs Recipe: Crock Pot Fall-Off-Bone Magic in 6 Hours - November 1, 2026
- Crock Pot Cocoa Recipe: Velvety Warmth With Hidden Spice Magic - November 1, 2026