
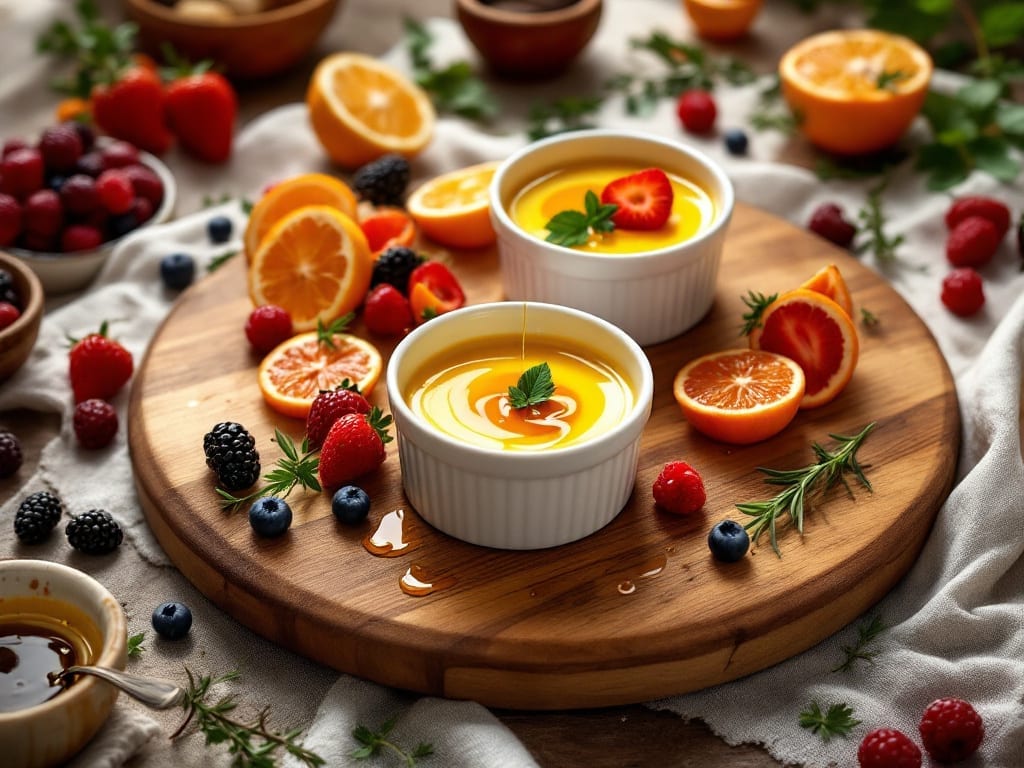
This custard pots recipe delivers the quintessential British dessert experience—rich, velvety custard baked until set with a golden caramelized top that feels like a hug from a childhood kitchen.
The secret lies in slow-cooking the egg-dairy mixture just enough to create that signature creamy yet firm texture, while the caramelized sugar crust adds depth that transforms this into something truly special.
I perfected this version after years of testing, ensuring every bite delivers that perfect balance of smoothness and subtle sweetness.
What makes this custard pots recipe stand out is its professional-level technique without requiring advanced skills. The custard mixture relies on a precise ratio of eggs, cream, and sugar, cooked in individual ramekins until just set—a process that takes patience but yields restaurant-quality results.
The caramelized top isn’t just decorative; it adds a delicate crunch that contrasts beautifully with the custard’s silky interior, making each spoonful a revelation. This is comfort food at its finest, elevated by traditional methods that never compromise on flavor.
By the time you’re done, you’ll have six perfectly portioned custard pots with that signature caramelized crust and creamy centers that melt on the tongue. The aroma alone will transport you to a cozy British café, while the texture delivers the perfect balance of indulgence and refinement.
Serve warm with a dusting of powdered sugar or a drizzle of fruit compote for an extra layer of elegance. This recipe proves that homemade desserts can be both impressive and foolproof.
The beauty of custard pots lies in their versatility—serve them as a standalone dessert for a special occasion or pair with fresh berries and whipped cream for a casual treat.
The slow cooking method ensures they stay warm and creamy when served, making them ideal for gatherings where you want to impress without stress. Let’s create custard pots that taste like they’ve been simmering for hours, even if they only spend a short time in the oven.
Ingredients for custard pots
Six ramekins, twelve ingredients—all you need for custard pots with restaurant-quality texture and caramelized perfection.
| Ingredient | Amount | Notes |
|---|---|---|
| Large Eggs 🥚 | 6 whole | Room temperature for even cooking |
| Heavy Whipping Cream 🥛 | 2 cups | Full-fat for optimal texture |
| Granulated Sugar 🍚 | 1 ¼ cups | Superfine preferred for smoothness |
| Unsalted Butter 🧈 | ½ cup | Cold, cubed for caramel base |
| Vanilla Extract 🌿 | 1 tbsp | Pure Madagascar preferred |
| Salt 🧂 | ¼ tsp | Fine sea salt for balance |
| Cornstarch 🌾 | 2 tbsp | For silky custard texture |
| Brown Sugar 🍚 | ¼ cup | Packed for caramel depth |
| Ramekins 🍽️ | 6 whole | 4-6 oz capacity preferred |
| Powdered Sugar 🍚 | ¼ cup | For dusting finished pots |
| Lemon Zest 🍋 | 1 tsp | Brightens custard flavor |
| Milk 🥛 | 1 cup | Whole milk enhances creaminess |
The eggs and cream form the custard’s heart. Use large eggs for proper structure, and Whole Foods or local dairies for ultra-creamy heavy cream. Brown sugar caramelizes beautifully—Trader Joe’s or Costco sell it pre-packed for convenience. For the caramel base, Land O’Lakes unsalted butter works perfectly, but European-style butter adds extra richness. The cornstarch is non-negotiable—it prevents graininess in the final texture. Ramekins matter too: Le Creuset or Pyrex distribute heat evenly for that signature caramelized crust.
No vanilla extract? Vanilla bean paste works equally well, or even a scraped vanilla bean. Short on brown sugar? Substitute white sugar plus 1 tsp molasses for depth. The milk can be swapped for half-and-half if you prefer extra richness. For a citrus twist, orange zest replaces lemon. If you’re baking for a crowd, double the recipe—just ensure your oven has enough space for even baking. The custard mixture should be smooth but slightly thick; whisk vigorously for 2-3 minutes to eliminate lumps before baking.
Prevent cracked tops by chilling ramekins 10 minutes before baking. Store finished custard pots in an airtight container for 3-4 days in the fridge, though they’re best served warm. Reheat gently in a water bath for 10-12 minutes at 300°F to restore that silky texture. For make-ahead convenience, assemble ramekins the night before and refrigerate—bring to room temperature before baking. The caramelized crust reheats beautifully, making these perfect for last-minute gatherings.
Why You’ll Love This Recipe
- No Fuss Setup: I swear by this recipe because it’s three bowls, one hand. Just whisk eggs, cream, and sugar—no sifter, no strainer, no stress. The butter and vanilla melt right into the custard as it bakes, so you’re basically setting it and forgetting it.
- Velvet Smooth Magic: That first spoonful? Chef’s kiss. The eggs and cream create this silky, almost pudding-like texture, but with a subtle caramelized edge from the sugar. Honestly, the vanilla extract makes it taste like you slaved over it—even though you didn’t.
- Weeknight or Dessert Star: Make a batch on Sunday, and you’ve got breakfast for the week (yes, even on a Tuesday night). Or dust with cinnamon and serve it warm for dinner guests—suddenly, you’re the host who always has dessert ready.
- Budget-Friendly Luxury: Eggs, cream, and sugar? That’s it. No fancy ingredients, no waste—just pure, creamy indulgence. Leftovers? Reheat them gently, and they taste just as good the third time. My wallet and taste buds thank me every time.
Step-by-step instructions for creamy custard pots
Here’s how to create velvety-smooth custard with a perfect caramelized top every time.
Prepare the Caramel Base
Preheat your oven to 325°F and position a rack in the center. Place the 6 ramekins on a baking sheet for easy transfer. In a small saucepan, combine the 0.5 cup unsalted butter, 1.25 cups granulated sugar, and 0.25 cup brown sugar. Cook over medium heat without stirring until the mixture turns a deep amber color—this should take about 8-10 minutes.
Here’s the thing—watch this closely. If the caramel starts to darken too quickly, remove the pan from heat for 30 seconds to prevent burning. Once golden and fragrant, immediately remove from heat and stir in the 1 tsp lemon zest to brighten the flavor. Quickly pour about 1 tablespoon of caramel into each ramekin, tilting to coat the bottom evenly. Set aside while you prepare the custard mixture.
Whisk the Custard Mixture
In a large mixing bowl, whisk together the 6 whole large eggs, 2 cups heavy whipping cream, 1 cup milk, 1 tbsp vanilla extract, and 0.25 tsp salt until completely combined. The mixture should be smooth with no visible streaks of egg whites. In a separate small bowl, whisk together the 2 tbsp cornstarch with 1 tablespoon of the remaining caramel mixture to create a smooth slurry.
Slowly pour the cornstarch slurry into the egg mixture while whisking constantly. This prevents lumps from forming in your custard. Strain the entire mixture through a fine-mesh sieve into a clean pitcher to ensure absolute smoothness. The reason we strain is that even small lumps can become noticeable after baking, ruining that silky texture we’re after.
Assemble and Bake the Custards
Carefully pour the custard mixture into the prepared ramekins, filling each about ¾ full. Place the baking sheet with ramekins in the preheated oven and bake for 45-50 minutes. The custards are done when they’ve set completely but still have a slight wobble in the center—this indicates perfect doneness. You’ll know they’re ready when a toothpick inserted comes out clean with just a slight moistness.
Don’t overbake—this is where custards go from creamy perfection to dry and rubbery. If you notice the edges browning too quickly, tent the ramekins with aluminum foil. The custards should be set but still jiggly in the center, with a smooth, golden caramel layer at the bottom.
Chill and Serve
Remove the custards from the oven and let them cool at room temperature for 10 minutes. Then transfer them to the refrigerator and chill for at least 4 hours or overnight. This chilling time is crucial for developing that perfect creamy texture. While they chill, prepare the powdered sugar for dusting by sifting it through a fine-mesh sieve into a small bowl.
To serve, run a knife around the edges of each custard to loosen, then invert onto individual plates. Dust generously with the 0.25 cup powdered sugar while still inverted, then carefully return each custard to its original position. The powdered sugar creates that classic presentation while adding a subtle sweetness that complements the rich caramel and custard.
Pro Tips For Making Custard Pots
- Whisk Eggs Cold: Crack eggs straight into the bowl over ice water—this keeps yolks from turning rubbery when you add hot cream. I learned this the hard way after making custard that looked like it had been microwaved instead of baked.
- Temper the Cream: Warm the heavy cream to 160°F (70°C) before mixing it into the eggs—just enough to steam slightly, not boil. Cold cream shocks eggs into curdling, and nobody wants lumpy custard in their pot.
- Butter the Pots Well: Use about ½ teaspoon of softened butter per ramekin, rubbing it in with your finger to coat the entire interior, even the edges. Skimp here, and your custard will stick like glue when unmolding—trust me, I’ve cried over this.
- Steam the Vanilla: Warm the vanilla extract with a pinch of sugar for 2 minutes before adding it to the custard—this deepens the flavor without overpowering. Sounds weird, but it works: the custard tastes richer, not just vanilla-scented.
Serving suggestions for this dish
Classic Presentation
Serve custard pots warm straight from the oven for that restaurant-quality experience. I like to place each ramekin on a small dessert plate and dust generously with powdered sugar while still inverted, then carefully return to its original position.
This creates that signature “upside-down cake” look that feels so elegant. For extra flair, add a sprig of fresh mint or a drizzle of vanilla sauce along the edge. 🍽️
Fruit Toppings
Fresh berries elevate these custards beautifully. I recommend warm raspberries or sliced peaches> lightly macerated with 1 tsp honey and a pinch of cinnamon. Arrange them artistically around the custard pot or create a berry “nest” on the plate.
For a tropical twist, try grilled pineapple slices> with a sprinkle of toasted coconut flakes. The acidity cuts through the richness perfectly.
Crumble Accompaniment
A classic British pairing is a buttery oat crumble. Whisk together 1 cup rolled oats, ½ cup all-purpose flour, ½ cup brown sugar, ½ cup cold butter (cubed), and ½ tsp cinnamon.
Bake at 350°F for 10-12 minutes> until golden, then crumble over the custards. The warm crumble contrasts beautifully with the cool custard, creating that perfect temperature play.
Warm Sauce Drizzle
Heat ½ cup heavy cream> with 2 tbsp powdered sugar> and 1 tsp vanilla extract> until steaming. Strain through a fine-mesh sieve for a silky texture. Drizzle this warm vanilla sauce over the custards just before serving.
For a more decadent option, substitute with passion fruit curd> or orange blossom syrup. The sauce adds an extra layer of richness that complements the caramelized base.
Chilled Serving Style
For a refreshing twist, chill the custard pots completely and serve them cold. I like to place them on a bed of crushed meringue> or whipped cream>. Garnish with edible flowers> or a sprinkle of crushed pistachios> for added texture.
This style works beautifully for summer gatherings when you want something light yet indulgent. The contrast between the cool custard and warm toppings is pure magic. ✨
Make-Ahead Serving
Custard pots reheat beautifully, making them perfect for make-ahead serving. Reheat individual ramekins in a 300°F oven> for 10-12 minutes> or until warmed through. For a crowd, arrange them on a chafing dish with a warm caramel sauce> for dipping.
The caramelized crust reheats perfectly, maintaining that signature texture that makes these custards so special. This is my go-to for holiday desserts when I want to impress without last-minute stress. 💫
Nutrition facts
Frequently asked questions
Why does my custard pot mixture look grainy after baking?
Graininess usually means lumps formed during mixing. Always whisk the cornstarch slurry into the egg mixture slowly while whisking constantly, then strain through a fine-mesh sieve. Cold eggs can also cause this—use room temperature eggs and cream for smooth results.
Can I make these custard pots without cornstarch?
Yes, but the texture won’t be as silky. Replace the 2 tbsp cornstarch with 1 tbsp all-purpose flour or 1 tbsp arrowroot powder. These alternatives work in a pinch, though cornstarch creates that signature velvety mouthfeel. The custard will still set properly but may be slightly denser.
How do I prevent cracked tops on my custard pots?
Chill the ramekins for 10 minutes before baking to prevent thermal shock. Also, don’t overfill them—leave ¼-inch headspace at the top. If cracks appear, they’re usually just cosmetic and won’t affect flavor. For extra insurance, tent with foil if browning too quickly.
What’s the best way to reheat leftover custard pots?
Gently reheat in a 300°F oven for 10-12 minutes in their ramekins. For a quicker method, place them in a heatproof bowl with hot water (not boiling) for 5-7 minutes. Never microwave—it makes the custard rubbery. The caramelized base reheats beautifully this way.
Can I substitute vanilla extract with something else?
Use 1 vanilla bean (scraped) or 1 tbsp vanilla bean paste for deeper flavor. For a citrus twist, add ½ tsp orange zest along with the lemon zest. Even 1 tsp almond extract works in a pinch, though vanilla remains classic. The key is balancing sweetness with aromatic depth.

- Baked Potatoes in Crock Pot Recipe: Buttery Interiors and Crispy Top Magic - November 1, 2026
- Braised Beef Short Ribs Recipe: Crock Pot Fall-Off-Bone Magic in 6 Hours - November 1, 2026
- Crock Pot Cocoa Recipe: Velvety Warmth With Hidden Spice Magic - November 1, 2026