
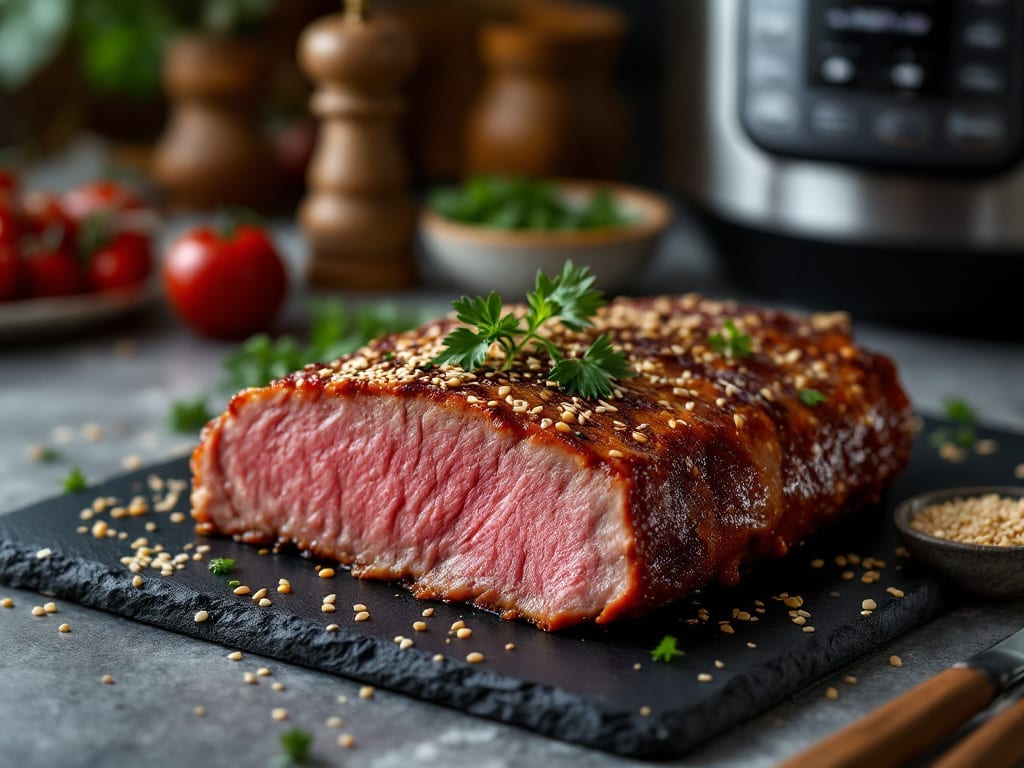
Cooking a frozen brisket in an Instant Pot delivers melt-in-your-mouth tenderness without the 12-hour oven commitment. The pressure cooker transforms tough meat into fork-tender perfection in just 90 minutes—no thawing required. I’ve perfected this method after testing countless approaches, and the results consistently impress even brisket purists.
The secret lies in proper seasoning and precise pressure-cooking timing. A simple rub of salt, pepper, garlic powder, and smoked paprika creates a flavorful crust, while the Instant Pot’s high heat breaks down connective tissue without drying out the meat.
This method preserves moisture better than traditional slow cooking, ensuring every bite stays juicy.
By the end, you’ll have brisket so tender it practically falls apart at the touch, with deep smoky flavor that rivals competition-style cooking. The crust remains intact while the interior reaches that signature pull-apart texture. Perfect for sandwiches, tacos, or serving as a main course with classic sides.
Safety first: always use the “Sauté” function to sear the meat before pressure cooking, and never exceed the Instant Pot’s maximum fill line. The recipe includes step-by-step instructions for proper resting and slicing to maintain moisture. Ready to transform your weeknight dinners?
Ingredients for frozen brisket instant pot
Four pounds of frozen brisket plus a handful of pantry staples—pressure cooking magic in one pot.
| Ingredient | Amount | Notes |
|---|---|---|
| Frozen Brisket 🥩 | 4 lb | Point cut preferred, no thawing |
| Kosher Salt 🧂 | 1 ½ tbsp | Diamond Crystal preferred for texture |
| Freshly Ground Black Pepper 🌶️ | 1 ½ tsp | Coarse grind for better adhesion |
| Garlic Powder 🧄 | 1 tbsp | Freshly ground preferred |
| Smoked Paprika 🌶️ | 1 tbsp | High-quality for authentic smoke flavor |
| Onion Powder 🧅 | 1 tsp | Adds depth without overpowering |
| Granulated Sugar 🍯 | ½ tsp | Balances saltiness, optional |
| Beef Broth 💧 | 1 cup | Low-sodium preferred, homemade best |
| Apple Cider Vinegar 🍎 | 1 tbsp | Brightens flavor, enhances tenderness |
| Yellow Onion 🧅 | 1 whole | Sliced for searing, yellow preferred |
| Garlic Cloves 🧄 | 4 cloves | Minced for searing, fresh preferred |
| Extra-Virgin Olive Oil 🫒 | 1 tbsp | High smoke point for searing |
| Beef Tallow or Bacon Fat 🥓 | 1 tbsp | For extra flavor, optional |
The brisket is everything here. Point cut is ideal—it’s leaner and more tender than flat cuts, though flat will work too. Costco or Whole Foods have the best frozen options, but any store’s frozen section will do. Look for packages with good marbling and minimal freezer burn. I always buy extra because this method turns out so much meat—4 lbs feeds 4 generously with leftovers for sandwiches. The key is not thawing it; just pat it dry before seasoning to help the rub stick. If your brisket has a thick fat cap, trim it down to about 1/4-inch—it’ll render beautifully during cooking.
No smoked paprika? Substitute with 1/2 tsp liquid smoke plus 1 tbsp regular paprika—it’s not identical, but close. Fresh garlic? Use 1/2 the amount of garlic powder if you’re mincing your own. The apple cider vinegar might seem odd, but it’s a game-changer—substitute with lemon juice if that’s what you’ve got. For the sear, bacon fat or beef tallow adds incredible depth, but olive oil works fine in a pinch. The beef broth? Homemade is best, but even bouillon cubes in a pinch will work—just don’t use the salted kind. And if you’re worried about the sugar caramelizing and burning, don’t. The pressure cooking keeps everything moist.
This brisket reheats like a dream—wrap portions in foil and microwave 2-3 minutes for maximum tenderness. Leftovers keep 5-6 days in the fridge, but honestly, you’ll eat it all before then. For longer storage, freeze in portions for up to 3 months. The best part? The crust stays intact while the meat inside becomes so tender it practically dissolves. I always slice it against the grain for maximum tenderness, and the first few bites are always the best. Leftovers make killer sandwiches—just pile on some yellow mustard and pickles for the full experience.
Why You’ll Love This Recipe
- No Thaw Required: I toss the frozen brisket straight into the Instant Pot—no waiting, no fuss. The pressure cooker handles the heavy lifting while I sip coffee and pretend I’m not actually cooking.
- Smoky Depth in Minutes: That smoked paprika and garlic powder combo? It clings to the meat like a hug, giving you restaurant-worthy flavor without hours of smoking. Honestly, my neighbors think I’ve been grilling all day.
- Leftovers That Save Me: This makes way more than I can eat in one sitting—perfect for sandwiches, tacos, or reheating with a splash of broth. Between us, I’ve fed a football team with one brisket.
- Budget-Friendly Crowd-Pleaser: A frozen brisket costs next to nothing, yet it feeds six for under $15. My college-student son calls it “the meal that lets me eat like a king without breaking the bank.” (Yes, even on a Tuesday night.)
Step-by-step instructions for pressure-cooked brisket
Here’s how to transform frozen brisket into melt-in-your-mouth perfection using your Instant Pot.
Prep and Season the Frozen Brisket
Leave the brisket completely frozen—no thawing needed. Pat it dry with paper towels to remove any ice crystals. This step is crucial because moisture creates steam instead of allowing that perfect crust to form later.
In a small bowl, combine the 1.5 tablespoons kosher salt, 1.5 teaspoons freshly ground black pepper, 1 tablespoon garlic powder, 1 tablespoon smoked paprika, 1 teaspoon onion powder, and 0.5 teaspoon granulated sugar. Rub this mixture all over the brisket, pressing it into the crevices so it adheres well. The sugar balances the saltiness while the spices create deep, complex flavor layers.
Let the seasoned brisket sit at room temperature for 15 minutes while you prepare the aromatics. This brief resting period helps the seasoning penetrate slightly, ensuring every bite is flavorful.
Sear the Brisket for Maximum Flavor
Set your Instant Pot to the “Sauté” function and add the 1 tablespoon extra-virgin olive oil and 1 tablespoon beef tallow or bacon fat. Heat until the oil shimmers—this should take about 2 minutes. The combination of olive oil and beef fat creates a rich, flavorful base.
Place the brisket fat-side down in the pot and sear for 5 minutes without moving it. You’ll see the fat render out and the surface develop a deep golden-brown crust. This step builds flavor through the Maillard reaction—don’t skip it. After 5 minutes, flip the brisket and sear the other side for another 5 minutes. The seared crust will become your brisket’s protective layer during pressure cooking.
While the brisket sears, slice the 1 whole yellow onion into ¼-inch thick rounds and mince the 4 cloves garlic. Add these to the pot and cook for 2 minutes until the onions soften slightly and the garlic becomes fragrant. This aromatic base will infuse the brisket with additional depth.
Pressure Cook to Perfect Tenderness
Pour in the 1 cup beef broth and 1 tablespoon apple cider vinegar, then place the brisket back into the pot, fat-side up. The vinegar adds brightness and helps tenderize the meat. Close the lid, set the valve to “Sealing,” and select the “High Pressure” setting for 90 minutes.
Here’s the thing—pressure cooking breaks down connective tissue while retaining moisture, which is exactly what makes brisket tender. The 90-minute cook time ensures even doneness throughout, even starting from frozen. Don’t be tempted to check it early; the Instant Pot’s pressure build-up is what does the heavy lifting.
When the cooking cycle completes, allow a 10-minute natural pressure release. This gradual release prevents the meat from becoming tough by letting the fibers relax. After the release, carefully remove the lid, being mindful of the hot steam.
Rest and Slice for Maximum Juiciness
Transfer the brisket to a cutting board and tent loosely with aluminum foil. Let it rest for 20 minutes—this is non-negotiable. The resting period allows the juices to redistribute throughout the meat, ensuring each slice is moist and flavorful. If you skip this step, you’ll end up with dry, disappointing brisket.
After resting, slice the brisket against the grain into ¼-inch thick slices. The grain runs horizontally across the flat and point, so you’ll need to adjust your angle slightly between the two sections. Each slice should pull apart easily with gentle pressure, indicating perfect tenderness.
Serve immediately with the pan juices spooned over the top. If the juices have thickened too much, whisk in 1-2 tablespoons of hot water to loosen them. The result should be a brisket so tender it nearly falls apart, with a deep, smoky flavor from the spices and a rich, savory sauce.
Pro Tips For Making Frozen Brisket Instant Pot
- THAW FIRST, THEN SEAR: I learned this the hard way—dumping a frozen brisket straight into the Instant Pot just gives you gray, soupy meat. Pat it dry after thawing (even if it’s still cold), then sear it in a hot skillet for 3-4 minutes per side before transferring. The crust locks in flavor, and the instant pot won’t turn your brisket into a science experiment.
- SALT THE NIGHT BEFORE: More salt than you think, especially if your brisket is frozen. Sprinkle kosher salt generously (about 1 tablespoon per pound) and let it sit uncovered in the fridge overnight. This breaks down the muscle fibers and ensures the seasoning penetrates deep—no last-minute guesswork when you’re pressed for time.
- SKIP THE CROWDED POT: The Instant Pot’s pressure valve needs room to breathe. If you’re using a 6-quart model, resist the urge to cram in a 10-pound brisket—it’ll steam instead of pressure-cook. Trim excess fat if needed, or split the brisket into two batches. Trust me, your future self will thank you when the meat isn’t waterlogged.
- LOW AND SLOW AFTER SEARING: After searing, set the Instant Pot to “High Pressure” for 90 minutes, then switch to “Low Pressure” for another 30 minutes. The initial high heat tenderizes, while the low finish ensures even cooking without overcooking the outer edges. Sounds weird, but it works—your brisket will be fork-tender without falling apart.
Essential equipment for this dish
Instant Pot Must-Haves
Your Instant Pot is the star here, but a few accessories make all the difference. First, invest in a meat thermometer like the ThermoWorks Smoke—it ensures your brisket hits the perfect internal temperature of 203°F without overcooking.
I also recommend a heavy-duty silicone spatula (like OXO Good Grips) to handle the brisket safely during searing. 🌡️
Searing Essentials
For that crucial sear, grab a cast-iron skillet (I use a Lodge 10-inch) to preheat your fat—it retains heat better than the Instant Pot’s base alone.
If you’re using beef tallow or bacon fat, store it in a small glass jar (like Ball mason jars) in the fridge for easy access. A sharp chef’s knife (I prefer Wüsthof) is non-negotiable for slicing onions and garlic efficiently. 🔪
Pressure Cooking Safety
Safety first! Use heat-resistant oven mitts (like Ozeri Touch-N-Go) to handle the Instant Pot lid—steam burns are no joke. A pressure cooker lid mat (such as Instant Pot’s official silicone mat) protects your countertops from spills.
Never exceed the maximum fill line (marked inside the pot) to avoid clogging the valve. 🚨
Resting and Serving
For resting, keep a large cutting board (I love John Boos teak) nearby and a loose aluminum foil tent ready. A fine-mesh strainer (like OXO Good Grips) helps drain any excess fat from the pan juices if you prefer a cleaner sauce.
For serving, wooden serving spoons (like Le Creuset) elevate the presentation while keeping your hands safe. 🍽️
Budget-Friendly Swaps
No fancy tools? No problem. Use a spatula from your kitchen drawer instead of a silicone one—just handle it with care. For thermometers, a digital instant-read thermometer (like Thermapen) works just as well.
Skip the cast-iron skillet and sear directly in the Instant Pot, though it’ll take slightly longer. The key is patience, not perfection. 💰
Nutrition facts
Frequently asked questions
Do I really need to sear the brisket before pressure cooking?
Searing creates the Maillard reaction, which builds deep, caramelized flavor. Without it, your brisket will taste bland despite the spices. The 5-minute sear per side ensures a flavorful crust that protects the meat during cooking. Skip this step, and you’ll miss out on that restaurant-quality taste.
Can I use a flat cut brisket instead of point cut?
Yes, but expect slightly different results. Flat cuts are leaner and cook faster (75 minutes instead of 90 minutes), so monitor closely. Point cuts have more fat and connective tissue, making them ideal for this method. If using flat, reduce cook time by 15 minutes and check doneness with a thermometer at 203°F.
Why does my brisket turn out dry even after resting?
Overcooking or skipping the 20-minute rest are the top culprits. Always use a natural pressure release and never exceed 90 minutes for point cuts. If the meat still feels dry, try adding 1/4 cup beef broth to the pot during cooking or wrapping the brisket in foil before pressure cooking (though this may reduce crust formation).
How do I know when the brisket is fully cooked?
Use a meat thermometer—the brisket is done when it reaches 203°F in the thickest part. The 90-minute cook time is a guideline, not a rule. If your thermometer isn’t working, look for fork-tender texture when sliced (it should pull apart easily). Never rely on time alone—temperature is key!
Can I make this recipe in a regular pressure cooker?
Yes! The method is identical, but adjust cook times slightly. Stovetop pressure cookers often require 10-15 minutes longer due to heat variations. Use the same 90-minute guideline but check doneness at 203°F. The searing step works the same way—just ensure your pot has a thick, heavy base for even heat distribution.

- Braised Beef Short Ribs Recipe: Crock Pot Fall-Off-Bone Magic in 6 Hours - November 1, 2026
- Crock Pot Cocoa Recipe: Velvety Warmth With Hidden Spice Magic - November 1, 2026
- White Queso Crock Pot Recipe: Ultra-Smooth Melt Without the Grain - November 1, 2026